


之前写了SpringBoot,SpringData 接下来要写SpringSecurity安全控制(权限管理)了.
SpringSecurity要涉及登陆页面,首页等页面跳转,故先说一下SpringBoot推荐模板thymeleaf的集成
这部分简单的说一下集成,和语法,以免SpringSecurityDemo中出现thymeleaf不好理解
本节代码根据SpringBoot初始化项目 : Maven构建SpringBoot项目 为基础
1,pom.xml添加thymeleaf依赖
<dependencies>

   <!-- 核心模块,包括自动配置支持、日志和YAML -->
   <dependency>
      <groupId>org.springframework.boot</groupId>
      <artifactId>spring-boot-starter</artifactId>
   </dependency>

   <!-- 测试模块,包括JUnit、Hamcrest、Mockito -->
   <dependency>
      <groupId>org.springframework.boot</groupId>
      <artifactId>spring-boot-starter-test</artifactId>
      <scope>test</scope>
   </dependency>

   <!-- 引入Web模块 -->
   <dependency>
      <groupId>org.springframework.boot</groupId>
      <artifactId>spring-boot-starter-web</artifactId>
   </dependency>

   <!-- thymeleaf模板引擎 -->
   <dependency>
      <groupId>org.springframework.boot</groupId>
      <artifactId>spring-boot-starter-thymeleaf</artifactId>
   </dependency>

</dependencies>
2,工程目录结构
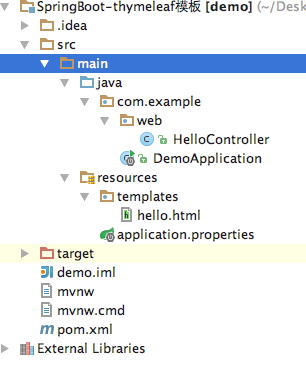
resources/templates为thymeleaf模板默认路径,当然也可以自定义路径
java/com.example/web/HelloController.java为Controller类,控制地址跳转到hello.html
3,application.properties-thymeleaf模板配置项
########################################################
###THYMELEAF (ThymeleafAutoConfiguration)
########################################################
## 前缀prefix
#spring.thymeleaf.prefix=classpath:templates/
## 后缀suffix
#spring.thymeleaf.suffix=.html
## 类型mode
#spring.thymeleaf.mode=HTML5
## charset=<encoding> is added
#spring.thymeleaf.encoding=UTF-8
##content-type
#spring.thymeleaf.content-type=text/html
# set to false for hot refresh
#spring.thymeleaf.cache=false
一般情况下,不需要进行配置,使用SpringBoot默认配置即可
主要说一下spring.thymeleaf.cache这个配置项
由于浏览器会有页面缓存,在开发过程中,建议开发者不启用cache
4,Controller
import org.springframework.stereotype.Controller;
import org.springframework.ui.ModelMap;
import org.springframework.web.bind.annotation.RequestMapping;
import org.springframework.web.bind.annotation.ResponseBody;
//import org.springframework.web.bind.annotation.RestController;

/**
 * Created by Brave on 16/10/9.
 *
 * 注意:
 *      这里要使用@Controller注解
 *      而不要使用@RestController
 *      否则return "hello";不能跳转到hello.html
 */
@Controller
public class HelloController {

    @ResponseBody
    @RequestMapping("/hello")
    public String hello() {
        return "Hello World";
    }

    @RequestMapping("/")
    public String index(ModelMap map) {
        map.addAttribute("hello", "hello Thymeleaf!");
        return "hello";
    }

}
这里需要注意一个问题,可能会影响到页面的正常跳转
如果遇到后边不能正常跳转到hello.html页面,请查看 : @Controller和@RestController的区别
5,hello.html
在thymeleaf模板目录下创建hello.html
<!DOCTYPE html>
<html xmlns="http://www.w3.org/1999/xhtml" xmlns:th="http://www.thymeleaf.org"
      xmlns:sec="http://www.thymeleaf.org/thymeleaf-extras-springsecurity3">
    <head>
        <title>Hello World!</title>
    </head>
    <body>
        <h1 th:inline="text">thymeleaf Test</h1>
        <p th:text="${hello}"></p>
    </body>
</html>
关于模板中的
等语法,我们会在下节简单列出作为开发中的参考目前只要理解这是一个传值操作就可以了 ^_^
6,测试项目
启动服务,浏览器访问http://localhost:8080/

如图,可以看到正常跳转hello.html并携带参数显示
至此SpringBoot-thymeleaf模板集成完成


 1397
1397

 被折叠的 条评论
为什么被折叠?
被折叠的 条评论
为什么被折叠?
 到【灌水乐园】发言


