


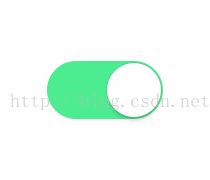
现在很多项目都有推送这一块的功能,而用户不一定想看到这些推送,这时候开关按钮就是必须的了,让用户自己设置通知管理。android开发中我也自己写过一个自定义的view,虽然实现了效果不过感觉有点(动画效果)生硬,原理根据Touch 的距离和滑动速度判断开关,指向Toggle的回调函数,以及onClick执行相关毁掉。今日闲来无事,找到个比较满意的开关效果,github地址:https://github.com/zcweng/ToggleButton,效果图如下:
先看看自定义控件ToggleButton,该类调用了onDetachedFromWindow、onAttachedToWindow这两个方法,onAttachedToWindow方法作用是在自定义View
onDraw以前调用,用于绑定相关的监听事件,onDetachedFromWindow则想法,取消相关的监听事件。具体代码如下:
@Override
	protected void onDetachedFromWindow() {
		super.onDetachedFromWindow();
		spring.removeListener(springListener);
	}

	public void onAttachedToWindow() {
		super.onAttachedToWindow();
		spring.addListener(springListener);
	}
	SimpleSpringListener springListener = new SimpleSpringListener(){
		@Override
		public void onSpringUpdate(Spring spring) {
			final double value = spring.getCurrentValue();
			calculateEffect(value);
		}
	};
public ToggleButton(Context context) {
this(context,null);
}
public ToggleButton(Context context, AttributeSet attrs) {
this(context, attrs,0);
}
public ToggleButton(Context context, AttributeSet attrs, int defStyleAttr) {
super(context, attrs, defStyleAttr);
setup(attrs);
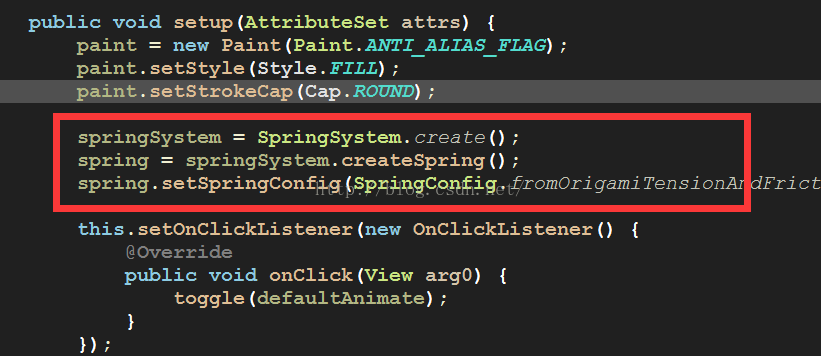
}setup(attrs)这里通过TypedArray获取自定义属性值,变量重新赋值,同时绑定自身onClick事件到Toggle。
public void setup(AttributeSet attrs) {
		paint = new Paint(Paint.ANTI_ALIAS_FLAG);
		paint.setStyle(Style.FILL);
		paint.setStrokeCap(Cap.ROUND);

		springSystem = SpringSystem.create();
		spring = springSystem.createSpring();
		spring.setSpringConfig(SpringConfig.fromOrigamiTensionAndFriction(50, 7));

		this.setOnClickListener(new OnClickListener() {
			@Override
			public void onClick(View arg0) {
				toggle(defaultAnimate);
			}
		});

		TypedArray typedArray = getContext().obtainStyledAttributes(attrs, R.styleable.ToggleButton);
		offBorderColor = typedArray.getColor(R.styleable.ToggleButton_offBorderColor, offBorderColor);
		onColor = typedArray.getColor(R.styleable.ToggleButton_onColor, onColor);
		spotColor = typedArray.getColor(R.styleable.ToggleButton_spotColor, spotColor);
		offColor = typedArray.getColor(R.styleable.ToggleButton_offColor, offColor);
		borderWidth = typedArray.getDimensionPixelSize(R.styleable.ToggleButton_borderWidth, borderWidth);
		defaultAnimate = typedArray.getBoolean(R.styleable.ToggleButton_animate, defaultAnimate);
		typedArray.recycle();

		borderColor = offBorderColor;
	}
<?xml version="1.0" encoding="utf-8"?>
<resources>
    <declare-styleable name="ToggleButton">
    	<attr name="borderWidth" format="dimension">
    	</attr>
    	<attr name="offBorderColor" format="reference|color">
    	</attr>
    	<attr name="offColor" format="reference|color">
    	</attr>
    	<attr name="onColor" format="reference|color">
    	</attr>
    	<attr name="spotColor" format="reference|color">
    	</attr>
    	<attr name="animate" format="reference|boolean">
    	</attr>
    </declare-styleable>
</resources>
接下来是自定义控件的测量onMeasure(int widthMeasureSpec, int heightMeasureSpec)方法重新测量View和内容,onMeasure方法调用就必须重新Measure保存测量到的宽高,否则measure会抛出异常。先来看看MeasureSpec:
 public static class MeasureSpec {
        private static final int MODE_SHIFT = 30;
        private static final int MODE_MASK  = 0x3 << MODE_SHIFT;

        /**
         * Measure specification mode: The parent has not imposed any constraint
         * on the child. It can be whatever size it wants.
         */
        public static final int UNSPECIFIED = 0 << MODE_SHIFT;

        /**
         * Measure specification mode: The parent has determined an exact size
         * for the child. The child is going to be given those bounds regardless
         * of how big it wants to be.
         */
        public static final int EXACTLY     = 1 << MODE_SHIFT;

        /**
         * Measure specification mode: The child can be as large as it wants up
         * to the specified size.
         */
        public static final int AT_MOST     = 2 << MODE_SHIFT;<span style="font-family: Arial, Helvetica, sans-serif; font-size: 12px;">    ....此处省略</span>
每个MeasureSpec都有一个Size和Mode,而Mode分三种:MeasureSpec.UNSPECIFIED、MeasureSpec.AT_MOST、MeasureSpec.EXACTLY。
unspecified:父布局对子布局没有任何限制,子布局可以是它想要的任何尺寸。exactly:父布局限制了子布局的绝对宽高,子布局将会被赋予这些边界限制.at-most:子布局可以是自己任意的大小,但是有个绝对尺寸的上限。下面来看看该类的onMeasure代码:
@Override
	protected void onMeasure(int widthMeasureSpec, int heightMeasureSpec) {

		final int widthMode = MeasureSpec.getMode(widthMeasureSpec);
		final int heightMode = MeasureSpec.getMode(heightMeasureSpec);

		int widthSize = MeasureSpec.getSize(widthMeasureSpec);
		int heightSize = MeasureSpec.getSize(heightMeasureSpec);

		Resources r = Resources.getSystem();
		if(widthMode == MeasureSpec.UNSPECIFIED || widthMode == MeasureSpec.AT_MOST){
			widthSize = (int) TypedValue.applyDimension(TypedValue.COMPLEX_UNIT_DIP, 50, r.getDisplayMetrics());
			widthMeasureSpec = MeasureSpec.makeMeasureSpec(widthSize, MeasureSpec.EXACTLY);
		}

		if(heightMode == MeasureSpec.UNSPECIFIED || heightSize == MeasureSpec.AT_MOST){
			heightSize = (int) TypedValue.applyDimension(TypedValue.COMPLEX_UNIT_DIP, 30, r.getDisplayMetrics());
			heightMeasureSpec = MeasureSpec.makeMeasureSpec(heightSize, MeasureSpec.EXACTLY);
		}


		super.onMeasure(widthMeasureSpec, heightMeasureSpec);
	}
	@Override
	protected void onLayout(boolean changed, int left, int top, int right,
			int bottom) {
		super.onLayout(changed, left, top, right, bottom);

		final int width = getWidth();
		final int height = getHeight();

		radius = Math.min(width, height) * 0.5f;
		centerY = radius;
		startX = radius;
		endX = width - radius;
		spotMinX = startX + borderWidth;
		spotMaxX = endX - borderWidth;
		spotSize = height - 4 * borderWidth;
		spotX = toggleOn ? spotMaxX : spotMinX;
		offLineWidth = 0;
	}
@Override
	public void draw(Canvas canvas) {
		//
		rect.set(0, 0, getWidth(), getHeight());
		paint.setColor(borderColor);
		canvas.drawRoundRect(rect, radius, radius, paint);

		if(offLineWidth > 0){
			final float cy = offLineWidth * 0.5f;
			rect.set(spotX - cy, centerY - cy, endX + cy, centerY + cy);
			paint.setColor(offColor);
			canvas.drawRoundRect(rect, cy, cy, paint);
		}
                ............此处省略
		paint.setColor(spotColor);
		canvas.drawRoundRect(rect, spotR, spotR, paint);

	}
经过一番折腾,得到结果如下:“Choreographer就是一个消息处理器,根据vsync 信号 来计算frame,而计算frame的方式就是处理三种回调,包括事件回调、动画回调、绘制回调。这三种事件在消息输入、加入动画、准备绘图layout 等动作时均会发给Choreographer。”
 public static SpringLooper createSpringLooper() {
    if (Build.VERSION.SDK_INT >= Build.VERSION_CODES.JELLY_BEAN) {
      return ChoreographerAndroidSpringLooper.create();
    } else {
      return LegacyAndroidSpringLooper.create();
    }
  }
这里项目走版本分支获取SpringLooper,从而注册BaseSpringSystem,在深入暂不涉及,参考相关资料:http://blog.csdn.net/farmer_cc/article/details/18619429,相关demo下载地址:http://download.csdn.net/detail/analyzesystem/8905455


 5358
5358


 被折叠的 条评论
为什么被折叠?
被折叠的 条评论
为什么被折叠?
 到【灌水乐园】发言


