


前段时间写了篇关于Fragment的文章,介绍了基础的概念,用静态和动态的方式加载Fragment Xamarin Android Fragment的两种加载方式。下面的这个例子介绍xamarin Android fragment实现简单的底部导航栏。
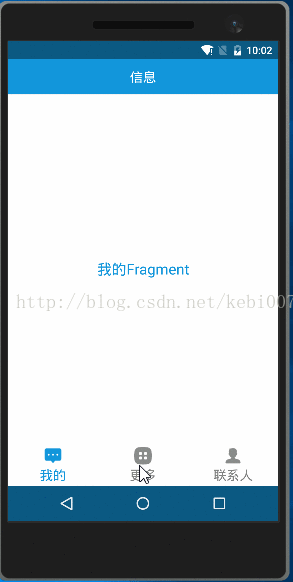
效果图和项目结构
效果图:
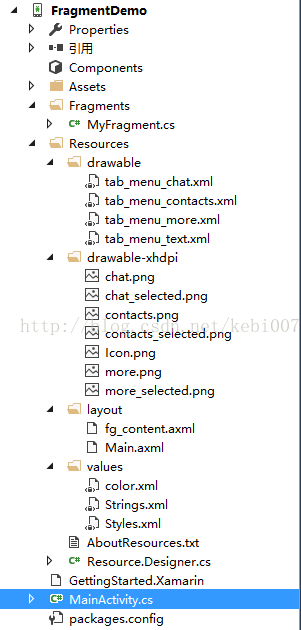
项目结构:
主要的流程就是:点击不同的菜单加载对应的fragment出来,同时菜单icon切换和菜单文字颜色也响应变化,是否选中是通过selected来判断的。我们需要写以下几个资源文件,文字颜色的变化,菜单图片的变化。
step1:底部菜单资源文件
文字颜色变化资源:
tab__menu_text.xml
- <?xml version="1.0" encoding="utf-8" ?>
- <selector xmlns:android="http://schemas.android.com/apk/res/android">
- <item android:color="@color/color_primary" android:state_selected="true"></item>
- <item android:color="@color/color_808080"></item>
- </selector>
<?xml version="1.0" encoding="utf-8" ?>
<selector xmlns:android="http://schemas.android.com/apk/res/android">
  <item android:color="@color/color_primary" android:state_selected="true"></item>
  <item android:color="@color/color_808080"></item>
</selector>- <?xml version="1.0" encoding="utf-8" ?>
- <selector xmlns:android="http://schemas.android.com/apk/res/android">
- <item android:drawable="@drawable/more_selected" android:state_selected="true"></item>
- <item android:drawable="@drawable/more"></item>
- </selector>
<?xml version="1.0" encoding="utf-8" ?>
<selector xmlns:android="http://schemas.android.com/apk/res/android">
  <item android:drawable="@drawable/more_selected" android:state_selected="true"></item>
  <item android:drawable="@drawable/more"></item>
</selector>step2:MainActivity布局文件 Main.axml
- <?xml version="1.0" encoding="utf-8"?>
- <RelativeLayout xmlns:android="http://schemas.android.com/apk/res/android"
- android:layout_width="match_parent"
- android:layout_height="match_parent"
- android:id="@+id/relativelayout1"
- android:background="@color/color_primary"
- android:fitsSystemWindows="true">
- <RelativeLayout
- android:id="@+id/ly_top_bar"
- android:layout_width="match_parent"
- android:layout_height="48dp"
- android:background="@color/color_primary">
- <TextView
- android:id="@+id/txt_topbar"
- android:layout_width="match_parent"
- android:layout_height="match_parent"
- android:layout_centerInParent="true"
- android:gravity="center"
- android:textSize="18sp"
- android:textColor="@color/color_white"
- android:text="信息" />
- <View
- android:layout_width="match_parent"
- android:layout_height="2px"
- android:background="@color/div_white"
- android:layout_alignParentBottom="true" />
- </RelativeLayout>
- <LinearLayout
- android:id="@+id/ly_tab_bar"
- android:layout_width="match_parent"
- android:layout_height="58dp"
- android:layout_alignParentBottom="true"
- android:background="@color/bg_white"
- android:orientation="horizontal">
- <TextView
- android:id="@+id/txt_chat"
- style="@style/tabText"
- android:drawableTop="@drawable/tab_menu_chat"
- android:text="我的"/>
- <TextView
- android:id="@+id/txt_more"
- style="@style/tabText"
- android:drawableTop="@drawable/tab_menu_more"
- android:text="更多"/>
- <TextView
- android:id="@+id/txt_contacts"
- style="@style/tabText"
- android:drawableTop="@drawable/tab_menu_contacts"
- android:text="联系人"/>
- </LinearLayout>
- <View
- android:id="@+id/div_tab_bar"
- android:layout_width="match_parent"
- android:layout_height="2px"
- android:background="@color/div_white"
- android:layout_above="@id/ly_tab_bar" />
- <FrameLayout
- android:layout_width="match_parent"
- android:layout_height="match_parent"
- android:layout_below="@id/ly_top_bar"
- android:layout_above="@id/div_tab_bar"
- android:id="@+id/ly_content" />
- </RelativeLayout>
<?xml version="1.0" encoding="utf-8"?>
<RelativeLayout xmlns:android="http://schemas.android.com/apk/res/android"
    android:layout_width="match_parent"
    android:layout_height="match_parent"
    android:id="@+id/relativelayout1"
    android:background="@color/color_primary"
     android:fitsSystemWindows="true">
    <RelativeLayout
        android:id="@+id/ly_top_bar"
        android:layout_width="match_parent"
        android:layout_height="48dp"
        android:background="@color/color_primary">
        <TextView
            android:id="@+id/txt_topbar"
            android:layout_width="match_parent"
            android:layout_height="match_parent"
            android:layout_centerInParent="true"
            android:gravity="center"
            android:textSize="18sp"
            android:textColor="@color/color_white"
            android:text="信息" />
        <View
            android:layout_width="match_parent"
            android:layout_height="2px"
            android:background="@color/div_white"
            android:layout_alignParentBottom="true" />
    </RelativeLayout>
    <LinearLayout
        android:id="@+id/ly_tab_bar"
        android:layout_width="match_parent"
        android:layout_height="58dp"
        android:layout_alignParentBottom="true"
        android:background="@color/bg_white"
        android:orientation="horizontal">
        <TextView
            android:id="@+id/txt_chat"
            style="@style/tabText"
            android:drawableTop="@drawable/tab_menu_chat"
            android:text="我的"/>
      <TextView
       android:id="@+id/txt_more"
       style="@style/tabText"
       android:drawableTop="@drawable/tab_menu_more"
       android:text="更多"/>
      <TextView
       android:id="@+id/txt_contacts"
       style="@style/tabText"
       android:drawableTop="@drawable/tab_menu_contacts"
       android:text="联系人"/>
    </LinearLayout>
    <View
        android:id="@+id/div_tab_bar"
        android:layout_width="match_parent"
        android:layout_height="2px"
        android:background="@color/div_white"
        android:layout_above="@id/ly_tab_bar" />
    <FrameLayout
        android:layout_width="match_parent"
        android:layout_height="match_parent"
        android:layout_below="@id/ly_top_bar"
        android:layout_above="@id/div_tab_bar"
        android:id="@+id/ly_content" />
</RelativeLayout>
关于布局采用的相对布局分为三个部分:头部标题、中间Fragment的位置、底部导航栏。关于根布局文件中fitsSystemWindows属性是为了配合透明状态栏使用的,有兴趣的可以看看前几天的写的那篇文章。底部导航栏文字很多属性都是一模一样的,所以提出来,写一个style。使用widget属性让其各占1/3。文字样式tabText如下:
- <?xml version="1.0" encoding="utf-8" ?>
- <selector xmlns:android="http://schemas.android.com/apk/res/android">
- <item android:color="@color/color_primary" android:state_selected="true"></item>
- <item android:color="@color/color_808080"></item>
- </selector>
<?xml version="1.0" encoding="utf-8" ?>
<selector xmlns:android="http://schemas.android.com/apk/res/android">
  <item android:color="@color/color_primary" android:state_selected="true"></item>
  <item android:color="@color/color_808080"></item>
</selector>
step3:Fragment布局文件继承Fragment的类MyFragment
fg_content.xml:
- <?xml version="1.0" encoding="utf-8"?>
- <LinearLayout xmlns:android="http://schemas.android.com/apk/res/android"
- android:orientation="vertical"
- android:layout_width="match_parent"
- android:layout_height="match_parent"
- android:background="@color/bg_white">
- <TextView
- android:id="@+id/txt_content"
- android:layout_width="match_parent"
- android:layout_height="match_parent"
- android:gravity="center"
- android:text="呵呵"
- android:textColor="@color/color_primary"
- android:textSize="20sp" />
- </LinearLayout>
<?xml version="1.0" encoding="utf-8"?>
<LinearLayout xmlns:android="http://schemas.android.com/apk/res/android"
    android:orientation="vertical"
    android:layout_width="match_parent"
    android:layout_height="match_parent"
    android:background="@color/bg_white">
    <TextView
        android:id="@+id/txt_content"
        android:layout_width="match_parent"
        android:layout_height="match_parent"
        android:gravity="center"
        android:text="呵呵"
        android:textColor="@color/color_primary"
        android:textSize="20sp" />
</LinearLayout>
MyFragment.cs
- public class MyFragment : Fragment
- {
- private string content { get; set; }
- public MyFragment(string content)
- {
- this.content = content;
- }
- public override View OnCreateView(LayoutInflater inflater, ViewGroup container, Bundle savedInstanceState)
- {
- View view = inflater.Inflate(Resource.Layout.fg_content, container, false);
- TextView txt_content = (TextView)view.FindViewById(Resource.Id.txt_content);
- txt_content.Text = content;
- return view;
- }
- }
    public class MyFragment : Fragment
    {
        private string content { get; set; }
        public MyFragment(string  content)
        {
            this.content = content;
        }
        public override View OnCreateView(LayoutInflater inflater, ViewGroup container, Bundle savedInstanceState)
        {
            View view = inflater.Inflate(Resource.Layout.fg_content, container, false);
            TextView txt_content = (TextView)view.FindViewById(Resource.Id.txt_content);
            txt_content.Text = content;
            return view;
        }
    }
step3:MainActivity.cs
- [Activity(Label = "FragmentDemo", MainLauncher = true, Icon = "@drawable/icon", Theme = "@android:style/Theme.Light.NoTitleBar")]
- public class MainActivity : Activity
- {
- private TextView txt_chat;
- private TextView txt_contacts;
- private TextView txt_more;
- private FrameLayout ly_content;
- private MyFragment fg1, fg2, fg3;
- private FragmentManager fManager;
- protected override void OnCreate(Bundle bundle)
- {
- base.OnCreate(bundle);
- SetContentView(Resource.Layout.Main);
- ly_content = (FrameLayout)FindViewById(Resource.Id.ly_content);
- MyFragment fg = new MyFragment("第一个fragment");
- txt_chat = (TextView)FindViewById(Resource.Id.txt_chat);
- txt_contacts = (TextView)FindViewById(Resource.Id.txt_contacts);
- txt_more = (TextView)FindViewById(Resource.Id.txt_more);
- bindViews();
- txt_chat.PerformClick();
- }
- //ui组件初始化与事件绑定
- private void bindViews()
- {
- txt_chat.Click += (s, e) => { onClick(txt_chat); };
- txt_contacts.Click += delegate { onClick(txt_contacts); };
- txt_more.Click += delegate { onClick(txt_more); };
- }
- //隐藏所有Fragment
- private void hideAllFragment(FragmentTransaction fragmentTransaction)
- {
- if (fg1 != null) fragmentTransaction.Hide(fg1);
- if (fg2 != null) fragmentTransaction.Hide(fg2);
- if (fg3 != null) fragmentTransaction.Hide(fg3);
- }
- //重置所有文本的选中状态
- private void setSelected()
- {
- txt_chat.Selected =false;
- txt_contacts.Selected = false;
- txt_more.Selected = false;
- }
- //单击事件
- public void onClick(View v)
- {
- FragmentTransaction fTransaction = FragmentManager.BeginTransaction();
- hideAllFragment(fTransaction);
- switch (v.Id)
- {
- case Resource.Id.txt_chat:
- setSelected();
- txt_chat.Selected = true;
- if (fg1 == null)
- {
- fg1 = new MyFragment("聊天Fragment");
- fTransaction.Add(Resource.Id.ly_content, fg1);
- }
- else{fTransaction.Show(fg1);}break;
- case Resource.Id.txt_contacts:
- setSelected();
- txt_contacts.Selected = true;
- if (fg2 == null)
- {
- fg2 = new MyFragment("联系人Fragment");
- fTransaction.Add(Resource.Id.ly_content, fg2);
- }
- else{fTransaction.Show(fg2);}
- break;
- case Resource.Id.txt_more:
- setSelected();
- txt_more.Selected = true;
- if (fg3 == null)
- {
- fg3 = new MyFragment("MoreFragment");
- fTransaction.Add(Resource.Id.ly_content, fg3);
- }else{fTransaction.Show(fg3);}break;
- }
- fTransaction.Commit();
- }
- }
    [Activity(Label = "FragmentDemo", MainLauncher = true, Icon = "@drawable/icon", Theme = "@android:style/Theme.Light.NoTitleBar")]
    public class MainActivity : Activity
    {
        private TextView txt_chat;
        private TextView txt_contacts;
        private TextView txt_more;
        private FrameLayout ly_content;
        private MyFragment fg1, fg2, fg3;
        private FragmentManager fManager;
        protected override void OnCreate(Bundle bundle)
        {
            base.OnCreate(bundle);
            SetContentView(Resource.Layout.Main);
            ly_content = (FrameLayout)FindViewById(Resource.Id.ly_content);
            MyFragment fg = new MyFragment("第一个fragment");
            txt_chat = (TextView)FindViewById(Resource.Id.txt_chat);
            txt_contacts = (TextView)FindViewById(Resource.Id.txt_contacts);
            txt_more = (TextView)FindViewById(Resource.Id.txt_more);
            bindViews();
            txt_chat.PerformClick();
        }
        //ui组件初始化与事件绑定
        private void bindViews()
        {

            txt_chat.Click += (s, e) => { onClick(txt_chat); };
            txt_contacts.Click += delegate { onClick(txt_contacts); };
            txt_more.Click += delegate { onClick(txt_more); };
        }
        //隐藏所有Fragment
        private void hideAllFragment(FragmentTransaction fragmentTransaction)
        {
            if (fg1 != null) fragmentTransaction.Hide(fg1);
            if (fg2 != null) fragmentTransaction.Hide(fg2);
            if (fg3 != null) fragmentTransaction.Hide(fg3);
        }
        //重置所有文本的选中状态
        private void setSelected()
        {
            txt_chat.Selected =false;
            txt_contacts.Selected = false;
            txt_more.Selected = false;
        }
        //单击事件
        public void onClick(View v)
        {
                FragmentTransaction fTransaction = FragmentManager.BeginTransaction();
                hideAllFragment(fTransaction);
                switch (v.Id)
                {
                    case Resource.Id.txt_chat:
                        setSelected();
                        txt_chat.Selected = true;
                        if (fg1 == null)
                        {
                            fg1 = new MyFragment("聊天Fragment");
                            fTransaction.Add(Resource.Id.ly_content, fg1);
                        }
                        else{fTransaction.Show(fg1);}break;
                    case Resource.Id.txt_contacts:
                        setSelected();
                        txt_contacts.Selected = true;
                        if (fg2 == null)
                        {
                            fg2 = new MyFragment("联系人Fragment");
                            fTransaction.Add(Resource.Id.ly_content, fg2);
                        }
                        else{fTransaction.Show(fg2);}
                        break;
                    case Resource.Id.txt_more:
                        setSelected();
                        txt_more.Selected = true;
                        if (fg3 == null)
                        {
                            fg3 = new MyFragment("MoreFragment");
                            fTransaction.Add(Resource.Id.ly_content, fg3);
                        }else{fTransaction.Show(fg3);}break;
                }
                fTransaction.Commit();
            }
}step4:沉浸式状态栏
这个随手也实现一下吧,挺简单的。Main.axml中根布局中已经设置了属性fitsSystemWindows,兼容android4.4 和安定肉ID5.* ,我们在用代码设置状态栏透明就可以。有关的介绍可以参考
Xamarin android沉浸式状态栏
- if (Build.VERSION.SdkInt >= Build.VERSION_CODES.Kitkat)
- {
- //透明状态栏
- Window.AddFlags(WindowManagerFlags.TranslucentStatus);
- //透明导航栏
- Window.AddFlags(WindowManagerFlags.TranslucentNavigation);
- }
            if (Build.VERSION.SdkInt >= Build.VERSION_CODES.Kitkat)
            {
                //透明状态栏
                Window.AddFlags(WindowManagerFlags.TranslucentStatus);
                //透明导航栏
                Window.AddFlags(WindowManagerFlags.TranslucentNavigation);
}作者:张林
标题:xamarin android Fragment实现底部导航栏 原文地址:http://blog.csdn.net/kebi007/article/details/70307509
转载


 264
264


 被折叠的 条评论
为什么被折叠?
被折叠的 条评论
为什么被折叠?
 到【灌水乐园】发言


