


1. PagerSlidingTabStrip介绍
添加之后的Tab归属于ActionBar,优点在于ActionBar空间足够的时候这些Tab会显示在ActionBar上。缺点在于,只能通过点击Tab来翻页。

图1.1 空间不足(来源于ActionBar官方tarining)

图1.2 空间足够(来源于ActionBar官方tarining)
PagerSlidingTabStrip是GitHub上一个开源项目(地址:https://github.com/astuetz/PagerSlidingTabStrip)用于获得同样的Tab翻页效果。与官方ActionBar的Tab不同的是,Tab不属于ActionBar,而是通过TextView自定义了Tab,并通过与ViewPager联动,实现点击Tab和侧滑均能翻页的效果。
2. PagerSlidingTabStrip集成
从GitHub上下载文件后,该文件本身就是一个Gradle工程,包含了两个Module,Library即用于被依赖的Module,Sample是作者依赖Library给出的一个实例。官方的使用说明不太详细。
表1,官方的使用说明
| 官方Usage |
| For a working implementation of this project see the sample/ folder.
|
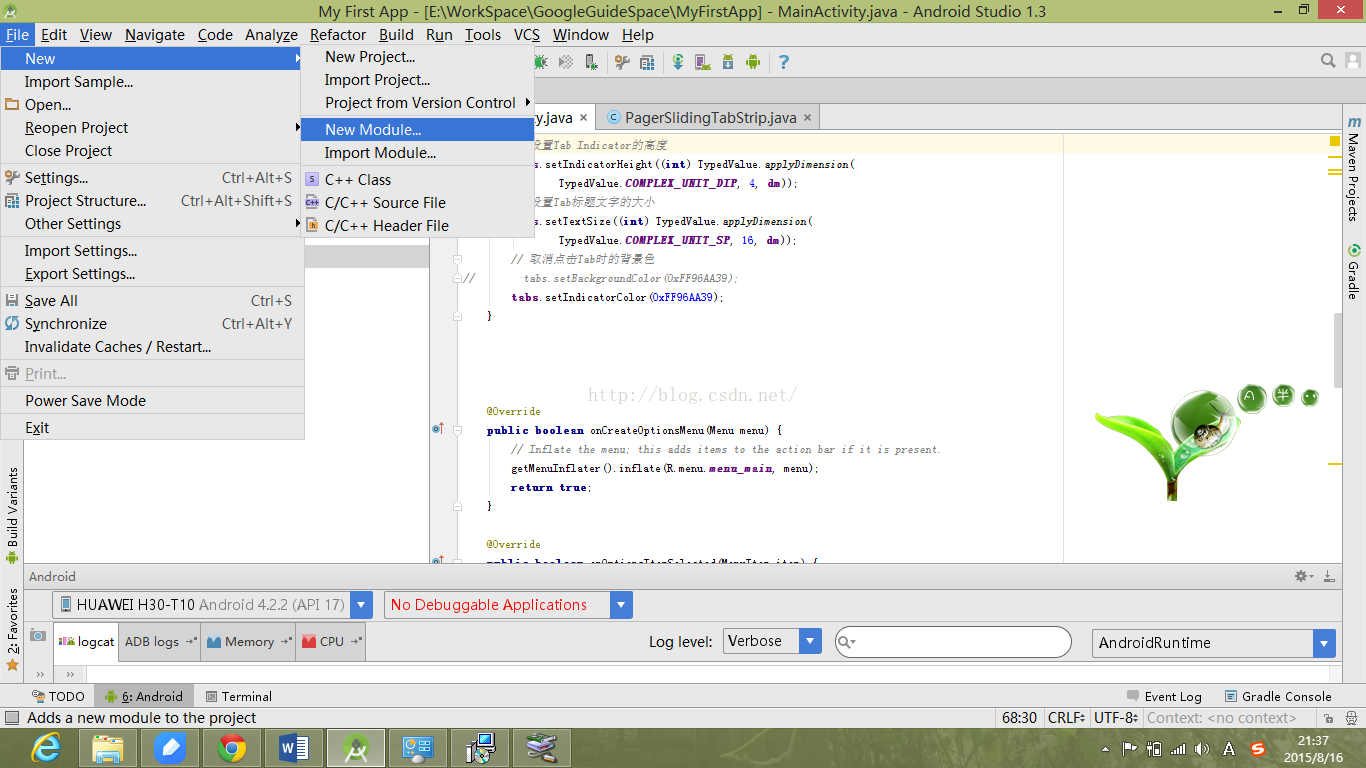
下载完毕后,可以通过两种方式新建。
1) 可以直接通过打开Project的方式打开该工程,然后在该Project中添加自己的Module。
1) 在自己的工程中添加Module。
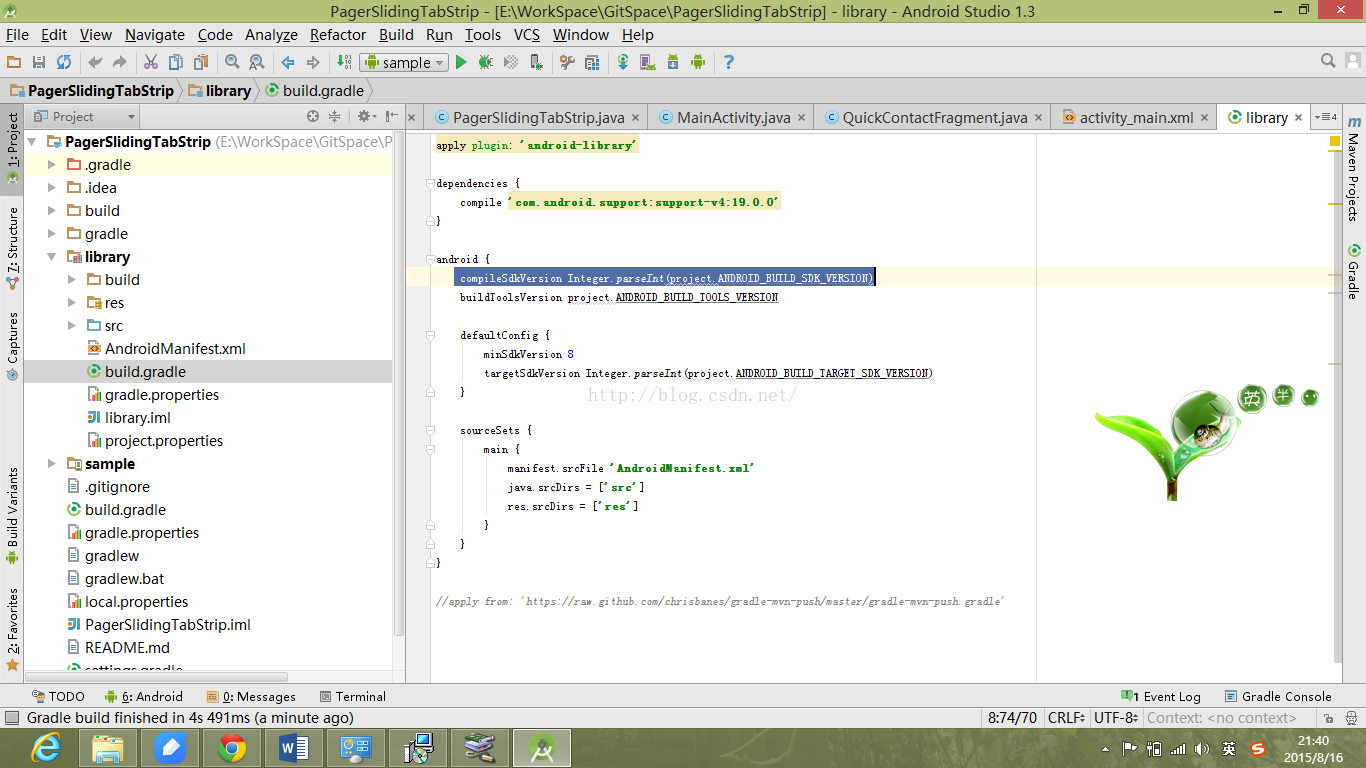
这里我们采用第二种。由于我们要依赖于PagerSlidingTabStrip工程中的library,所以要把自己的Module和library的配置进行统一。
参看了博客“Androidstudio 导入github工程”(地址:http://blog.csdn.net/onlysnail/article/details/45115093),将libary和sample的build.gradle中build.gradle文件修改成和工程本地的Module一致(黄色部分)。 例如,我的工程本地的Module的build.gradle文件如下。
android {
<span style="color:#ffff00;"> </span><span style="background-color: rgb(255, 255, 102);">   compileSdkVersion 22
    buildToolsVersion "23.0.0 rc3"</span>

    defaultConfig {
        applicationId "example.geosis.myapplication"
<span style="background-color: rgb(255, 255, 0);">        minSdkVersion 15
        targetSdkVersion 22
        versionCode 1
        versionName "1.0"</span>
    }
    buildTypes {
        release {
            minifyEnabled false
            proguardFiles getDefaultProguardFile('proguard-android.txt'), 'proguard-rules.pro'
        }
    }
}
3. PagerSlidingTabStrip源码分析
有不少分析该源码的文章,PagerSlidingTabStrip主要是继承了HorizontalScrollView
。参考博客:PagerSlidingTabStrip源码分析(http://blog.csdn.net/cym492224103/article/details/43371895)
4. PagerSlidingTabStripSample的分析
sample实现的效果如图4.1、4.2。
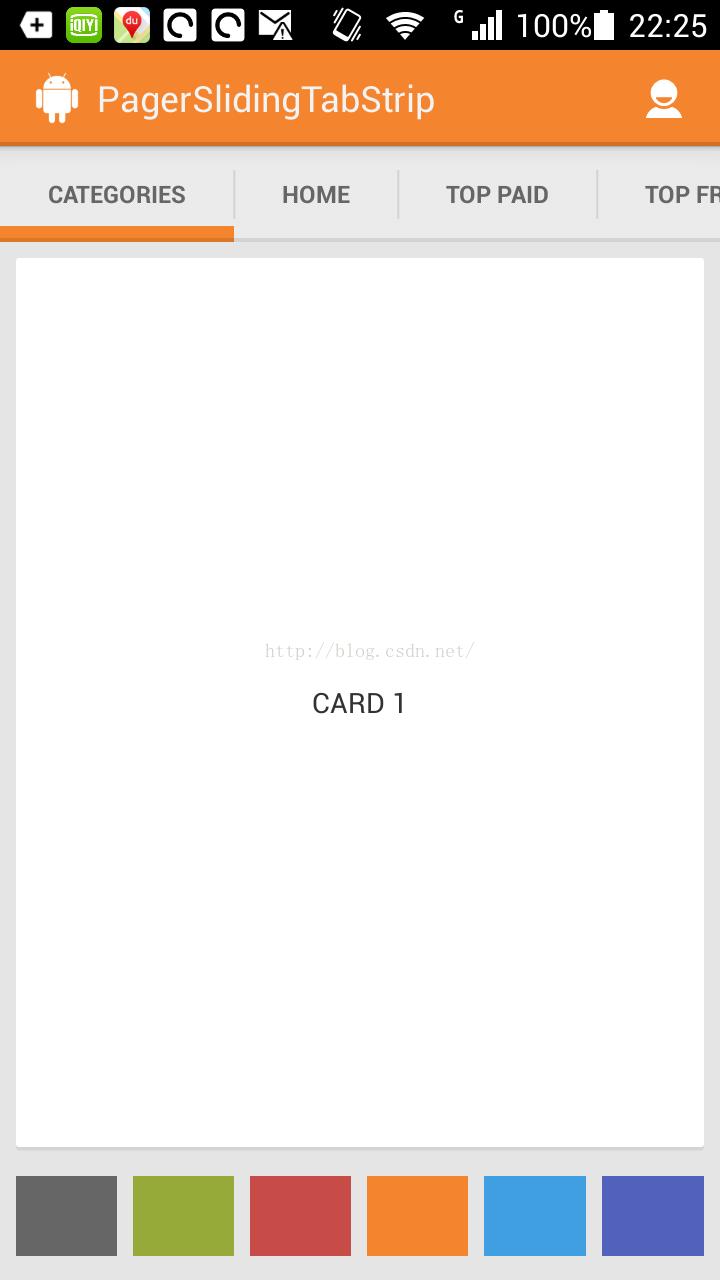
主界面主要实现了Tab+ViewPager的滑动效果,以及下面点选颜色修改ActionBar和Tab Indicator的颜色。
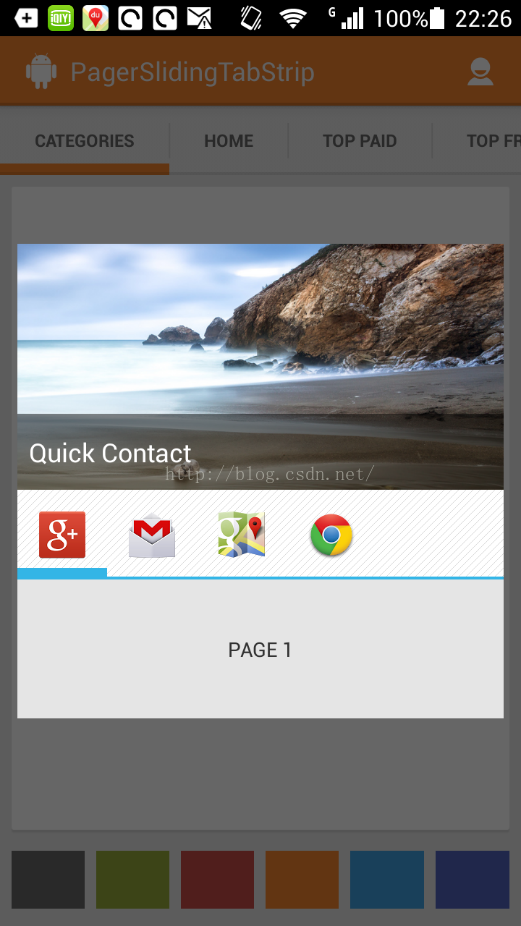
弹出界面也实现了Tab+ViewPager的滑动效果,只是Tab采用图片背景。
以主界面为例,在界面文件中,将PagerSlidingTabStrip放在ViewPager上方。
<RelativeLayout xmlns:android="http://schemas.android.com/apk/res/android"
    xmlns:app="http://schemas.android.com/apk/res-auto"
    xmlns:tools="http://schemas.android.com/tools"
    android:layout_width="match_parent"
    android:layout_height="match_parent" >

    <com.astuetz.PagerSlidingTabStrip
        android:id="@+id/tabs"
        android:layout_width="match_parent"
        android:layout_height="48dip"
        android:background="@drawable/background_tabs" />

    <android.support.v4.view.ViewPager
        android:id="@+id/pager"
        android:layout_width="match_parent"
        android:layout_height="wrap_content"
        android:layout_above="@+id/colors"
        android:layout_below="@+id/tabs"
        tools:context=".MainActivity" />

    <LinearLayout
        android:id="@+id/colors"
        android:layout_width="match_parent"
        android:layout_height="48dip"
        android:layout_alignParentBottom="true"
        android:layout_marginBottom="8dip"
        android:layout_marginLeft="4dip"
        android:layout_marginRight="4dip"
        android:orientation="horizontal" >

        <ImageView
            android:layout_width="0dip"
            android:layout_height="match_parent"
            android:layout_margin="4dip"
            android:layout_weight="1"
            android:background="#FF666666"
            android:onClick="onColorClicked"
            android:tag="#FF666666" />

        <ImageView
            android:layout_width="0dip"
            android:layout_height="match_parent"
            android:layout_margin="4dip"
            android:layout_weight="1"
            android:background="#FF96AA39"
            android:onClick="onColorClicked"
            android:tag="#FF96AA39" />

        <ImageView
            android:layout_width="0dip"
            android:layout_height="match_parent"
            android:layout_margin="4dip"
            android:layout_weight="1"
            android:background="#FFC74B46"
            android:onClick="onColorClicked"
            android:tag="#FFC74B46" />

        <ImageView
            android:layout_width="0dip"
            android:layout_height="match_parent"
            android:layout_margin="4dip"
            android:layout_weight="1"
            android:background="#FFF4842D"
            android:onClick="onColorClicked"
            android:tag="#FFF4842D" />

        <ImageView
            android:layout_width="0dip"
            android:layout_height="match_parent"
            android:layout_margin="4dip"
            android:layout_weight="1"
            android:background="#FF3F9FE0"
            android:onClick="onColorClicked"
            android:tag="#FF3F9FE0" />

        <ImageView
            android:layout_width="0dip"
            android:layout_height="match_parent"
            android:layout_margin="4dip"
            android:layout_weight="1"
            android:background="#FF5161BC"
            android:onClick="onColorClicked"
            android:tag="#FF5161BC" />
    </LinearLayout>

</RelativeLayout>
在主程序中,分别获取tabs和pager。
tabs = (PagerSlidingTabStrip) findViewById(R.id.tabs);
pager = (ViewPager) findViewById(R.id.pager);
关键部分是撰写pager的适配器。采用的是FragmentPagerAdapter类型。参见附录FragmentPagerAdapter的API
最后,将Tab和pager关联即可。
tabs.setViewPager(pager);5. PagerSlidingTabStrip的使用
参考:AndroidActionBar应用实战,高仿微信主界面的设计(地址:http://blog.csdn.net/gebitan505/article/details/36674397)
通过对Sample的分析,这里要实现的效果已经很简单了。
最后,注意在使用过程中的兼容问题。
6. 附录:FragmentPagerAdapter API 解释
FragmentPagerAdapter
extends PagerAdapter
| ↳ | ||
|
| ↳ | android.support.v4.app.FragmentPagerAdapter |
Class Overview
Implementation of PagerAdapter thatrepresents each page as a Fragment thatis persistently kept in the fragment manager as long as the user can return tothe page.
This version of the pageris best for use when there are a handful of typically more static fragments tobe paged through, such as a set of tabs. The fragment of each page the uservisits will be kept in memory, though its view hierarchy may be destroyed whennot visible. This can result in using a significant amount of memory sincefragment instances can hold on to an arbitrary amount of state. For larger setsof pages, considerFragmentStatePagerAdapter.
When usingFragmentPagerAdapter the host ViewPager must have a valid ID set.
Subclasses only need toimplement getItem(int) and getCount() tohave a working adapter.
Here is an exampleimplementation of a pager containing fragments of lists:
public class FragmentPagerSupport extends FragmentActivity {
    static final int NUM_ITEMS = 10;

    MyAdapter mAdapter;

    ViewPager mPager;

    @Override
    protected void onCreate(Bundle savedInstanceState) {
        super.onCreate(savedInstanceState);
        setContentView(R.layout.fragment_pager);

        mAdapter = new MyAdapter(getSupportFragmentManager());

        mPager = (ViewPager)findViewById(R.id.pager);
        mPager.setAdapter(mAdapter);

        // Watch for button clicks.
        Button button = (Button)findViewById(R.id.goto_first);
        button.setOnClickListener(new OnClickListener() {
            public void onClick(View v) {
                mPager.setCurrentItem(0);
            }
        });
        button = (Button)findViewById(R.id.goto_last);
        button.setOnClickListener(new OnClickListener() {
            public void onClick(View v) {
                mPager.setCurrentItem(NUM_ITEMS-1);
            }
        });
    }

   <span style="background-color: rgb(255, 255, 51);"> public static class MyAdapter extends FragmentPagerAdapter {
        public MyAdapter(FragmentManager fm) {
            super(fm);
        }

        @Override
        public int getCount() {
            return NUM_ITEMS;
        }

        @Override
        public Fragment getItem(int position) {
            return ArrayListFragment.newInstance(position);
        }
    }

    public static class ArrayListFragment extends ListFragment {
        int mNum;

        /**
         * Create a new instance of CountingFragment, providing "num"
         * as an argument.
         */
        static ArrayListFragment newInstance(int num) {
            ArrayListFragment f = new ArrayListFragment();

            // Supply num input as an argument.
            Bundle args = new Bundle();
            args.putInt("num", num);
            f.setArguments(args);

            return f;
        }

        /**
         * When creating, retrieve this instance's number from its arguments.
         */
        @Override
        public void onCreate(Bundle savedInstanceState) {
            super.onCreate(savedInstanceState);
            mNum = getArguments() != null ? getArguments().getInt("num") : 1;
        }

        /**
         * The Fragment's UI is just a simple text view showing its
         * instance number.
         */
        @Override
        public View onCreateView(LayoutInflater inflater, ViewGroup container,
                Bundle savedInstanceState) {
            View v = inflater.inflate(R.layout.fragment_pager_list, container, false);
            View tv = v.findViewById(R.id.text);
            ((TextView)tv).setText("Fragment #" + mNum);
            return v;
        }

        @Override
        public void onActivityCreated(Bundle savedInstanceState) {
            super.onActivityCreated(savedInstanceState);
            setListAdapter(new ArrayAdapter<String>(getActivity(),
                    android.R.layout.simple_list_item_1, Cheeses.sCheeseStrings));
        }

        @Override
        public void onListItemClick(ListView l, View v, int position, long id) {
            Log.i("FragmentList", "Item clicked: " + id);
        }
    }</span>
}
</pre><pre name="code" class="java"><pre name="code" class="java">The R.layout.fragment_pager resource of the top-level fragment is:</pre><pre name="code" class="java"><span style="font-family: Arial, Helvetica, sans-serif;"><LinearLayout xmlns:android="http://schemas.android.com/apk/res/android"</span><pre name="code" class="html"> android:orientation="vertical" android:padding="4dip"
android:gravity="center_horizontal"
android:layout_width="match_parent" android:layout_height="match_parent">
<android.support.v4.view.ViewPager
android:id="@+id/pager"
android:layout_width="match_parent"
android:layout_height="0px"
android:layout_weight="1">
</android.support.v4.view.ViewPager>
<LinearLayout android:orientation="horizontal"
android:gravity="center" android:measureWithLargestChild="true"
android:layout_width="match_parent" android:layout_height="wrap_content"
android:layout_weight="0">
<Button android:id="@+id/goto_first"
android:layout_width="wrap_content" android:layout_height="wrap_content"
android:text="@string/first">
</Button>
<Button android:id="@+id/goto_last"
android:layout_width="wrap_content" android:layout_height="wrap_content"
android:text="@string/last">
</Button>
</LinearLayout>
</LinearLayout>
The R.layout.fragment_pager_list resource containing each individual fragment's layout is:
<LinearLayout xmlns:android="http://schemas.android.com/apk/res/android"
android:orientation="vertical"
android:layout_width="match_parent"
android:layout_height="match_parent"
android:background="@android:drawable/gallery_thumb">
<TextView android:id="@+id/text"
android:layout_width="match_parent" android:layout_height="wrap_content"
android:gravity="center_vertical|center_horizontal"
android:textAppearance="?android:attr/textAppearanceMedium"
android:text="@string/hello_world"/>
<!-- The frame layout is here since we will be showing either
the empty view or the list view. -->
<FrameLayout
android:layout_width="match_parent"
android:layout_height="0dip"
android:layout_weight="1" >
<!-- Here is the list. Since we are using a ListActivity, we
have to call it "@android:id/list" so ListActivity will
find it -->
<ListView android:id="@android:id/list"
android:layout_width="match_parent"
android:layout_height="match_parent"
android:drawSelectorOnTop="false"/>
<!-- Here is the view to show if the list is emtpy -->
<TextView android:id="@android:id/empty"
android:layout_width="match_parent"
android:layout_height="match_parent"
android:textAppearance="?android:attr/textAppearanceMedium"
android:text="No items."/>
</FrameLayout>
</LinearLayout>


 1万+
1万+


 被折叠的 条评论
为什么被折叠?
被折叠的 条评论
为什么被折叠?
 到【灌水乐园】发言


