


测试caffe–用c++训练数据集的三个实例
caffe本来也不支持windows,能移植到windows下已经很不错了。
1、(1)首先明确我们需要设定两个重要的prototxt文件,它们分别是CAFFE_ROOT/examples/mnist下的lenet_train_test.prototxt和lenet_solver.prototxt。(注:lenet为一种网络模型)
(2)在lenet_train_test.prototxt中:(写字板打开)
①在此给出用于训练的MNIST数据mnist-train-leveldb以及mnist-test-leveldb的路径;
②在此定义这个网络都有哪些层,给出每一层的定义。
(3)在lenet_solver.prototxt中:
①在此指明我们要训练的网络是lenet_train_test.prototxt,给出lenet_train_test.prototxt的路径;
②在此指定是用CPU还是GPU。
(4)在CAFFE_ROOT/examples/mnist下找到sh文件(脚本文件)train_lenet.sh,在里面给出:
①caffe编译后生成的可执行文件exe的名称(带不带“.exe”都可以),后面跟“train”代表选择“训练”;
②刚才写好的lenet_solver.prototxt的路径。
然后双击执行该脚本文件即可。

2 、Makefile.config.example文件具体修改说明如下
## Refer to http://caffe.berkeleyvision.org/installation.html
# Contributions simplifying and improving our build system are welcome!

# cuDNN acceleration switch (uncomment to build with cuDNN).
# USE_CUDNN := 1//  改成了(USE_CUDNN := 1)
//CuDNN是NVIDIA 出的专门针对Deep Learning框架设计的一套GPU计算加速库,用于实现高性能的并行计算。在有GPU并且安装cudnn的情况下可以打开即将注释去掉。
# CPU-only switch (uncomment to build without GPU support).
#CPU_ONLY := 1
//表示是否用gpu如果只有cpu这里要打开,如果只有一个gpu建议不要打开,测试过只有一个gpu的情况下,速度并未得到提升反而更慢,当然可以打开gpu尝试下啦~
# uncomment to disable IO dependencies and corresponding data layers
USE_OPENCV := 1//  原来是(# USE_OPENCV := 0)
# USE_LEVELDB := 0
# USE_LMDB := 0
//因为要用到opencv库所以要打开,下面这两个选项表示是选择caffe的数据管理第三方库,两者都不打开 caffe默认用的是LMDB,这两者均是嵌入式数据库管理系统编程库,详细介绍:http://www.cnblogs.com/yymn/p/4479216.html
# uncomment to allow MDB_NOLOCK when reading LMDB files (only if necessary)
#   You should not set this flag if you will be reading LMDBs with any
#   possibility of simultaneous read and write
# ALLOW_LMDB_NOLOCK := 1
//打开这个注释是当需要读取LMDB文件时,默认不打开,所以不取消注释
# Uncomment if you're using OpenCV 3
OPENCV_VERSION := 2.4.10// 原来是(#OPENCV_VERSION := 3)
//用pkg-config --modversion opencv命令查看opencv版本
# To customize your choice of compiler, uncomment and set the following.
# N.B. the default for Linux is g++ and the default for OSX is clang++
# CUSTOM_CXX := g++
//linux系统一般用得都是g++编译器
# CUDA directory contains bin/ and lib/ directories that we need.
CUDA_DIR := /usr/local/cuda
//cuda的安装目录
# On Ubuntu 14.04, if cuda tools are installed via
# "sudo apt-get install nvidia-cuda-toolkit" then use this instead:
# CUDA_DIR := /usr

# CUDA architecture setting: going with all of them.
# For CUDA < 6.0, comment the *_50 lines for compatibility.
CUDA_ARCH := -gencode arch=compute_20,code=sm_20 \
        -gencode arch=compute_20,code=sm_21 \
        -gencode arch=compute_30,code=sm_30 \
        -gencode arch=compute_35,code=sm_35 \
        -gencode arch=compute_50,code=sm_50 \
        -gencode arch=compute_50,code=compute_50
//这些是指gpu的计算能力,6.0以下的版本不支持×_50的计算能力,这里有个链接介绍:http://www.tuicool.com/articles/qUN322z
# BLAS choice:
# atlas for ATLAS (default)
# mkl for MKL
# open for OpenBlas
BLAS := open //  原来是(BLAS := atlas)
//BLAS这个值如果用的是atlas计算库则赋值ATLAS,mkl计算库则用MKL赋值,OpenBlas则赋值open

# Custom (MKL/ATLAS/OpenBLAS) include and lib directories.
# Leave commented to accept the defaults for your choice of BLAS
# (which should work)!
BLAS_INCLUDE := /usr/local/OpenBlas/include//  # BLAS_INCLUDE := /path/to/your/blas
BLAS_LIB := /usr/local/OpenBlas/lib//  # BLAS_LIB := /path/to/your/blas
//blas库安装目录

# Homebrew puts openblas in a directory that is not on the standard search path
# BLAS_INCLUDE := $(shell brew --prefix openblas)/include
# BLAS_LIB := $(shell brew --prefix openblas)/lib
//如果不是安装在标准路径则要指明

# This is required only if you will compile the matlab interface.
# MATLAB directory should contain the mex binary in /bin.
# MATLAB_DIR := /usr/local
# MATLAB_DIR := /Applications/MATLAB_R2012b.app
//matlab安装库的目录

# NOTE: this is required only if you will compile the python interface.
# We need to be able to find Python.h and numpy/arrayobject.h.
PYTHON_INCLUDE := /usr/include/python2.7 \
        /usr/lib/python2.7/dist-packages/numpy/core/include
//python安装目录
# Anaconda Python distribution is quite popular. Include path:
# Verify anaconda location, sometimes it's in root.
# ANACONDA_HOME := $(HOME)/anaconda
# PYTHON_INCLUDE := $(ANACONDA_HOME)/include \
        # $(ANACONDA_HOME)/include/python2.7 \
        # $(ANACONDA_HOME)/lib/python2.7/site-packages/numpy/core/include \
# Uncomment to use Python 3 (default is Python 2)
# PYTHON_LIBRARIES := boost_python3 python3.5m
# PYTHON_INCLUDE := /usr/include/python3.5m \
#                 /usr/lib/python3.5/dist-packages/numpy/core/include

# We need to be able to find libpythonX.X.so or .dylib.
PYTHON_LIB := /usr/lib
//python库位置
# PYTHON_LIB := $(ANACONDA_HOME)/lib
# Homebrew installs numpy in a non standard path (keg only)
# PYTHON_INCLUDE += $(dir $(shell python -c 'import numpy.core; print(numpy.core.__file__)'))/include
# PYTHON_LIB += $(shell brew --prefix numpy)/lib
# Uncomment to support layers written in Python (will link against Python libs)
WITH_PYTHON_LAYER := 1

# Whatever else you find you need goes here.
INCLUDE_DIRS := $(PYTHON_INCLUDE) /usr/local/include
LIBRARY_DIRS := $(PYTHON_LIB) /usr/local/lib /usr/lib

# If Homebrew is installed at a non standard location (for example your home directory) and you use it for general dependencies
# INCLUDE_DIRS += $(shell brew --prefix)/include
# LIBRARY_DIRS += $(shell brew --prefix)/lib

# Uncomment to use `pkg-config` to specify OpenCV library paths.
# (Usually not necessary -- OpenCV libraries are normally installed in one of the above $LIBRARY_DIRS.)
# USE_PKG_CONFIG := 1

# N.B. both build and distribute dirs are cleared on `make clean`
BUILD_DIR := build
DISTRIBUTE_DIR := distribute

# Uncomment for debugging. Does not work on OSX due to https://github.com/BVLC/caffe/issues/171
# DEBUG := 1

# The ID of the GPU that 'make runtest' will use to run unit tests.
TEST_GPUID := 0
//所用的gpu的ID编号
# enable pretty build (comment to see full commands)
Q ?= @
3、文件lenet_train_test.prototxt ,这个文件定义了具体的lenet网络参数。
name: "LeNet" 网络名
layer {
name: "mnist" 本层名称
type: "Data" 层类型
top: "data" 下一层接口
top: "label" 下一层接口
include {
phase: TRAIN
}
transform_param {
scale: 0.00390625 #1/256,预处理如减均值,尺寸变换,随机剪,镜像等
}
data_param {
source: "examples/mnist/mnist_train_lmdb" 训练数据位置
batch_size: 64 一次训练的样本数
backend: LMDB 读入的训练数据格式,默认leveldb
}
}
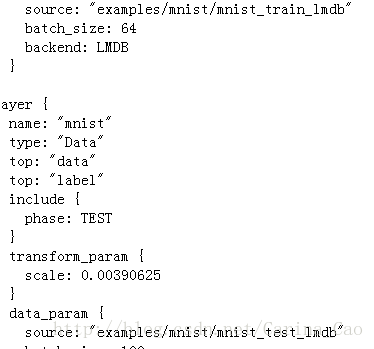
layer {
name: "mnist"
type: "Data"
top: "data"
top: "label"
include {
phase: TEST
}
transform_param {
scale: 0.00390625
}
data_param {
source: "examples/mnist/mnist_test_lmdb"
batch_size: 100 一次测试使用100个数据
backend: LMDB
}
}
layer {
name: "conv1"
type: "Convolution" 卷积层
bottom: "data" 上一层名“data”
top: "conv1" 下一层接口“conv1”
param {
lr_mult: 1 (weights的学习率与全局相同)
}
param {
lr_mult: 2 (biases的学习率是全局的2倍)
}
convolution_param {
num_output: 20 卷积核20个
kernel_size: 5 卷积核尺寸5×5
stride: 1 步长1
weight_filler {
type: "xavier" (随机的初始化权重和偏差)
}
bias_filler {
type: "constant" bias用0初始化
}
}
}
layer {
name: "pool1"
type: "Pooling" 池化层
bottom: "conv1" 上层“conv1”
top: "pool1" 下层接口“pool1”
pooling_param {
pool: MAX 池化函数用MAX
kernel_size: 2 池化核函数大小2×2
stride: 2 步长2
}
}
layer {
name: "conv2"
type: "Convolution"
bottom: "pool1"
top: "conv2"
param {
lr_mult: 1
}
param {
lr_mult: 2
}
convolution_param {
num_output: 50 卷积核50个
kernel_size: 5
stride: 1
weight_filler {
type: "xavier"
}
bias_filler {
type: "constant"
}
}
}
layer {
name: "pool2"
type: "Pooling"
bottom: "conv2"
top: "pool2"
pooling_param {
pool: MAX
kernel_size: 2
stride: 2
}
}
layer {
name: "ip1"
type: "InnerProduct" 全连接层
bottom: "pool2" 上层连接“pool2”
top: "ip1" “下层输出接口ip1”
param {
lr_mult: 1
}
param {
lr_mult: 2
}
inner_product_param {
num_output: 500 输出数量500
weight_filler {
type: "xavier"
}
bias_filler {
type: "constant"
}
}
}
layer {
name: "relu1"
type: "ReLU" 激活函数
bottom: "ip1"
top: "ip1" (这个地方还是ip1,底层与顶层相同减少开支,下一层全连接层的输入也还是ip1)
}
layer {
name: "ip2"
type: "InnerProduct"
bottom: "ip1"
top: "ip2"
param {
lr_mult: 1
}
param {
lr_mult: 2
}
inner_product_param {
num_output: 10 输出结果10个
weight_filler {
type: "xavier"
}
bias_filler {
type: "constant"
}
}
}
layer {
name: "accuracy"
type: "Accuracy"
bottom: "ip2" 上层连接ip2全连接层
bottom: "label" 上层连接label层
top: "accuracy" 输出接口为accuracy
include {
phase: TEST
}
}
layer {
name: "loss"
type: "SoftmaxWithLoss" 损失函数
bottom: "ip2"
bottom: "label"
top: "loss"
}4、文件lenet_solver.prototxt ,这个文件具体参数如下
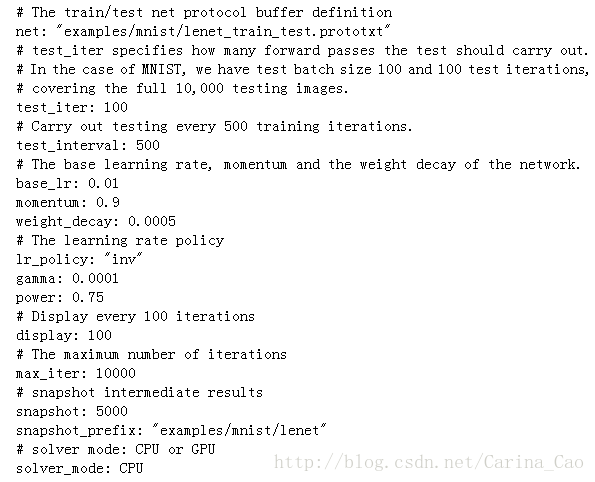
# The train/test net protocol buffer definition
net: "examples/mnist/lenet_train_test.prototxt"
//网络协议具体定义
# test_iter specifies how many forward passes the test should carry out.
# In the case of MNIST, we have test batch size 100 and 100 test iterations,
# covering the full 10,000 testing images.
test_iter: 100
//test迭代次数 如果batch_size =100,则100张图一批,训练100次,则可以覆盖10000张图的需求
# Carry out testing every 500 training iterations.
test_interval: 500
//训练迭代500次,测试一次
# The base learning rate, momentum and the weight decay of the network.
base_lr: 0.01
momentum: 0.9
weight_decay: 0.0005
//网络参数:学习率,动量,权重的衰减
# The learning rate policy
lr_policy: "inv"
gamma: 0.0001
power: 0.75
//学习策略:有固定学习率和每步递减学习率
# Display every 100 iterations
display: 100
//每迭代100次显示一次
# The maximum number of iterations
max_iter: 10000
//最大迭代次数
# snapshot intermediate results
snapshot: 5000
//每5000次迭代存储一次数据,路径前缀是<</span>span style="font-family: Arial, Helvetica, sans-serif;">examples/mnist/lenet</</span>span>
snapshot_prefix: "examples/mnist/lenet"
# solver mode: CPU or GPU
solver_mode: GPU
//是否使用GPU还是CPU
5、这里简单介绍一下整个过程的操作执行的指令,不详细介绍里面的原理,如果你搭建完caffe,赶紧追随小C一起试试caffe的第一个例子。
caffe在mnist自带的是使用leNet的网络结构
MNIST,一个经典的手写数字库,包含60000个训练样本和10000个测试样本,图片大小28*28,在Caffe上配置的第一个案例
Ø 打开caffe.sln,生成convert_mnist_data,这样就在Build/x64/Release下生成了convert_mnist_data.exe。
Ø 在cygwin中执行caffe-master/caffe-master/data/mnist/get_mnist.sh,这样就下载了后缀名为ubyte的mnist的数据文件放在mnist的文件下。需要通过cd 将路径转化到caffe-master/caffe-master/data/mnist/下,然后./ get_mnist.sh执行。
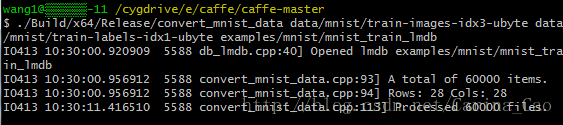
Ø 将数据文件转换为lmdb格式。这需要使用刚刚生成的convert_mnist_data.exe。执行指令(在Cygwin中执行命令)
注意:对于.exe文件,在cygwin中执行时候需要去掉Build/x64/Release/convert_mnist_data.exe(此处需要去掉.exe)(后接空格键)data/mnist/train-images-idx3-ubyte(后接空格键)data/mnist/train-labels-idx1-ubyte(后接空格键)examples/mnist/mnist_train_lmdb和
Build/x64/Release/convert_mnist_data.exe(后接空格键)data/mnist/t10k-images-idx3-ubyte(后接空格键)data/mnist/t10k-labels-idx1-ubyte(后接空格键)examples/mnist/mnist_test_lmdb
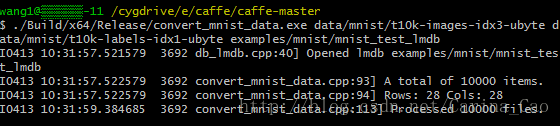
执行完指令后,examples/mnist文件下生成两个lmdb文件。将mnist的训练数据和测试数据全部转换为lmdb格式。如果你们比较熟悉cygwin,也可以将上面的指令写到脚本文件中,执行起来比较方便。
Ø 开始最后的训练,执行
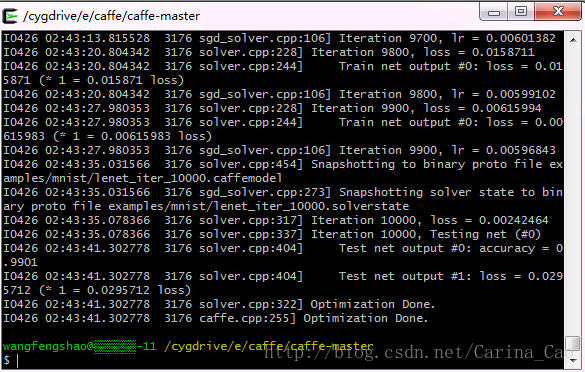
方法1:在cygwin下运行)cd ‘E:\caffe\caffe-master’ 变换到路径E:\caffe\caffe-master下
Build/x64/Release/caffe.exe(此处有空格键)train (此处有空格键)–solver=examples/mnist/lenet_solver.prototxt

开始整个的训练过程。最终得到了99.11%准确率的训练模型。到这里你就已经使用caffe测试了第一个例子了,是不是觉得很厉害和自豪,不要太得意,到这里我们才是刚刚开始caffe之旅,要走的路还很多,不过不要灰心,我们一起努力走下去。
注意:若出现下面错误
I0414 02:31:07.980375  7076 common.cpp:36] System entropy source not available(系统熵源不可用,理解为GPU版本不够,太低), using fallback algorithm to generate seed instead.
F0414 02:31:07.982374  7040 cudnn_conv_layer.cpp:53] Check failed: status == CUDNN_STATUS_SUCCESS (6 vs. 0)  CUDNN_STATUS_ARCH_MISMATCH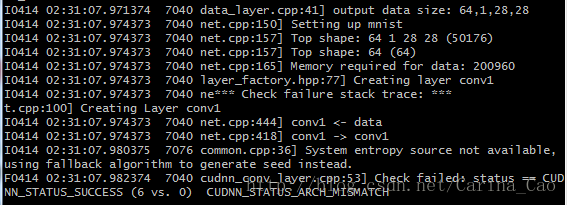
简单讲就是GPU的加速性能不够,CUDNN只支持CUDA Capability 3.0以上的GPU加速,因为我的华硕笔记本上的GT720M的CUDA Capability是2.1的,而官方的cudnn加速是不支持3.0以下的版本的
怎么样查看compute capability呢?
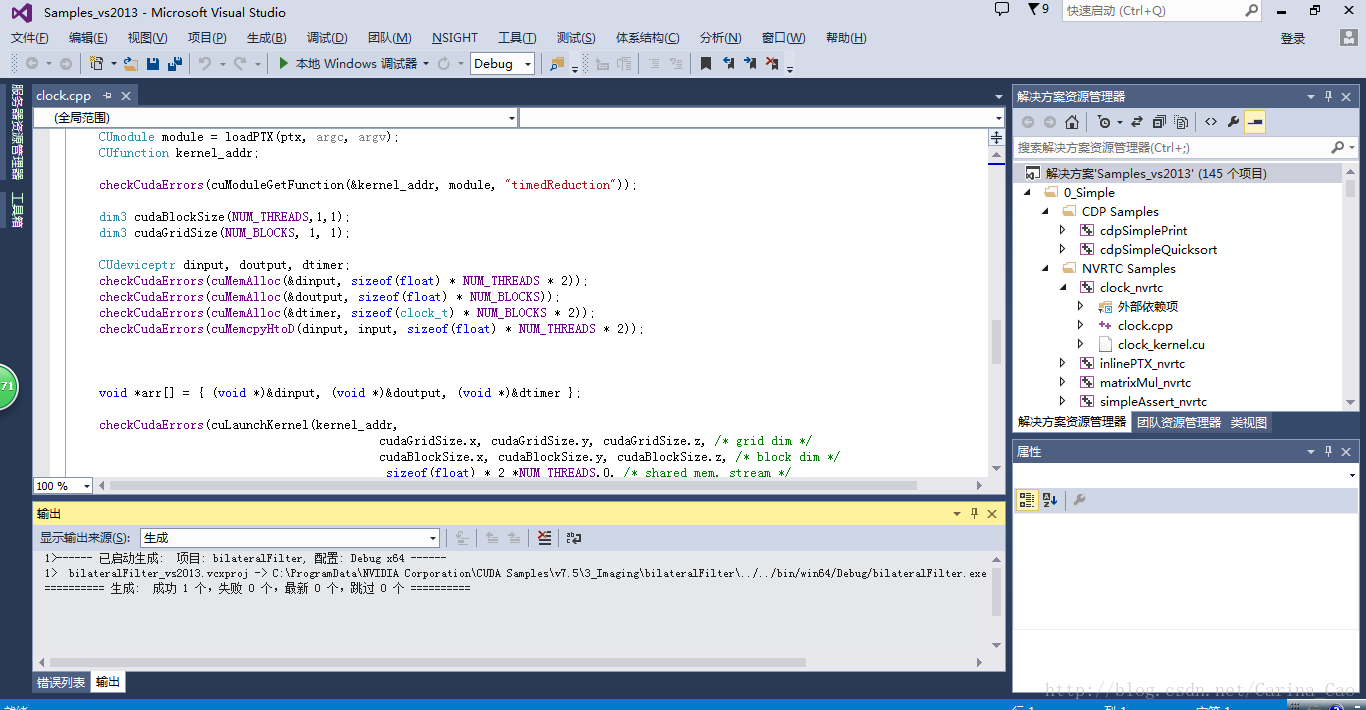
进入CUDA的安装目录C:\ProgramData\NVIDIA Corporation\CUDA Samples\v7.5(默认文件夹隐藏,需要显示出来),点Samples_vs2013执行,后打开VS2013, 如下:
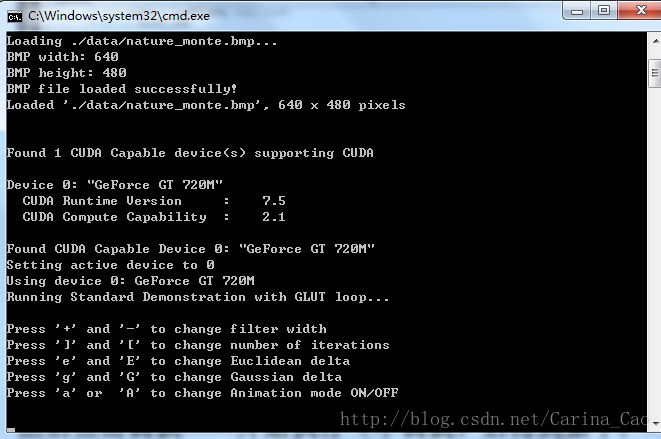
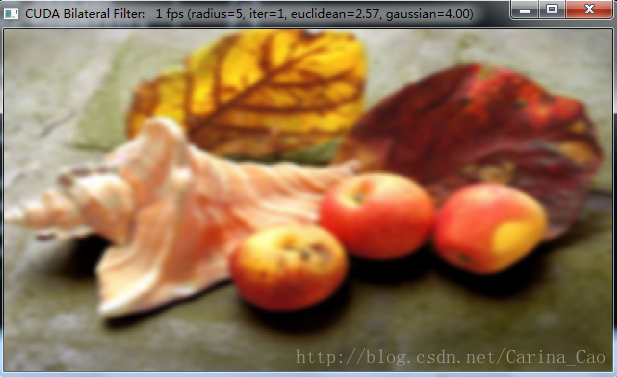
然后点击调试——开始执行(不调试)后得到如下:
和
其中c\windows\system32\cmd.exe下的

就可以看到自己GPU的计算能力(compute capability)
在cuda的安装目录的samples目录下,有个1_Utilities\deviceQuery,编译里面的工程就可以看到结果了
解决方法如下:
1) 这时可以把cuDnn的选项去掉
打开VS2013+CUDA7.5配置后的sample,路径在:E:\VS2013bianxiedaima\cuda_samples
在各个项目点击右键【属性】->【C/C++】->【所有选项】->【预处理器定义】(preprocessordefinitions)
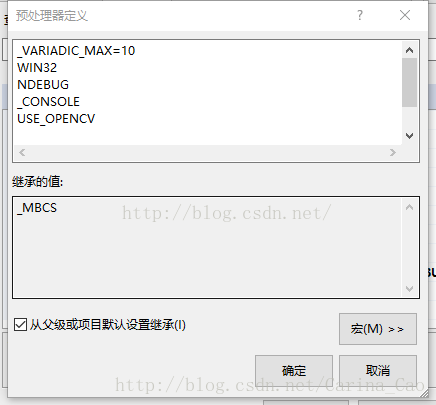
然后在右边点击向下的箭头,【编辑】
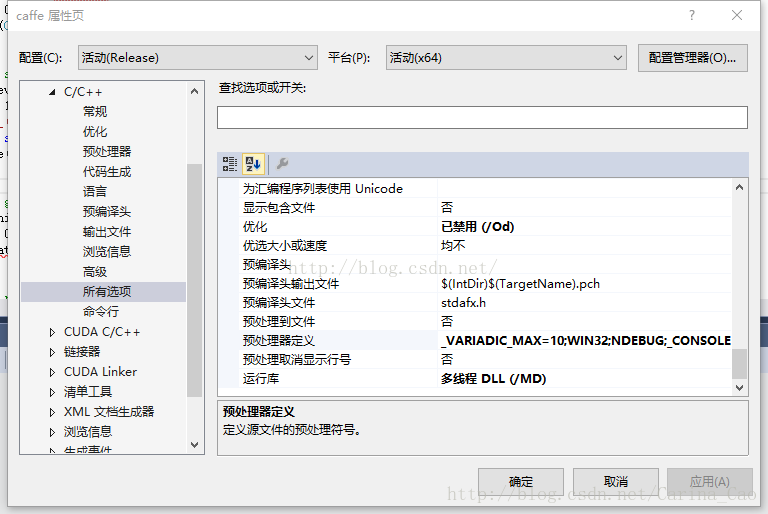
删除里面的USE_CUDNN,然后重新编译
2)在Makefile.config中注释掉USE_CUDNN这行
从上面的过程中可以看出来,微软版本的caffe其实与Linux下的caffe没有本质的区别,还是以前的处理solver和网络结构,基本上没有任何区别。改善的地方就是:一不再需要必须Linux下的运行环境了,在Windows下使用cygwin就直接执行Linux指令即可。二是安装过程方便,不再需要像linux下那样安装各种各样的依赖包,而是很方便的安装。
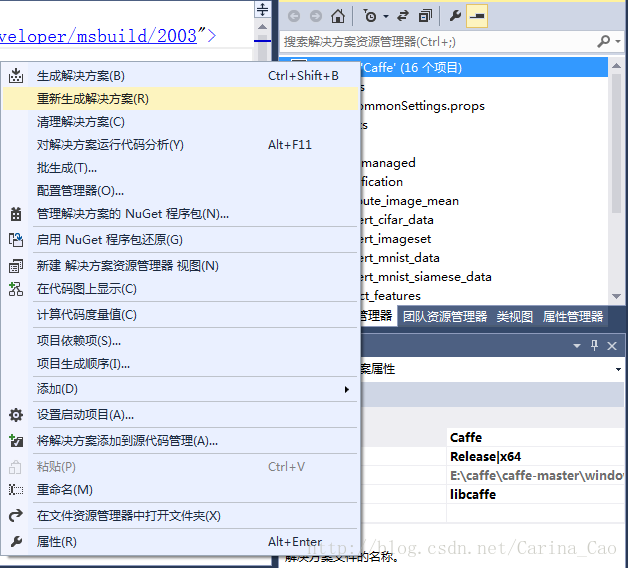
注意,若无GPU,则在双击CommonSettings.props中改变如下:


然后在解决方案那儿全部重新生成:等16个全部生成成功,得等好长时间
然后:若运行出现如下情况:Cannot use GPU in CPU-only Caffe: check mode.

则需要调整两个配置文件:用写字板打开
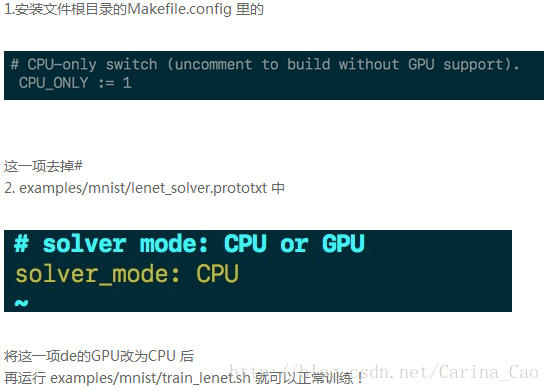
训练如下:
最前面的部分是打印各种信息(包括是用CPU还是GPU、训练参数、网络参数等等)
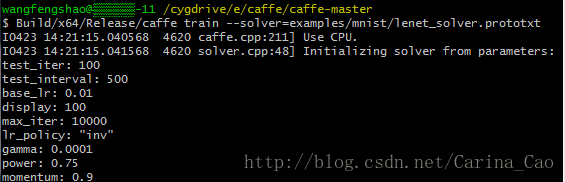
之后即为和下图一样的正式训练过程,可以看到打印信息的格式也是有规律的:
左侧为caffe采用的GLOG库内方法打印的信息,这个库主要起记录日志的功能,方便出现问题时查找根源,具体格式为:
[日期] [时间] [进程号] [文件名] [行号]
往右即为当前迭代次数以及损失值(训练过程不输出准确率accuracy)。
当迭代次数达到lenet_solver.prototxt定义的max_iter时,就可以认为训练结束了。
方法2:在c\Windows\system32\cmd.exe下运行)过程如下:
参考http://www.cnblogs.com/yixuan-xu/p/5858595.html
到caffe根目录下,即E:\caffe\caffe-master下,创建run.txt文件,然后在该文件中写入内容
Build\x64\Release\caffe.exe(此处有空格)train(此处有空格)--solver=examples/mnist/lenet_solver.prototxt
Pause
即如下图所示:

然后将run.txt文件名字改为run.bat文件,即编写批处理文件run.bat,然后双击运行,即开始训练。
如下图所示:
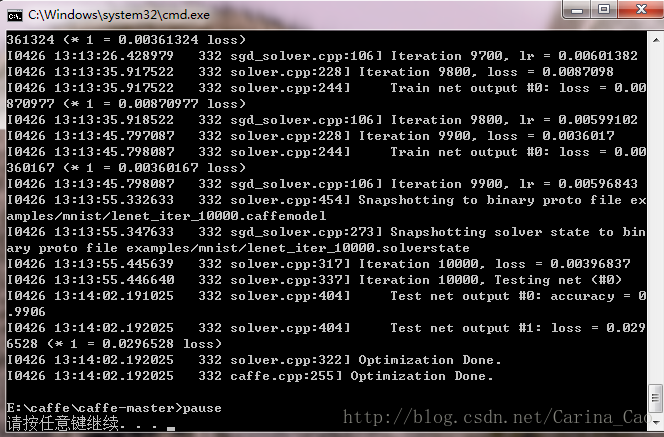
这两种方法在训练完成后都会在E:\caffe\caffe-master\examples\mnist下得到如下四个文件,即运行最终产生lenet_iter_10000的binary protobuf文件

分别是训练至一半和训练最终完成后的模型。
至此,已经完成了最初的caffe配置过程并成功利用mnist数据训练出了第一个caffemodel。
接下来就可以利用模型进行测试:参考http://www.cnblogs.com/yixuan-xu/p/5862657.html
测试方法选择bat文件(Windows下c\Windows\system32\cmd.exe运行),当然python、matlab更为方便,比如可以迅速把识别错误的图片显示出来。
在进行分类之前首先需要产生所有图片的平均值图片,真正分类时的每个图片都会先减去这张平均值图片再进行分类。这样的处理方式能够提升分类的准确率。
产生均值文件的方法是利用解决方案中的compute_image_mean.exe,位于目录\caffe-windows\Build\x64\Release下。回到caffe-windows根目录下创建一个mnist_mean.txt,写入如下内容
Build\x64\Release\compute_image_mean.exe examples/mnist/mnist_train_lmdb mean.binaryproto --backend=lmdb
pause
如下图所示:

注意:此处backend=lmdb,是因为examples/mnist/mnist_train_lmdb为lmdb,若examples/mnist/mnist_train_leveldb为leveldb类型,则backend=leveldb。
然后将mnist_mean.txt改为mnist_mean.bat(windows批量处理文件),
如下图:

然后双击运行,出现如下图情况:

则运行成功,此时在根目录(E:\caffe\caffe-master)下会生成一个mean.binaryproto文件,也就是我们所需要的均值文件,如下图所示:

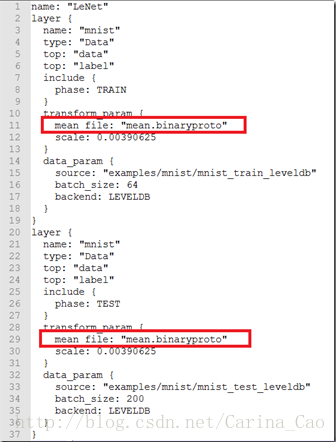
接着为了使用均值文件需要稍微修改下层的定义。所以打开\examples\mnist\lenet_train_test.prototxt,做如下修改:
在 transform_param {
scale: 0.00390625
}中添加mean_file:” mean.binaryproto”,如下图所示:
到此为止,均值文件的预处理部分处理完毕,下面就可以进行测试了
这部分比较简单,因为之前生成的Caffe.exe就可以直接用来进行测试。同样地在caffe-windows根目录下新建mnist_test.txt,并写入如下内容(其中的间断处都为一个空格)。
Build\x64\Release\caffe.exe test --model=examples\mnist\lenet_train_test.prototxt -weights=examples\mnist\lenet_iter_10000.caffemodel
pause
如下图所示:

意思也显而易见,首先指定为测试模式,随后指定模型和训练出来的参数。
然后同样将txt改为bat文件,然后双击执行,如下图所示:

测试结果如下所示:
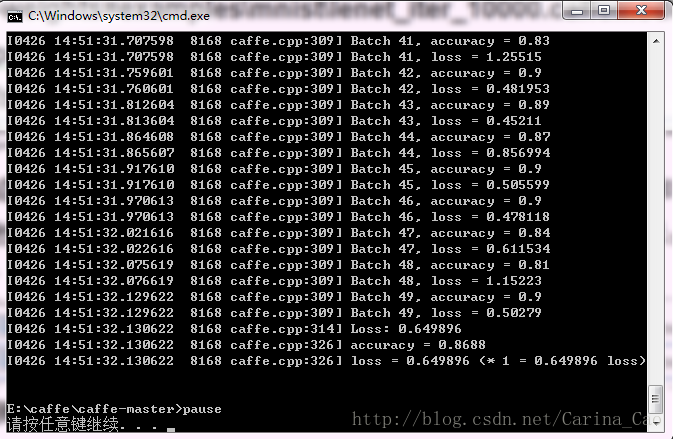
左侧的内容依旧是GLOG的记录日志,右侧中的Batch需要和网络参数初始中的batch_size一起理解。每个Batch中包含了batch_size张测试图片,所以每个Batch的准确率是对这batch_size张测试图片整体而言的。而不是像我最初一样先入为主地以为准确率应该是对每张测试图片而言,故只有0和1两种情况。
这边个人也有个小问题,Batch之所以为0-49共50个是由caffe.cpp中一个叫做FLAGS_iterations的变量指定的,但是找来找去实在无法确定这个变量是否是由网络参数确定的,之后再好好看一下代码。到此为止我们已经完成了mnist测试集在caffe上的运行和测试。接下来利用自己的手写数字进行测试。
二、利用自己的手写数字进行测试
参考http://blog.csdn.net/zb1165048017/article/details/52217772
这一步往后就比较实用了,先介绍如何制作手写数字的单张测试样本。两种方法:①按照我前面的博客,从mnist数据集里面摘取里面的某张或者某些图片;②用Windows的画图工具自己手写一张(怎么打开画图工具就不说了吧)
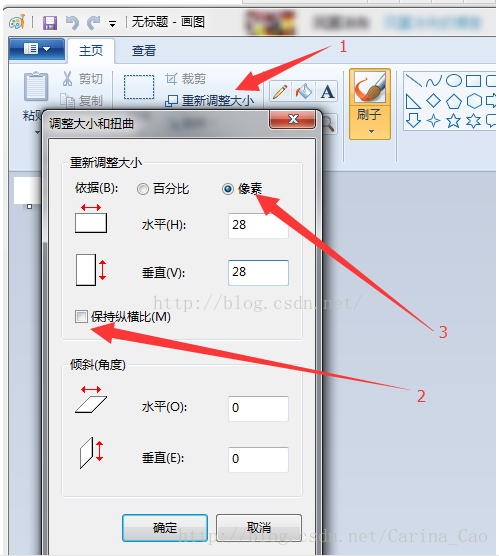
注意:按箭头顺序来,否则无法得到28*28的尺寸。
可以发现,这个保存下来的是RGB图像,三通道,然而我们的测试集和训练集mnist都是灰度图像,需要转化为灰度图像,用opencv或者matlab转化一下就可以了。

注意:毕竟mnist的数据集就是白字黑底
另外,这里不要手动去save那个figure哦,不然图像会比28*28大,一定要用imwrite,并且格式为bmp
然后把转换好的二值图像拷贝到E:\caffe\caffe-master\examples\mnist下(自己的目录)在该目录下建立一个文件夹,我建的文件夹名称为:graybmp,然后将要识别的手写数字按编号放入其中,如下图所示:

然后在该目录下建立标签文件label.txt(自己命名),如下所示:

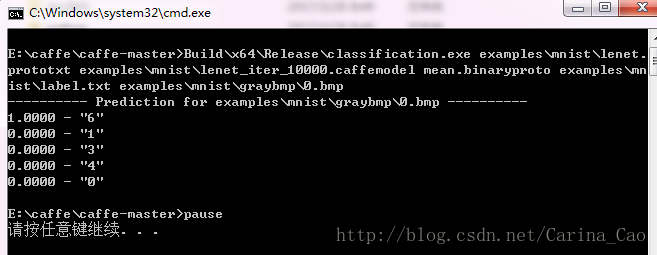
调用classification.exe(E:\caffe\caffe-master\Build\x64\Release下)去识别某张图片,在E:\caffe\caffe-master根目录新建person_test.txt,并写入如下内容:
Build\x64\Release\classification.exe(空格)examples\mnist\lenet.prototxt (空格)examples\mnist\lenet_iter_10000.caffemodel(空格)mean.binaryproto(空格)examples\mnist\lable.txt (空格)examples\mnist\graybmp\0.bmp pause
如下图所示:


然后将person_test.txt转变为person_test.bat(Windows批处理文件),如下图所示:

然后双击执行,结果如下图所示:
在person_test.txt文件中
Build\x64\Release\classification.exe(空格)examples\mnist\lenet.prototxt (空格)examples\mnist\lenet_iter_10000.caffemodel(空格)mean.binaryproto(空格)examples\mnist\lable.txt (空格)examples\mnist\graybmp\0.bmp末尾修改0~9.bmp,就可以改变要识别的数字。
三、CPU模式下训练cifar10训练集
由于windows版本需要用vs2013对相关程序进行重新编译,因此系统自带的sh程序将无法正确运行。解决办法就是依次修改相关目录及设置参数。
1、下载安装cygwin以运行shell程序,
2、下载并安装wget,为自动数据下载做准备。(需要设置系统环境变量)
3、用vs2013编译convert_cifar_data、computte_image_mean两个模块,在x64/debug目录下生成exe文件
4、下载数据
#sh data/cifar10/get_cifar10.sh
运行成功后,会在 data/cifar10/文件夹下生成一堆bin文件。
5、转换数据格式为lmdb:
修改create_cifar10.sh中tools中文件目录为
./build/x64/Debug/convert_cifar_data.exe $DATA $EXAMPLE $DBTYPE
#sh examples/cifar10/create_cifar10.sh
转换成功后,会在examples/cifar10/文件夹下生成两个文件夹,cifar10_train_lmdb和cifar10_test_lmdb, 里面的文件就是我们需要的文件。
6、运行
修改train_quick.sh中,TOOLS=./build/x64/Debug(改为相应的caffe.exe目录)
修改cifar10_quick_solver.prototxt中运行模式为cpu
#sh examples/cifar10/train_quick.sh
cpu模式需要运行时间较长。
用GPU训练,运行结果如下:
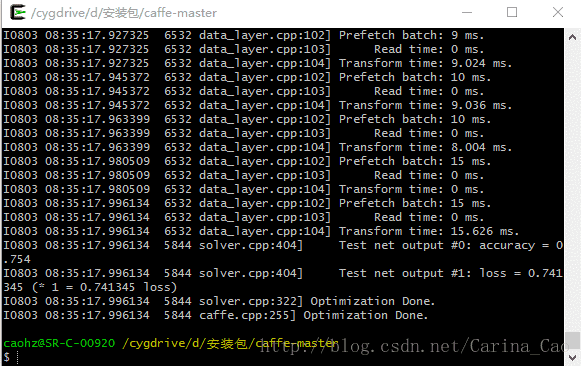
训练识别率:0.754


 1672
1672


 被折叠的 条评论
为什么被折叠?
被折叠的 条评论
为什么被折叠?
 到【灌水乐园】发言


