


This document gives a quick overview of the main angular components and how they work together. These are:
- startup - bring up hello world
- runtime - overview of angular runtime
- scope - the glue between the view and the controller
- controller - application behavior
- model - your application data
- view - what the user sees
- directives - extend HTML vocabulary
- filters - format the data in user locale
- injector - assembles your application
- module - configures the injector
$- angular namespace
启动
his is how we get the ball rolling (refer to the diagram and example below):
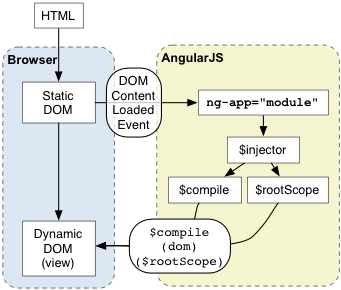
- The browser loads the HTML and parses it into a DOM 加载页面,parses 成dom
- The browser loads
angular.jsscript 加载angular.js脚本 - Angular waits for
DOMContentLoadedevent angular等待dom 加载事件 - Angular looks for
ng-appdirective, which designates the application boundary AngularJS寻找ng-app 指令 - The Module specified in
ng-app(if any) is used to configure the$injector - The
$injectoris used to create the$compileservice 编译服务 as well as$rootScope 根作用域 - The
$compileservice is used to compile the DOM and link it with$rootScope 编译服务是用来编译DOM并把它链接到根作用 - The
ng-initdirective assignsWorldto thenameproperty on the scopeng-init指令将world 赋值给作用域里的name属性 - The
{{name}}interpolatesthe expression toHello World! 通过替换,整个表达式变成了“HelloWorld
代码如下,看看
index.html:
<!doctype html>
<html ng-app>
<head>
<script src="http://code.angularjs.org/angular-1.1.0.min.js"></script>
</head>
<body>
<p ng-init=" name='World' ">Hello {{name}}!</p>
</body>
</html>
运行效果
执行期
The diagram and the example below describe how Angular interacts with the browser's event loop.
下面的图和例子解释了AngularJS如何和浏览器的事件回路(eventloop)交互。

- The browser's event-loop waits for an event to arrive. An event is a user interaction, timer event, or network event (response from a server).浏览器循环等待事件的触发。事件包括用户的交互操作、定时事件、或者网络事件(服务器的响应)。
- The event's callback gets executed. This enters the JavaScript context. The callback can modify the DOM structure. 事件触发后,会回调。此时会进入Javascript,通常回调可以用来修改DOM结构。
- Once the callback executes, the browser leaves the JavaScript context and re-renders the view based on DOM changes.回调执行完毕,浏览器会DOM
Angular modifies the normal JavaScript flow by providing its own event processing loop. This splits the JavaScript into classical and Angular execution context. Only operations which are applied in Angular execution context will benefit from Angular data-binding, exception handling, property watching, etc... You can also use $apply() to enter Angular execution context from JavaScript. Keep in mind that in most places (controllers, services) $apply has already been called for you by the directive which is handling the event. An explicit call to $apply is needed only when implementing custom event callbacks, or when working with third-party library callbacks.
好难理解啊 , AngularJS使用自己的事件处理循环,使得Javascript的执行被分成原始部分和拥有AngularJS执行上下文的部分。只有在AngularJS执行上下文中运行的操作,才能享受到AngularJS提供的数据绑定,异常处理,资源管理等功能和服务。你可以使用$apply() 来从普通Javascript上下文进入AngularJS执行上下文。大部分情况下(如在控制器,服务中),$apply都已经被用来处理当前事件的相应指令执行过了。只有当你使用自定义的事件回调或者是使用第三方类库的回调时,才需要自己执行$apply 。
- Enter Angular execution context by calling scope
.$apply(stimulusFn). WherestimulusFnis the work you wish to do in Angular execution context. - Angular executes the
stimulusFn(), which typically modifies application state. - Angular enters the
$digestloop. The loop is made up of two smaller loops which process$evalAsyncqueue and the$watchlist. The$digestloop keeps iterating until the model stabilizes, which means that the$evalAsyncqueue is empty and the$watchlist does not detect any changes. - The
$evalAsyncqueue is used to schedule work which needs to occur outside of current stack frame, but before the browser's view render. This is usually done withsetTimeout(0), but thesetTimeout(0)approach suffers from slowness and may cause view flickering since the browser renders the view after each event. - The
$watchlist is a set of expressions which may have changed since last iteration. If a change is detected then the$watchfunction is called which typically updates the DOM with the new value. - Once the Angular
$digestloop finishes the execution leaves the Angular and JavaScript context. This is followed by the browser re-rendering the DOM to reflect any changes
下面解释了"helloworld"的例子是怎么样实现“将用户输入绑定到视图上”的效果。
1. 在编译阶段:
A. input上的ng-model 指令给<input> 输入框绑定了keydown事件;
B. {{name}} 这个变量替换表单式建立了一个$watch来接受name变量改变的通知。
2. 在执行期阶段:
A. 按下任何一个键(以X键为例),都会触发一个input输入框的keydown事件;
B. input上的指令捕捉到input里值得改变,然后调用$apply("name='X';")来更新处于
AngularJS执行上下文中的模型;
C. AngularJS将 name='X' 应用到模型上;
D. $digest循环开始;
E. $watch列表检测到了name值的变化,然后通知 {{name}} 变量替换的表达式,这个表达式负责
将DOM进行更新;
F. AngularJS退出执行上下文,然后退出Javascript上下文中的keydown事件;
G. 浏览器以更新的文本重渲染视图。
index.html:
<!doctype html>
<html ng-app>
<head>
<script src="http://code.angularjs.org/angular-1.1.0.min.js"></script>
</head>
<body>
<input ng-model="name">
<p>Hello {{name}}!</p>
</body>
</html>
作用域
作用域是用来检测模型的改变和为表达式提供执行上下文的。它是分层组织起来的,并且层级关系是紧跟着DOM的结构的。(请参考单个指令的文档,有一些指令会导致新的作用域的创建。)
下面这个例子演示了{{name}} 表达式在不同的作用域下解析成不同的值。这个例子下面的图片显示作用域的边界。
代码多,就不贴了,给个链接 去看看http://docs.angularjs.org/guide/concepts
下面这个例子演示了{{name}} 表达式在不同的作用域下解析成不同的值。这个例子下面的图片显示作用域的边界。
代码多,就不贴了,给个链接 去看看http://docs.angularjs.org/guide/concepts
控制器 controller

视图背后的控制代码就是控制器。它的主要工作内容是构造模型,并把模型和回调方法一起发送到视图。视图可以看做是作用域在模板(HTML)上的“投影(projection)”。而作用域是一个中间地带,它把模型整理好传递给视图,把浏览器事件传递给控制器。
控制器和模型的分离非常重要,因为:
- The controller is written in JavaScript. JavaScript is imperative. Imperative is a good fit for specifying application behavior. The controller should not contain any rendering information (DOM references or HTML fragments).
- The view template is written in HTML. HTML is declarative. Declarative is a good fit for specifying UI. The View should not contain any behavior.
- Since the controller is unaware of the view, there could be many views for the same controller. This is important for re-skinning, device specific views (i.e. mobile vs desktop), and testability.
index.html
<html ng-app>
<head>
<script src="http://code.angularjs.org/angular-1.1.0.min.js"></script>
<script src="script.js"></script>
</head>
<body>
<div ng-controller="MyCtrl">
Hello {{name}}!
<button ng-click="action()">
OK
</button>
</div>
</body>
</html>
script.js:
function MyCtrl($scope) {
$scope.action = function() {
$scope.name = 'OK';
}
$scope.name = 'World';
}
模型 model
The model is the data which is merged with the template to produce the view. To be able to render the model into the view, the model has to be able to be referenced from the scope. Unlike many other frameworks Angular makes no restrictions or requirements on the model. There are no classes to inherit from or special accessor methods for accessing or changing the model. The model can be primitive, object hash, or a full object Type. In short the model is a plain JavaScript object.
模型就是用来和模板结合生成视图的数据。模型必须在作用域中时可以被引用,这样才能被渲染
生成视图。和其他框架不一样的是,Angularjs对模型本身没有任何限制和要求。你不需要继承任何类
也不需要实现指定的方法以供调用或者改变模型。模型可以是原生的对象哈希形式的,也可以是完整
对象类型的。简而言之,模型可以是原生的Javascript对象。
生成视图。和其他框架不一样的是,Angularjs对模型本身没有任何限制和要求。你不需要继承任何类
也不需要实现指定的方法以供调用或者改变模型。模型可以是原生的对象哈希形式的,也可以是完整
对象类型的。简而言之,模型可以是原生的Javascript对象。

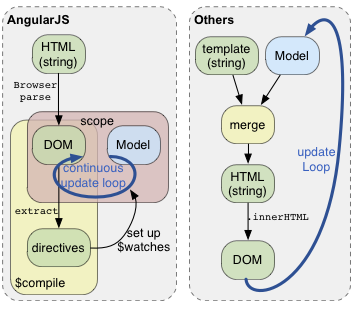
视图 view
所谓视图,就是指用户所看见的。视图的生命周期由作为一个模板开始,它将和模型合并并最终渲染到浏览器的DOM中。与其他模板系统不同的是,AngularJS使用一种独特的形式来渲染视图。
指令
一个指令就是一种“由某个属性、元素名称、css类名出现而导致的行为,或者说是DOM的变化”。指令能让你以一种声明式的方法来扩展HTML表示能力。下面演示了一个增加了数据绑定的“内容可编辑”HTML。
index.html:
<html ng-app="directive">
<head>
<script src="http://code.angularjs.org/angular-1.1.0.min.js"></script>
<script src="script.js"></script>
</head>
<body>
<div contentEditable="true" ng-model="content">Edit Me</div>
<pre>model = {{content}}</pre>
</body>
</html>
script.js
<html ng-app="directive">
<head>
<script src="http://code.angularjs.org/angular-1.1.0.min.js"></script>
<script src="script.js"></script>
</head>
<body>
<div contentEditable="true" ng-model="content">Edit Me</div>
<pre>model = {{content}}</pre>
</body>
</html>
Filters过滤器 和 模块和注入器 以及命名空间见官方文档


 511
511

 被折叠的 条评论
为什么被折叠?
被折叠的 条评论
为什么被折叠?
 到【灌水乐园】发言


