


引言
在我们程序开发中,用户体验始终是一项十分重要的指标,通常为了良好的用户体验,在确认一些敏感或者数据操作更新之前允许客户反悔即让用户拥有更多的自主性,而Android开发中是借助对话框Dialog系、Popupwindow和Dialog样式的Activity来实现。
一、Dialog及其衍生类
Android里Dialog作为对话框系的基类,我们一般不会直接去使用Dialog而是使用他的子类,比如说AlertDialog, DatePickerDialog, ProgressDialog, TimePickerDialog,CharacterPickerDialog,MediaRouteChooserDialog, MediaRouteControllerDialog, Presentation,其中前四者使用比较频繁,使用方法也大同小异,接下来就以AlertDialog为例总结下。
1、AlertDialog
1.1、AlertDialog的部分源码结构
AlertDialog 其实也是采用了建造者模式,AlertDialog是我们最终想要生产得到的产品,但是我们不能直接通过它的构造方法来new,同时我们看到AlertDialog里有一个内部类Builder,Builder内部类里封装了一系列的方法用于初始化,然后再通过Builder内部类里有一个create方法返回Dialog
public class AlertDialog extends Dialog implements DialogInterface {
    private AlertController mAlert;
    protected AlertDialog(Context context) {
        this(context, 0);
    }//请注意AlertDialog的构造方法是protected
    protected AlertDialog(Context context, boolean cancelable, OnCancelListener cancelListener) {
        this(context, 0);
        setCancelable(cancelable);
        setOnCancelListener(cancelListener);
    }
    ...
    protected AlertDialog(Context context, @StyleRes int themeResId) {
        this(context, themeResId, true);
    }
    public static class Builder {
        private final AlertController.AlertParams P;
        public Builder setTitle(@StringRes int titleId) {
            P.mTitle = P.mContext.getText(titleId);
            return this;
        }
        public Builder setIcon(Drawable icon) {
            P.mIcon = icon;
            return this;
        }
        /**
         * @param context the parent context
         *
         */
        public Builder(Context context) {
            this(context, resolveDialogTheme(context, 0));
        }
        ...
        public AlertDialog create() {
            // Context has already been wrapped with the appropriate theme.
            final AlertDialog dialog = new AlertDialog(P.mContext, 0, false);
            P.apply(dialog.mAlert);
            dialog.setCancelable(P.mCancelable);
            if (P.mCancelable) {
                dialog.setCanceledOnTouchOutside(true);
            }
            dialog.setOnCancelListener(P.mOnCancelListener);
            dialog.setOnDismissListener(P.mOnDismissListener);
            if (P.mOnKeyListener != null) {
                dialog.setOnKeyListener(P.mOnKeyListener);
            }
            return dialog;
        }
        public AlertDialog show() {
            final AlertDialog dialog = create();
            dialog.show();
            return dialog;
        }
    }
}
1.2、使用系统AlertDialog
我们都知道Android中的所有的View,首先是一个class,要使用一个class我们首先得先得到他的对象(初学的时候照着教材敲了弹出对话框的窗口,但是对于为什么是用builder而不是直接new一无所知,曾经困惑了蛮久),然后进行一系列的初始化,最后再显示。步骤简记:一系列初始化Builder——>create得到Dialog对象——>显示
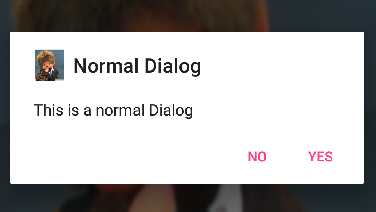
1.2.1、setMessage一般对话框
private void showDialog(){
    /**需要注意的是构造AlertDialog.Builder对象时传入的参数可以理解成*说依附的父容器,比如说在Activity上显示就传入this,在Fragment上显示就传入*Fragment的父级即getActivity()至于是否都是父级的,我还得需要测试下,比如说嵌套Fragment的,测试完毕之后再行更新!!!!
            */
        AlertDialog.Builder builder= new AlertDialog.Builder(this);//得到Builder对象

        /*一系列初始化工作*/
        builder.setIcon(R.mipmap.bcg)
                .setTitle(R.string.dialog_title)
                .setMessage(R.string.dialog_msg)
              .setPositiveButton(R.string.dialog_btn_positive,new DialogInterface.OnClickListener(){
                    @Override
                    public void onClick(DialogInterface dialog, int which) {
                   Toast.makeText(DialogActivity.this,"Yes",Toast.LENGTH_LONG).show();
                    }
                })
                .setNegativeButton(R.string.dialog_btn_negative, new DialogInterface.OnClickListener() {
                    @Override
                    public void onClick(DialogInterface dialog, int which) {
                        Toast.makeText(DialogActivity.this,"No",Toast.LENGTH_LONG).show();
                    }
                })
                .create()/*得到dialog*/
                .show();/*居中显示于Activity*/
    }
也可以把监听器单独封装成一个类
 class DialogBtnClicklistener implements DialogInterface.OnClickListener{
     @Override
     public void onClick(DialogInterface dialog, int which){
      switch(which){
       case Dialog.BUTTON_POSITIVE
       case Dialog.BUTTON_NEGATIVE
       ...
      }
    }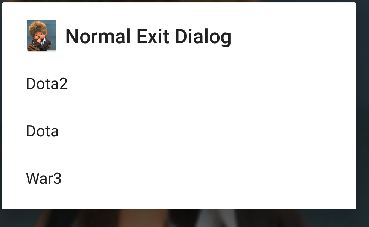
} 1.2.2、setItems列表对话框
 private void showDialog(){
        final String items[]={"Dota2","Dota","War3"};
        AlertDialog.Builder builder= new AlertDialog.Builder(this);//得到DIalog对象
        builder.setIcon(R.mipmap.bcg)
                .setTitle(R.string.dialog_title)
                .setItems(items, new DialogInterface.OnClickListener(){
                    @Override
                    public void onClick(DialogInterface dialog, int which) {
                        Toast.makeText(DialogActivity.this, items[which], Toast.LENGTH_LONG).show();
                    }
                })
                .create()
                .show();
    }
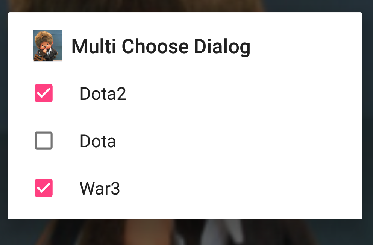
1.2.3 setSingleChoiceItems单选、setMultiChoiceItems多选对话框
.setSingleChoiceItems(items, 0, new DialogInterface.OnClickListener() {
                            @Override
                            public void onClick(DialogInterface dialog, int which) {
                                Toast.makeText(DialogActivity.this, items[which], Toast.LENGTH_LONG).show();
                            }
                        })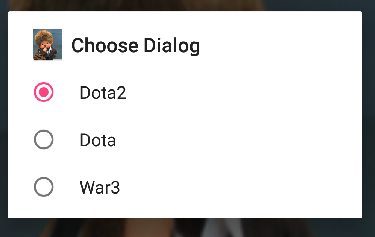
    private void showDialog(){
        //final String items[]={"Dota2","Dota","War3"};
        final String[] items = getResources().getStringArray(R.array.items);
        final boolean selected[]={true,false,true};
        AlertDialog.Builder builder= new AlertDialog.Builder(this);//得到DIalog对象
        builder.setIcon(R.mipmap.bcg)
                .setTitle(R.string.dialog_title)
                /*selected是默认的对应的选中状态。当你选择时,系统会自动帮你把selected中的值做相应改变,所以在勾选框中可以得到所有的选择状态。*/
                        .setMultiChoiceItems(items, selected, new DialogInterface.OnMultiChoiceClickListener() {
                            @Override
                            public void onClick(DialogInterface dialog, int which, boolean isChecked) {
                                Toast.makeText(DialogActivity.this, items[which]+isChecked, Toast.LENGTH_LONG).show();
                            }
                        })
                .create()
                .show();
    }
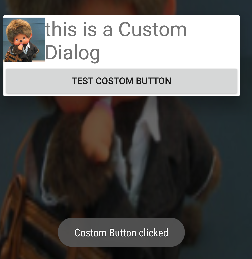
1.3、setView显示自定义Dialog
先定义Dialog需要显示的界面布局文件,再通过 View view = LayoutInflater.from(DialogActivity.this).inflate(R.layout.dialog_main, null)把布局文件加载进来,得到一个View对象,然后通过 AlertDialog.Builder 的setView方法来设置,最后还可以通过Window对象调整对话框的大小、透明度等等。
private void showCustomDialog(){
        AlertDialog.Builder builder= new AlertDialog.Builder(this);//得到DIalog对象
        //    通过LayoutInflater来加载一个xml的布局文件作为一个View对象
        View view = LayoutInflater.from(DialogActivity.this).inflate(R.layout.dialog_main, null);
        final Button btn= (Button) view.findViewById(R.id.btn_test);
        btn.setOnClickListener(new View.OnClickListener() {
           @Override
           public void onClick(View v) {
               Toast.makeText(DialogActivity.this,"Costom Button clicked",Toast.LENGTH_LONG).show();
           }
       });
       /**!!!!!!!!!
       Window dialogWindow=builder.create().getWindow();
        WindowManager.LayoutParams layoutParams = dialogWindow.getAttributes();
        layoutParams.width=800;
        layoutParams.height=600;
        layoutParams.alpha=0.8f;
        dialogWindow.setAttributes(layoutParams);
        Log.e("layoutParams",layoutParams.width+"--1---"+layoutParams.height);//此时输出 800  --1--- 600
        dialog.show();
        Log.e("layoutParams",layoutParams.width+"--2---"+layoutParams.height);//此时值改变了-2  --1--- -2
        //dialogWindow.setLayout(layoutParams.width,layoutParams.height);如果用这这段代码则无法调整对话框的大小
        dialogWindow.setLayout(800,600);
       */
       //    设置我们自己定义的布局文件作为弹出框的Content
       builder.setView(view)
              .show();
    }
我们首先需要写一个xml的布局文件,我们不需要在布局文件里定义Button按钮,可以通过 AlertDialog.Builder 来设置 action buttons。
通过 View view = LayoutInflater.from(MainActivity.this).inflate(R.layout.dialog, null); 我们可以将我们的布局文件加载进来,得到一个View对象,然后通过 AlertDialog.Builder 的setView方法来设置我们的自定义弹出框
2、ProgressDialog
2.1、ProgressDialog部分源码结构
ProgressDialog直接继承自AlertDialog并实现了DialogInterface接口,支持旋转的圆形进度条和水平进度条,从代码结构来看我们可以通过两种方式来得到ProgressDialog对象:构造方法和静态方法show
private Handler mViewUpdateHandler;
public class ProgressDialog extends AlertDialog {
    /** Creates a ProgressDialog with a circular, spinning progress
     * bar. This is the default.
     */
    private Handler mViewUpdateHandler;
    public ProgressDialog(Context context) {
        ...
    }
    public ProgressDialog(Context context, int theme) {
       ...
    }
    public static ProgressDialog show(Context context, CharSequence title,
            CharSequence message, boolean indeterminate, boolean cancelable) {
        ...
    }
    public static ProgressDialog show(Context context, CharSequence title,
            CharSequence message, boolean indeterminate,
            boolean cancelable, OnCancelListener cancelListener) {
        ProgressDialog dialog = new ProgressDialog(context);
        dialog.setTitle(title);
        dialog.setMessage(message);
        dialog.setIndeterminate(indeterminate);
        dialog.setCancelable(cancelable);
        dialog.setOnCancelListener(cancelListener);
        dialog.show();
        return dialog;
    }
    @Override
    protected void onCreate(Bundle savedInstanceState) {
        LayoutInflater inflater = LayoutInflater.from(mContext);
        TypedArray a = mContext.obtainStyledAttributes(null,
                com.android.internal.R.styleable.AlertDialog,
                com.android.internal.R.attr.alertDialogStyle, 0);
        if (mProgressStyle == STYLE_HORIZONTAL) {
            /* Use a separate handler to update the text views as they
             * must be updated on the same thread that created them.
             */
            mViewUpdateHandler = new Handler() {
                @Override
                public void handleMessage(Message msg) {
                    super.handleMessage(msg);
                    /* Update the number and percent */
                    int progress = mProgress.getProgress();
                    int max = mProgress.getMax();
                    if (mProgressNumberFormat != null) {
                        String format = mProgressNumberFormat;
                        mProgressNumber.setText(String.format(format, progress, max));
                    } else {
                        mProgressNumber.setText("");
                    }
                    if (mProgressPercentFormat != null) {
                        double percent = (double) progress / (double) max;
                        SpannableString tmp = new SpannableString(mProgressPercentFormat.format(percent));
                        tmp.setSpan(new StyleSpan(android.graphics.Typeface.BOLD),
                                0, tmp.length(), Spannable.SPAN_EXCLUSIVE_EXCLUSIVE);
                        mProgressPercent.setText(tmp);
                    } else {
                        mProgressPercent.setText("");
                    }
                }
            };
            ...
            View view = inflater.inflate(a.getResourceId(
                    com.android.internal.R.styleable.AlertDialog_horizontalProgressLayout,
                    R.layout.alert_dialog_progress), null);
            mProgress = (ProgressBar) view.findViewById(R.id.progress);
            mProgressNumber = (TextView) view.findViewById(R.id.progress_number);
            mProgressPercent = (TextView) view.findViewById(R.id.progress_percent);
            setView(view);
        } else {
            View view = inflater.inflate(a.getResourceId(
                    com.android.internal.R.styleable.AlertDialog_progressLayout,
                    R.layout.progress_dialog), null);
            mProgress = (ProgressBar) view.findViewById(R.id.progress);
            mMessageView = (TextView) view.findViewById(R.id.message);
            setView(view);
        }
        ...
        setIndeterminate(mIndeterminate);
        onProgressChanged();
        super.onCreate(savedInstanceState);
    }
}
2.2、使用ProgressDialog
步骤简记:得到ProgressDialog对象——>显示
2.2.1、创建ProgressDialog对象
- 通过构造方法new
ProgressDialog dialog = new ProgressDialog(this); - 通过ProgressDialog的静态方法show
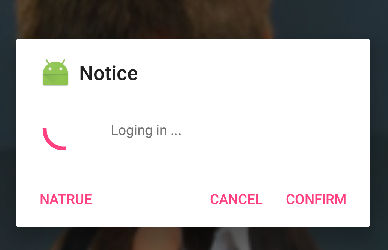
//创建进度对话框(只能是圆形条)并设置title和Message提示内容
ProgressDialog logDialog = ProgressDialog.show(this, "Notice", "Loging……");

//创建进度对话框(只能是圆形条)并设置title和Message提示内容,最后一个参数boolean indeterminate设置是否是不明确的状态
    ProgressDialog logDialog = ProgressDialog
            .show(this,"Notice", "Loging……", false);

 //创建进度对话框(只能是圆形条)并设置title和Message提示内容,最后一个参数boolean cancelable 设置进度条是否是可以取消的
    ProgressDialog logDialog = ProgressDialog
.show(this,"Notice", "Loging……", false,true);还可以监听进度条取消的事件
private OnCancelListener cancelListener = new OnCancelListener(){
    @Override
    public void onCancel(DialogInterface dialog) {
        Toast.makeText(DialogActivity.this, "ProgressBar canceled", Toast.LENGTH_LONG).show();
    }
};
 // cancelListener用于监听进度条被取消
    ProgressDialog logDialog = ProgressDialog.show(this, "Notice", "Loging……", true,
true, cancelListener); 2.2.2、圆形进度条对话框
private void showProgressDialog(){
        final ProgressDialog dialog = new ProgressDialog(this);
        dialog.setProgressStyle(ProgressDialog.STYLE_SPINNER);// 设置进度条的形式为圆形转动的进度条
        dialog.setCancelable(true);// 设置是否可以通过点击Back键取消
        dialog.setCanceledOnTouchOutside(false);// 设置在点击Dialog外是否取消Dialog进度条
        dialog.setIcon(R.mipmap.ic_launcher);//
        // 设置提示的title的图标,默认是没有的,需注意的是如果没有设置title的话只设置Icon是不会显示图标的
        dialog.setTitle("Notice");
        // dismiss监听
        dialog.setOnDismissListener(new DialogInterface.OnDismissListener() {

            @Override
            public void onDismiss(DialogInterface dialog) {
            }
        });
        // 监听Key事件被传递给dialog
        dialog.setOnKeyListener(new DialogInterface.OnKeyListener() {

            @Override
            public boolean onKey(DialogInterface dialog, int keyCode,
                                 KeyEvent event) {
                return false;
            }
        });
        // 监听cancel事件
        dialog.setOnCancelListener(new DialogInterface.OnCancelListener() {

            @Override
            public void onCancel(DialogInterface dialog) {
            }
        });
        //设置可点击的按钮,最多有三个(默认情况下)
        dialog.setButton(DialogInterface.BUTTON_POSITIVE, "Confirm",
                new DialogInterface.OnClickListener() {

                    @Override
                    public void onClick(DialogInterface dialog, int which) {
                    }
                });
        dialog.setButton(DialogInterface.BUTTON_NEGATIVE, "Cancel",
                new DialogInterface.OnClickListener() {

                    @Override
                    public void onClick(DialogInterface dialog, int which) {
                    }
                });
        dialog.setButton(DialogInterface.BUTTON_NEUTRAL, "Natrue",
                new DialogInterface.OnClickListener() {

                    @Override
                    public void onClick(DialogInterface dialog, int which) {
                    }
                });
        dialog.setMessage("Loging in ...");
        dialog.show();
        new Thread(new Runnable() {

            @Override
            public void run() {
                try {
                    Thread.sleep(6666);
                    /*cancel和dismiss方法本质都是一样的,都是从屏幕中删除Dialog,唯一的区别是
                     调用cancel方法会回调DialogInterface.OnCancelListener如果注册的话,dismiss方法不会回掉*/
                    dialog.cancel();
                    // dialog.dismiss();
                } catch (InterruptedException e) {
                    e.printStackTrace();
                }
            }
        }).start();
    }
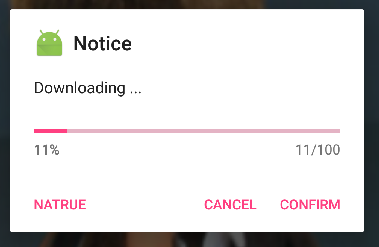
2.2.3、水平进度条对话框
private void showHorProgressDialog(){
        final ProgressDialog dialog = new ProgressDialog(this);
      ///dialog.setProgressStyle(ProgressDialog.STYLE_SPINNER);// 设置进度条的形式为圆形转动的进度条
        dialog.setProgressStyle(ProgressDialog.STYLE_HORIZONTAL);
        dialog.setProgress(R.mipmap.ic_launcher);
        dialog.setSecondaryProgress(R.mipmap.image002);//设置二级进度条的背景
        dialog.setCancelable(true);// 设置是否可以通过点击Back键取消
        dialog.setCanceledOnTouchOutside(false);// 设置在点击Dialog外是否取消Dialog进度条
        dialog.setIcon(R.mipmap.ic_launcher);//
        // 设置提示的title的图标,默认是没有的,需注意的是如果没有设置title的话只设置Icon是不会显示图标的
        dialog.setTitle("Notice");
        dialog.setMax(100);
        // dismiss监听
        dialog.setOnDismissListener(new DialogInterface.OnDismissListener() {

            @Override
            public void onDismiss(DialogInterface dialog) {
            }
        });
        // 监听Key事件被传递给dialog
        dialog.setOnKeyListener(new DialogInterface.OnKeyListener() {

            @Override
            public boolean onKey(DialogInterface dialog, int keyCode,
                                 KeyEvent event) {
                return false;
            }
        });
        // 监听cancel事件
        dialog.setOnCancelListener(new DialogInterface.OnCancelListener() {

            @Override
            public void onCancel(DialogInterface dialog) {
            }
        });
        //设置可点击的按钮,最多有三个(默认情况下)
        dialog.setButton(DialogInterface.BUTTON_POSITIVE, "Confirm",
                new DialogInterface.OnClickListener() {

                    @Override
                    public void onClick(DialogInterface dialog, int which) {
                    }
                });
        dialog.setButton(DialogInterface.BUTTON_NEGATIVE, "Cancel",
                new DialogInterface.OnClickListener() {

                    @Override
                    public void onClick(DialogInterface dialog, int which) {
                    }
                });
        dialog.setButton(DialogInterface.BUTTON_NEUTRAL, "Natrue",
                new DialogInterface.OnClickListener() {

                    @Override
                    public void onClick(DialogInterface dialog, int which) {
                    }
                });
        dialog.setMessage("Downloading ...");
        dialog.show();
        new Thread(new Runnable() {
            @Override
            public void run() {
                int i = 0;
                while (i < 100) {
                    try {
                        Thread.sleep(200);
                        // 更新进度条的进度,可以在子线程中更新进度条进度
                        dialog.incrementProgressBy(1);
                       dialog.incrementSecondaryProgressBy(15);//二级进度条更新方式
                        i++;

                    } catch (Exception e) {                    }
                }
                // 在进度条走完时删除Dialog
                dialog.dismiss();
            }
        }).start();
    }


 1493
1493


 被折叠的 条评论
为什么被折叠?
被折叠的 条评论
为什么被折叠?
 到【灌水乐园】发言


