Android Bitmap inBitmap 图片复用


主要就是指的复用内存块,不需要在重新给这个bitmap申请一块新的内存,避免了一次内存的分配和回收,从而改善了运行效率。

需要注意的是inBitmap只能在3.0以后使用。2.3上,bitmap的数据是存储在native的内存区域,并不是在Dalvik的内存堆上。

使用inBitmap,在4.4之前,只能重用相同大小的bitmap的内存区域,而4.4之后你可以重用任何bitmap的内存区域,只要这块内存比将要分配内存的bitmap大就可以。这里最好的方法就是使用LRUCache来缓存bitmap,后面来了新的bitmap,可以从cache中按照api版本找到最适合重用的bitmap,来重用它的内存区域。

Google官方文档已经给出了一个非常棒的教程 Managing Bitmap Memory

另外非常推荐Google官方文档的这个系列 Displaying Bitmaps Efficiently 绝对帮你精通bitmap的操作。


inBitmap类似对象池的技术原理,避免内存的频繁的创建和销毁带来性能的损耗。使用inBitmap能高提升bitmap的循环效率。在Google发布的第二季性能优化都有提到inBitmap技术 youtube.com/watch?(需翻墙)

使用inBitmap前,每创建一个bitmap需要独占一块内存
<img src="https://pic2.zhimg.com/e2dc7b46d2de25253a890f4603bf7659_b.png" data-rawwidth="859" data-rawheight="488" class="origin_image zh-lightbox-thumb" width="859" data-original="https://pic2.zhimg.com/e2dc7b46d2de25253a890f4603bf7659_r.png">
使用inBitmap后,多个bitmap会复用同一块内存
<img src="https://pic3.zhimg.com/67963f56caf572db533ee92104762a56_b.png" data-rawwidth="861" data-rawheight="509" class="origin_image zh-lightbox-thumb" width="861" data-original="https://pic3.zhimg.com/67963f56caf572db533ee92104762a56_r.png">
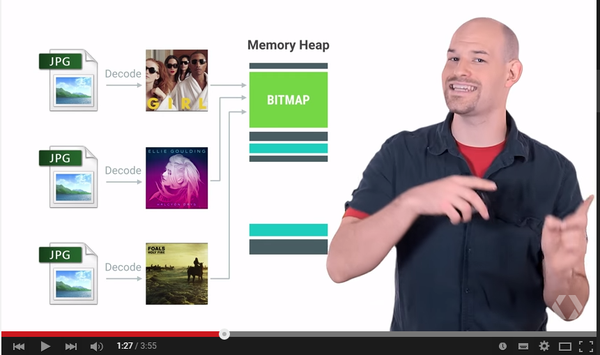
所以使用inBitmap能够大大提高内存的利用效率,但是它也有几个限制条件:
  1. 在SDK 11 -> 18之间,重用的bitmap大小必须是一致的,例如给inBitmap赋值的图片大小为100-100,那么新申请的bitmap必须也为100-100才能够被重用。从SDK 19开始,新申请的bitmap大小必须小于或者等于已经赋值过的bitmap大小。
  2. 新申请的bitmap与旧的bitmap必须有相同的解码格式,例如大家都是8888的,如果前面的bitmap是8888,那么就不能支持4444与565格式的bitmap了,不过可以通过创建一个包含多种典型可重用bitmap的对象池,这样后续的bitmap创建都能够找到合适的“模板”去进行重用。
      @hi大头鬼hi 提到 Managing Bitmap Memory 上的demo的DisplayingBitmaps.zip,代码也有用到inBitmap,我目前开发的项目的图片加载库就是DisplayingBitmaps,但是我把使用inBitmap的代码给注释掉了,因为之前遇到过不同的ImageView设置不同ScaleType,然后使用同一张图片会造成相互影响,设置图片圆角也是,所以这也是使用inBitmap要注意的地方。DisplayingBitmaps功能还是很弱,后面考虑替换faceboo的fresco或者Glide来进行图片加载。

  • 1
    点赞
  • 3
    收藏
    觉得还不错? 一键收藏
  • 0
    评论
android Bitmap用法总结 Bitmap用法总结 1、Drawable → Bitmap public static Bitmap drawableToBitmap(Drawable drawable) { Bitmap bitmap = Bitmap .createBitmap( drawable.getIntrinsicWidth(), drawable.getIntrinsicHeight(), drawable.getOpacity() != PixelFormat.OPAQUE ? Bitmap.Config.ARGB_8888 : Bitmap.Config.RGB_565); Canvas canvas = new Canvas(bitmap); // canvas.setBitmap(bitmap); drawable.setBounds(0, 0, drawable.getIntrinsicWidth(), drawable.getIntrinsicHeight()); drawable.draw(canvas); return bitmap; } 2、从资源中获取Bitmap Resources res=getResources(); Bitmap bmp=BitmapFactory.decodeResource(res, R.drawable.pic); 3、Bitmap → byte[] private byte[] Bitmap2Bytes(Bitmap bm){ ByteArrayOutputStream baos = new ByteArrayOutputStream(); bm.compress(Bitmap.CompressFormat.PNG, 100, baos); return baos.toByteArray(); } 4、byte[] → Bitmap private Bitmap Bytes2Bimap(byte[] b){ if(b.length!=0){ return BitmapFactory.decodeByteArray(b, 0, b.length); } else { return null; } } 5、保存bitmap static boolean saveBitmap2file(Bitmap bmp,String filename){ CompressFormat format= Bitmap.CompressFormat.JPEG; int quality = 100; OutputStream stream = null; try { stream = new FileOutputStream("/sdcard/" + filename); } catch (FileNotFoundException e) { // TODO Auto-generated catch block Generated by Foxit PDF Creator © Foxit Software http://www.foxitsoftware.com For evaluation only. e.printStackTrace(); } return bmp.compress(format, quality, stream); } 6、将图片按自己的要求缩放 // 图片Bitmap bm = BitmapFactory.decodeStream(getResources() .openRawResource(R.drawable.dog)); // 获得图片的宽高 int width = bm.getWidth(); int height = bm.getHeight(); // 设置想要的大小 int newWidth = 320; int newHeight = 480; // 计算缩放比例 float scaleWidth = ((float) newWidth) / width; float scaleHeight = ((float) newHeight) / height; // 取得想要缩放的matrix参数 Matrix matrix = new Matrix(); matrix.postScale(scaleWidth, scaleHeight); // 得到新的图片 Bitmap newbm = Bitmap.createBitmap(bm, 0, 0, width, height, matrix, true); // 放在画布上 canvas.drawBitmap(newbm, 0, 0, paint); 相关知识链接:http://www.eoeandroid.com/thread-3162-1-1.html 7、bitmap的用法小结 BitmapFactory.Options option = new BitmapFactory.Options(); option.inSampleSize = 2; //将图片设为原来宽高的1/2,防止内存溢出 Bitmap bm = BitmapFactory.decodeFile("",option);//文件流 URL url = new URL(""); InputStream is = url.openStream(); Bitmap bm = BitmapFactory.decodeStream(is); android:scaleType: android:scaleType是控制图片如何resized/moved来匹对ImageView的size。ImageView.ScaleType / android:scaleType值的意义区别: CENTER /center 按图片的原来size居中显示,当图片长/宽超过View的长/宽,则截取图片的居中部分 显示 CENTER_CROP / centerCrop 按比例扩大图片的size居中显示,使得图片长(宽)等于或大于View的长 (宽) CENTER_INSIDE / centerInside 将图片的内容完整居中显示,通过按比例缩小或原来的size使得图片 长/宽等于或小于View的长/宽 Generated by Foxit PDF Creator © Foxit Software http://www.foxitsoftware.com For evaluation only. FIT_CENTER / fitCenter 把图片按比例扩大/缩小到View的宽度,居中显示 FIT_END / fitEnd 把图片按比例扩大/缩小到View的宽度,显示在View的下部分位置 FIT_START / fitStart 把图片按比例扩大/缩小到View的宽度,显示在View的上部分位置 FIT_XY / fitXY 把图片 不按比例 扩大/缩小到View的大小显示 MATRIX / matrix 用矩阵来绘制,动态缩小放大图片来显示。 //放大缩小图片 public static Bitmap zoomBitmap(Bitmap bitmap,int w,int h){ int width = bitmap.getWidth(); int height = bitmap.getHeight(); Matrix matrix = new Matrix(); float scaleWidht = ((float)w / width); float scaleHeight = ((float)h / height); matrix.postScale(scaleWidht, scaleHeight); Bitmap newbmp = Bitmap.createBitmap(bitmap, 0, 0, width, height, matrix, true); return newbmp; } //将Drawable转化为Bitmap public static Bitmap drawableToBitmap(Drawable drawable){ int width = drawable.getIntrinsicWidth(); int height = drawable.getIntrinsicHeight(); Bitmap bitmap = Bitmap.createBitmap(width, height, drawable.getOpacity() != PixelFormat.OPAQUE ? Bitmap.Config.ARGB_8888 : Bitmap.Config.RGB_565); Canvas canvas = new Canvas(bitmap); drawable.setBounds(0,0,width,height); drawable.draw(canvas); return bitmap; Generated by Foxit PDF Creator © Foxit Software http://www.foxitsoftware.com For evaluation only. } //获得圆角图片的方法 public static Bitmap getRoundedCornerBitmap(Bitmap bitmap,float roundPx){ Bitmap output = Bitmap.createBitmap(bitmap.getWidth(), bitmap .getHeight(), Config.ARGB_8888); Canvas canvas = new Canvas(output); final int color = 0xff424242; final Paint paint = new Paint(); final Rect rect = new Rect(0, 0, bitmap.getWidth(), bitmap.getHeight()); final RectF rectF = new RectF(rect); paint.setAntiAlias(true); canvas.drawARGB(0, 0, 0, 0); paint.setColor(color); canvas.drawRoundRect(rectF, roundPx, roundPx, paint); paint.setXfermode(new PorterDuffXfermode(Mode.SRC_IN)); canvas.drawBitmap(bitmap, rect, rect, paint); return output; } //获得带倒影的图片方法 public static Bitmap createReflectionImageWithOrigin(Bitmap bitmap){ final int reflectionGap = 4; int width = bitmap.getWidth(); int height = bitmap.getHeight(); Matrix matrix = new Matrix(); matrix.preScale(1, -1); Bitmap reflectionImage = Bitmap.createBitmap(bitmap, 0, height/2, width, height/2, matrix, false); Bitmap bitmapWithReflection = Bitmap.createBitmap(width, (height + height/2), Config.ARGB_8888); Canvas canvas = new Canvas(bitmapWithReflection); canvas.drawBitmap(bitmap, 0, 0, null); Paint deafalutPaint = new Paint(); Generated by Foxit PDF Creator © Foxit Software http://www.foxitsoftware.com For evaluation only. canvas.drawRect(0, height,width,height + reflectionGap, deafalutPaint); canvas.drawBitmap(reflectionImage, 0, height + reflectionGap, null); Paint paint = new Paint(); LinearGradient shader = new LinearGradient(0, bitmap.getHeight(), 0, bitmapWithReflection.getHeight() + reflectionGap, 0x70ffffff, 0x00ffffff, TileMode.CLAMP); paint.setShader(shader); // Set the Transfer mode to be porter duff and destination in paint.setXfermode(new PorterDuffXfermode(Mode.DST_IN)); // Draw a rectangle using the paint with our linear gradient canvas.drawRect(0, height, width, bitmapWithReflection.getHeight() + reflectionGap, paint); return bitmapWithReflection; } }
YOLO高分设计资源源码,详情请查看资源内容中使用说明 YOLO高分设计资源源码,详情请查看资源内容中使用说明 YOLO高分设计资源源码,详情请查看资源内容中使用说明 YOLO高分设计资源源码,详情请查看资源内容中使用说明YOLO高分设计资源源码,详情请查看资源内容中使用说明YOLO高分设计资源源码,详情请查看资源内容中使用说明YOLO高分设计资源源码,详情请查看资源内容中使用说明YOLO高分设计资源源码,详情请查看资源内容中使用说明YOLO高分设计资源源码,详情请查看资源内容中使用说明YOLO高分设计资源源码,详情请查看资源内容中使用说明YOLO高分设计资源源码,详情请查看资源内容中使用说明YOLO高分设计资源源码,详情请查看资源内容中使用说明YOLO高分设计资源源码,详情请查看资源内容中使用说明YOLO高分设计资源源码,详情请查看资源内容中使用说明YOLO高分设计资源源码,详情请查看资源内容中使用说明YOLO高分设计资源源码,详情请查看资源内容中使用说明YOLO高分设计资源源码,详情请查看资源内容中使用说明YOLO高分设计资源源码,详情请查看资源内容中使用说明YOLO高分设计资源源码,详情请查看资源内容中使用说明YOLO高分设计资源源码,详情请查看资源内容中使用说明YOLO高分设计资源源码,详情请查看资源内容中使用说明YOLO高分设计资源源码,详情请查看资源内容中使用说明YOLO高分设计资源源码,详情请查看资源内容中使用说明YOLO高分设计资源源码,详情请查看资源内容中使用说明YOLO高分设计资源源码,详情请查看资源内容中使用说明YOLO高分设计资源源码,详情请查看资源内容中使用说明
要改变Android Bitmap的大小,可以使用Bitmap.createScaledBitmap()方法来缩放图像。该方法需要原始位图、新宽度和新高度作为参数,并返回一个新的位图对象,该对象具有指定的宽度和高度。 以下是一个示例代码片段,可以将原始位图缩放为新的大小: ```java Bitmap originalBitmap = BitmapFactory.decodeResource(getResources(), R.drawable.original_image); int width = originalBitmap.getWidth(); int height = originalBitmap.getHeight(); int newWidth = 300; int newHeight = 300; float scaleWidth = ((float) newWidth) / width; float scaleHeight = ((float) newHeight) / height; Matrix matrix = new Matrix(); matrix.postScale(scaleWidth, scaleHeight); Bitmap scaledBitmap = Bitmap.createBitmap(originalBitmap, 0, 0, width, height, matrix, false); ``` 在上面的代码中,我们首先使用BitmapFactory.decodeResource()方法从资源文件中获取原始位图。然后,我们获取原始位图的宽度和高度,并计算新的宽度和高度。接下来,我们使用Matrix.postScale()方法创建一个变换矩阵,该矩阵将原始位图缩放到新的大小。最后,我们使用Bitmap.createBitmap()方法创建一个新的位图对象,该对象具有指定的宽度和高度。 请注意,使用Bitmap.createScaledBitmap()会在内存中创建新的位图对象,因此可能会占用大量内存。如果内存使用量是一个问题,可以考虑使用inSampleSize属性来加载缩小的位图,或者使用更高级的技术,如OpenGL ES纹理渲染。

“相关推荐”对你有帮助么?

  • 非常没帮助
  • 没帮助
  • 一般
  • 有帮助
  • 非常有帮助
提交
评论
添加红包

请填写红包祝福语或标题

红包个数最小为10个

红包金额最低5元

当前余额3.43前往充值 >
需支付:10.00
成就一亿技术人!
领取后你会自动成为博主和红包主的粉丝 规则
hope_wisdom
发出的红包
实付
使用余额支付
点击重新获取
扫码支付
钱包余额 0

抵扣说明:

1.余额是钱包充值的虚拟货币,按照1:1的比例进行支付金额的抵扣。
2.余额无法直接购买下载,可以购买VIP、付费专栏及课程。

余额充值