


项目中有一个需求如下图所示:
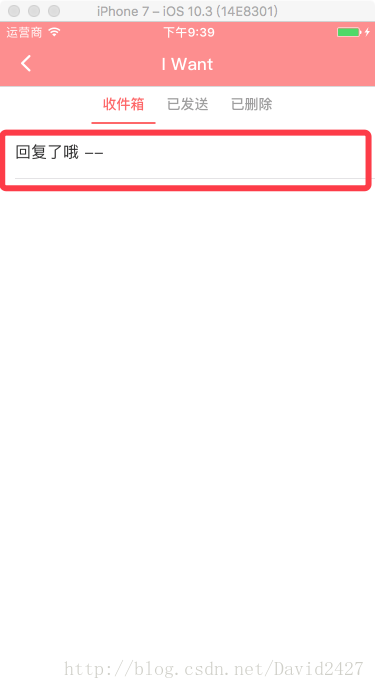
这是已经的收件箱的cell显示。
另外一种是未读的收件箱的显示,如下图所示:
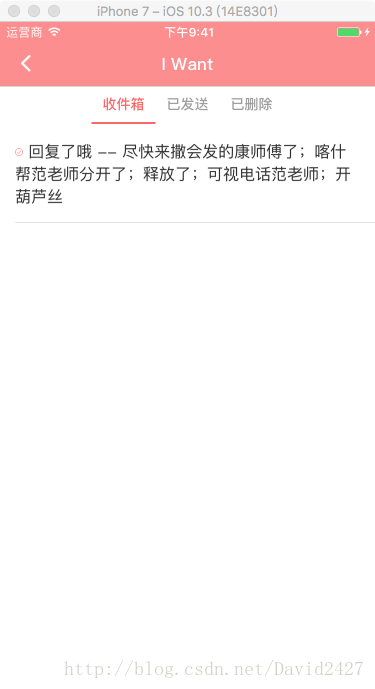
对于未读的信息的显示,最开始考虑的是将前面的小圆点设置成一个UIImageView,然后后面用UILabel显示正文。但是这样有一个问题就是,第二行的文字和第一行是对齐的,并不是从小圆点的正下方开始显示。而且也不想未读和已读自定义两种cell。
所以最终选择了富文本的方式解决这个问题。
在完成这个功能的时候,遇到的主要问题包括:
(1)UITableViewCell的高度自适应
(2)UITableViewCell中的UILabel高度自适应;
(3)富文本的高度计算;
(4)普通文本的高度计算;
我的思路是:在给UITableViewCell的模型赋值时,在模型的set方法中,根据是否已读,选择文本的计算方式,如果是已读就选择普通的高度计算,如果是未读,就选择富文本计算高度。并设置当前的UIlabel的frame,接着得到UILabel的最大Y值,算出Cell的高度。
在控制器中,在UITableView的代理方法:
-(CGFloat)tableView:(UITableView )tableView heightForRowAtIndexPath:(NSIndexPath )indexPath中根据indexPath的到对应的cell,返回这个cell的高度。
具体的代码如下:
自定义的cell中:
.h中的代码如下:
#import <UIKit/UIKit.h>
#import "GCIWantMessageModel.h"
@interface GCIWantRecieveCell : UITableViewCell

-(id)initWithReuseIdentifier:(NSString*)reuseIdentifier;

@property (nonatomic,strong) GCIWantMessageModel *model;

@end
其中GCIWantMessageModel是cell的模型。
.m文件如下:
//
//  GCIWantRecieveCell.m
//  GreedyCat
//
//  Created by DH on 2017/6/12.
//  Copyright © 2017年 GreedyCat. All rights reserved.
//

#import "GCIWantRecieveCell.h"


#define SCREEN_WIDTH    ([[UIScreen mainScreen] bounds].size.width)
#define SCREEN_HEIGHT    ([[UIScreen mainScreen] bounds].size.height)

@interface GCIWantRecieveCell ()

@property (nonatomic,strong) UILabel *label;

@property (nonatomic,assign) CGFloat cellHeight;

@end

@implementation GCIWantRecieveCell

-(id)initWithReuseIdentifier:(NSString*)reuseIdentifier
{
    self = [super initWithStyle:UITableViewCellStyleDefault reuseIdentifier:reuseIdentifier];
    if (self) {
        _label = [[UILabel alloc]initWithFrame:CGRectMake(15, 16, SCREEN_WIDTH - 30, 100)];
        [self addSubview:_label];
        self.selectionStyle = UITableViewCellSelectionStyleNone;
    }

    return self;
}

#pragma mark -给子控件赋值
-(void)setModel:(GCIWantMessageModel *)model
{
    _model = model;
    self.label.numberOfLines = 0;
    if(_model.readed == YES){
        NSString *tempStr = [[NSString alloc]initWithFormat:@" %@",_model.content];
        // 利用富文本进行显示
        NSMutableAttributedString *attributedStr = [[NSMutableAttributedString alloc]initWithString:tempStr];
        [attributedStr addAttribute:NSFontAttributeName value:[UIFont fontWithName:@"PingFangSC-Regular" size:16] range:NSMakeRange(0, [tempStr length])];
        [attributedStr addAttribute:NSForegroundColorAttributeName value:[UIColor colorWithRed:46/255.0 green:46/255.0 blue:46/255.0 alpha:1.0] range:NSMakeRange(0, [tempStr length])];

        // 在最前面添加一个图片
        NSTextAttachment *attch = [[NSTextAttachment alloc]init];
        attch.image = [UIImage imageNamed:@"check"];
        attch.bounds = CGRectMake(0, 1, 8, 8);

        // 创建带有图片的富文本
        NSAttributedString *attributedImageStr = [NSAttributedString  attributedStringWithAttachment:attch];
        [attributedStr insertAttributedString:attributedImageStr atIndex:0];
        _label.attributedText = attributedStr;

        // 设置label的高度
        CGSize attributeStrSize = [attributedStr boundingRectWithSize:CGSizeMake(SCREEN_WIDTH - 30, MAXFLOAT) options:NSStringDrawingUsesLineFragmentOrigin | NSStringDrawingUsesFontLeading context:nil].size;

        // 计算出cell的高度
        _label.frame = CGRectMake(15, 16, SCREEN_WIDTH - 30, attributeStrSize.height);


    }else{

        _label.textColor = [UIColor colorWithRed:46/255.0 green:46/255.0 blue:46/255.0 alpha:1.0];
        _label.font = [UIFont fontWithName:@"PingFangSC-Regular" size:16];
        _label.text = _model.content;

        // 设置label的高度
        NSDictionary *dic = @{NSFontAttributeName:[UIFont fontWithName:@"PingFangSC-Regular" size:16]};
        CGSize labelSize = [_model.content boundingRectWithSize:CGSizeMake(SCREEN_WIDTH - 30, MAXFLOAT) options:NSStringDrawingUsesLineFragmentOrigin attributes:dic context:nil].size;

        _label.frame = CGRectMake(15, 16, SCREEN_WIDTH - 30, labelSize.height);


    }

    // 设置cell的frame
    CGRect cellFrame = self.frame;
    cellFrame.size.height = CGRectGetMaxY(_label.frame) + 16;
    self.frame = cellFrame;

}

@end
接着,我们需要在控制器中得到cell的高度,并利用代理进行设置。
具体代码如下:
#pragma mark -tableview的代理
-(UITableViewCell *)tableView:(UITableView *)tableView cellForRowAtIndexPath:(NSIndexPath *)indexPath
{
    //指定cellIdentifier为自定义的cell
    static NSString *CellIdentifier = @"Cell";
    //自定义cell类
    GCIWantRecieveCell *cell = [tableView dequeueReusableCellWithIdentifier:CellIdentifier];
    if (cell == nil) {
        cell = [[GCIWantRecieveCell alloc] initWithReuseIdentifier:CellIdentifier];
    }
    cell.model = _recieveBoxArrs[indexPath.row];
    return cell;
}

-(NSInteger) tableView:(UITableView *)tableView numberOfRowsInSection:(NSInteger)section
{
    return _recieveBoxArrs.count;
}

-(NSInteger) numberOfSectionsInTableView:(UITableView *)tableView
{
    return 1;
}

//在这个函数中获取相应的cell,返回cell的高度
-(CGFloat)tableView:(UITableView *)tableView heightForRowAtIndexPath:(NSIndexPath *)indexPath
{

    GCIWantRecieveCell *cell = (GCIWantRecieveCell *)[self tableView:_mainTableView cellForRowAtIndexPath:indexPath];

    return  cell.frame.size.height;
}
如果cell中还有其他的子控件,也可以按照这种方法,当然还有其他几种cell的高度自适应方法,例如sunny大神的一篇帖子sunny的博客。请多多交流


 2068
2068


 被折叠的 条评论
为什么被折叠?
被折叠的 条评论
为什么被折叠?
 到【灌水乐园】发言


