


转载至:http://colobu.com/2015/03/23/kafka-internals/?utm_source=tuicool&utm_medium=referral
提示:最好看原文,复制转载的格式排版不如原版,转载目的也就是为了价格书签,方便巩固时候查看
本文主要介绍了Kafka High level的代码架构和主要的类。
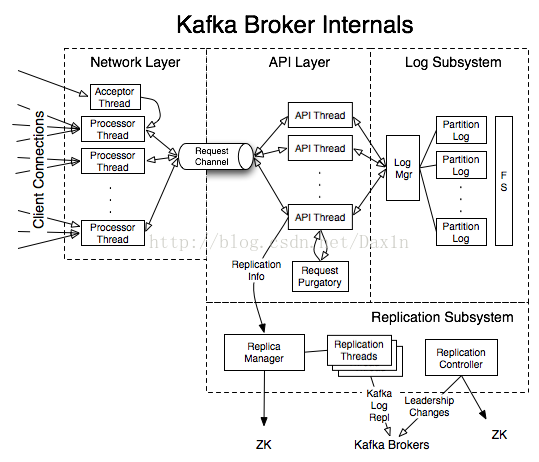
Boker 架构
network layer
Kafka使用NIO自己实现了网络层的代码, 而不是采用netty, mina等第三方的网络框架。从性能上来讲,这一块的代码不是性能的瓶颈。
它采用IO多路复用和多线程下的Reactor模式,主要实现类包括 SocketServer , Acceptor , Processor 和 RequestChannel 。
Kafka的服务器由 SocketServer 实现,它是一个NIO的服务器,线程模型如下:
- 1个Acceptor线程负责处理新连接
- N个Processor线程, 每个processor都有自己的selector,负责从socket中读取请求和发送response
- M个Handler线程处理请求,并产生response给processor线程
可以从上面的图形中看到Acceptor, Processor和Handler的功能。
a. Boker在启动的时候会调用SocketServer的 startup 方法。
defstartup() {
 ......
for(i <-0until numProcessorThreads) {
 processors(i) = newProcessor(i,
 time,
 maxRequestSize,
 aggregateIdleMeter,
 newMeter("IdlePercent","percent", TimeUnit.NANOSECONDS, Map("networkProcessor"-> i.toString)),
 numProcessorThreads,
 requestChannel,
 quotas,
 connectionsMaxIdleMs)
 Utils.newThread("kafka-network-thread-%d-%d".format(port, i), processors(i),false).start()
 }

 ......
// start accepting connections
this.acceptor =newAcceptor(host, port, processors, sendBufferSize, recvBufferSize, quotas)
 Utils.newThread("kafka-socket-acceptor", acceptor,false).start()
 acceptor.awaitStartup
 ......
 }
b. 它为每个Processor生成一个线程并启动,然后启动一个 Acceptor 线程。
Acceptor 是一个典型NIO 处理新连接的方法类:
private[kafka]classAcceptor(...)extendsAbstractServerThread(connectionQuotas){
valserverChannel = openServerSocket(host, port)
defrun() {
 serverChannel.register(selector, SelectionKey.OP_ACCEPT);
 ......
while(isRunning) {
valready = selector.select(500)
if(ready >0) {
valkeys = selector.selectedKeys()
valiter = keys.iterator()
while(iter.hasNext && isRunning) {
 ......
 accept(key, processors(currentProcessor))
 ......
 currentProcessor = (currentProcessor + 1) % processors.length
 }
 }
 }
 ......
 }

}
c. 它会将新的连接均匀地分配给一个Processor。通过 accept 方法配置网络参数,并交给processor读写数据。
defaccept(key: SelectionKey, processor: Processor) {
valserverSocketChannel = key.channel().asInstanceOf[ServerSocketChannel]
valsocketChannel = serverSocketChannel.accept()
try{
 connectionQuotas.inc(socketChannel.socket().getInetAddress)
 socketChannel.configureBlocking(false)
 socketChannel.socket().setTcpNoDelay(true)
 socketChannel.socket().setSendBufferSize(sendBufferSize)

 processor.accept(socketChannel)
 } catch{
casee: TooManyConnectionsException =>
 info("Rejected connection from %s, address already has the configured maximum of %d connections.".format(e.ip, e.count))
 close(socketChannel)
 }
}
d. Processor的 accept 方法将新连接加入它的新连接待处理队列中
在 configureNewConnections 方法中注册 OP_READ 。
defaccept(socketChannel: SocketChannel) {
 newConnections.add(socketChannel)
 wakeup()
}

privatedefconfigureNewConnections() {
while(newConnections.size() >0) {
valchannel = newConnections.poll()
 debug("Processor "+ id +" listening to new connection from "+ channel.socket.getRemoteSocketAddress)
 channel.register(selector, SelectionKey.OP_READ)
 }
 }
e. Processor线程的主处理逻辑如下, 这是一个死循环,会一直处理这些连接的读写
overridedefrun() {
 ......
while(isRunning) {
// 为新连接注册OP_READ
 configureNewConnections()
// 为新的response注册OP_WRITE, 它从requestChannel.receiveResponse(processor's id)读取response
 processNewResponses()
valstartSelectTime = SystemTime.nanoseconds

valready = selector.select(300)
if(ready >0) {
valkeys = selector.selectedKeys()
valiter = keys.iterator()
while(iter.hasNext && isRunning) {
varkey: SelectionKey =null
try{
 key = iter.next
 iter.remove()
if(key.isReadable)
 read(key)
elseif(key.isWritable)
 write(key)
elseif(!key.isValid)
 close(key)
else
thrownewIllegalStateException("Unrecognized key state for processor thread.")
 } catch{
 ......
 }
 }
 }
 ......
 }
 ......
}
这也是一个标准的NIO的处理代码。
f. 我们看看 read 和 write 是怎么实现的。
defread(key: SelectionKey) {
 ......
valsocketChannel = channelFor(key)
varreceive = key.attachment.asInstanceOf[Receive]
if(key.attachment ==null) {
 receive = newBoundedByteBufferReceive(maxRequestSize)
 key.attach(receive)
 }
valread = receive.readFrom(socketChannel)
valaddress = socketChannel.socket.getRemoteSocketAddress();

if(read <0) {
 close(key)
 } elseif(receive.complete) {
valreq = RequestChannel.Request(processor = id, requestKey = key, buffer = receive.buffer, startTimeMs = time.milliseconds, remoteAddress = address)
 requestChannel.sendRequest(req)
 key.attach(null)
// explicitly reset interest ops to not READ, no need to wake up the selector just yet
 key.interestOps(key.interestOps & (~SelectionKey.OP_READ))
 } else{
// more reading to be done
 key.interestOps(SelectionKey.OP_READ)
 wakeup()
 }
}
因为Kafka的消息前四个字节代表(一个int)为后续消息的size,所以首先读取size,接着把一个完整的消息读取出来。
如果读取出来一个完整的Request,则将它放到 requestChannel 中。
具体的Kafka消息的格式可以参考 A Guide To The Kafka Protocol
我们再看看 write 方法的实现
defwrite(key: SelectionKey) {
valsocketChannel = channelFor(key)
valresponse = key.attachment().asInstanceOf[RequestChannel.Response]
valresponseSend = response.responseSend
if(responseSend ==null)
thrownewIllegalStateException("Registered for write interest but no response attached to key.")
valwritten = responseSend.writeTo(socketChannel)

if(responseSend.complete) {
 response.request.updateRequestMetrics()
 key.attach(null)

 key.interestOps(SelectionKey.OP_READ)
 } else{
 key.interestOps(SelectionKey.OP_WRITE)
 wakeup()
 }
}
直到写完一个response,才讲Ops设为 OP_READ ,否则一直尝试写。
以上是网络层的主要代码逻辑,主要负责Kafka消息的读写。
API layer
API层的主要功能是由 KafkaApis 类实现的。
根据配置Kafka生成了一组KafkaRequestHandler线程,叫做 KafkaRequestHandlerPool :
classKafkaRequestHandlerPool(......)extendsLoggingwithKafkaMetricsGroup{
 ......
valthreads =newArray[Thread](numThreads)
valrunnables =newArray[KafkaRequestHandler](numThreads)
for(i <-0until numThreads) {
 runnables(i) = newKafkaRequestHandler(i, brokerId, aggregateIdleMeter, numThreads, requestChannel, apis)
 threads(i) = Utils.daemonThread("kafka-request-handler-"+ i, runnables(i))
 threads(i).start()
 }
 .....
}
KafkaRequestHandler不断的从 requestChannel 队列里面取出request交给 apis 处理。
classKafkaRequestHandler(......)extendsRunnablewithLogging{
defrun() {
while(true) {
try{
varreq : RequestChannel.Request =null
while(req ==null) {
 req = requestChannel.receiveRequest(300)
 }
if(req eq RequestChannel.AllDone) {
return
 }
 ......
 apis.handle(req)
 } catch{
 ......
 }
 }
 }

}
apis 根据不同的请求类型调用不同的方法进行处理。
defhandle(request: RequestChannel.Request) {
try{
 request.requestId match{
caseRequestKeys.ProduceKey => handleProducerRequest(request)
caseRequestKeys.FetchKey => handleFetchRequest(request)
caseRequestKeys.OffsetsKey => handleOffsetRequest(request)
caseRequestKeys.MetadataKey => handleTopicMetadataRequest(request)
caseRequestKeys.LeaderAndIsrKey => handleLeaderAndIsrRequest(request)
caseRequestKeys.StopReplicaKey => handleStopReplicaRequest(request)
caseRequestKeys.UpdateMetadataKey => handleUpdateMetadataRequest(request)
caseRequestKeys.ControlledShutdownKey => handleControlledShutdownRequest(request)
caseRequestKeys.OffsetCommitKey => handleOffsetCommitRequest(request)
caseRequestKeys.OffsetFetchKey => handleOffsetFetchRequest(request)
caseRequestKeys.ConsumerMetadataKey => handleConsumerMetadataRequest(request)
caseRequestKeys.JoinGroupKey => handleJoinGroupRequest(request)
caseRequestKeys.HeartbeatKey => handleHeartbeatRequest(request)
caserequestId =>thrownewKafkaException("Unknown api code "+ requestId)
 }
 } catch{

 } finally
 request.apiLocalCompleteTimeMs = SystemTime.milliseconds
}
显然,此处处理的速度影响Kafka整体的消息处理的速度。
这里我们分析一个处理方法 handleProducerRequest 。
defhandleProducerRequest(request: RequestChannel.Request) {
valproduceRequest = request.requestObj.asInstanceOf[ProducerRequest]

// the callback for sending a produce response
defsendResponseCallback(responseStatus: Map[TopicAndPartition, ProducerResponseStatus]) {
varerrorInResponse =false
 responseStatus.foreach { case(topicAndPartition, status) =>
if(status.error != ErrorMapping.NoError && status.error != ErrorMapping.UnknownCode) {
 errorInResponse = true
 }
 }

if(produceRequest.requiredAcks ==0) {
if(errorInResponse) {
 requestChannel.closeConnection(request.processor, request)
 } else{
 requestChannel.noOperation(request.processor, request)
 }
 } else{
valresponse = ProducerResponse(produceRequest.correlationId, responseStatus)
 requestChannel.sendResponse(newRequestChannel.Response(request,newBoundedByteBufferSend(response)))
 }
 }

valinternalTopicsAllowed = produceRequest.clientId == AdminUtils.AdminClientId
 replicaManager.appendMessages(
 produceRequest.ackTimeoutMs.toLong,
 produceRequest.requiredAcks,
 internalTopicsAllowed,
 produceRequest.data,
 sendResponseCallback)

 produceRequest.emptyData()
}
这里会调用 replicaManager.appendMessages 处理Kafka message的保存和备份,也就是leader和备份节点上。
Replication subsystem
顺藤摸瓜,我们进入 replicaManager.appendMessages 的代码。
这个方法会将消息放到leader分区上,并复制到备份分区上。在超时或者根据required acks的值及时返回response。
defappendMessages(......) {
if(isValidRequiredAcks(requiredAcks)) {
vallocalProduceResults = appendToLocalLog(internalTopicsAllowed, messagesPerPartition, requiredAcks)

valproduceStatus = localProduceResults.map {case(topicAndPartition, result) =>
 topicAndPartition ->
 ProducePartitionStatus(
 result.info.lastOffset + 1,// required offset
 ProducerResponseStatus(result.errorCode, result.info.firstOffset)) // response status
 }

if(delayedRequestRequired(requiredAcks, messagesPerPartition, localProduceResults)) {
// create delayed produce operation
valproduceMetadata = ProduceMetadata(requiredAcks, produceStatus)
valdelayedProduce =newDelayedProduce(timeout, produceMetadata,this, responseCallback)

// create a list of (topic, partition) pairs to use as keys for this delayed produce operation
valproducerRequestKeys = messagesPerPartition.keys.map(newTopicPartitionOperationKey(_)).toSeq

// try to complete the request immediately, otherwise put it into the purgatory
// this is because while the delayed produce operation is being created, new
// requests may arrive and hence make this operation completable.
 delayedProducePurgatory.tryCompleteElseWatch(delayedProduce, producerRequestKeys)

 } else{
// we can respond immediately
valproduceResponseStatus = produceStatus.mapValues(status => status.responseStatus)
 responseCallback(produceResponseStatus)
 }
 } else{
// If required.acks is outside accepted range, something is wrong with the client
// Just return an error and don't handle the request at all
valresponseStatus = messagesPerPartition.map {
case(topicAndPartition, messageSet) =>
 (topicAndPartition ->
 ProducerResponseStatus(Errors.INVALID_REQUIRED_ACKS.code,
 LogAppendInfo.UnknownLogAppendInfo.firstOffset))
 }
 responseCallback(responseStatus)
 }
 }
注意复制是 ReplicaFetcherManager 通过 ReplicaFetcherThread 线程完成的。
更详细的资源可以参考: kafka replication
To publish a message to a partition, the client first finds the leader of the partition from Zookeeper and sends the message to the leader. The leader writes the message to its local log. Each follower constantly pulls new messages from the leader using a single socket channel. That way, the follower receives all messages in the same order as written in the leader. The follower writes each received message to its own log and sends an acknowledgment back to the leader. Once the leader receives the acknowledgment from all replicas in ISR, the message is committed. The leader advances the HW and sends an acknowledgment to the client. For better performance, each follower sends an acknowledgment after the message is written to memory. So, for each committed message, we guarantee that the message is stored in multiple replicas in memory. However, there is no guarantee that any replica has persisted the commit message to disks though. Given that correlated failures are relatively rare, this approach gives us a good balance between response time and durability. In the future, we may consider adding options that provide even stronger guarantees. The leader also periodically broadcasts the HW to all followers. The broadcasting can be piggybacked on the return value of the fetch requests from the followers. From time to time, each replica checkpoints its HW to its disk.
Log subsystem
LogManager负责管理Kafka的Log(Kafka消息), 包括log/Log文件夹的创建,获取和清理。它也会通过定时器检查内存中的log是否要缓存到磁盘中。
重要的类包括 LogManager 和 Log 。
offsetManager
负责管理offset,提供offset的读写。
topicConfigManager
它负责动态改变Topic的配置属性。
如果某个topic的配置属性改变了,Kafka会在ZooKeeper上创建一个类似/brokers/config_changes/config_change_13321的节点, topicConfigManager会监控这些节点, 获得属性改变的topics并处理,实际上以新的 LogConfig 替换老的:
privatedefprocessConfigChanges(notifications: Seq[String]) {
if(notifications.size >0) {
valnow = time.milliseconds
vallogs = logManager.logsByTopicPartition.toBuffer
vallogsByTopic = logs.groupBy(_._1.topic).mapValues(_.map(_._2))
for(notification <- notifications) {
valchangeId = changeNumber(notification)
if(changeId > lastExecutedChange) {
valchangeZnode = ZkUtils.TopicConfigChangesPath +"/"+ notification
val(jsonOpt, stat) = ZkUtils.readDataMaybeNull(zkClient, changeZnode)
if(jsonOpt.isDefined) {
valjson = jsonOpt.get
valtopic = json.substring(1, json.length -1)// hacky way to dequote
if(logsByTopic.contains(topic)) {
/* combine the default properties with the overrides in zk to create the new LogConfig */
valprops =newProperties(logManager.defaultConfig.toProps)
 props.putAll(AdminUtils.fetchTopicConfig(zkClient, topic))
vallogConfig = LogConfig.fromProps(props)
for(log <- logsByTopic(topic))
 log.config = logConfig
 info("Processed topic config change %d for topic %s, setting new config to %s.".format(changeId, topic, props))
 purgeObsoleteNotifications(now, notifications)
 }
 }
 lastExecutedChange = changeId
 }
 }
 }
}
其它类
还有一些其它的重要的类, 包括 KafkaController , KafkaScheduler , ConsumerCoordinator, KafkaHealthcheck 等。
Metrics
Kafka使用 metrics 进行性能的度量。原先是yammer metrics,现在独立成dropwizard metrics.目前这个框架的package名字比较乱,但是性能监控的功能却是非常的强大。
metrics提供了几种reporter,可以将性能报告显示在哪里, 比如控制台,JMX, Slf4j,Ganglia,Graphite等。
Kafka实现了一个CSV文件报告类 KafkaCSVMetricsReporter ,它调用metrics的 CsvReporter生成报告。
如果你想生成这些报告,需要在server.properties加入:
kafka.metrics.reporters=kafka.metrics.KafkaCSVMetricsReporter
kafka.csv.metrics.reporter.enabled=true
默认它会在kafka的kafka_metrics文件夹下生成这些csv文件。
Producer
kafka.producer.Producer 定义了两种类型的Producer: sync和async。基本上都是通过 eventHandler.handle(messages)处理消息, 只不过async会通过一个线程, 以LinkedBlockingQueue为缓冲发送消息。
defhandle(events: Seq[KeyedMessage[K,V]]) {
valserializedData = serialize(events)
varoutstandingProduceRequests = serializedData
varremainingRetries = config.messageSendMaxRetries +1
valcorrelationIdStart = correlationId.get()

while(remainingRetries >0&& outstandingProduceRequests.size >0) {
 topicMetadataToRefresh ++= outstandingProduceRequests.map(_.topic)
if(topicMetadataRefreshInterval >=0&&
 SystemTime.milliseconds - lastTopicMetadataRefreshTime > topicMetadataRefreshInterval) {
 Utils.swallowError(brokerPartitionInfo.updateInfo(topicMetadataToRefresh.toSet, correlationId.getAndIncrement))
 sendPartitionPerTopicCache.clear()
 topicMetadataToRefresh.clear
 lastTopicMetadataRefreshTime = SystemTime.milliseconds
 }
 outstandingProduceRequests = dispatchSerializedData(outstandingProduceRequests)
if(outstandingProduceRequests.size >0) {
 Thread.sleep(config.retryBackoffMs)
 Utils.swallowError(brokerPartitionInfo.updateInfo(outstandingProduceRequests.map(_.topic).toSet, correlationId.getAndIncrement))
 sendPartitionPerTopicCache.clear()
 remainingRetries -= 1
 producerStats.resendRate.mark()
 }
 }
if(outstandingProduceRequests.size >0) {
 producerStats.failedSendRate.mark()
valcorrelationIdEnd = correlationId.get()
thrownewFailedToSendMessageException("Failed to send messages after "+ config.messageSendMaxRetries +" tries.",null)
 }
}
首先通过Encoder序列化成标准的 KeyedMessage[K,Message] 。然后通过 dispatchSerializedData(outstandingProduceRequests) 将消息添加到计算出的broker上(通过send方法发送ProducerRequest),这里有尝试次数的限制。
kafka.javaapi.producer.Producer 则提供了java接口。
Consumer
kafka.consumer.SimpleConsumer 提供了Simple Consumer API.它通过一个BlockingChannel发送消息,接收Response完成任务。
kafka.javaapi.consumer.SimpleConsumer 则提供了java接口。
High level consumer实际由 ZookeeperConsumerConnector 完成,它将consumer信息记录在zookeeper中,提供 KafkaStream 获取Kafka消息。


 500
500


 被折叠的 条评论
为什么被折叠?
被折叠的 条评论
为什么被折叠?
 到【灌水乐园】发言


