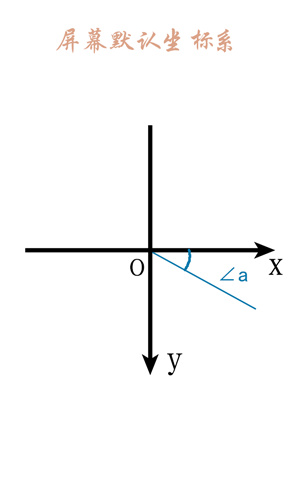
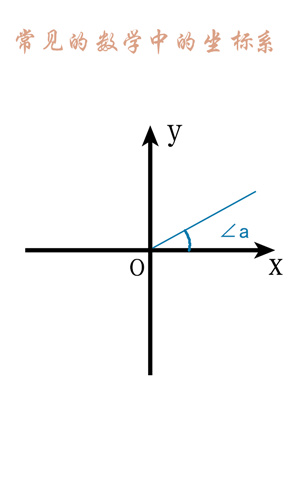
Android自定义View(一)__坐标系

*屏幕坐标系和数学中的坐标系的区别

由于Android定义屏幕左上角为坐标原点 , 向右为x轴增大方向 , 向下为y轴增大方向 , 所以在手机屏幕上的坐标系与数学中常见的坐标系是稍微有点差别的,详情如下图:


Android屏幕坐标系 - - - - - -> > > 数学中的坐标系


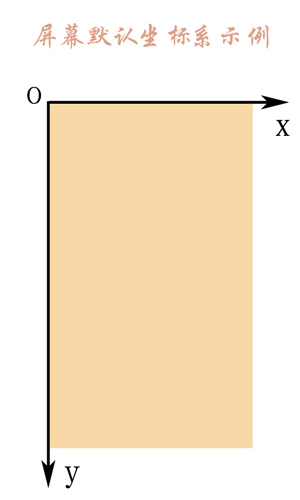
实际手机的坐标系如下图所示 (黄色区域是手机屏幕)
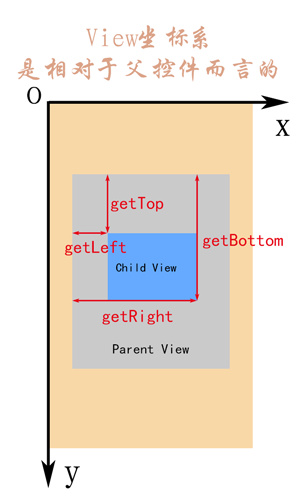
手机坐标图


* 控件(View)的坐标系


View的坐标系统是相对于父控件而言的
  getTop();       //获取子View左上角距父View顶部的距离
  getLeft();      //获取子View左上角距父View左侧的距离
  getBottom();    //获取子View右下角距父View顶部的距离
  getRight();     //获取子View右下角距父View左侧的距离

如下图所示:

View坐标系


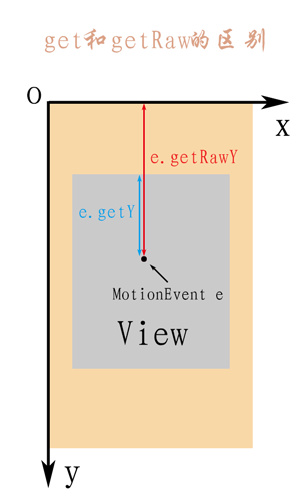
*MotionEvent中 get 和 getRaw 的区别

    event.getX();       //触摸点相对于其所在组件坐标系的坐标
    event.getY();

    event.getRawX();    //触摸点相对于屏幕默认坐标系的坐标
    event.getRawY();

如下图所示:
这里写图片描述


到此Android自定义view坐标系的内容介绍完了,谢谢!


参考文章: 安卓中的坐标系
下篇博客将介绍: Android自定义View(二)__角度和弧度的区别

  • 0
    点赞
  • 0
    收藏
    觉得还不错? 一键收藏
  • 0
    评论
首先需要了解一下 Android 中通知的相关知识。Android 中的通知是通过 NotificationManager 来管理的,通知的显示效果是由 Notification 类的实例来控制的。一般情况下,我们可以使用 NotificationCompat 类来构造通知,可以兼容不同版本的 Android 系统。 接下来,我们来介绍一下如何通过自定义 Toast 实现悬浮通知效果: 1. 首先,在 AndroidManifest.xml 文件中添加权限声明: ```xml <uses-permission android:name="android.permission.SYSTEM_ALERT_WINDOW"/> ``` 2. 在代码中创建自定义的 Toast 类,并重写其 onWindowFocusChanged() 方法,用于创建悬浮通知: ```java public class FloatingToast extends Toast { private WindowManager mWindowManager; private View mView; private WindowManager.LayoutParams mParams; public FloatingToast(Context context) { super(context); mWindowManager = (WindowManager) context.getSystemService(Context.WINDOW_SERVICE); mView = LayoutInflater.from(context).inflate(R.layout.floating_toast, null); mParams = new WindowManager.LayoutParams(ViewGroup.LayoutParams.WRAP_CONTENT, ViewGroup.LayoutParams.WRAP_CONTENT, WindowManager.LayoutParams.TYPE_APPLICATION_OVERLAY, WindowManager.LayoutParams.FLAG_NOT_FOCUSABLE, PixelFormat.TRANSLUCENT); mParams.gravity = Gravity.TOP | Gravity.START; } @Override public void onWindowFocusChanged(boolean hasFocus) { super.onWindowFocusChanged(hasFocus); if (hasFocus) { mWindowManager.addView(mView, mParams); } else { mWindowManager.removeView(mView); } } } ``` 3. 在布局文件 floating_toast.xml 中定义悬浮通知的样式: ```xml <LinearLayout xmlns:android="http://schemas.android.com/apk/res/android" android:id="@+id/floating_toast" android:layout_width="wrap_content" android:layout_height="wrap_content" android:background="@drawable/bg_floating_toast" android:orientation="horizontal"> <ImageView android:id="@+id/iv_icon" android:layout_width="wrap_content" android:layout_height="wrap_content" android:src="@drawable/ic_notification" /> <TextView android:id="@+id/tv_content" android:layout_width="wrap_content" android:layout_height="wrap_content" android:text="这是一条悬浮通知" /> </LinearLayout> ``` 4. 在 Activity 中使用自定义 Toast 实现悬浮通知: ```java FloatingToast toast = new FloatingToast(this); toast.setDuration(Toast.LENGTH_LONG); toast.setView(LayoutInflater.from(this).inflate(R.layout.floating_toast, null)); toast.show(); ``` 5. 最后,记得在 Activity 的 onDestroy() 方法中销毁自定义 Toast 对象: ```java @Override protected void onDestroy() { super.onDestroy(); if (toast != null) { toast.cancel(); } } ``` 上述代码中的布局文件和相关资源文件可以根据需要自行修改,以实现不同的悬浮通知样式。同时,需要注意的是,由于 Android 8.0 及以上版本对通知权限进行了限制,如果需要在这些系统版本上显示悬浮通知,需要申请权限并设置 targetSdkVersion 为 25 或以下。

“相关推荐”对你有帮助么?

  • 非常没帮助
  • 没帮助
  • 一般
  • 有帮助
  • 非常有帮助
提交
评论
添加红包

请填写红包祝福语或标题

红包个数最小为10个

红包金额最低5元

当前余额3.43前往充值 >
需支付:10.00
成就一亿技术人!
领取后你会自动成为博主和红包主的粉丝 规则
hope_wisdom
发出的红包
实付
使用余额支付
点击重新获取
扫码支付
钱包余额 0

抵扣说明:

1.余额是钱包充值的虚拟货币,按照1:1的比例进行支付金额的抵扣。
2.余额无法直接购买下载,可以购买VIP、付费专栏及课程。

余额充值