


序:最近呢,工作鸭梨不是怎么大,对于自己爱折腾的想法又冒出了水面,开始自己的android开发的学习之旅。但是呢,本人是做GIS的,所以呢,就打算从这方面入手看看,是不是有什么比较好玩的玩意呢,这才导致了“Arcgis for Androd API开发系列教程”的成功问世……
本篇呢,是用“Arcgis for Androd API”实现基本的地图显示并在图上显示当前GPS所在位置。为了比较直观的让大家看看本人的成果呢,先给大家上账图吧:
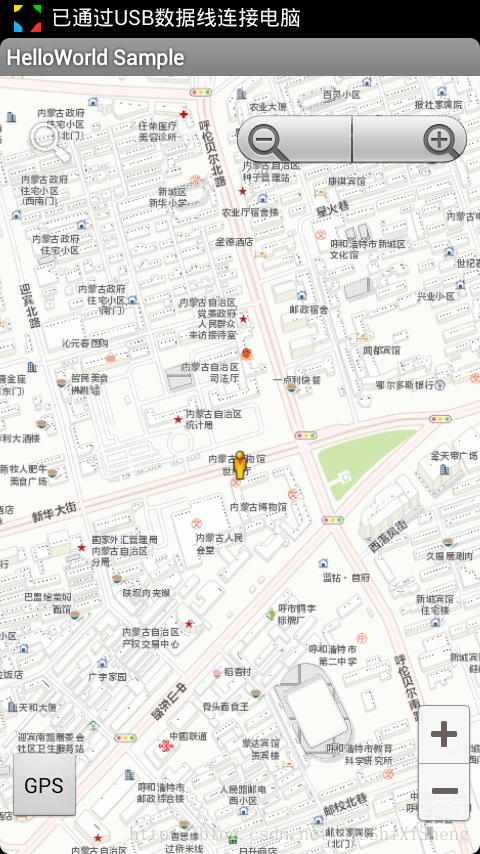
看见了吧,人所在的位置呢就是本人所处的位置……知道要做什么了之后,下面给大家说一下具体的实现方法吧。
在做Arcgis for Android API开发之前,你得做一件大事,那就是搭建Android的开发环境,至于怎么搭建,我在此就不再说了,本来没打算说这玩意的。安卓开发环境搭建完成之后了,你需要需要安装 ArcGIS 发相关的库和 Eclipse插件了,这个的安装呢,你可以选择在线的安装方式,也可以选择离线的安装方式,在线的比较简单,Eclipse菜单/help/Install New Softwear...,在弹出的框框里面输入http://downloads.esri.com/software/arcgis/android即可,离线的更省事,不过你本机得有ArcGISAndroidSDK_v????.zip,没有的那别着急,你可以去网站上找,不想找的呢,我呢也给大家共享了,下载地址为:http://download.csdn.net/detail/gisshixisheng/6703689,大家按需下载,不受积分的。
靠,废话一大堆,终于到主题了!上面的工作完成之后呢,首先你得新建一个Arcgis for Android的工程,暂且就叫做MapGps吧,建成之后文件组织形式如下:

我想,做过安卓开发或者了解安卓开发的人呢对着玩意肯定不陌生吧,具体的我也不做解释,有疑问的我们可以私聊,最好是美女……不过呢,有些东西呢,还是交代一下吧:
1、src
这个东东我不怎么清楚,个人认为类似于web开发的后台
2、libs
这个是开发相关的类库
3、res
英语差不多的人应该明白,res是resources的简写,是“资源”的意思。其中,darwable命名的文件夹是一些图片文件,layout是一些布局文件,values是一些值文件,里面包括string,color等等……这个layout类似于web的前台吧……
首先,来看看main.xml文件的内容:
<?xml version="1.0" encoding="utf-8"?>
<RelativeLayout xmlns:android="http://schemas.android.com/apk/res/android"
    android:layout_width="fill_parent"
    android:layout_height="fill_parent" >

    <!-- MapView layout and initial extent -->
    <com.esri.android.map.MapView
  		android:id="@+id/map"
  		android:layout_width="fill_parent"
  		android:layout_height="fill_parent">
  	</com.esri.android.map.MapView>

  	<com.esri.arcgis.android.samples.helloworld.ZoomControlView
        android:id="@+id/ZoomControlView"
        android:layout_width="wrap_content"
        android:layout_height="wrap_content"
        android:layout_alignParentBottom="true"
        android:layout_alignParentRight="true"
        android:layout_marginBottom="20.0dip"
        android:layout_marginRight="5.0dip"/>

  	<ZoomControls
  	    android:id="@+id/zoomCtrl"
  	    android:layout_width="wrap_content"
  	    android:layout_height="wrap_content"
  	    android:layout_alignParentTop="true"
        android:layout_alignParentRight="true"
        android:layout_marginTop="20.0dip"
        android:layout_marginRight="5.0dip" />

  	<android.widget.SearchView
  	    android:id="@+id/searchView"
  	    android:layout_width="wrap_content"
  	    android:layout_height="wrap_content"
  	    android:layout_alignParentTop="true"
        android:layout_alignParentLeft="true"
        android:layout_marginTop="20.0dip"
        android:layout_marginLeft="5.0dip" />

  	<Button
  	    android:id="@+id/btnGps"
  	    android:layout_width="wrap_content"
  	    android:layout_height="wrap_content"
  	    android:layout_alignParentBottom="true"
        android:layout_alignParentLeft="true"
        android:layout_marginBottom="20.0dip"
        android:layout_marginLeft="5.0dip"
  	    android:text="GPS" />

</RelativeLayout>
接着,看看HelloWorld.java的内容:
/* Copyright 2012 ESRI
 *
 * All rights reserved under the copyright laws of the United States
 * and applicable international laws, treaties, and conventions.
 *
 * You may freely redistribute and use this sample code, with or
 * without modification, provided you include the original copyright
 * notice and use restrictions.
 *
 * See the �Sample code usage restrictions� document for further information.
 *
 */

package com.esri.arcgis.android.samples.helloworld;

import java.util.List;

import android.app.Activity;
import android.content.Context;
import android.location.Location;
import android.location.LocationListener;
import android.location.LocationManager;
import android.os.Bundle;
import android.util.Log;
import android.view.View;
import android.view.View.OnClickListener;
import android.widget.Button;
import android.widget.ZoomControls;

import com.esri.android.map.GraphicsLayer;
import com.esri.android.map.MapView;
import com.esri.android.map.ags.ArcGISTiledMapServiceLayer;
import com.esri.core.geometry.GeometryEngine;
import com.esri.core.geometry.Point;
import com.esri.core.geometry.SpatialReference;
import com.esri.core.map.Graphic;
import com.esri.core.symbol.PictureMarkerSymbol;

public class HelloWorld extends Activity {
	Button zoomin;
	Button zoomout;
	Button btnGps;
	ZoomControls zoomctrl;
	LocationManager locMag;
	Location loc ;

	MapView map = null;
	ArcGISTiledMapServiceLayer tileLayer;
	GraphicsLayer gLayerPos;
	Point point;
	Point wgspoint;
	Point mapPoint;
	PictureMarkerSymbol locationSymbol;

	ZoomControlView mZoomControlView;

	/** Called when the activity is first created. */
	@Override
	public void onCreate(Bundle savedInstanceState) {
		super.onCreate(savedInstanceState);
		setContentView(R.layout.main);

		map = (MapView)findViewById(R.id.map);

		tileLayer = new ArcGISTiledMapServiceLayer(
				"http://cache1.arcgisonline.cn/ArcGIS/rest/services/ChinaOnlineCommunity/MapServer");

		map.addLayer(tileLayer);

		//设置地图中心点
		point = (Point) GeometryEngine.project(new Point(40.805, 111.661),SpatialReference.create(4326),map.getSpatialReference());
		map.centerAt(point, true);
		/*
		zoomin=(Button)findViewById(R.id.zoomin);
		zoomout=(Button)findViewById(R.id.zoomout);
		zoomin.setOnClickListener(new OnClickListener(){
			@Override
			public void onClick(View arg0) {
				// TODO Auto-generated method stub
				map.zoomin();
			}
		});
		zoomout.setOnClickListener(new OnClickListener(){
			@Override
			public void onClick(View arg0) {
				// TODO Auto-generated method stub
				map.zoomout();
			}
		});*/
		//放大与缩小——自定义
		mZoomControlView = (ZoomControlView) findViewById(R.id.ZoomControlView);
		mZoomControlView.setMapView(map);

		//放大与缩小ZoomControls
		zoomctrl=(ZoomControls)findViewById(R.id.zoomCtrl);
		zoomctrl.setOnZoomInClickListener(new OnClickListener(){
			@Override
			public void onClick(View v) {
				// TODO Auto-generated method stub
				map.zoomin();
			}
		});
		zoomctrl.setOnZoomOutClickListener(new OnClickListener(){
			@Override
			public void onClick(View v) {
				// TODO Auto-generated method stub
				map.zoomout();
			}
		});

		gLayerPos = new GraphicsLayer();
	    map.addLayer(gLayerPos);

	    locationSymbol =  new PictureMarkerSymbol(this.getResources().getDrawable(
				R.drawable.location));

	    //要定位在地图中的位置,需要知道当前位置,而当前位置有Location对象决定,
	  	//但是,Location对象又需要LocationManager对象来创建。
	    //创建LocationManager的唯一方法
	  	locMag = (LocationManager) this.getSystemService(Context.LOCATION_SERVICE);
	  	//获得Provider列表
	  	final List<String> providers=locMag.getProviders(true);
	  	//循环Provider,根据Provider获取位置信息
	  	for(String provider:providers)
	  	{
		    loc = locMag.getLastKnownLocation(provider);

		    LocationListener locationListener = new LocationListener(){
		    	/**
		    	 * 位置改变时调用
		    	 */
		    	public void onLocationChanged(Location location) {
					//刷新图层
					markLocation(location);
				}
		    	//Provider失效时调用
				public void onProviderDisabled(String arg0)
				{
				}
				//Provider生效时调用
				public void onProviderEnabled(String arg0)
				{
				}
				//状态改变时调用
				public void onStatusChanged(String arg0, int arg1, Bundle arg2)
				{
				}
			};
			locMag.requestLocationUpdates(provider, 100, 0, locationListener);
			if(loc!=null)
			{
				//开始画图
				markLocation(loc);
			}
		}
	}

	private void markLocation(Location location)
	{
		gLayerPos.removeAll();
		double locx = location.getLongitude();
		double locy = location.getLatitude();
		wgspoint = new Point(locx, locy);
		mapPoint = (Point) GeometryEngine.project(wgspoint,SpatialReference.create(4326),map.getSpatialReference());

		//图层的创建
		Graphic graphic = new Graphic(mapPoint,locationSymbol);
		gLayerPos.addGraphic(graphic);
		map.centerAt(mapPoint, true);
	}

	@Override
	protected void onPause() {
		super.onPause();
		map.pause();
	}

	@Override
	protected void onResume() {
		super.onResume();
		map.unpause();
	}
}
附件:
点此下载源码 点此现在类库包


 2511
2511


 被折叠的 条评论
为什么被折叠?
被折叠的 条评论
为什么被折叠?
 到【灌水乐园】发言


