


/
C#/Unity中的异步编程C#迭代器,Task,async/await,同步上下文等机制
//
C# yield
yield return将一个函数分为多个部分,让其具有分段多次返回的能力:
1 2 3 4 5 6 7 8 9 10 11 12 13 14 15 16 17 18 19 20 21 | public static IEnumerable<int> TestYield(int a)
{
yield return a+1;
if (a % 2 == 0) {
yield break;
}
else {
yield return 1;
}
yield return 2;
}
static void Main(string[] args)
{
IEnumerator<int> enumerator = TestYield(4).GetEnumerator();
while (enumerator.MoveNext())
{
Console.WriteLine(enumerator.Current);
}
}
// Output:
// 5
|
迭代器本身是基于迭代器的语法糖,编译器会为TestYield函数生成一个状态机类,将函数执行体通过yield分为几个部分,内部通过一个state字段(通常是个整数)来标识当前迭代到哪一步了,并实现IEnumerator,IEnumerable等接口。因此我们可以将TestYield作为一个迭代器直接用于while和for循环。介绍关于yield语法糖实现机制的文章很多,这里就不赘述了。
这类让函数返回多次的能力,容易让人联想倒lua coroutine,但它们是有区别的,C#本质上没有协程,如果我们将C# yield对应lua yield,C# MoveNext 对应 lua resume,可以做个简单的对比:
- lua的协程yield/consume之间具备双向动态交换信息的能力,C#只能单向静态传递(yield => MoveNext)
- lua的协程本质是运行时捕获和保存堆栈上下文,而C#只是编译期的语法糖(转换为状态机类,以适配迭代器接口)
Unity Coroutine
C#没有协程,我们经常听到或看到C#协程的概念,主要来自于Unity,它对yield做了一些改造:
- 基于yield返回的对象,只能是YieldInstruction的子类(它最重要的方法是bool IsDone(),用于判断当前任务是否已经完成)
- 默认实现了部分预定义的YieldInstruction,如WaitForSeconds,null,WaitForEndOfFrame等,以实现常用的协程控制(告诉Unity协程的唤醒时机)
- Unity Runtime会根据返回的YieldInstruction对象类型,在合适(IsDone()==true)的时候唤醒协程(无需显示MoveNext)
- 支持协程嵌套
- 简单的协程生命周期管理(提供StopCoroutine接口),并将协程的生命周期与GmaeObject绑定
如此,对于Unity开发者而言,使用yield能达成协程类似的效果,yield虽然不能像await一样传递返回值,但由于本质是单线程,yield的处理结果可以放到类成员或GameObject上,因此灵活性也足够。本质上,Unity Coroutine是个桢驱动的迭代器。关于Unity协程的更多细节,可以参考Unity Coroutines: How Do They Work?,深入剖析Unity协程的实现原理
C# Task
C#中的Task本质上类似JS中的Promise,表示一个异步任务,通常运行在其他线程而非创建Task的当前线程中。Task在启动(Task.Start/Task.Run/TaskFactory.StartNew)和ContinueWith的时候,可以选择指定其对应的TaskScheduler(对于ContinueWith而言,指定的是执行异步回调的任务调度器),默认的TaskScheduler只会将任务放到线程池中去执行。
1 2 3 4 5 6 7 8 9 10 11 12 13 14 15 16 17 18 19 20 21 22 23 24 25 | static void Main(string[] args) {
int a = 888;
int b = 111;
var task = new Task<int>(() =>
{
Console.WriteLine("add task, on thread{0}", Thread.CurrentThread.ManagedThreadId);
return a + b;
});
Console.WriteLine("main thread{0}, task{1} init status: {2}", Thread.CurrentThread.ManagedThreadId, task.Id, task.Status);
task.Start();
task.ContinueWith((task, arg) =>
{
Console.WriteLine("continue with 1, got result: {0}, got arg: {1}, on thread{2}", task.Result, arg, Thread.CurrentThread.ManagedThreadId);
}, "Arg1").
ContinueWith((task) =>
{
Console.WriteLine("continue with 2, on thread{0}", Thread.CurrentThread.ManagedThreadId);
}).Wait();
}
// Output:
// main thread1, task1 init status: Created
// add task, on thread3
// continue with 1, got result: 999, got arg: Arg1, on thread4
// continue with 2, on thread5
|
以上代码展示了Task的几个特性:
- 任务内部有个简单的状态机,其他线程可通过
Task.Status获取任务当前状态 Task.ContinueWith返回值是一个新的Task,可以像JS promise.then一样,以可读性较好的方式(相比回调地狱)书写异步调用链task.ContinueWith中的回调可以取到到task的返回值,并且可以为其附加额外的参数task.Wait可以让当前线程同步阻塞等待该任务完成,除此之外,还可以通过Task.WaitAny和Task.WaitAll来等待一个任务数组- 在任务执行完成后,通过
task.Result可以取得异步任务的返回值,注意,如果此时任务未完成,将会同步阻塞等待任务完成 - 如果没有指定TaskScheduler,默认的任务调度器只是在线程池中随机选一个线程来执行异步任务和对应回调
有时候我们在线程A中将某些耗时操作,如网络IO,磁盘IO等封装为Task放到线程B异步执行之后,希望Task的回调在A线程执行(最典型的如UI线程,因为通常UI框架的API都不是线程安全的),以实现A->B->A的线程上下文切换效果。要实现这种效果,我们需要为Task显式指定TaskScheduler,TaskScheduler本质只是接口,它的派生类主要有两个:
- thread pool task scheduler: 基于线程池的任务调度器,即任务(及其continuewith产生的新任务)会被分配到线程池中的某个工作线程,这也是默认的调度器,通过
TaskScheduler.Default获取默认线程池调度器 - synchronization context task scheduler: 同步上下文调度器,即任务会在指定的同步上下文上执行,比如在GUI框架中,通常会将控件操作全部放到GUI线程中执行。通过
TaskScheduler.FromCurrentSynchronizationContext获取与当前同步上下文绑定的任务调度器
那么什么是同步上下文?SynchronizationContext代表代码的执行环境,提供在各种同步模型中传播同步上下文的功能,为各个框架的线程交互提供统一的抽象。它最重要的是以下两个方法。
1 2 3 4 5 6 | // 获取当前线程的同步上下文
public static System.Threading.SynchronizationContext? Current { get; }
// 派发一个异步到消息到当前同步上下文
public virtual void Post (System.Threading.SendOrPostCallback d, object? state);
// 派发一个同步消息到当前同步上下文
public virtual void Send (System.Threading.SendOrPostCallback d, object? state);
|
SynchronizationContext提供了默认的实现,对Post而言,它只会通过QueueUserWorkItem将任务丢给ThreadPool,对于Send而言,它会立即在当前线程上同步执行委托。
各个框架可以重载SynchronizationContext实现自己的同步上下文行为,如Windows Froms实现了WindowsFormsSynchronizationContext,它的Post会通过Control.BeginInvoke实现,而WPF的DispatcherSynchronizationContext则通过框架的Dispatcher.BeginInvoke实现,它们都实现了将委托异步投递给UI线程执行。正因为不同的平台,不同的线程,有不同的消息泵和交互方式,因此才需要SynchronizationContext来封装抽象这些差异性,以增强代码的可移植性。
每个线程都有自己的SynchronizationContext(通过SynchronizationContext.Current获取,默认为null),但SynchronizationContext与线程不一定是一一对应的,比如默认的SynchronizationContext.Post是通过线程池来执行任务。SynchronizationContext本质上想要封装的是一个执行环境以及与该环境进行任务交互的方式。
对Task,TaskScheduler,SynchronizationContext有一定了解后,我们将这些概念结合起来:
1 2 3 4 5 6 7 8 9 10 11 12 13 14 15 16 17 18 19 20 21 22 23 24 | static void Main(string[] args) {
{
// 创建并设置当前线程的SynchronizationContext
// 否则TaskScheduler.FromCurrentSynchronizationContext()调用会触发System.InvalidOperationException异常
var context = new SynchronizationContext();
SynchronizationContext.SetSynchronizationContext(context);
Console.WriteLine("main thread{0}", Thread.CurrentThread.ManagedThreadId);
Task<int> task = new Task<int>(() =>
{
Console.WriteLine("task thread{0}", Thread.CurrentThread.ManagedThreadId);
return 1;
});
task.Start();
task.ContinueWith(t =>
{
Console.WriteLine("continuewith result: {0}, thread{1}", t.Result, Thread.CurrentThread.ManagedThreadId);
}, TaskScheduler.FromCurrentSynchronizationContext()).Wait();
}
// Output:
// main thread1
// task thread3
// continuewith result: 1, thread4
|
上面代码中,使用TaskScheduler.FromCurrentSynchronizationContext()来指定task.ContinueWith任务的调度器(注意,我们并没有为task.Start指定调度器,因为我们希望task本身使用默认的线程池调度器,当执行完成之后,再回到主线程执行ContinueWith任务),输出结果并不如我们预期,task.ContinueWith中的回调委托仍然在线程池中执行,而不是在主线程。
这个结果其实很容易解释,task.ContinueWith(delegate, TaskScheduler.FromCurrentSynchronizationContext())表示: 当task执行完成后,通过SynchronizationContext.Post(delegate, task)将任务异步投递到指定的同步上下文(在上例中,即为主线程创建的上下文)。但是一来我们创建的是默认的SynchronizationContext,它的Post本身就是投递到线程池的,二来我们并没有在主线程中集成消息泵(message pump)。
类比Actor模型,我们要实现 Actor A 向 Actor B 通信,我们需要:
- 定义一个消息通道: channel/mailbox
- 集成channel/mailbox到B消息泵
- 将channel/mailbox暴露给A
因此,上例中,我们即没有定义消息的传输方式,也没有定义消息的处理方式。SynchronizationContext本质只是提供了一层同步上下文切换交互抽象,传输方式,消息泵,甚至线程模型都需要我们自己实现。这里就不再展示SynchronizationContext的扩展细节,更多关于SynchronizationContext的文档:
C# async/await
async/await是C# .NET4.5推出的更高级的异步编程模型:
1 2 3 4 5 6 7 8 9 10 11 12 13 14 15 16 17 18 19 20 21 22 | public static async void AsyncTask()
{
Console.WriteLine("before await, thread{0}", Thread.CurrentThread.ManagedThreadId);
var a = await Task.Run(() =>
{
Thread.Sleep(500);
Console.WriteLine("in task, thread{0}", Thread.CurrentThread.ManagedThreadId);
return 666;
});
Console.WriteLine("after await, got result: {0}, thread{1}", a, Thread.CurrentThread.ManagedThreadId);
}
static void Main(string[] args)
{
Console.WriteLine("Main: before AsyncTask thread{0}", Thread.CurrentThread.ManagedThreadId);
var r = AsyncTask().Result;
Console.WriteLine("Main: after AsyncTask result: {0} thread{1}", r, Thread.CurrentThread.ManagedThreadId);
}
// Output:
AsyncTask: before await, thread1
AsyncTask: in task, thread3
AsyncTask: after await, got result: 666, thread3
Main: after AsyncTask result: 667 thread1
|
可以看到async/await进一步简化了异步编程的书写方式,达到更接近同步编程的可读性和易用性(这一点后面会再探讨下)。
实现原理
在进一步了解它的用法之前,我们先大概了解下它的实现机制(可以看看这篇文章提到了不少实现细节),async/await本质也是编译器的语法糖,编译器做了以下事情:
- 为所有带async关键字的函数,生成一个状态机类,它满足IAsyncStateMachine接口,await关键字本质生成了状态机类中的一个状态,状态机会根据内部的state字段(通常-1表示开始,-2表示结束,其他状态依次为0,1,2…),一步步执行异步委托。整个状态机由
IAsyncStateMachine.MoveNext方法驱动,类似迭代器 - 代码中的
await xxx,xxx返回的对象都需要实现GetAwaiter方法,该方法返回一个Awaiter对象,编译器不关心这个对象Awaiter对象类型,它只关心这个Awaiter对象需要满足三个条件: a. 实现INotifyCompletion,b. 实现IsCompleted属性,c. 实现GetResult方法,如此编译器就能知道如何与该异步操作进行交互,比如最常见的Task对象,就实现了GetAwaiter方法返回一个TaskAwaiter对象,但除了TaskAwaiter,任何满足以上三个条件的对象均可被await - 有了stateMachine和TaskAwaiter之后,还需要一个工具类将它们组合起来,以驱动状态机的推进,这个类就是
AsyncTaskMethodBuilder/AsyncTaskMethodBuilder<TResult>,是Runtime预定义好的,每个async方法,都会创建一个Builder对象,然后通过AsyncTaskMethodBuilder.Start方法绑定对应的IAsyncStateMachine,并进行状态首次MoveNext驱动,MoveNext执行到await处(此时实际上await已经被编译器去掉了,只有TaskAwaiter),会调用TaskAwaiter.IsCompleted判断任务是否已经立即完成(如Task.FromResult(2)),如果已完成,则将结果设置到builder(此时仍然在当前线程上下文),并之后跳转到之后的代码(直接goto,无需MoveNext),否则,更新state状态,通过AsyncTaskMethodBuilder.AwaitUnsafeOnCompleted挂接异步回调并返回(此时当前线程已经让出控制权),当taskAwaiter完成后,buildier会再次调用stateMachine.MoveNext驱动状态机(此时可能已经不在当前线程,state状态也不一样了,可通过TaskAwaiter.GetResult拿到异步结果),如此完成状态机的正常驱动。 - 除了驱动状态机外,AsyncTaskMethodBuilder的另一个作用是将整个async函数,封装为一个新的Task(wrapper task),该Task可通过
AsyncTaskMethodBuilder.Task属性获取。当stateMachine通过MoveNext走完每个状态后,会将最终结果,通过builder.SetResult写入到builder中的Task,如果中途出现异常,则通过builder.SetExpection保存,如此发起方可通过try {await xxx;} catch (e Exception){...}捕获异常,最终整个编译器改写后的async函数,返回的实际上就是这个builder.Task。
基础用法
除了直接跟Task外,.NET和Windows运行时也封装了部分关于网络IO,文件,图像等,这些方法通常都以Async结尾,可直接用于await。以下代码说明了跟在await后面的常见的几种函数,以便进一步理解其中的差异和原理。
1 2 3 4 5 6 7 8 9 10 11 12 13 14 15 16 17 18 19 20 21 22 | // 因为没有async标注,所以编译器不会为该函数生成状态机,但由于该函数返回的是Task,因此可以直接用于await
public static Task<int> F1Async()
{
return Task.Run(() => { return 2; });
}
// 只要标记了async 就会生成对应状态机,但这里有几点需要注意:
// 1. 如果方法声明为 async,那么可以直接 return 异步操作返回的具体值,不再用创建Task,由编译器通过builder创建Task
// 2. 由于该函数体内没有使用await,整个状态机相当于直接builder.SetResult(2),其中不涉及异步操作和线程切换(没有await异步切换点),因此整个过程实际上都是在主线程同步进行的(虽然经过了一层builder.Task封装)
// 3. 编译器也会提示Warning CS1998: This async method lacks 'await' operators and will run synchronously.
public static async Task<int> F2Async()
{
return 2;
}
// 该方法在Task上套了一层空格子Task,看起来好像和F1Async没区别
// 但实际上,编译器仍然会生成对应的builder和wrapper task,这个wrapper task在原task完成之后,只是做了简单的return操作
// 因此 await F3Async() 实际上可能导致两次线程上下文切换,如果是在UI线程上执行await,用法不当则可能触发"async/await 经典UI线程卡死"场景,因为await会默认捕获SynchronizationContext。这个后面说。
public static async Task<int> F3Async()
{
return await Task.Run(() => { return 2; });
}
|
线程切换
理解async/await基本原理后,不难发现,async/await本质上是不创建线程的,它只是一套状态机封装,以及通过回调驱动状态机的异步编程模型。await默认会捕获当前的执行上下文ExecuteContext,但是并不会捕获当前的同步上下文SynchronizationContext(关于ExcuteContext和SynchronizationContext的区别联系参考executioncontext-vs-synchronizationcontext on MSDN,强烈建议阅读),同步上下文的捕获是由TaskAwaiter实现(见TaskAwaiter.OnCompleted),它会先获取SynchronizationContext.Current,如果没有或者是默认的,会再尝试获取Task对应的TaskScheduler上的SynchronizationContext。也就是说对TaskAwaiter而言,设置默认的SynchronizationContext和没有设置效果是一样的(为了少一次QueueWorkItem,对应源码在这里,我们可以结合前面的AsyncTask,以及下面的进一步测试来验证:
1 2 3 4 5 6 7 8 9 10 11 12 13 14 15 16 17 18 19 20 21 22 23 24 25 26 27 28 29 30 31 32 33 34 35 | class MySynchronizationContext : SynchronizationContext {
public override void Post(SendOrPostCallback d, object state) {
Console.WriteLine("MySynchronizationContext Post, thread{0}", Thread.CurrentThread.ManagedThreadId);
base.Post(d, state);
}
}
public static async void AsyncTask()
{
// 创建并使用自定义的SynchronizationContext
var context = new MySynchronizationContext();
SynchronizationContext.SetSynchronizationContext(context);
Console.WriteLine("AsyncTask: before await, thread{0}", Thread.CurrentThread.ManagedThreadId);
var a = await Task.Run(() =>
{
Thread.Sleep(500);
Console.WriteLine("AsyncTask: in task, thread{0}", Thread.CurrentThread.ManagedThreadId);
return 666;
});
Console.WriteLine("AsyncTask: after await, got result: {0}, thread{1}", a, Thread.CurrentThread.ManagedThreadId);
}
static void Main(string[] args)
{
AsyncTask();
Console.ReadKey();
}
// Output (使用自定义的SynchronizationContext):
// AsyncTask: before await, thread1
// AsyncTask: in task, thread3
// MySynchronizationContext Post, thread3
// AsyncTask: after await, got result: 666, thread4
// Output2 (使用默认的SynchronizationContext):
// AsyncTask: before await, thread1
// AsyncTask: in task, thread3
// AsyncTask: after await, got result: 666, thread3
|
这说明了如果当前线程没有或者设置的默认的SynchronizationContex,那么await之后的回调委托实际上是在await的Task所在的线程上执行的(这一点和ContinueWith的默认行为不大一样,后者总是会通过QueueWorkItem跑在一个新的线程中)。
如果设置了非默认的SynchronizationContex,那么回调委托将通过SynchronizationContex.Post方法封送(由于SynchronizationContex本质也只是接口,我们这里并不能草率地说,会回到Caller线程)。如对于WPF这类UI框架而言,它实现的DispatcherSynchronizationContext最终通过Dispatcher.BeginInvoke将委托封送到UI线程。而如果你是在UI线程发起await,其后又在UI线程上使用task.Result同步等待执行结果,就可能解锁前面F3Async中提到的UI线程卡死场景,这也是新手最常犯的问题。你可以通过task.ConfigureAwait(bool continueOnCapturedContext)指定false来关闭指定Task捕获SynchronizationContex的能力,如此委托回调的执行线程就和没有SynchronizationContex类似了。
总结下,async/await本身不创建线程,aaa; await bbb; ccc; 这三行代码,可能涉及到一个线程(比如没有await,或任务立即完成,甚至await线程自己的异步操作),两个线程(比如没有自定义SynchronizationContex,或有自己实现消息泵的的SynchronizationContex),三个线程(有其他线程实现消息泵的自定义SynchronizationContex)。但具体涉及几个线程,GetAwaiter(通常返回的是TaskAwaiter,但是你也可以自定义),SynchronizationContex等外部代码和环境决定的。
常见问题
await与yield的区别
yield和await都是语法糖,最后都会被生成一个状态机,每行yield/await都对应其中一个状态。
- 状态驱动: yield状态机是手动单步驱动的(通过foreach或显示调用MoveNext),而await状态机是自动驱动的(从调用async函数起,状态机就通过异步回调不断调用MoveNext,直至走完每个状态)
- 线程切换: yield不涉及线程上下文的切换,而await通常涉及(前面说了,不是因为它会创建线程,而是依赖具体的异步操作,以及同步上下文)
- 本质用途: yield用于快速构造迭代器,await用于简化异步编程模型
async/await是Task+状态机的语法糖
从实现机制上来说,这句话没有问题,但要更细致地看,一方面,async函数在经过编译器处理后,最终返回给调用方的,是builder中的Task对象(这也是为何async方法的返回值只能是void, Task, Task<TResult>)。而另一方面,await本身不关注Task,它支持所有提供异步相关接口的对象(GetAwaiter),这样的好处在于除了Task,它还可以集成更多来自框架(比如.NET已经提供的各种Async API),甚至自定义的异步对象,已有的异步操作也可以通过适配GetAwaiter移植到新的async/await异步编程模型。
出现await的地方,当前线程就会返回
这个前面也解释过了,出现await的地方未必会涉及线程上下文切换,比如前面的F2Async,对它的整个调用都是同步的。异步编程和线程无关,线程切换取决于异步操作的实现细节,而await本身只关注与异步操作交互的接口。
Unity async/await
Unity也引入了C# async/await机制,以弥补自己多线程编程方面的短板:
- Unity本身也是UI框架,因此它实现了自己的同步上下文UnitySynchronizationContext以及主线程的消息泵,如此await的异步委托会默认会回到Unity主线程执行(可通过task.ConfigureAwait配置)
- Unity官方提供了部分Async API,如LoadAssetAsync
- Unity社区提供了针对大部分常见YieldInstruction(如WaitForSeconds),以及其他常用库(如UnityWebRequest)的GetAwaiter适配(如Unity3dAsyncAwaitUtil)
Unity3dAsyncAwaitUtil这个库及其相关Blog: Async-Await instead of coroutines in Unity 2017,非常值得了解一下,以适配大家最熟悉的YieldInstruction WaitForSeconds(3)为例,来大概了解下如何通过将它适配为可以直接await WaitForSeconds(3);
1 2 3 4 5 6 7 8 9 10 11 12 13 14 15 16 17 18 19 20 21 22 23 24 25 26 27 28 29 30 31 32 33 34 35 36 37 38 39 40 41 42 43 44 45 46 47 48 49 50 51 52 53 54 55 56 57 58 59 60 61 62 63 64 65 66 67 68 69 70 71 72 73 74 75 76 77 78 79 80 81 82 83 84 85 86 87 88 | // GetAwaiter
// 适配WaitForSeconds类的GetAwaiter方法,通过GetAwaiterReturnVoid返回其Awaiter对象
public static SimpleCoroutineAwaiter GetAwaiter(this WaitForSeconds instruction)
{
return GetAwaiterReturnVoid(instruction);
}
// GetAwaiterReturnVoid
// 创建和返回Awaiter: SimpleCoroutineAwaiter
// 并在Unity主线程执行InstructionWrappers.ReturnVoid(awaiter, instruction)
static SimpleCoroutineAwaiter GetAwaiterReturnVoid(object instruction)
{
var awaiter = new SimpleCoroutineAwaiter();
RunOnUnityScheduler(() => AsyncCoroutineRunner.Instance.StartCoroutine(
InstructionWrappers.ReturnVoid(awaiter, instruction)));
return awaiter;
}
// InstructionWrappers.ReturnVoid
// 这里其实已经在Unity主线程,所以这里本质是将await最终换回了yield,由Unity来驱动WaitForSeconds的完成
// 只不过yield完成之后,通过awaiter.Complete回到Awaiter.OnCompleted流程去
public static IEnumerator ReturnVoid(
SimpleCoroutineAwaiter awaiter, object instruction)
{
// For simple instructions we assume that they don't throw exceptions
yield return instruction;
awaiter.Complete(null);
}
// 确保Action在Unity主线程上运行
// SyncContextUtil.UnitySynchronizationContext在插件Install的时候就初始化好了
// 如果发现当前已经在Unity主线程,就直接执行Action,无需自己Post自己
static void RunOnUnityScheduler(Action action)
{
if (SynchronizationContext.Current == SyncContextUtil.UnitySynchronizationContext)
{
action();
}
else
{
SyncContextUtil.UnitySynchronizationContext.Post(_ => action(), null);
}
}
// 真正的Awaiter,它是无返回值的,对应还有一个SimpleCoroutineAwaiter<T>版本
// 它的实现比较简单,就是适配接口,记录委托回调(_continuation),并在Compele()任务完成时,通过RunOnUnityScheduler封送委托回调
public class SimpleCoroutineAwaiter : INotifyCompletion
{
bool _isDone;
Exception _exception;
Action _continuation;
public bool IsCompleted
{
get { return _isDone; }
}
public void GetResult()
{
Assert(_isDone);
if (_exception != null)
{
ExceptionDispatchInfo.Capture(_exception).Throw();
}
}
public void Complete(Exception e)
{
Assert(!_isDone);
_isDone = true;
_exception = e;
// Always trigger the continuation on the unity thread when awaiting on unity yield
// instructions
if (_continuation != null)
{
RunOnUnityScheduler(_continuation);
}
}
void INotifyCompletion.OnCompleted(Action continuation)
{
Assert(_continuation == null);
Assert(!_isDone);
_continuation = continuation;
}
}
|
如此我们就可以直接使用await WaitForSeconds(3);了,深入细节可以发现,不管是WaitForSeconds本身,还是之后的回调委托,其实都是在Unity主线程中执行的,并且结合RunOnUnityScheduler的优化,整个过程既不会创建线程,也不会产生额外的消息投递,只是在yield上加了一层壳子而已。上例也再次说明了,async/await本身只是异步编程模型,具体的线程切换情况,Awaiter,SynchronizationContext,ConfigureAwait等综合控制。
这个工具库还有一些有意思的小特性,比如Task到IEnumerator的转(原理就是轮询Task完成状态),通过await new WaitForBackgroundThread();切换到后台线程(原理其实就是对task.ConfigureAwait(false)的封装),这些在理解整个async/await,Unity协程,SynchronizationContext等内容后,都应该不难理解了。
//
线程(Thread)和协程(Coroutine)
使用协程的作用一共有两点:1)延时(等待)一段时间执行代码;2)等某个操作完成之后再执行后面的代码。总结起来就是一句话:控制代码在特定的时机执行。
很多初学者,都会下意识地觉得协程是异步执行的,都会觉得协程是C# 线程的替代品,是Unity不使用线程的解决方案。
所以首先,请你牢记:协程不是线程,也不是异步执行的。协程和 MonoBehaviour 的 Update函数一样也是在MainThread中执行的。使用协程你不用考虑同步和锁的问题。
Unity中协程的执行原理
UnityGems.com给出了协程的定义:
A coroutine is a function that is executed partially and, presuming suitable conditions are met, will be resumed at some point in the future until its work is done.
即协程是一个分部执行,遇到条件(yield return 语句)会挂起,直到条件满足才会被唤醒继续执行后面的代码。
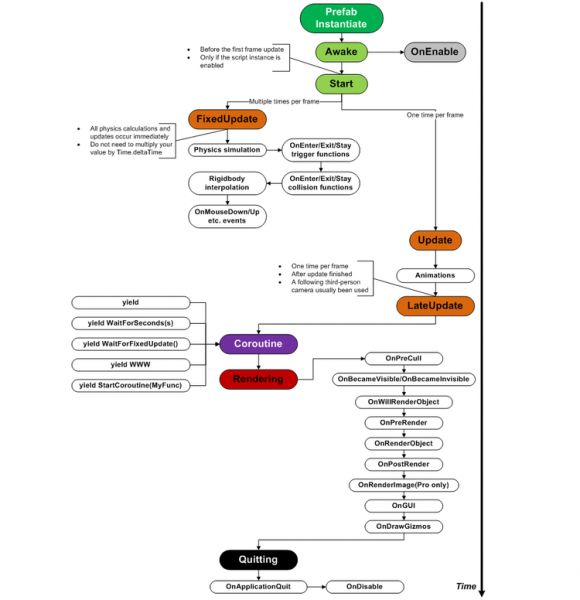
Unity在每一帧(Frame)都会去处理对象上的协程。Unity主要是在Update后去处理协程(检查协程的条件是否满足),但也有写特例:
从上图的剖析就明白,协程跟Update()其实一样的,都是Unity每帧对会去处理的函数(如果有的话)。如果MonoBehaviour 是处于激活(active)状态的而且yield的条件满足,就会协程方法的后面代码。还可以发现:如果在一个对象的前期调用协程,协程会立即运行到第一个 yield return 语句处,如果是 yield return null ,就会在同一帧再次被唤醒。如果没有考虑这个细节就会出现一些奇怪的问题『1』。
『1』注 图和结论都是从UnityGems.com 上得来的,经过下面的验证发现与实际不符,D.S.Qiu用的是Unity 4.3.4f1 进行测试的。经过测试验证,协程至少是每帧的LateUpdate()后去运行。
下面使用 yield return new WaitForSeconds(1f); 在Start,Update 和 LateUpdate 中分别进行测试:

- using UnityEngine;
- using System.Collections;
- public class TestCoroutine : MonoBehaviour {
- private bool isStartCall = false; //Makesure Update() and LateUpdate() Log only once
- private bool isUpdateCall = false;
- private bool isLateUpdateCall = false;
- // Use this for initialization
- void Start () {
- if (!isStartCall)
- {
- Debug.Log("Start Call Begin");
- StartCoroutine(StartCoutine());
- Debug.Log("Start Call End");
- isStartCall = true;
- }
- }
- IEnumerator StartCoutine()
- {
- Debug.Log("This is Start Coroutine Call Before");
- yield return new WaitForSeconds(1f);
- Debug.Log("This is Start Coroutine Call After");
- }
- // Update is called once per frame
- void Update () {
- if (!isUpdateCall)
- {
- Debug.Log("Update Call Begin");
- StartCoroutine(UpdateCoutine());
- Debug.Log("Update Call End");
- isUpdateCall = true;
- }
- }
- IEnumerator UpdateCoutine()
- {
- Debug.Log("This is Update Coroutine Call Before");
- yield return new WaitForSeconds(1f);
- Debug.Log("This is Update Coroutine Call After");
- }
- void LateUpdate()
- {
- if (!isLateUpdateCall)
- {
- Debug.Log("LateUpdate Call Begin");
- StartCoroutine(LateCoutine());
- Debug.Log("LateUpdate Call End");
- isLateUpdateCall = true;
- }
- }
- IEnumerator LateCoutine()
- {
- Debug.Log("This is Late Coroutine Call Before");
- yield return new WaitForSeconds(1f);
- Debug.Log("This is Late Coroutine Call After");
- }
- }
得到日志输入结果如下:
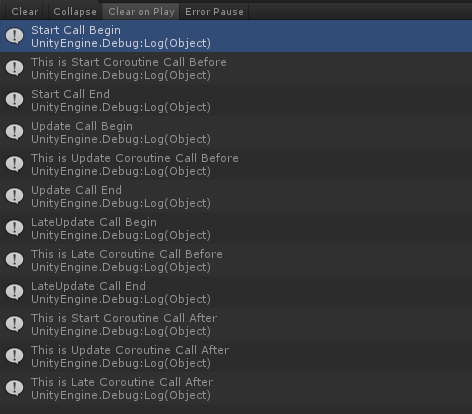
然后将yield return new WaitForSeconds(1f);改为 yield return null; 发现日志输入结果和上面是一样的,没有出现上面说的情况:
- using UnityEngine;
- using System.Collections;
- public class TestCoroutine : MonoBehaviour {
- private bool isStartCall = false; //Makesure Update() and LateUpdate() Log only once
- private bool isUpdateCall = false;
- private bool isLateUpdateCall = false;
- // Use this for initialization
- void Start () {
- if (!isStartCall)
- {
- Debug.Log("Start Call Begin");
- StartCoroutine(StartCoutine());
- Debug.Log("Start Call End");
- isStartCall = true;
- }
- }
- IEnumerator StartCoutine()
- {
- Debug.Log("This is Start Coroutine Call Before");
- yield return null;
- Debug.Log("This is Start Coroutine Call After");
- }
- // Update is called once per frame
- void Update () {
- if (!isUpdateCall)
- {
- Debug.Log("Update Call Begin");
- StartCoroutine(UpdateCoutine());
- Debug.Log("Update Call End");
- isUpdateCall = true;
- }
- }
- IEnumerator UpdateCoutine()
- {
- Debug.Log("This is Update Coroutine Call Before");
- yield return null;
- Debug.Log("This is Update Coroutine Call After");
- }
- void LateUpdate()
- {
- if (!isLateUpdateCall)
- {
- Debug.Log("LateUpdate Call Begin");
- StartCoroutine(LateCoutine());
- Debug.Log("LateUpdate Call End");
- isLateUpdateCall = true;
- }
- }
- IEnumerator LateCoutine()
- {
- Debug.Log("This is Late Coroutine Call Before");
- yield return null;
- Debug.Log("This is Late Coroutine Call After");
- }
- }
『今天意外发现Monobehaviour的函数执行顺序图,发现协程的运行确实是在LateUpdate之后,下面附上:』
增补于:03/12/2014 22:14
前面在介绍TaskManager工具时,说到MonoBehaviour 没有针对特定的协程提供Stop方法,其实不然,可以通过MonoBehaviour enabled = false 或者 gameObject.active = false 就可以停止协程的执行『2』。
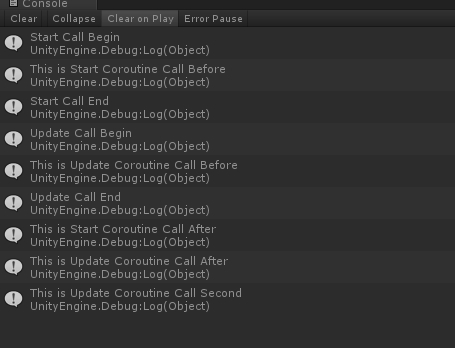
经过验证,『2』的结论也是错误的,正确的结论是,MonoBehaviour.enabled = false 协程会照常运行,但 gameObject.SetActive(false) 后协程却全部停止,即使在Inspector把 gameObject 激活还是没有继续执行:
- using UnityEngine;
- using System.Collections;
- public class TestCoroutine : MonoBehaviour {
- private bool isStartCall = false; //Makesure Update() and LateUpdate() Log only once
- private bool isUpdateCall = false;
- private bool isLateUpdateCall = false;
- // Use this for initialization
- void Start () {
- if (!isStartCall)
- {
- Debug.Log("Start Call Begin");
- StartCoroutine(StartCoutine());
- Debug.Log("Start Call End");
- isStartCall = true;
- }
- }
- IEnumerator StartCoutine()
- {
- Debug.Log("This is Start Coroutine Call Before");
- yield return new WaitForSeconds(1f);
- Debug.Log("This is Start Coroutine Call After");
- }
- // Update is called once per frame
- void Update () {
- if (!isUpdateCall)
- {
- Debug.Log("Update Call Begin");
- StartCoroutine(UpdateCoutine());
- Debug.Log("Update Call End");
- isUpdateCall = true;
- this.enabled = false;
- //this.gameObject.SetActive(false);
- }
- }
- IEnumerator UpdateCoutine()
- {
- Debug.Log("This is Update Coroutine Call Before");
- yield return new WaitForSeconds(1f);
- Debug.Log("This is Update Coroutine Call After");
- yield return new WaitForSeconds(1f);
- Debug.Log("This is Update Coroutine Call Second");
- }
- void LateUpdate()
- {
- if (!isLateUpdateCall)
- {
- Debug.Log("LateUpdate Call Begin");
- StartCoroutine(LateCoutine());
- Debug.Log("LateUpdate Call End");
- isLateUpdateCall = true;
- }
- }
- IEnumerator LateCoutine()
- {
- Debug.Log("This is Late Coroutine Call Before");
- yield return null;
- Debug.Log("This is Late Coroutine Call After");
- }
- }
先在Update中调用 this.enabled = false; 得到的结果:
然后把 this.enabled = false; 注释掉,换成 this.gameObject.SetActive(false); 得到的结果如下:
整理得到:通过设置MonoBehaviour脚本的enabled对协程是没有影响的,但如果 gameObject.SetActive(false) 则已经启动的协程则完全停止了,即使在Inspector把gameObject 激活还是没有继续执行。也就说协程虽然是在MonoBehvaviour启动的(StartCoroutine)但是协程函数的地位完全是跟MonoBehaviour是一个层次的,不受MonoBehaviour的状态影响,但跟MonoBehaviour脚本一样受gameObject 控制,也应该是和MonoBehaviour脚本一样每帧“轮询” yield 的条件是否满足。
yield 后面可以有的表达式:
a) null - the coroutine executes the next time that it is eligible
b) WaitForEndOfFrame - the coroutine executes on the frame, after all of the rendering and GUI is complete
c) WaitForFixedUpdate - causes this coroutine to execute at the next physics step, after all physics is calculated
d) WaitForSeconds - causes the coroutine not to execute for a given game time period
e) WWW - waits for a web request to complete (resumes as if WaitForSeconds or null)
f) Another coroutine - in which case the new coroutine will run to completion before the yielder is resumed
值得注意的是 WaitForSeconds()受Time.timeScale影响,当Time.timeScale = 0f 时,yield return new WaitForSecond(x) 将不会满足。
IEnumerator & Coroutine
协程其实就是一个IEnumerator(迭代器),IEnumerator 接口有两个方法 Current 和 MoveNext() ,前面介绍的 TaskManager 就是利用者两个方法对协程进行了管理,只有当MoveNext()返回 true时才可以访问 Current,否则会报错。迭代器方法运行到 yield return 语句时,会返回一个expression表达式并保留当前在代码中的位置。 当下次调用迭代器函数时执行从该位置重新启动。
Unity在每帧做的工作就是:调用 协程(迭代器)MoveNext() 方法,如果返回 true ,就从当前位置继续往下执行。
Hijack
这里在介绍一个协程的交叉调用类 Hijack(参见附件):
- using System;
- using System.Collections.Generic;
- using System.Linq;
- using UnityEngine;
- using System.Collections;
- [RequireComponent(typeof(GUIText))]
- public class Hijack : MonoBehaviour {
- //This will hold the counting up coroutine
- IEnumerator _countUp;
- //This will hold the counting down coroutine
- IEnumerator _countDown;
- //This is the coroutine we are currently
- //hijacking
- IEnumerator _current;
- //A value that will be updated by the coroutine
- //that is currently running
- int value = 0;
- void Start()
- {
- //Create our count up coroutine
- _countUp = CountUp();
- //Create our count down coroutine
- _countDown = CountDown();
- //Start our own coroutine for the hijack
- StartCoroutine(DoHijack());
- }
- void Update()
- {
- //Show the current value on the screen
- guiText.text = value.ToString();
- }
- void OnGUI()
- {
- //Switch between the different functions
- if(GUILayout.Button("Switch functions"))
- {
- if(_current == _countUp)
- _current = _countDown;
- else
- _current = _countUp;
- }
- }
- IEnumerator DoHijack()
- {
- while(true)
- {
- //Check if we have a current coroutine and MoveNext on it if we do
- if(_current != null && _current.MoveNext())
- {
- //Return whatever the coroutine yielded, so we will yield the
- //same thing
- yield return _current.Current;
- }
- else
- //Otherwise wait for the next frame
- yield return null;
- }
- }
- IEnumerator CountUp()
- {
- //We have a local increment so the routines
- //get independently faster depending on how
- //long they have been active
- float increment = 0;
- while(true)
- {
- //Exit if the Q button is pressed
- if(Input.GetKey(KeyCode.Q))
- break;
- increment+=Time.deltaTime;
- value += Mathf.RoundToInt(increment);
- yield return null;
- }
- }
- IEnumerator CountDown()
- {
- float increment = 0f;
- while(true)
- {
- if(Input.GetKey(KeyCode.Q))
- break;
- increment+=Time.deltaTime;
- value -= Mathf.RoundToInt(increment);
- //This coroutine returns a yield instruction
- yield return new WaitForSeconds(0.1f);
- }
- }
- }
上面的代码实现是两个协程交替调用,对有这种需求来说实在太精妙了。


 6431
6431


 被折叠的 条评论
为什么被折叠?
被折叠的 条评论
为什么被折叠?
 到【灌水乐园】发言


