


Note: this article was originally posted on a previous version of the 500px engineering blog. A lot has changed since it was originally posted on Feb 1, 2015. In the future posts, we will be covering how our image classification solution has evolved and what other interesting machine learning projects we have.
TLDR: This post provides an overview of how to perform large scale image classification using Hadoop Streaming. First, we look at each component individually and identify things that need to be taken into account for the final integration. Then we go over how to ‘glue’ all pieces together to produce the desired results.
Introduction
Till recently image search and discovery at 500px was based mainly on meta information provided by users which included tags, title and description. It’s obvious that the quality of such search and discovery directly depends on how well users describe their photos. Since this is such a tedious process, most photos are simply left untagged or have inconsistent keywords. The recentupdate from Facebook illustrates the scale of the problem:
~2 Billion photos are shared on Facebook per day!
Luckily, due to the recent advancements in Deep Neural Networks (NN) and their efficient implementations using GPUs, it is now possible to perform automatic image classification (tagging) with nearly human performance. Getting close to human capabilities or even beating them does not mean we’ve achieved real Artificial Intelligence (AI). The deep NN algorithms do not ‘understand’ content of images nor the concepts that describe them. Instead, they learn invariant representation of patterns (features) found in images and create a mapping function that maps pixels of an image to a combination of patterns found in the image. This mapping function is essentially a specially crafted mathematical function that takes a set of numbers (pixels) and outputs another set of numbers (features).
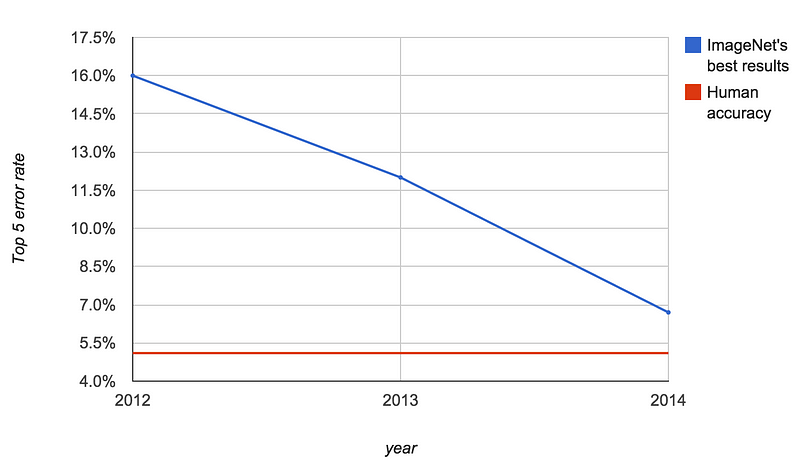
Despite not being real AI, deep NN algorithms applied to image classification tasks have been significantly improved over the last few years. This is best illustrated by looking at the results of the ImageNet competition.
Additional advantages of using NN algorithms include:
- calculating keyword weights in order to better control search results
- calculating similarity between images
- reverse image search
- extracting aesthetic qualities of images
There are many open source projects like Theano, Torch, Caffe, DL4J, Toronto DeepNet that provide tools for implementing NNs. For our approach we choseCaffe because it was one of the easiest to start with and also satisfied our requirements:
- availability of pre-trained models which is important, considering it takes weeks to train a model and requires large training set like ImageNet.
- Python wrapper so we can use a lot of existing machine learning libraries like scikit-learn in the same environment
- active community, decent documentation and examples
So we have the library and models for automatic image recognition. Let’s look at the steps we need to perform to classify one image:
- download an image
- resize and crop to fit the model’s input dimensions
- convert RGB pixels into an array of real numbers
- call Caffe’s APIs
- extract predicted labels and features
- save results
When operating with hundreds of millions of images, just the download step may take weeks to complete on a single machine. A faster approach would include performing these steps in parallel. We achieved this by parallelizing execution both within one machine using GPU and multiprocessing, and across many machines relying on Hadoop.
Hadoop Streaming for Image Classification
Hadoop is a framework for distributed processing and storage. Normally, it requires to write Java code to run your jobs. Conveniently, it also offersHadoop Streaming that allows to use any scripting language to create custom jobs. Hadoop Streaming is essentially a job that will run your script in a child process. stdin and stdout are used to pass data to and from your code. stderr is used for logging and debugging. Hadoop Streaming assumes that your input and output data is textual and has one item per line. This means you cannot simply point Hadoop to a folder containing images. It will try to read each image as a text file and will eventually fail.
The big challenge with Hadoop is installing and configuring the cluster. It could take a full-time devops position just to do that. Our shortcut to the problem was to use Elastic MapReduce (EMR) which is Amazon’s web service that provides APIs to configure a Hadoop cluster and run jobs. Another advantage of EMR is seamless integration with Amazon S3. Essentially, when running an EMR job you specify where to read data from and save results to on S3. The only limitation is the input param needs to point to a file or a folder with files on S3, it will not traverse subfolders.
So the input to EMR should be either a text file or a folder with text files on S3. Since we are dealing with a very large collection of photos, we generated a list of files, where each file contained around 1000 records (lines) in the following format:
photo_id  s3://input_photo.jpg  s3://output_classification.json
photo_id  s3://input_photo.jpg  s3://output_classification.json
photo_id  s3://input_photo.jpg  s3://output_classification.json
...
By default, EMR outputs data as one large list split among many part-xxxxxfiles. These split files could be very large and are not aligned with new line boundaries which make parsing them hard. For our classification pipeline we saved predictions for each image as a separate JSON file. This is why we explicitly specified destination location in the input for Hadoop so each worker can save results for each image separately.
We performed image classification on GPU-based EC2 instances. To our surprise we found out that these g2.2xlarge instances are highly unreliable. The most common problem we observed was the failures of the CUDA driver to find the GPU card. From Hadoop side it looked like a stuck worker whose containers were blocked by the GPU driver. The workaround was to kill the failed instance and let EMR to bring a new node and restore HDFS cluster.
There were also problems resulting in failed jobs that Hadoop/EMR could not handle. Those included exceeding memory configuration limits, running out of disk space, S3 connectivity issues, bugs in the code and so on. This is why we needed ability to resume long running jobs that failed. Our approach was to write photo_id into Hadoop’s output for successfully processed images. In case of a failed job, we would parse part-xxxxx files and exclude successfully processed photo ids from the input files.
Bootstrapping and configuring EMR with mrjob
Before we can schedule a job on EMR we first need to bootstrap the cluster and then configure Hadoop. Amazon provides command line tools to perform both actions. However, we took an easier path and used mrjob which is a Python library that provides abstractions over EMR APIs and makes developing and testing of MapReduce jobs very easy.
It’s worth mentioning that mrjob is not the slowest Python framework for Hadoop as opposed to the blog post by Cloudera. Instead, it is as fast as any Hadoop Streaming job can get. It just does more than other frameworks by offering protocols which serialize and deserialize raw text into native Python objects. Of course, this feature can be disabled in the code.
To bootstrap and configure EMR via mrjob you create a YAML file. This is what our classifier_job.conf looked like:
It’s important to highlight the memory specific settings both for YARN (Hadoop’s resource manager) and MapReduce. One map operation required around 2.7GB of RAM: 1.7GB to keep Caffe model in memory + 1GB for downloading and preparing 5 images in parallel. This is why we allocated 3GB per one YARN container. Each g2.2xlarge worker had 15GB RAM out of which 12GB was allocated to MapReduce and 3GB was left to the OS. This gave us 4 containers per node or 80 containers for 20 nodes cluster.
The bash script classifier_job.sh that installed Numpy, Caffe and other libraries would run on the master and worker nodes. To make sure it did not fail on the master node without GPU we had the following switch:
Running the classification job
The image classification job consisted of a single map operation that included downloading images, preparing batch data, performing classification on GPU and saving results. To justify overhead of loading data in/from GPU, images needed to be processed in batches. Unfortunately, mrjob does not support batch processing out of the box. The workaround was to override run_mappermethod and manually control reading lines from stdin.
The batch size was set to 50 images based on the available GPU memory ofg2.2xlarge instance. Below are the two main methods that handled batch operation: run_mapper for preparing batch data and process_batch for batch classification task.
Among all the major steps of process_batch, downloading images was the slowest step:
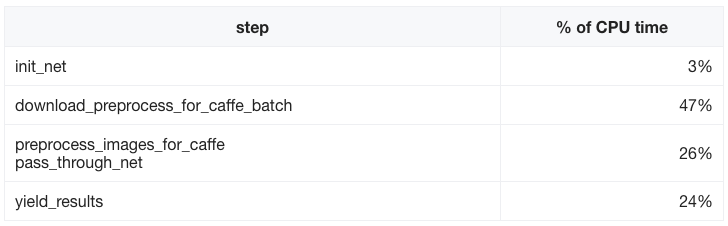
download_preprocess_for_caffe_batch was parallelized to perform downloading using 5 processes. Normally this download step would be a good candidate for a separate map operation. However, the limitation here is to store all resized images in HDFS (Hadoop Distributed File System), which would require to have a very large EMR cluster. Alternatively, it is possible to increase the number of parallel processes from 5 to 10, for example. But doing so would require to increase the map task’s memory footprint and as the result to reduce number of containers per node (e.g. from 4 containers to 3).
Here are the stats for the final run:
- 20 nodes EMR cluster
- 80 containers (4 containers per node)
- ~600 images/s (30 images/s per node)
- ~80% average CPU load across the cluster
- several days to complete
General tips
Just a compilation of random tips we found useful while working on this project.
- Use EMR job flow to start a persistent cluster so you can avoid provisioning and boostraping every time you want to run a job. An example of possible workflow using mrjob:
# start cluster. It will return job flow id
python -m mrjob.tools.emr.create_job_flow \
--conf-path=classifier_job.conf

# schedule a job using the job flow id
python classifier_job.py -r emr \
--emr-job-flow-id=j-396IAJN5Y6BCB \
--conf-path=classifier_job.conf \
--no-output --output-dir=s3://output s3://input
- Use EC2 spot instances to save EMR costs by specifying the bid price in the config file:
ec2_master_instance_bid_price: '0.07'
ec2_core_instance_bid_price: '0.07'
- Use Hadoop’s counters and stderr to output debug and profiling info. For example:
...
except Exception as e:
  self.increment_counter('error', str(e))
  self.increment_counter('count', 'failed photos', count)
  stderr.write(str(e) + '\n')
...
- ssh to EMR cluster and run:
# to view worker nodes and # of running containers
yarn node -list

# to view running jobs and get urls for the monitoring dashboard
yarn application -list
- Specify S3 location where to store EMR logs in the mrjob’s config file.
s3_log_uri: s3n://path_to_store_emr_logs
These logs contain when and where each map/reduce attempt is started and whether it succeeded or failed. For the failed tasks you can look at the corresponding container logs that contain your code’s stderr output and other possible exceptions.
Summary
We showed how to perform a large scale image classification task using caffe, Elastic MapReduce (EMR) and mrjob. In our approach we optimized for simplicity and speed of development.
The combination of Hadoop Streaming and machine learning libraries available in Python opens up interesting opportunities for large scale data processing and analysis.
from: https://developers.500px.com/image-classification-with-hadoop-streaming-1aa18b81e22b#.b27jerwf8


 4809
4809


 被折叠的 条评论
为什么被折叠?
被折叠的 条评论
为什么被折叠?
 到【灌水乐园】发言


