


一、文件管理命令
1. ls
ls 显示非隐藏文件
[geek@localhost ~]$ ls
cprograms  Lshare   signal_lshare  模板  图片  下载  桌面
lin        scripts  公共           视频  文档  音乐
ls -a 显示所有文件(包括隐藏文件)
[geek@localhost ~]$ ls -a
.              .bashrc    .ICEauthority  scripts        图片
..             .cache     lin            signal_lshare  文档
.bash_history  .config    .local         公共           下载
.bash_logout   cprograms  Lshare         模板           音乐
.bash_profile  .esd_auth  .mozilla       视频           桌面
ls -l (或者直接用ll)显示详细信息(包括权限信息,所有者信息,大小,创建时间等)
[geek@localhost ~]$ ls -l
总用量 4
drwxr-xr-x. 2 root root  102 7月   7 21:47 cprograms
drwxr-xr-x. 2 root root    6 7月   6 21:16 lin
drwxrwxr-x. 2 geek geek    6 7月   6 16:29 Lshare
drwxr-xr-x. 2 root root 4096 7月   8 15:22 scripts
lrwxrwxrwx. 1 geek geek    6 7月   6 16:30 signal_lshare -> Lshare
drwxr-xr-x. 2 geek geek    6 10月 17 2014 公共
drwxr-xr-x. 2 geek geek    6 10月 17 2014 模板
drwxr-xr-x. 2 geek geek    6 10月 17 2014 视频
drwxr-xr-x. 2 geek geek    6 10月 17 2014 图片
drwxr-xr-x. 2 geek geek    6 10月 17 2014 文档
drwxr-xr-x. 2 geek geek    6 10月 17 2014 下载
drwxr-xr-x. 2 geek geek   18 7月   6 16:23 音乐
drwxr-xr-x. 2 geek geek    6 10月 17 2014 桌面
2. pwd
pwd 打印当前目录
[geek@localhost ~]$ pwd
/home/geek
3. cd
cd .. 切换到上一级目录
[geek@localhost ~]$ cd ..
[geek@localhost home]$ pwd
/home
[geek@localhost home]$
cd / 切换到根目录
[geek@localhost home]$ cd /
[geek@localhost /]$ pwd
/
[geek@localhost /]$
4. mkdir
mkdir geek 在当前目录创建名为geek的子目录
[geek@localhost ~]$ mkdir geek
[geek@localhost ~]$ ls
cprograms  lin     scripts        公共  视频  文档  音乐
geek       Lshare  signal_lshare  模板  图片  下载  桌面
5. rmdir
rmdir geek 删除空目录geek
[geek@localhost ~]$ rmdir geek
[geek@localhost ~]$ ls
cprograms  Lshare   signal_lshare  模板  图片  下载  桌面
lin        scripts  公共           视频  文档  音乐
6. touch
touch 1.txt 在当前目录创建空文件1.txt
[geek@localhost ~]$ touch 1.txt
[geek@localhost ~]$ ls
1.txt      lin     scripts        公共  视频  文档  音乐
cprograms  Lshare  signal_lshare  模板  图片  下载  桌面
7. rm
rm 1.txt 删除当前目录的1.txt
[geek@localhost ~]$ rm 1.txt
[geek@localhost ~]$ ls
cprograms  Lshare   signal_lshare  模板  图片  下载  桌面
lin        scripts  公共           视频  文档  音乐
rm -rf lin 删除非空目录lin
[geek@localhost ~]$ ls lin
test
[geek@localhost ~]$ rmdir lin
rmdir: 删除 "lin" 失败: 目录非空
[geek@localhost ~]$ rm -rf lin
[geek@localhost ~]$ ls
cprograms  scripts  公共  模板  视频  图片  文档  下载  音乐  桌面
[geek@localhost ~]$
8. cat
cat 1.txt 直接显示1.txt的所有内容,跳转到末尾
[geek@localhost ~]$ cat 1.txt
.
.
.
,但是维基百科内仍然包含有大量未经证实或者是相互矛盾的信息[32]。不过《自然》在2005年的调查之中认为维基百科在科学文章这一领域与作为传统百科全书代表的《大英百科全书》有着相似的精确度,但是两者在内容上都有一定程度上的“严重缺失”[33][34]。
[geek@localhost ~]$
9. more
more 1.txt 分页显示1.txt的内容,按空格键可以向下查看
[geek@localhost ~]$ more 1.txt
维基百科最早是在吉米·威尔士与拉里·桑格两人的合作下,在2001年1月13日于互联网上推
出网站服务,并在1月15日正式展开网络百科全书的项目[4]。其中桑格同时结合了维基百科
网站合作核心的“Wiki”以及具有百科全书之意的“encyclopedia”,而创造出新的混成词“Wik
ipedia”。
--More--(49%)
10. less
less 1.txt 进入全文阅读模式,可上下滚轮和按空格向下查看,按q退出
[geek@localhost ~]$ less 1.txt11. grep
grep -i “wiki” 1.txt 从1.txt中不区分大小写地找出包含”wiki” 的行
[geek@localhost ~]$ grep -i "wiki" 1.txt
维基百科最早是在吉米·威尔士与拉里·桑格两人的合作下,在2001年1月13日于互联网上推出网站服务,并在1月15日正式展开网络百科全书的项目[4]。其中桑格同时结合了维基百科网站合作核心的“Wiki”以及具有百科全书之意的“encyclopedia”,而创造出新的混成词“Wikipedia”。
。。。
12. mv
mv 1.txt 2.txt 将1.txt更名为2.txt
[geek@localhost ~]$ mv 1.txt 2.txt
[geek@localhost ~]$ ls
2.txt  cprograms  scripts  公共  模板  视频  图片  文档  下载  音乐  桌面
mv 2.txt /home 移动当前目录中的2.txt到/home目录中
[root@localhost geek]# ls
2.txt  cprograms  scripts  公共  模板  视频  图片  文档  下载  音乐  桌面
[root@localhost geek]# mv 2.txt /home
[root@localhost geek]# cd ..
[root@localhost home]# ls
2.txt  geek
13. cp
cp 2.txt /home/geek/1.txt 将当前目录的2.txt复制到/home/geek并更名为1.txt
[root@localhost home]# cp 2.txt /home/geek/1.txt
[root@localhost home]# cd geek
[root@localhost geek]# ls
1.txt  cprograms  scripts  公共  模板  视频  图片  文档  下载  音乐  桌面
cp /home/2.txt /home/geek 将/home中的2.txt复制到/home/geek目录中
[root@localhost geek]# cp /home/2.txt /home/geek
[root@localhost geek]# ls
1.txt  2.txt  cprograms  scripts  公共  模板  视频  图片  文档  下载  音乐  桌面
14. find
find *.txt 在当前目录查找所有以“.txt”结尾的文件
[root@localhost geek]# find *.txt
1.txt
2.txt
find -name *.txt 递归查找当前目录及其子目录中的所有以“.txt”结尾的文件
[root@localhost geek]# cd ..
[root@localhost home]# find -name *.txt
./geek/.local/share/Trash/files/2.txt
./geek/2.txt
./2.txt
15. file
file 2.txt 显示2.txt的文件类型
[root@localhost home]# file 2.txt
2.txt: UTF-8 Unicode text, with very long lines
二、磁盘管理命令
1.df
df
[geek@localhost home]$ df  列出文件系统的整体磁盘使用量
文件系统                  1K-块    已用    可用 已用% 挂载点
/dev/mapper/centos-root 8910848 4801752 4109096   54% /
devtmpfs                 496140       0  496140    0% /dev
tmpfs                    505428     148  505280    1% /dev/shm
tmpfs                    505428   13532  491896    3% /run
tmpfs                    505428       0  505428    0% /sys/fs/cgroup
/dev/sda1                508588  121304  387284   24% /boot
df -h 以易读(KB、MB、GB)形式显示文件系统的整体磁盘使用量
[geek@localhost home]$ df -h
文件系统                 容量  已用  可用 已用% 挂载点
/dev/mapper/centos-root  8.5G  4.6G  4.0G   54% /
devtmpfs                 485M     0  485M    0% /dev
tmpfs                    494M  148K  494M    1% /dev/shm
tmpfs                    494M   14M  481M    3% /run
tmpfs                    494M     0  494M    0% /sys/fs/cgroup
/dev/sda1                497M  119M  379M   24% /boot
df -T 将文件系统类型也显示出来
[geek@localhost home]$ df -T
文件系统                类型       1K-块    已用    可用 已用% 挂载点
/dev/mapper/centos-root xfs      8910848 4801808 4109040   54% /
devtmpfs                devtmpfs  496140       0  496140    0% /dev
tmpfs                   tmpfs     505428     148  505280    1% /dev/shm
tmpfs                   tmpfs     505428   13532  491896    3% /run
tmpfs                   tmpfs     505428       0  505428    0% /sys/fs/cgroup
/dev/sda1               xfs       508588  121304  387284   24% /boot
df /etc 显示目录/etc所在的分区的使用情况
[geek@localhost home]$ df /etc
文件系统                  1K-块    已用    可用 已用% 挂载点
/dev/mapper/centos-root 8910848 4801776 4109072   54% /
[geek@localhost home]$ df /home/geek/2.txt
文件系统                  1K-块    已用    可用 已用% 挂载点
/dev/mapper/centos-root 8910848 4801776 4109072   54% /
2.du
du -h 以易读的方式评估当前目录及其递归子目录的文件量
[geek@localhost ~]$ du -h
4.0K    ./.mozilla/extensions/{ec8030f7-c20a-464f-9b0e-13a3a9e97384}
4.0K    ./.mozilla/extensions
0   ./.mozilla/plugins
du -s 列出当前目录的总文件量(默认单位为KB)
[root@localhost home]# du -s
38040   .
du -sm 检查当前目录下各个目录的文件量,单位为MB
[root@localhost home]# du -sm ./*
1   ./2.txt
38  ./geek
3.fdisk
fdisk -l 列出磁盘分区表
[root@localhost home]# fdisk -l

磁盘 /dev/sda:10.7 GB, 10737418240 字节,20971520 个扇区
Units = 扇区 of 1 * 512 = 512 bytes
扇区大小(逻辑/物理):512 字节 / 512 字节
I/O 大小(最小/最佳):512 字节 / 512 字节
磁盘标签类型:dos
磁盘标识符:0x000bf8fb

   设备 Boot      Start         End      Blocks   Id  System
/dev/sda1   *        2048     1026047      512000   83  Linux
/dev/sda2         1026048    20971519     9972736   8e  Linux LVM

磁盘 /dev/mapper/centos-swap:1073 MB, 1073741824 字节,2097152 个扇区
Units = 扇区 of 1 * 512 = 512 bytes
扇区大小(逻辑/物理):512 字节 / 512 字节
I/O 大小(最小/最佳):512 字节 / 512 字节


磁盘 /dev/mapper/centos-root:9135 MB, 9135194112 字节,17842176 个扇区
Units = 扇区 of 1 * 512 = 512 bytes
扇区大小(逻辑/物理):512 字节 / 512 字节
I/O 大小(最小/最佳):512 字节 / 512 字节
三、文件权限命令
1.chmod
Linux文件的基本权限有9个,分别是owner、group、others三种身份各有自己的read、write、execute权限。文件的权限字符为“-rwxrwxrwx”,这9个权限是三个三个一组的。其中,我们可以使用数字来代表各个权限,各权限的分数分别为:r—-4,w—-2,x—-1。每种身份(owner、group、others)各自的三个权限(r、w、x)分数是需要累加的。1
chmod -o=rw 2.txt 给2.txt的其他用户加上写的权限
[root@localhost home]# ll
总用量 12
-rw-rw-r--.  1 geek geek 5080 7月   9 12:30 2.txt
drwx------. 15 geek geek 4096 7月   9 13:59 geek
[root@localhost home]# chmod o=rw 2.txt
[root@localhost home]# ll
总用量 12
-rw-rw-rw-.  1 geek geek 5080 7月   9 12:30 2.txt
drwx------. 15 geek geek 4096 7月   9 13:59 geek
chmod 777 2.txt 给2.txt的所有用户加上所有权限
[root@localhost home]# ll
总用量 12
-rw-rw-rw-.  1 geek geek 5080 7月   9 12:30 2.txt
drwx------. 15 geek geek 4096 7月   9 13:59 geek
[root@localhost home]# chmod 777 2.txt
[root@localhost home]# ll
总用量 12
-rwxrwxrwx.  1 geek geek 5080 7月   9 12:30 2.txt
drwx------. 15 geek geek 4096 7月   9 13:59 geek
2.chown
chown -R root scripts 更改scripts目录连同其下的的所有目录文件的所有者为root
[root@localhost geek]# chown -R root scripts
[root@localhost geek]# ll
总用量 20
-rw-r--r--. 1 root root 5080 7月   9 13:08 1.txt
-rw-r--r--. 1 root root 5080 7月   9 13:11 2.txt
drwxr-xr-x. 2 root root  102 7月   7 21:47 cprograms
drwxr-xr-x. 2 root geek 4096 7月   8 15:22 scripts
drwxr-xr-x. 2 geek geek    6 10月 17 2014 公共
drwxr-xr-x. 2 geek geek    6 10月 17 2014 模板
drwxr-xr-x. 2 geek geek    6 10月 17 2014 视频
drwxr-xr-x. 2 geek geek    6 10月 17 2014 图片
drwxr-xr-x. 2 geek geek    6 10月 17 2014 文档
drwxr-xr-x. 2 geek geek    6 10月 17 2014 下载
drwxr-xr-x. 2 geek geek   18 7月   6 16:23 音乐
drwxr-xr-x. 2 geek geek    6 10月 17 2014 桌面
chown root:root 2.txt 改变2.txt的所有者为root和所属组为root
[root@localhost home]# ll
总用量 12
-rwxrwxrwx.  1 geek geek 5080 7月   9 12:30 2.txt
drwx------. 15 geek geek 4096 7月   9 13:59 geek
[root@localhost home]# chown root:root 2.txt
[root@localhost home]# ll
总用量 12
-rwxrwxrwx.  1 root root 5080 7月   9 12:30 2.txt
drwx------. 15 geek geek 4096 7月   9 13:59 geek
3.chgrp
chgrp geek 2.txt 改变2.txt的所属组为geek
[root@localhost home]# ll
总用量 12
-rwxrwxrwx.  1 root root 5080 7月   9 12:30 2.txt
drwx------. 15 geek geek 4096 7月   9 13:59 geek
[root@localhost home]# chgrp geek 2.txt
[root@localhost home]# ll
总用量 12
-rwxrwxrwx.  1 root geek 5080 7月   9 12:30 2.txt
drwx------. 15 geek geek 4096 7月   9 13:59 geek
四、用户管理命令
1.su、sudo
sudo passwd root 从当前用户更新root的密码
[geek@localhost home]$ sudo passwd root
[sudo] password for geek:
更改用户 root 的密码 。
新的 密码:
无效的密码: 密码少于 8 个字符
重新输入新的 密码:
passwd:所有的身份验证令牌已经成功更新。
su root 从当前用户切换root用户
[geek@localhost home]$ su root
密码:
[root@localhost home]#
2.who/w
who 获取目前已登录系统的用户信息
[root@localhost home]# who
geek     pts/0        2015-07-09 11:07 (:1)
geek     :1           2015-07-06 21:38 (:1)
[root@localhost home]# w
 16:37:49 up 1 day, 9 min,  2 users,  load average: 0.11, 0.26, 0.18
USER     TTY        LOGIN@   IDLE   JCPU   PCPU WHAT
geek     pts/0     11:07    5.00s  1.01s 27.56s /usr/libexec/gnome-terminal-serve
geek     :1        一21   ?xdm?  57:05   0.62s gdm-session-worker [pam/gdm-autol
3.useradd
useradd Lshare 以默认方式新增用户Lshare
[root@localhost home]# useradd Lshare
[root@localhost home]# id Lshare
uid=1001(Lshare) gid=1002(Lshare) 组=1002(Lshare)
在CentOS中,系统默认处理以下几个项目:
- 在/etc/passwd里面创建一行与账号相关的数据,包括UID/GID/主文件夹等;
- 在/etc/shadow里面将此账号的密码相关参数填入,但是尚未有密码;
- 在/etc/group里面加入一个与账号名称一模一样的组名;
- 在/home下面创建一个与账号同名的目录作为用户文件夹,且权限为7002
4.groupadd
groupadd geeks 添加用户组geeks
[root@localhost home]# groupadd geeks
[root@localhost home]# grep geeks /etc/group
geeks:x:1003:
5.passwd
passwd geek 更改geek的登录密码
[root@localhost home]# passwd geek
更改用户 geek 的密码 。
新的 密码:
无效的密码: 密码少于 8 个字符
重新输入新的 密码:
passwd:所有的身份验证令牌已经成功更新。
6.usermod
usermod -l Lee Lshare 修改用户名Lshare为Lee
[root@localhost home]# usermod -l Lee Lshare
[root@localhost home]# grep Lee /etc/shadow
Lee:!!:16625:0:99999:7:::
usermod -e “2015-07-31” Lee 用户Lee的密码将在15年7月31号失效
[root@localhost home]# grep Lee /etc/shadow
Lee:!!:16625:0:99999:7:::
[root@localhost home]# usermod -e "2015-07-31" Lee
[root@localhost home]# grep Lee /etc/shadow
Lee:!!:16625:0:99999:7::16647:
7.id
id geek 获取geek用户的ID
[root@localhost home]# id geek
uid=1000(geek) gid=1000(geek) 组=1000(geek),10(wheel)
8.userdel
userdel Lshare 删除用户Lshare
[root@localhost home]# userdel Lshare
[root@localhost home]# grep Lshare /etc/shadow
[root@localhost home]#
9.groupmod
groupmod -n guests geeks 更改组名geeks为guest
[root@localhost home]# groupmod -n guests geeks
[root@localhost home]# grep guests /etc/gshadow
guests:!::
10.gpasswd
gpasswd -a Lee guests 将用户Lee添加到用户组guests中
[root@localhost home]# gpasswd -a Lee guests
正在将用户“Lee”加入到“guests”组中
[root@localhost home]# id Lee
uid=1001(Lee) gid=1004(Lshare) 组=1004(Lshare),1003(guests)
11.groupdel
groupdel guests 删除用户组guests
[root@localhost home]# groupdel guests
[root@localhost home]# id Lee
uid=1001(Lee) gid=1004(Lshare) 组=1004(Lshare)
五、软件管理命令
1.rpm
软件管理器 简介3:
| distribution代表 | 软件管理机制 | 使用命令 | 在线升级机制(命令) |
|---|---|---|---|
| Red Hat/Fedora | RPM | rpm,rpmbuild | YUM(yum) |
| Debian/Ubuntu | DPKG | dpkg | APT(apt-get) |
RPM与SRPM区别4:
| 文件格式 | 文件名格式 | 直接安装与否 | 内含程序类型 | 可否修改参数并编译 |
|---|---|---|---|---|
| RPM | xxx.rpm | 可 | 已编译 | 不可 |
| SRPM | xxx.src.rpm | 不可 | 未编译的源代码 | 可 |
RPM包下载:http://rpm.pbone.net/
rpm -ivh htop-1.0.2-6.1.x86_64.rpm
[root@localhost geek]# ls
1.txt  cprograms                  scripts  模板  图片  下载  桌面
2.txt  htop-1.0.2-6.1.x86_64.rpm  公共     视频  文档  音乐
[root@localhost geek]# rpm -ivh htop-1.0.2-6.1.x86_64.rpm
警告:htop-1.0.2-6.1.x86_64.rpm: 头V3 DSA/SHA1 Signature, 密钥 ID c86c6f35: NOKEY
准备中...                          ################################# [100%]
正在升级/安装...
   1:htop-1.0.2-6.1                   ################################# [100%]
root@localhost geek]# htop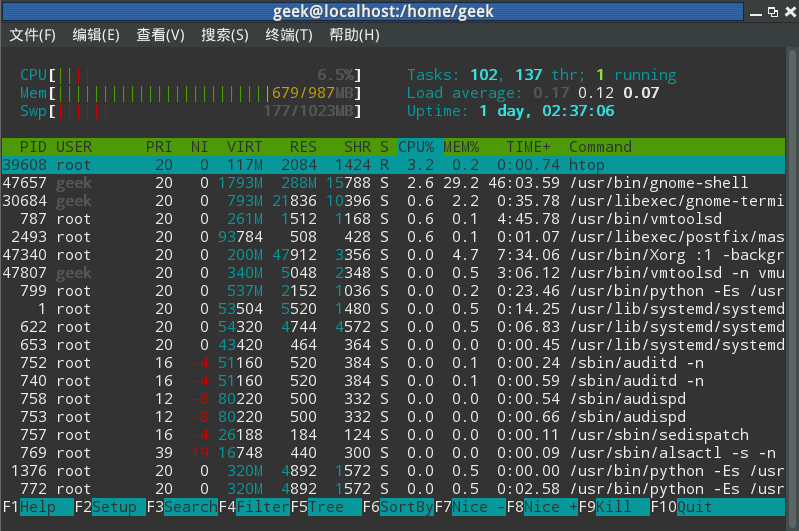
rpm -Uvh htop-1.0.2-6.1.x86_64.rpm 升级软件包(若无已安装的旧版软件也要安装)
rpm -Fvh htop-1.0.2-6.1.x86_64.rpm 更新软件包(若无已安装的旧版软件则不安装)
[root@localhost geek]# rpm -Uvh htop-1.0.2-6.1.x86_64.rpm
警告:htop-1.0.2-6.1.x86_64.rpm: 头V3 DSA/SHA1 Signature, 密钥 ID c86c6f35: NOKEY
准备中...                          ################################# [100%]
    软件包 htop-1.0.2-6.1.x86_64 已经安装
rpm -qa 查询系统中所有已安装的软件包
[root@localhost geek]# rpm -qa
libvirt-daemon-driver-qemu-1.1.1-29.el7.x86_64
newt-0.52.15-4.el7.x86_64
nautilus-3.8.2-7.el7.x86_64
python-krbV-1.0.90-8.el7.x86_64
...
rpm -qi htop-1.0.2-6.1.x86_64 查询该软件的信息,包括开发商、版本和说明等。
[root@localhost geek]# rpm -qi htop-1.0.2-6.1.x86_64
Name        : htop
Version     : 1.0.2
Release     : 6.1
...
rpm -ql htop-1.0.2-6.1.x86_64 列出该软件提供的所有目录和文件
[root@localhost geek]# rpm -ql htop-1.0.2-6.1.x86_64
/usr/bin/htop
/usr/share/applications/htop.desktop
/usr/share/doc/htop-1.0.2
...
rpm -qR htop-1.0.2-6.1.x86_64 列出该软件所依赖软件所含的文件
[root@localhost geek]# rpm -qR htop-1.0.2-6.1.x86_64
libc.so.6()(64bit)
libc.so.6(GLIBC_2.2.5)(64bit)
libc.so.6(GLIBC_2.3)(64bit)
...
rpm -qf usr/share/man/man1/htop.1.gz 查询文件htop.1.gz所属的已安装的软件
[root@localhost geek]# rpm -qf usr/share/man/man1/htop.1.gz
htop-1.0.2-6.1.x86_64
rpm -e htop-1.0.2-6.1.x86_64 卸载(erase)软件包htop-1.0.2-6.1.x86_64
[root@localhost geek]# rpm -qa |grep htop
htop-1.0.2-6.1.x86_64
[root@localhost geek]# rpm -e htop-1.0.2-6.1.x86_64
[root@localhost geek]# rpm -q htop-1.0.2-6.1.x86_64
未安装软件包 htop-1.0.2-6.1.x86_64
2.tar、./configure、make、make install
Tarball软件:
- 源代码文件
- 检测程序文件(configure或config)
- 安装说明(INSTALL或README)
| 类别 | 压缩方式 | 后缀名 |
|---|---|---|
| 1 | gzip | .tar.gz |
| 2 | bzip2 | .tar.bz2 |
Tarball软件的安装:
- 取得源文件,并解压到、usr/local/src中;
- 查看安装说明并安装依赖软件;
- 建立makefile,检测安装环境并makeclean清除产生的目标文件;
- 编译make;
- 安装make install;
- 为安装到单独目录的软件的man page加入man path。
安装Linux流量监控工具 - iftop( http://www.ex-parrot.com/~pdw/iftop/)
安装依赖包
----------

[root@localhost geek]# yum install flex byacc  libpcap ncurses ncurses-devel libpcap-devel
已加载插件:fastestmirror, langpacks
base                                                            | 3.6 kB  00:00:00
extras                                                          | 3.4 kB  00:00:00
updates                                                         | 3.4 kB  00:00:00
...

安装iftop
----------

[root@localhost geek]# ls
1.txt  cprograms                  iftop-0.17.tar.gz  公共  视频  文档  音乐
2.txt  htop-1.0.2-6.1.x86_64.rpm  scripts            模板  图片  下载  桌面
[root@localhost geek]# cd /usr/local/src
[root@localhost src]# tar -xvf /home/geek/iftop-0.17.tar.gz
iftop-0.17/
iftop-0.17/aclocal.m4
iftop-0.17/addr_hash.c
...
[root@localhost src]# cd iftop-0.17/
[root@localhost iftop-0.17]# vi INSTALL
[root@localhost iftop-0.17]# ./configure --prefix=/usr/local/iftop
checking build system type... x86_64-unknown-linux-gnu
checking host system type... x86_64-unknown-linux-gnu
checking target system type... x86_64-unknown-linux-gnu
...
[root@localhost iftop-0.17]# make clean;make
[root@localhost iftop-0.17]# make check
[root@localhost iftop-0.17]# make install

修改环境变量,在/etc/profile末尾添加
export PATH="/usr/local/iftop/sbin:$PATH"
----------

[root@localhost sbin]# vi /etc/profile
[root@localhost sbin]# source /etc/profile
[root@localhost sbin]# iftop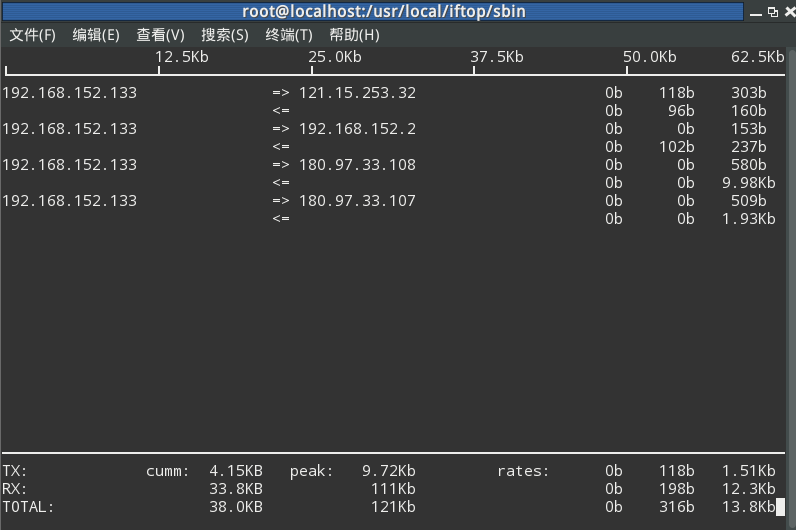
六、启动管理命令
1.reboot、init 6
重启系统
----------
[root@localhost geek]# reboot
或
[root@localhost geek]# init 6
2.halt、init 0、shutdown –h now
关闭系统
----------
[root@localhost geek]# halt
或
[root@localhost geek]# init 0
或
[root@localhost geek]# shutdown –h now
3.runlevel
运行级别
| 运行级别 | 说明 |
|---|---|
| 0 | 关机 |
| 1 | 单用户模式 |
| 2 | 多用户模式,但不提供网络文件系统(NFS) |
| 3 | 完整的多用户模式,仅提供字符界面 |
| 4 | 保留的运行级别 |
| 5 | 完整的多用户模式,自动启动图形化界面、 |
| 6 | 重新启动 |
第一个数字为上一次的运行级别,第二个为当前的运行级别
----------

[root@localhost geek]# runlevel
3 5
4.init 5
进入桌面模式
----------

[root@localhost geek]# init 5
5.chkconfig
七、进程管理命令
1.top
[root@localhost geek]# top
2.ps
[root@localhost geek]# ps -aux
3.pstree
[root@localhost geek]# pstree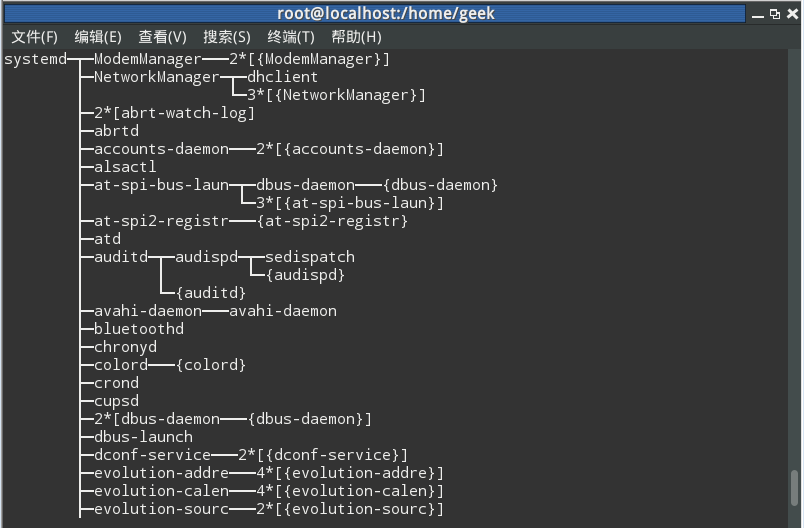


 257
257

 被折叠的 条评论
为什么被折叠?
被折叠的 条评论
为什么被折叠?
 到【灌水乐园】发言


