


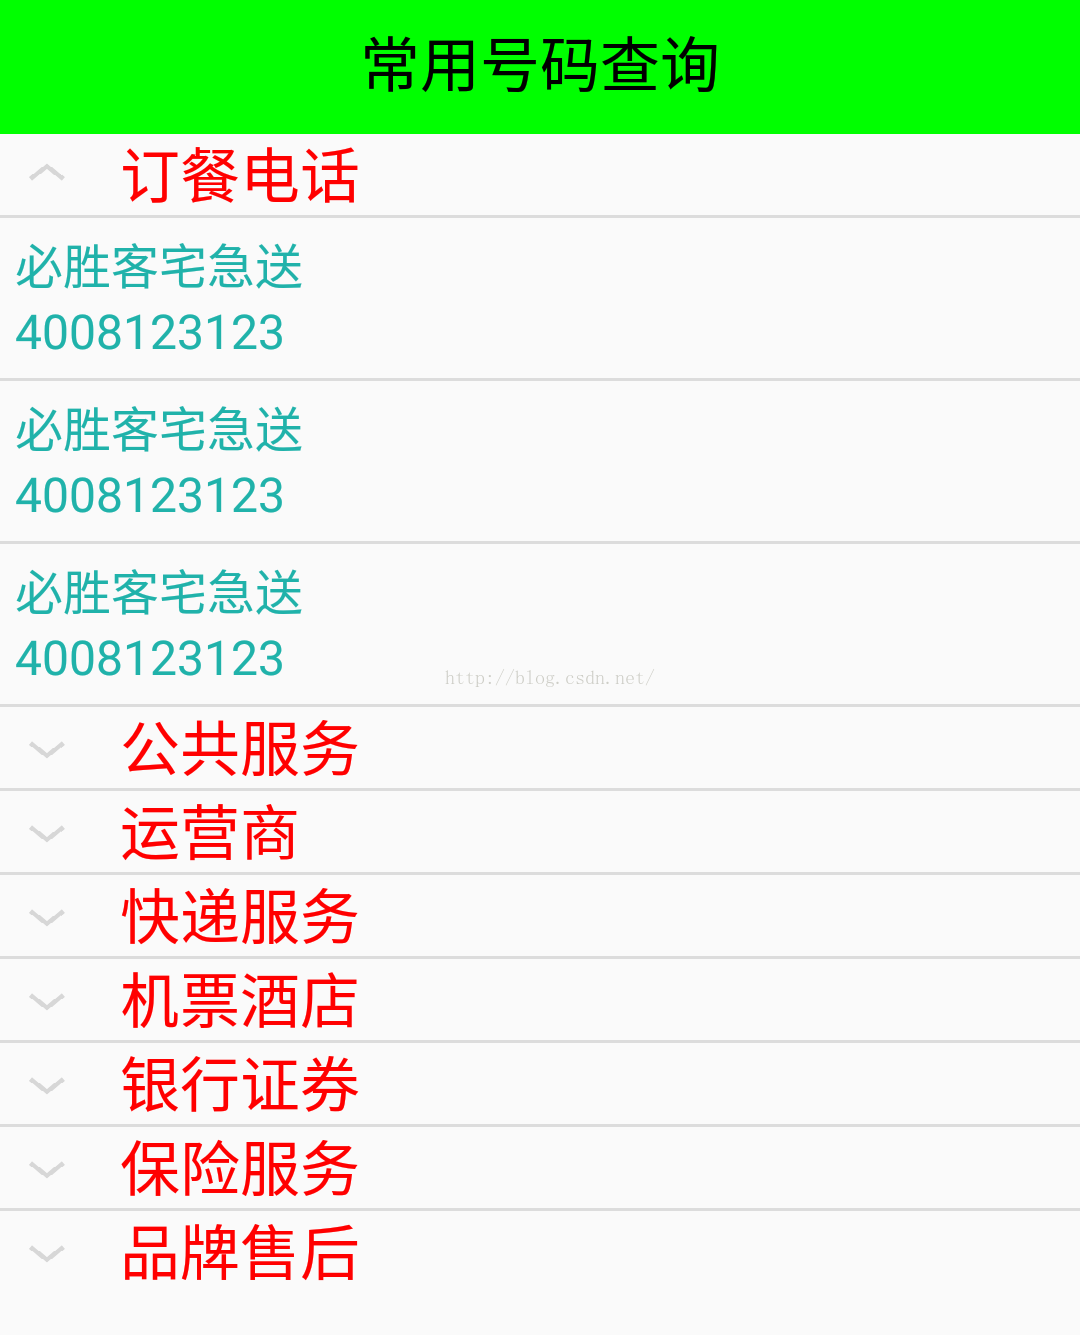
ExpandableListView组件是android中一个比较常用的组件,当点击一个父item的时候可以将它的子item显示出来。大
部分应用都会用到,如QQ的联系人列表,省级联动的二级菜单,资源分类查看器。ExpandableListView继承与listview类
用法跟ListView一样,但进行了扩展,它把应用中的列表项分为几组,每组里 又可包含多个列表项。,不在适配器基础
上设置它的adapter,这个adapter必须继承BaseExpandbaleListAdapter类。
所以实现运用ExpandableListView的核心就是学会继承这个BaseExpanableListAdapter类。例子:
主界面的xml:
<?xml version="1.0" encoding="utf-8"?>
<LinearLayout xmlns:android="http://schemas.android.com/apk/res/android"
    android:layout_width="match_parent"
    android:layout_height="match_parent"
    android:orientation="vertical" >
    <TextView
        style="@style/TitleStyle"
        android:text="常用号码查询"/>
    <!-- 可扩展的listview ExpandableListView和listview类似-->
    <ExpandableListView
        android:id="@+id/elv_common_number"
        android:layout_width="match_parent"
        android:layout_height="wrap_content"
        ></ExpandableListView>

</LinearLayout>
<?xml version="1.0" encoding="utf-8"?>
<LinearLayout xmlns:android="http://schemas.android.com/apk/res/android"
    android:layout_width="match_parent"
    android:layout_height="match_parent"
    android:orientation="vertical"
    android:padding="5dp">
    <TextView
        android:id="@+id/tv_name"
        android:text="电话名称"
        android:textSize="16sp"
        android:textColor="#20B2AA"
        android:layout_width="match_parent"
        android:layout_height="wrap_content"
        />
    <TextView
        android:id="@+id/tv_number"
        android:text="电话号码"
        android:textSize="16sp"
        android:textColor="#20B2AA"
        android:layout_width="match_parent"
        android:layout_height="wrap_content"
        />

</LinearLayout>主Activity 电话黄页查询
package com.itheima.mobilesafe74.activity;

import java.util.List;


import com.itheima.mobilesafe74.R;
import com.itheima.mobilesafe74.engine.CommonDao;
import com.itheima.mobilesafe74.engine.CommonDao.Child;
import com.itheima.mobilesafe74.engine.CommonDao.Group;

import android.app.Activity;
import android.content.Intent;
import android.graphics.Color;
import android.net.Uri;
import android.os.Bundle;
import android.util.TypedValue;
import android.view.View;
import android.view.ViewGroup;
import android.widget.BaseExpandableListAdapter;
import android.widget.ExpandableListView;
import android.widget.ExpandableListView.OnChildClickListener;
import android.widget.TextView;

public class CommonNumberQueryActivity extends Activity {
	private List<Group> mGroup;
	private ExpandableListView elv_common_number;
	private MyAdapter mAdapter;

	@Override
	protected void onCreate(Bundle savedInstanceState) {
		super.onCreate(savedInstanceState);
		setContentView(R.layout.avtivity_common_number);
		initUI();
		initDate();
	}

	/**
	 * 给可扩展listview准备数据,并且填充
	 */
	private void initDate() {
		CommonDao commonDao =new CommonDao();
		mGroup = commonDao.getGroup();
		//设置数据适配器
		mAdapter = new MyAdapter();
		elv_common_number.setAdapter(mAdapter);
		//给child组的item设置点击事件
		elv_common_number.setOnChildClickListener(new OnChildClickListener() {

			@Override
			public boolean onChildClick(ExpandableListView parent,
					View v, int groupPosition, int childPosition, long id) {
				startCall(mAdapter.getChild(groupPosition, childPosition).number);
				return false;
			}
		});
	}

	protected void startCall(String number) {
		//开启系统的打电话界面
		Intent intent = new Intent(Intent.ACTION_CALL);
		intent.setData(Uri.parse("tel:"+number));
		startActivity(intent);
	}

	class MyAdapter extends BaseExpandableListAdapter{

		@Override//拿到组的size
		public int getGroupCount() {
			return mGroup.size();
		}

		@Override//拿到孩子组的size
		public int getChildrenCount(int groupPosition) {
			return mGroup.get(groupPosition).childlist.size();
		}

		@Override//拿到组的对象
		public Group getGroup(int groupPosition) {
			return mGroup.get(groupPosition);
		}

		@Override//拿到孩子组的对象
		public Child getChild(int groupPosition, int childPosition) {

			return mGroup.get(groupPosition).childlist.get(childPosition);
		}

		@Override//拿到组的id
		public long getGroupId(int groupPosition) {

			return groupPosition;
		}

		@Override//拿到孩子组的id
		public long getChildId(int groupPosition, int childPosition) {

			return childPosition;
		}

		@Override//不做修改
		public boolean hasStableIds() {
			return false;
		}

		@Override//维护组的listview
		public View getGroupView(int groupPosition, boolean isExpanded, View convertView, ViewGroup parent) {
			TextView textView = new TextView(getApplicationContext());
			textView.setText("        "+getGroup(groupPosition).name);
			textView.setTextColor(Color.RED);
			textView.setTextSize(TypedValue.COMPLEX_UNIT_DIP,20);
			return textView;
		}

		@Override
		public View getChildView(int groupPosition, int childPosition, boolean isLastChild, View convertView,
				ViewGroup parent) {
			View view = View.inflate(getApplicationContext(), R.layout.elv_child_item, null);
			TextView tv_name = (TextView) view.findViewById(R.id.tv_name);
			TextView tv_number = (TextView) view.findViewById(R.id.tv_number);
			tv_name.setText(getChild(groupPosition, childPosition).name);
			tv_number.setText(getChild(groupPosition, childPosition).number);
			return view;
		}

		@Override//你的孩子组是否能可被选中,响应事件
		public boolean isChildSelectable(int groupPosition, int childPosition) {
			return true;
		}

	}


	private void initUI() {
		elv_common_number = (ExpandableListView) findViewById(R.id.elv_common_number);
	}
}
public boolean isChildSelectable(int groupPosition, int childPosition) {
			return true;
		}
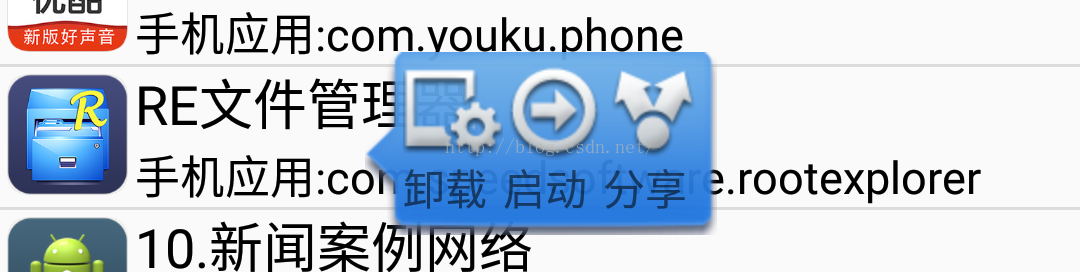
PopupWindow的用法:
PopupWindow这个类用来实现一个弹出框,可以使用任意布局的View作为其内容,这个弹出框是悬浮在当前activity之上的。与Dialog的区别就是:Dialog不能指定显示位置,只能默认系统规定在屏幕的最中间(可以通过设置WindowManager设置),而PopupWindow是可以指定位置的,更加灵活,具有设计感。
还是就是:当Dialog弹出的时候,当前activity是走了onPause() ,界面可见,但是不能获得焦点不能与用户交互。而
PopupWindow点击其他位置界面时,PopupWindow会自动消失,与用户交互更加人性化。
其对应的构造函数:
//方法一:
public PopupWindow (Context context)
//方法二:
public PopupWindow(View contentView)
//方法三:
public PopupWindow(View contentView, int width, int height)
//方法四:
public PopupWindow(View contentView, int width, int height, boolean focusable)contentView必须要自己设定,contentView是PopupWindow展示的相对参考物。而width、height是要设定位置的,不能不去设定。固构造方法三最常用。
例子:
PopupWindow对应的布局:
<?xml version="1.0" encoding="utf-8"?>
<LinearLayout xmlns:android="http://schemas.android.com/apk/res/android"
    android:layout_width="wrap_content"
    android:layout_height="wrap_content"
    android:background="@drawable/local_popup_bg"
    android:orientation="horizontal" >

	<TextView
	    android:id="@+id/tv_uninstall"
	    android:drawableTop="@drawable/img1"
	    android:text="卸载"
	    android:layout_width="wrap_content"
	    android:layout_height="wrap_content"/>
	<TextView
	    android:id="@+id/tv_start"
	    android:drawableTop="@drawable/img2"
	    android:text="启动"
	    android:layout_width="wrap_content"
	    android:layout_height="wrap_content"/>
	<TextView
	    android:id="@+id/tv_share"
	    android:drawableTop="@drawable/img3"
	    android:text="分享"
	    android:layout_width="wrap_content"
	    android:layout_height="wrap_content"/>
</LinearLayout>
主activity:的 PopupWindow方法:
protected void showPopupWindow(View view) {
		View popupView = View.inflate(this, R.layout.popupwindow_layout, null);
		TextView tv_uninstall = (TextView) popupView.findViewById(R.id.tv_uninstall);
		TextView tv_share = (TextView) popupView.findViewById(R.id.tv_share);
		TextView tv_start = (TextView) popupView.findViewById(R.id.tv_start);

		tv_share.setOnClickListener(this);
		tv_start.setOnClickListener(this);
		tv_uninstall.setOnClickListener(this);
		// 透明动画(不 透明)
		AlphaAnimation alphaAnimation = new AlphaAnimation(0, 1);
		alphaAnimation.setDuration(1000);
		// 等待
		alphaAnimation.setFillAfter(true);
		// 缩放由小到大
		ScaleAnimation scaleAnimation = new ScaleAnimation(0, 1, 0, 1, Animation.RELATIVE_TO_SELF, 0.5f,
				Animation.RELATIVE_TO_SELF, 0.5f);
		scaleAnimation.setDuration(1000);
		scaleAnimation.setFillAfter(true);

		// 动画集合
		AnimationSet animationSet = new AnimationSet(true);
		animationSet.addAnimation(alphaAnimation);
		animationSet.addAnimation(scaleAnimation);

		mPopupWindow = new PopupWindow(popupView, LinearLayout.LayoutParams.WRAP_CONTENT,
				LinearLayout.LayoutParams.WRAP_CONTENT, true);
		// 2,设置一个透明背景,可以取消回到界面 ColorDrawable无设置为透明
		mPopupWindow.setBackgroundDrawable(new ColorDrawable());
		// 3,指定窗体位置
		mPopupWindow.showAsDropDown(view, 365, -(view.getHeight() + 15));
		popupView.startAnimation(animationSet);
}若此处的width、higth都为0,就是指:PopupWindow的布局的左上角点与对应view的左下角对其的。
注:对android而言,布局的原点是 : 左上角。向右为正,向下正。
接口回调的例子:
android中接口回调是最容易见到的:各种控件的点击事件:
button.setOnClickListener(new OnClickListener() {
			@Override
			public void onClick(View v) {
				// TODO Auto-generated method stub
			}
});例子:
package com.example.testinterface;

import android.app.Activity;
import android.os.Bundle;
import android.view.View;
import android.view.View.OnClickListener;
import android.widget.Button;
import android.widget.Toast;

public class MainActivity extends Activity  {

	private Button button;
	private int x;
	private int y;

	@Override
	protected void onCreate(Bundle savedInstanceState) {
		super.onCreate(savedInstanceState);
		setContentView(R.layout.activity_main);
		init();
		doother();
	}

	private void doother() {
		//........
	}

	private void init() {
		button = (Button) findViewById(R.id.button);
		 x = 0;
		 y = 0;
		button.setOnClickListener(new OnClickListener() {
			@Override
			public void onClick(View v) {
				test(new Callback() {

					@Override
					public void test1(int n) {
						x=3*n+1;
						//x=n+n;
						Toast.makeText(getApplicationContext(), "计算值x为:"+x, 0).show();
					}

					@Override
					public void test2(int m) {
						y=m+m;
						//y=m+500;
						Toast.makeText(getApplicationContext(), "计算值y为:"+y, 0).show();
					}

				});
			}
		});
	}
	public void test(Callback callback){
		int n=0;
		int m=0;
		for (int i = 0; i < 10000; i++) {
			n++;
		}
		callback.test1(n);
		for (int j = 0; j < 5000; j++) {
			m++;
		}
		callback.test2(m);
	}

	public interface Callback{
		public void test1(int n);
		public void test2(int m);
	}
}
总结:学会二级菜单的用法,适配器的参数理解。


 759
759


 被折叠的 条评论
为什么被折叠?
被折叠的 条评论
为什么被折叠?
 到【灌水乐园】发言


