


Fragment和ActionBar都是Android3.0之后出现的,Fragment,碎片,主要是为了支持更多的UI设计在大屏幕设备上,如平板。因为现在设备的屏幕越来越大,使用Fragment可以更灵活的管理视图层次的变化。像Activity一样,可以创建Fragment来包含View,进行布局,但是Fragment必须嵌入在Activity中,不能单独存在,而且一个Activity可以嵌入多个Fragment,同时一个Fragment可以被多个Activity重用。Action Bar被认为是新版Android系统中最重要的交互元素,在程序运行中一直置于顶部,主要起到的作用在于:突出显示一些重要操作、在程序中保持统一的页面导航和切换方式、将使用频率低的功能放在Action overflow中,节省页面空间、一个固定区域显示程序标示。
ActionBar+Fragment实现Tab标签页的步骤:
1、定义每个Fragment,以及Activity布局。Tab的内容部分相应地在Activity布局中Fragment位置,android:id="@+id/fragment_content"。
2、Activity中获得ActionBar, 设置Tab模式。
3、新建Tab标签页。
4、声明Tab(Fragment), 并添加监听器。让Tab标签页(ActionBar.Tab),内容(Fragment),监听事件关联,在监听器的事件 onTabSelected onTabUnselected 进行Tab内容 Fragment切换。
5、添加Tab到ActionBar中。
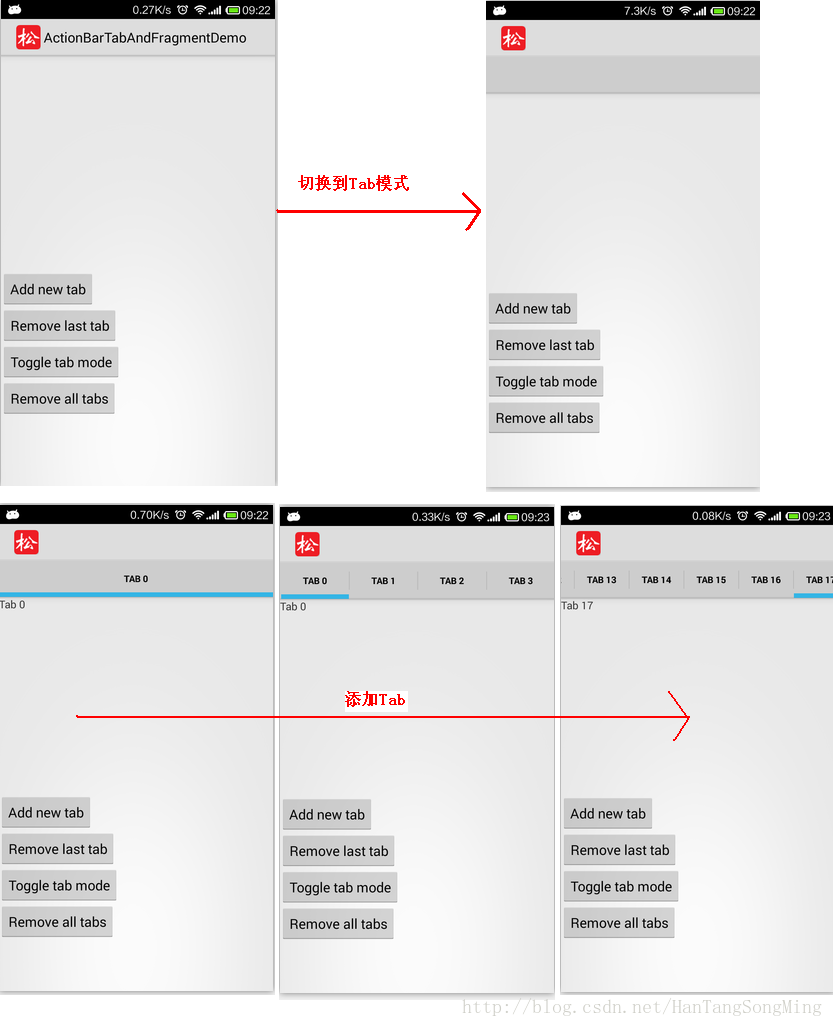
实例:ActionBarTabAndFragmentDemo
运行效果:
代码清单:
布局文件:action_bar_tabs.xml
布局文件:action_bar_tab_content.xml
Java源代码文件:MainActivity.java
API知识点
public class
Activity
extends ContextThemeWrapper
implements ComponentCallbacks2 KeyEvent.Callback LayoutInflater.Factory2 View.OnCreateContextMenuListener Window.Callback
Known Direct Subclasses
AccountAuthenticatorActivity, ActivityGroup, AliasActivity, ExpandableListActivity, FragmentActivity, ListActivity, NativeActivity
Known Indirect Subclasses
ActionBarActivity, LauncherActivity, PreferenceActivity, TabActivity
Class Overview
An activity is a single, focused thing that the user can do. Almost all activities interact with the user, so the Activity class takes care of creating a window for you in which you can place your UI with setContentView(View).
ActionBar getActionBar()
Retrieve a reference to this activity's ActionBar.
public abstract class
ActionBar
extends Object
Class Overview
A window feature at the top of the activity that may display the activity title, navigation modes, and other interactive items.
abstract int getNavigationMode()
Returns the current navigation mode.
abstract void setNavigationMode(int mode)
Set the current navigation mode.
abstract void setDisplayOptions(int options, int mask)
Set selected display options.
abstract int getTabCount()
Returns the number of tabs currently registered with the action bar.
abstract ActionBar.Tab newTab()
Create and return a new ActionBar.Tab.
abstract void addTab(ActionBar.Tab tab)
Add a tab for use in tabbed navigation mode.
abstract void removeTabAt(int position)
Remove a tab from the action bar.
abstract void removeAllTabs()
Remove all tabs from the action bar and deselect the current tab.
public static abstract class
ActionBar.Tab
extends Object
Class Overview
A tab in the action bar.
Tabs manage the hiding and showing of Fragments.
abstract ActionBar.Tab setText(CharSequence text)
Set the text displayed on this tab.
abstract ActionBar.Tab setTabListener(ActionBar.TabListener listener)
Set the ActionBar.TabListener that will handle switching to and from this tab.
public static interface
ActionBar.TabListener
Class Overview
Callback interface invoked when a tab is focused, unfocused, added, or removed.
abstract void onTabReselected(ActionBar.Tab tab, FragmentTransaction ft)
Called when a tab that is already selected is chosen again by the user.
abstract void onTabSelected(ActionBar.Tab tab, FragmentTransaction ft)
Called when a tab enters the selected state.
abstract void onTabUnselected(ActionBar.Tab tab, FragmentTransaction ft)
Called when a tab exits the selected state.
public abstract class
FragmentTransaction
extends Object
Class Overview
API for performing a set of Fragment operations.
abstract FragmentTransaction add(int containerViewId, Fragment fragment, String tag)
Add a fragment to the activity state.
abstract FragmentTransaction remove(Fragment fragment)
Remove an existing fragment.
public class
Fragment
extends Object
implements ComponentCallbacks2 View.OnCreateContextMenuListener
Class Overview
A Fragment is a piece of an application's user interface or behavior that can be placed in an Activity.
View onCreateView(LayoutInflater inflater, ViewGroup container, Bundle savedInstanceState)
Called to have the fragment instantiate its user interface view.
ActionBar+Fragment实现Tab标签页的步骤:
1、定义每个Fragment,以及Activity布局。Tab的内容部分相应地在Activity布局中Fragment位置,android:id="@+id/fragment_content"。
2、Activity中获得ActionBar, 设置Tab模式。
3、新建Tab标签页。
4、声明Tab(Fragment), 并添加监听器。让Tab标签页(ActionBar.Tab),内容(Fragment),监听事件关联,在监听器的事件 onTabSelected onTabUnselected 进行Tab内容 Fragment切换。
5、添加Tab到ActionBar中。
实例:ActionBarTabAndFragmentDemo
运行效果:
代码清单:
布局文件:action_bar_tabs.xml
<?xml version="1.0" encoding="utf-8"?>
<LinearLayout xmlns:android="http://schemas.android.com/apk/res/android"
              android:layout_width="match_parent"
              android:layout_height="match_parent"
              android:orientation="vertical">
    <FrameLayout android:id="@+id/fragment_content"
                 android:layout_width="match_parent"
                 android:layout_height="0dip"
                 android:layout_weight="1" />
    <LinearLayout android:layout_width="match_parent"
                  android:layout_height="0dip"
                  android:layout_weight="1"
                  android:orientation="vertical">
        <Button android:id="@+id/btn_add_tab"
                android:layout_width="wrap_content"
                android:layout_height="wrap_content"
                android:text="@string/btn_add_tab"
                android:onClick="onAddTab" />
        <Button android:id="@+id/btn_remove_tab"
                android:layout_width="wrap_content"
                android:layout_height="wrap_content"
                android:text="@string/btn_remove_tab"
                android:onClick="onRemoveTab" />
        <Button android:id="@+id/btn_toggle_tabs"
                android:layout_width="wrap_content"
                android:layout_height="wrap_content"
                android:text="@string/btn_toggle_tabs"
                android:onClick="onToggleTabs" />
        <Button android:id="@+id/btn_remove_all_tabs"
                android:layout_width="wrap_content"
                android:layout_height="wrap_content"
                android:text="@string/btn_remove_all_tabs"
                android:onClick="onRemoveAllTabs" />
    </LinearLayout>
</LinearLayout>
布局文件:action_bar_tab_content.xml
<?xml version="1.0" encoding="utf-8"?>
<TextView xmlns:android="http://schemas.android.com/apk/res/android"
          android:id="@+id/text"
          android:layout_width="wrap_content"
          android:layout_height="wrap_content" />
Java源代码文件:MainActivity.java
package com.rainsong.actionbartabandfragmentdemo;


import android.app.ActionBar;
import android.app.ActionBar.Tab;
import android.app.Activity;
import android.app.Fragment;
import android.app.FragmentTransaction;
import android.os.Bundle;
import android.view.LayoutInflater;
import android.view.View;
import android.view.ViewGroup;
import android.widget.TextView;
import android.widget.Toast;

public class MainActivity extends Activity {
    @Override
    protected void onCreate(Bundle savedInstanceState) {
        super.onCreate(savedInstanceState);

        setContentView(R.layout.action_bar_tabs);
    }

    public void onAddTab(View v) {
        final ActionBar bar = getActionBar();
        final int tabCount = bar.getTabCount();
        final String text = "Tab " + tabCount;
        bar.addTab(bar.newTab()
                .setText(text)
                .setTabListener(new TabListener(new TabContentFragment(text))));
    }

    public void onRemoveTab(View v) {
        final ActionBar bar = getActionBar();
        if (bar.getTabCount() > 0) {
            bar.removeTabAt(bar.getTabCount() - 1);
        }
    }

    public void onToggleTabs(View v) {
        final ActionBar bar = getActionBar();

        if (bar.getNavigationMode() == ActionBar.NAVIGATION_MODE_TABS) {
            bar.setNavigationMode(ActionBar.NAVIGATION_MODE_STANDARD);
            bar.setDisplayOptions(ActionBar.DISPLAY_SHOW_TITLE, ActionBar.DISPLAY_SHOW_TITLE);
        } else {
            bar.setNavigationMode(ActionBar.NAVIGATION_MODE_TABS);
            bar.setDisplayOptions(0, ActionBar.DISPLAY_SHOW_TITLE);
        }
    }

    public void onRemoveAllTabs(View v) {
        getActionBar().removeAllTabs();
    }

    private class TabListener implements ActionBar.TabListener {
        private TabContentFragment mFragment;

        public TabListener(TabContentFragment fragment) {
            mFragment = fragment;
        }

        public void onTabSelected(Tab tab, FragmentTransaction ft) {
            ft.add(R.id.fragment_content, mFragment, mFragment.getText());
        }

        public void onTabUnselected(Tab tab, FragmentTransaction ft) {
            ft.remove(mFragment);
        }

        public void onTabReselected(Tab tab, FragmentTransaction ft) {
            Toast.makeText(MainActivity.this, "Reselected!", Toast.LENGTH_SHORT).show();
        }

    }

    private class TabContentFragment extends Fragment {
        private String mText;

        public TabContentFragment(String text) {
            mText = text;
        }

        public String getText() {
            return mText;
        }

        @Override
        public View onCreateView(LayoutInflater inflater, ViewGroup container,
                Bundle savedInstanceState) {
            View fragView = inflater.inflate(R.layout.action_bar_tab_content, container, false);

            TextView text = (TextView) fragView.findViewById(R.id.text);
            text.setText(mText);

            return fragView;
        }

    }
}
API知识点
public class
Activity
extends ContextThemeWrapper
implements ComponentCallbacks2 KeyEvent.Callback LayoutInflater.Factory2 View.OnCreateContextMenuListener Window.Callback
Known Direct Subclasses
AccountAuthenticatorActivity, ActivityGroup, AliasActivity, ExpandableListActivity, FragmentActivity, ListActivity, NativeActivity
Known Indirect Subclasses
ActionBarActivity, LauncherActivity, PreferenceActivity, TabActivity
Class Overview
An activity is a single, focused thing that the user can do. Almost all activities interact with the user, so the Activity class takes care of creating a window for you in which you can place your UI with setContentView(View).
ActionBar getActionBar()
Retrieve a reference to this activity's ActionBar.
public abstract class
ActionBar
extends Object
Class Overview
A window feature at the top of the activity that may display the activity title, navigation modes, and other interactive items.
abstract int getNavigationMode()
Returns the current navigation mode.
abstract void setNavigationMode(int mode)
Set the current navigation mode.
abstract void setDisplayOptions(int options, int mask)
Set selected display options.
abstract int getTabCount()
Returns the number of tabs currently registered with the action bar.
abstract ActionBar.Tab newTab()
Create and return a new ActionBar.Tab.
abstract void addTab(ActionBar.Tab tab)
Add a tab for use in tabbed navigation mode.
abstract void removeTabAt(int position)
Remove a tab from the action bar.
abstract void removeAllTabs()
Remove all tabs from the action bar and deselect the current tab.
public static abstract class
ActionBar.Tab
extends Object
Class Overview
A tab in the action bar.
Tabs manage the hiding and showing of Fragments.
abstract ActionBar.Tab setText(CharSequence text)
Set the text displayed on this tab.
abstract ActionBar.Tab setTabListener(ActionBar.TabListener listener)
Set the ActionBar.TabListener that will handle switching to and from this tab.
public static interface
ActionBar.TabListener
Class Overview
Callback interface invoked when a tab is focused, unfocused, added, or removed.
abstract void onTabReselected(ActionBar.Tab tab, FragmentTransaction ft)
Called when a tab that is already selected is chosen again by the user.
abstract void onTabSelected(ActionBar.Tab tab, FragmentTransaction ft)
Called when a tab enters the selected state.
abstract void onTabUnselected(ActionBar.Tab tab, FragmentTransaction ft)
Called when a tab exits the selected state.
public abstract class
FragmentTransaction
extends Object
Class Overview
API for performing a set of Fragment operations.
abstract FragmentTransaction add(int containerViewId, Fragment fragment, String tag)
Add a fragment to the activity state.
abstract FragmentTransaction remove(Fragment fragment)
Remove an existing fragment.
public class
Fragment
extends Object
implements ComponentCallbacks2 View.OnCreateContextMenuListener
Class Overview
A Fragment is a piece of an application's user interface or behavior that can be placed in an Activity.
View onCreateView(LayoutInflater inflater, ViewGroup container, Bundle savedInstanceState)
Called to have the fragment instantiate its user interface view.


 759
759


 被折叠的 条评论
为什么被折叠?
被折叠的 条评论
为什么被折叠?
 到【灌水乐园】发言


