


转载请注明出处:http://blog.csdn.net/harryweasley/article/details/41957143谢谢
前言:本篇文章是利用fragment最基础的知识,仅供初学者观看,也为我以后要做相关知识做基础准备。如果是大神的话,浪费你几分钟看下也可以。
关于fragment那些api的基础知识,你可以点击这里查看Android Fragment 基本介绍 这篇文章将不会叙述。
首先,我们看下界面
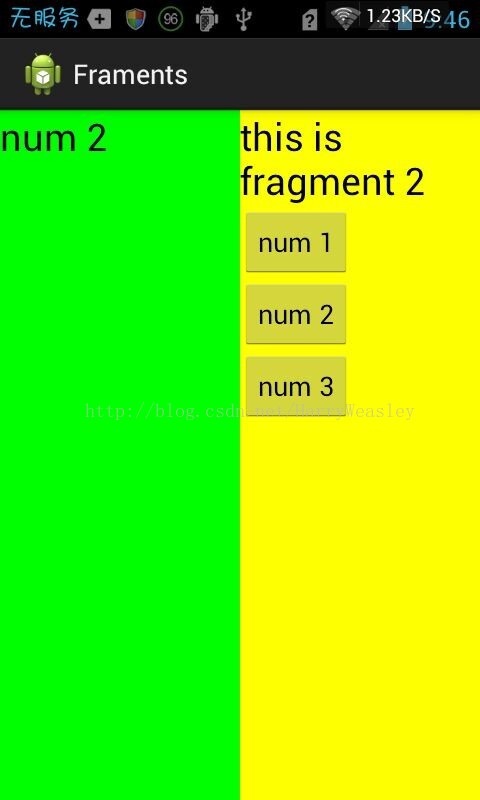

左边的TextView会根据右边点击button的不同而改变。
下面开始介绍代码:
1.在layout里新建fragment1.xml
<?xml version="1.0" encoding="utf-8"?>
<LinearLayout xmlns:android="http://schemas.android.com/apk/res/android"
    android:layout_width="match_parent"
    android:layout_height="match_parent"
    android:background="#00ff00"
    android:orientation="vertical" >

    <TextView
        android:id="@+id/fragment_text"
        android:layout_width="wrap_content"
        android:layout_height="wrap_content"
        android:text="this is fragment 1"
        android:textColor="#000000"
        android:textSize="25sp" />

</LinearLayout>2.在layout里新建fragment2.xml
<?xml version="1.0" encoding="utf-8"?>
<LinearLayout xmlns:android="http://schemas.android.com/apk/res/android"
    android:layout_width="match_parent"
    android:layout_height="match_parent"
    android:background="#ffff00"
    android:orientation="vertical" >

    <TextView
        android:layout_width="wrap_content"
        android:layout_height="wrap_content"
        android:text="this is fragment 2"
        android:textColor="#000000"
        android:textSize="25sp" />

    <Button
        android:id="@+id/button"
        android:layout_width="wrap_content"
        android:layout_height="wrap_content"
        android:text="num 1" />

    <Button
        android:id="@+id/button2"
        android:layout_width="wrap_content"
        android:layout_height="wrap_content"
        android:text="num 2" />

    <Button
        android:id="@+id/button3"
        android:layout_width="wrap_content"
        android:layout_height="wrap_content"
        android:text="num 3" />

</LinearLayout>
这里是三个button
3.创建类Fragment1继承Fragment
package lgx.fram.framents;

import android.app.Fragment;
import android.os.Bundle;
import android.view.LayoutInflater;
import android.view.View;
import android.view.ViewGroup;

public class Fragment1 extends Fragment {
	@Override
	public View onCreateView(LayoutInflater inflater, ViewGroup container,
			Bundle savedInstanceState) {
		return inflater.inflate(R.layout.fragment1, container, false);
	}
}4.创建类Fragment2继承Fragment
package lgx.fram.framents;

import android.app.Fragment;
import android.os.Bundle;
import android.view.LayoutInflater;
import android.view.View;
import android.view.View.OnClickListener;
import android.view.ViewGroup;
import android.widget.Button;
import android.widget.TextView;

public class Fragment2 extends Fragment {
	@Override
	public View onCreateView(LayoutInflater inflater, ViewGroup container,
			Bundle savedInstanceState) {
		return inflater.inflate(R.layout.fragment2, container, false);
	}

	TextView textview;
	Button button, button2, button3;

	@Override
	public void onActivityCreated(Bundle savedInstanceState) {
		super.onActivityCreated(savedInstanceState);
		button = (Button) getActivity().findViewById(R.id.button);
		button2 = (Button) getActivity().findViewById(R.id.button2);
		button3 = (Button) getActivity().findViewById(R.id.button3);
		textview = (TextView) getActivity().findViewById(R.id.fragment_text);
		button.setOnClickListener(new OnClickListener() {

			@Override
			public void onClick(View v) {
				textview.setText(button.getText());
			}
		});
		button2.setOnClickListener(new OnClickListener() {

			@Override
			public void onClick(View v) {
				textview.setText(button2.getText());
			}
		});
		button3.setOnClickListener(new OnClickListener() {

			@Override
			public void onClick(View v) {
				textview.setText(button3.getText());
			}
		});
	}
}
button = (Button) getActivity().findViewById(R.id.button);通过这种方法来得到fragment上面的控件
5.activity_fragment.xml里面的代码是这个样子的
<?xml version="1.0" encoding="utf-8"?>
<LinearLayout xmlns:android="http://schemas.android.com/apk/res/android"
    android:id="@+id/main_layout"
    android:layout_width="match_parent"
    android:layout_height="match_parent"
    android:baselineAligned="false"
    android:orientation="horizontal" >

    <fragment
        android:id="@+id/fragment1"
        android:name="lgx.fram.framents.Fragment1"
        android:layout_width="match_parent"
        android:layout_height="match_parent"
        android:layout_weight="1" />

    <fragment
        android:id="@+id/fragment2"
        android:name="lgx.fram.framents.Fragment2"
        android:layout_width="match_parent"
        android:layout_height="match_parent"
        android:layout_weight="1" />

</LinearLayout>
注意:控件fragment里的android:name=" "里面填写的是你的Fragment类的绝对路径(脑子突然短路,是这样说的吗??),id用来标示fragment。
6.FragmentActivity是最简单的,就只是setContentView,并没有进行其他改变。看下面
package lgx.fram.framents;

import android.app.Activity;
import android.os.Bundle;


public class FragmentActivity extends Activity {

	@Override
	protected void onCreate(Bundle savedInstanceState) {
		super.onCreate(savedInstanceState);
		setContentView(R.layout.activity_fragment);
	}

}
在这里我的整个小应用就做完了。我这里的Fragment通过布局文件加入到Activity里的,还有另一种方式是通过编程的方式将Fragment加入Activity里。这里我简单叙述
上面的1,2,3,4都不需要动。
第5步骤,activity_fragment.xml里面的代码变成下面的
<?xml version="1.0" encoding="utf-8"?>
<LinearLayout xmlns:android="http://schemas.android.com/apk/res/android"
    android:id="@+id/main_layout"
    android:layout_width="match_parent"
    android:layout_height="match_parent"
    android:baselineAligned="false"
    android:orientation="horizontal" >


</LinearLayout>
你会发现我知识去掉了两个Fragment,整个LinearLayout加进去了id
第6个步骤,里面的注释,已经写得很清楚了:
package lgx.fram.framents;

import android.os.Bundle;
import android.app.Activity;
import android.view.Display;
import android.view.Menu;

/**
 *
 * @author lenovo 动态添加Fragment主要分为4步:
 *         1.获取到FragmentManager,在Activity中可以直接通过getFragmentManager得到。
 *
 *         2.开启一个事务,通过调用beginTransaction方法开启。
 *
 *         3.向容器内加入Fragment,一般使用replace方法实现,需要传入容器的id和Fragment的实例。
 *
 *         4.提交事务,调用commit方法提交。
 */
public class FragmentActivity extends Activity {

	@Override
	protected void onCreate(Bundle savedInstanceState) {
		super.onCreate(savedInstanceState);
		setContentView(R.layout.activity_fragment);
		Display display = getWindowManager().getDefaultDisplay();
		if (display.getWidth() > display.getHeight()) {
			Fragment1 fragment1 = new Fragment1();
			getFragmentManager().beginTransaction()
					.replace(R.id.main_layout, fragment1).commit();
		} else {
			Fragment2 fragment2 = new Fragment2();
			getFragmentManager().beginTransaction()
					.replace(R.id.main_layout, fragment2).commit();
		}
	}

}
这个代码的意思是,横竖屏显示不同的Fragment。如果是模拟机测试,请按Ctrl+F11。
我这里用的是replace方法,还有一个方法是add。。。这里不在赘述,请移步这里去看Android Fragment 基本介绍
完毕。。。


 344
344

 被折叠的 条评论
为什么被折叠?
被折叠的 条评论
为什么被折叠?
 到【灌水乐园】发言


