


1. Component 组成

如上图所示: 红色框内的内容是AppComponent, 绿色是HeaderConponent, 黄色是SideBarComponent, 橘色是MainComponent。
这样说可能不太准确,因为我们看到的只是html,并不是完整的Component, 这里看到的只是对应组件的Html Teamplate。那么组件中有什么呢?
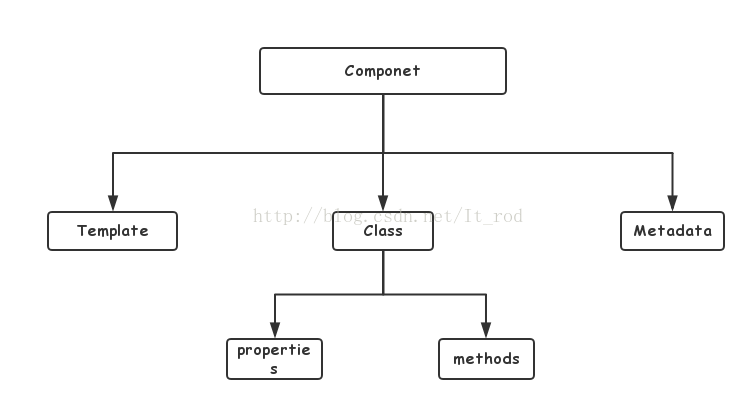
Template
<!--app.component.html-->
<router-outlet></router-outlet>
Class & Metadata
//app.component.ts
import { Component } from '@angular/core';

@Component({
  selector: 'app-root',
  templateUrl: './app.component.html',
  styleUrls: ['./app.component.css']
})

export class AppComponent {
  title = 'app';

  method() {
    console.log('test method');
  }
}
class AppComponent这里只是一个普通的类,其内部有一个属性和一个方法。此时的这个类不能作用在Angular环境中。
直到我们告诉 Angular 它是一个组件。这需要把元数据附加到这个类。
在TypeScript中,我们用装饰器 (decorator) 来附加元数据@Component装饰器,它把紧随其后的类标记成了组件类。
@Component里面的元数据会告诉 Angular 从哪里获取你为组件指定的主要的构建块。
@Component装饰器能接受一个配置对象, Angular 会基于这些信息创建和展示组件及其视图。
@Component的配置项包括:
selector: CSS 选择器,它告诉 Angular 在父级 HTML 中查找<hero-list>标签,创建并插入该组件。
templateUrl:组件 HTML 模板的模块相对地址,如前所示。
providers : 组件所需服务的依赖注入提供商数组。
styleUrls: 当前组件引用的style样式
模板、元数据和组件共同描绘出这个视图。
2. 生命周期
组件继承于指令,并扩展了与UI视图相关的属性。Angular指令的生命周期,它是用来记录指令从创建、应用及销毁的过程。Angular提供了一系列与指令生命周期相关的钩子,便于我们监控指令生命周期的变化,并执行相关的操作。指令与组件共有的钩子
ngOnChangesngOnInit
ngDoCheck
ngOnDestroy
组件特有的钩子
ngAfterContentInitngAfterContentChecked
ngAfterViewInit
ngAfterViewChecked
Angular指令生命周期钩子的作用及调用顺序
ngOnChanges - 当数据绑定输入属性的值发生变化时调用ngOnInit - 在第一次 ngOnChanges 后调用
ngDoCheck - 自定义的方法,用于检测和处理值的改变
ngAfterContentInit - 在组件内容初始化之后调用
ngAfterContentChecked - 组件每次检查内容时调用
ngAfterViewInit - 组件相应的视图初始化之后调用
ngAfterViewChecked - 组件每次检查视图时调用
ngOnDestroy - 指令销毁前调用
具体的内容这里就先不提了,等到后面和指令一起学习,因为涉及到检查策略。
3. ViewEncapsulation
(1) WebComponents
web 开发者们通过插件或者模块的形式在网上分享自己的代码,便于其他开发者们复用这些优秀的代码。同样的故事不断发生,人们不断的复用 JavaScript 文件,然后是 CSS 文件,当然还有 HTML 片段。但是你又必须祈祷这些引入的代码不会影响到你的网站或者web app。WebComponents 是解决这类问题最好的良药,它通过一种标准化的非侵入的方式封装一个组件,每个组件能组织好它自身的 HTML 结构、CSS 样式、JavaScript 代码,并且不会干扰页面上的其他元素。
Web Components 由以下四种技术组成:
Custom Elements - 自定义元素
HTML Templates - HTML模板
Shadow DOM - 影子DOM
HTML Imports - HTML导入
(2) Shadow DOM
<!DOCTYPE html>
<html lang="en">
<head>
    <meta charset="UTF-8">
    <title>Shadow DOM</title>
    <style type="text/css">
        .shadowroot_son {
            color: #f00;
            font-weight: bold;
        }
    </style>
</head>
<body>
<p class="shadowroot_son">App-Root内部</p>
<app-root>
	<router-outlet></router-outlet>
	<app-home></app-home>
</app-root>


<template class="app-home">
	<style>
	  .shadowroot_son {
            color: blue;
            font-size: 18px;
          }
	</style>

	<p class="shadowroot_son">App-Home内部</p>
</template>
<script>
 // 影子宿主(shadow host)
 var shadowHost = document.querySelector('app-home');
 // 创建影子根(shadow root)
 var shadowRoot = shadowHost.createShadowRoot();
 // 影子根作为影子树的第一个节点,其他的节点比如p节点都是它的子节点

 shadowRoot.appendChild(document.importNode(document.querySelector('.app-home').content, true))
</script>
</body>
<html>
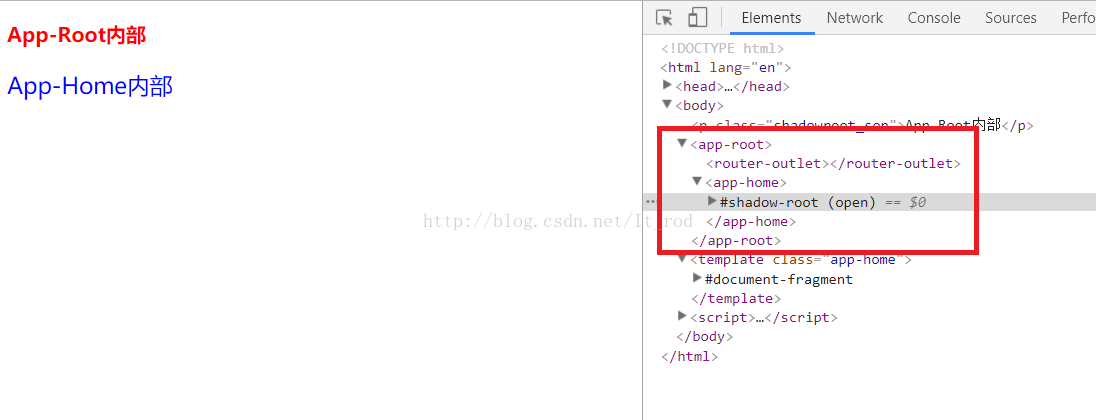
上面例子可以看到shadow内部的.shadowroot_son与外部的.shadowroot_son之间互不影响。
(3) ViewEncapsulation
ViewEncapsulation 允许设置三个可选的值:ViewEncapsulation.Emulated - 无 Shadow DOM,但是通过 Angular 提供的样式包装机制来封装组件,使得组件的样式不受外部影响。这是 Angular 的默认设置。
ViewEncapsulation.Native - 使用原生的 Shadow DOM 特性
ViewEncapsulation.None - 无 Shadow DOM,并且也无样式包装
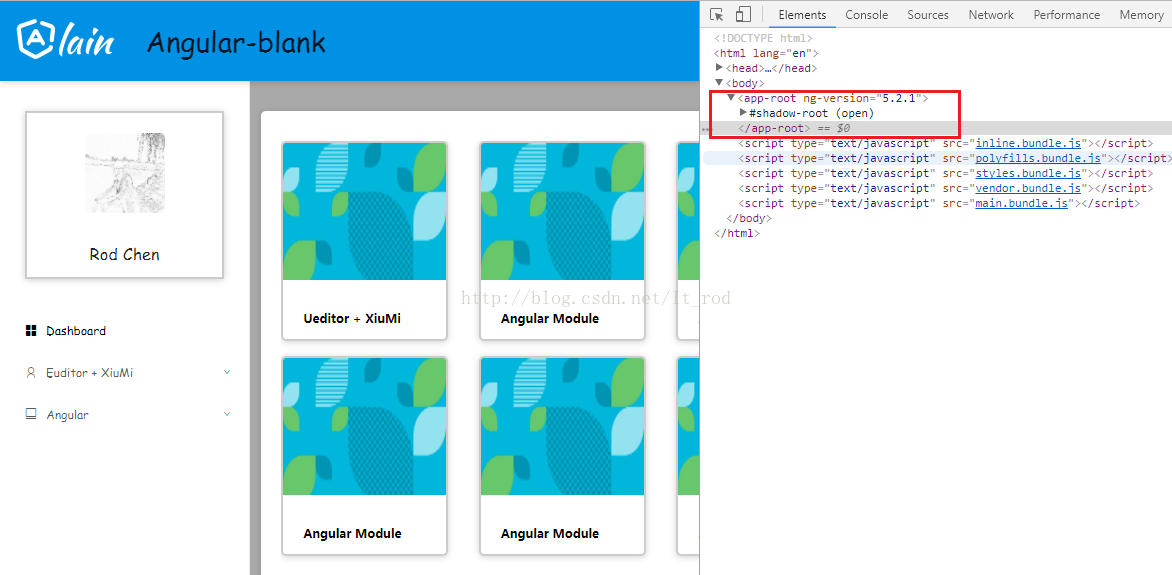
当我们在AppComponent中使用ViewEncapsulation.Native的话,就会看到与上面的例子中相似的html。
import {Component, ViewEncapsulation} from '@angular/core';


@Component({
  selector: 'app-root',
  templateUrl: './app.component.html',
  styleUrls: ['./app.component.css'],
  encapsulation: ViewEncapsulation.Native
})
export class AppComponent {
  title = 'app';


  method() {
    console.log('test method');
  }
}
这里了解的目的是为了后面内容的学习。
4. @Input & @Output
(1) Input 是属性装饰器,用来定义组件内的输入属性。在实际应用场合,我们主要用来实现父组件向子组件传递数据。
a) @Input()
第一步: 子组件添加input装饰器装饰的属性import {Component, Input, OnInit} from '@angular/core';
import {NzMessageService} from 'ng-zorro-antd';
import {HttpCommonService} from '../../service/http-common.service';
@Component({
selector: 'app-step',
templateUrl: './step.component.html',
styleUrls: ['./step.component.css']
})
export class StepComponent implements OnInit {
@Input()
stepString: Array<string>;
constructor(private nzMessageService: NzMessageService, private httpService: HttpCommonService) {
console.log('constructor stepString的值:' + this.stepString); //undefined
}
ngOnInit() {
console.log('ngOnInit stepString的值:' + this.stepString); //['common component']
}
}第二步: 父组件调用子组件传入数据
<p>
  <app-step [stepString]="['common component']"></app-step>
</p>但是注意,这个值的传递在执行构造函数的时候还没有获取,执行init方法的时候已经获取到了,至于原因可以看一下上面的生命周期执行的顺序。
b) @Input('bindingPropertyName')
Input 装饰器支持一个可选的参数,用来指定组件绑定属性的名称。如果没有指定,则默认使用 @Input 装饰器,装饰的属性名。请看上面的例子中父组件用名为stepString的属性来传递数据,我们可以在子组件顶一个名称用于传递数据,假如我们使用value,那么我们只需要将上面的父子组件修改一下。
//子组件
@Input('value')
stepString: Array<string>;
//父组件
<app-step [value]="['common component']"></app-step>c) @Component() - inputs
我们可以将input用元数据声明,这样就不用在class文件中使用@input。例如将上面子组件改写一下。import {Component, Input, OnInit} from '@angular/core';
import {NzMessageService} from 'ng-zorro-antd';
import {HttpCommonService} from '../../service/http-common.service';
@Component({
selector: 'app-step',
templateUrl: './step.component.html',
styleUrls: ['./step.component.css'],
inputs: ['stepString:value'] // 类成员属性名称:绑定的输入属性名称
})
export class StepComponent implements OnInit {
stepString: Array<string>;
constructor(private nzMessageService: NzMessageService, private httpService: HttpCommonService) {
console.log('constructor stepString的值:' + this.stepString);
}
ngOnInit() {
console.log('ngOnInit stepString的值:' + this.stepString);
}
}
d) setter & getter
setter 和 getter 是用来约束属性的设置和获取,它们提供了一些属性读写的封装,可以让代码更便捷,更具可扩展性。import {Component, Input, OnInit} from '@angular/core';
import {NzMessageService} from 'ng-zorro-antd';
import {HttpCommonService} from '../../service/http-common.service';
@Component({
selector: 'app-step',
templateUrl: './step.component.html',
styleUrls: ['./step.component.css'],
})
export class StepComponent implements OnInit {
private _stepString: Array<string>;
@Input('value')
set stepString(value: Array<string>) {
this._stepString = value;
}
get stepString() {
return this._stepString;
}
constructor(private nzMessageService: NzMessageService, private httpService: HttpCommonService) {
console.log('constructor stepString的值:' + this._stepString);
}
ngOnInit() {
console.log('ngOnInit stepString的值:' + this._stepString);
}
}
e) ngOnChanges
当数据绑定输入属性的值发生变化的时候,Angular 将会主动调用 ngOnChanges 方法。它会获得一个 SimpleChanges 对象,包含绑定属性的新值和旧值,它主要用于监测组件输入属性的变化。并且这个方法的调用在ngOnInit之前,正好我们来测试一下。第一步: 修改父组件可以输入传入的数据
<p>
  <input type="text" [(ngModel)]="firstString"/>
  <app-step [value]="[firstString]"></app-step>
</p>
第二步: 修改子组件接受每一个传入属性的当前值
import {Component, Input, OnChanges, OnInit, SimpleChanges} from '@angular/core';
import {NzMessageService} from 'ng-zorro-antd';
import {HttpCommonService} from '../../service/http-common.service';


@Component({
  selector: 'app-step',
  templateUrl: './step.component.html',
  styleUrls: ['./step.component.css'],
})
export class StepComponent implements OnInit, OnChanges {
  @Input('value')
  stepString: Array<string>;


  constructor(private nzMessageService: NzMessageService, private httpService: HttpCommonService) {
    console.log('constructor stepString的值:' + this.stepString);
  }


  ngOnChanges(changes: SimpleChanges): void {
    let stepString = changes['stepString'].currentValue[0];
    console.log('ngOnChanges stepString的值:' + this.stepString);
  }


  ngOnInit() {
    console.log('ngOnInit stepString的值:' + this.stepString);
  }
}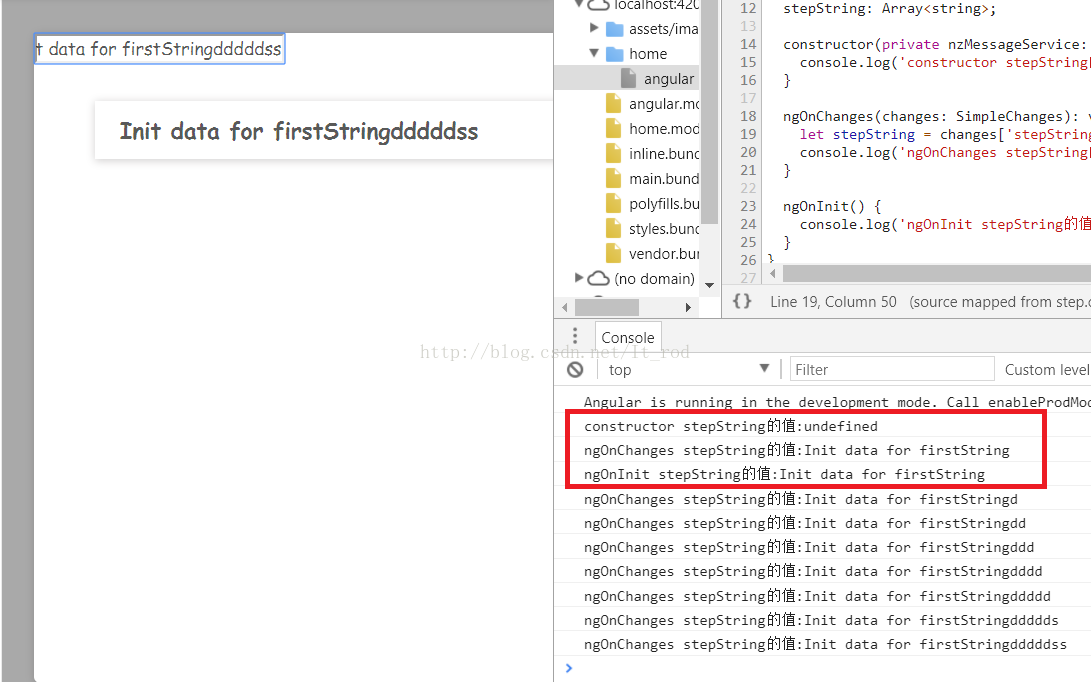
从上图中红色的部分可以看出,组件的声明周期,也是之前我们提到的传入的数据在构造函数的时候获取不到的原因。而后当我没一次输入一个字符的时候可以看到ngOnChanges都执行的一次。
(2) Output 是属性装饰器,用来定义组件内的输出属性
a) @Output()
第一步: 子组件添加output装饰器装饰的属性import {Component, EventEmitter, Input, OnChanges, OnInit, Output, SimpleChanges} from '@angular/core';
import {NzMessageService} from 'ng-zorro-antd';
import {HttpCommonService} from '../../service/http-common.service';
@Component({
selector: 'app-step',
templateUrl: './step.component.html',
styleUrls: ['./step.component.css'],
})
export class StepComponent implements OnInit {
@Output()
stepString: EventEmitter<string> = new EventEmitter<string>();
data: string = '';
constructor(private nzMessageService: NzMessageService, private httpService: HttpCommonService) {
}
ngOnInit() {
}
postData() {
this.stepString.emit(this.data);
}
}
//step.component.html
<div class="step">
  <div>
    <input type="text" [(ngModel)]="data">
    <button (click)="postData()">发送</button>
  </div>
</div>
第二步: 父组件接受子组件的输出事件
//angular.component.html
<p>
  <app-step (stepString)="acceptValue($event)" ></app-step>
</p>
//angular.component.ts
import { Component, OnInit } from '@angular/core';
import {HttpCommonService} from '../../common/service/http-common.service';
@Component({
selector: 'app-angular',
templateUrl: './angular.component.html',
styleUrls: ['./angular.component.css']
})
export class AngularComponent implements OnInit {
firstString = '';
constructor(private httpCommonService: HttpCommonService) { }
ngOnInit() {
}
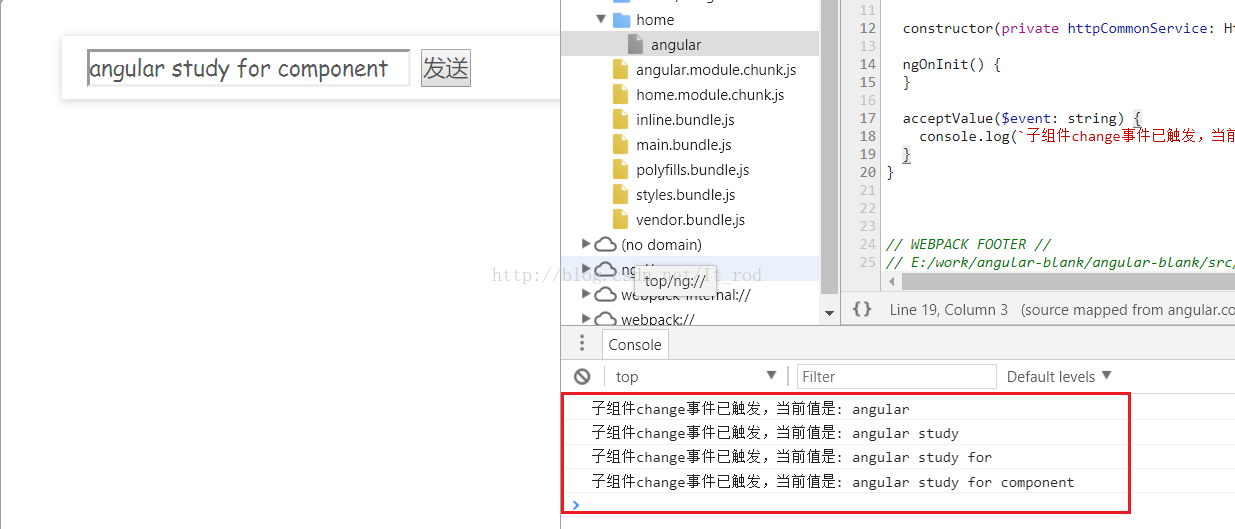
acceptValue($event: string) {
console.log(`子组件change事件已触发,当前值是: ${$event}`);
}
}
然后我们在子组件中输入值,然后点击发送到父组件。
b) @Output('bindingPropertyName')
这个与input那边相似。子组件修改:
@Output('value')
stepString: EventEmitter<string> = new EventEmitter<string>();
父组件修改:
<p>
  <app-step (value)="acceptValue($event)" ></app-step>
</p>
c) @Component() - outputs
import {Component, EventEmitter, Input, OnChanges, OnInit, Output, SimpleChanges} from '@angular/core';
import {NzMessageService} from 'ng-zorro-antd';
import {HttpCommonService} from '../../service/http-common.service';


@Component({
  selector: 'app-step',
  templateUrl: './step.component.html',
  styleUrls: ['./step.component.css'],
  outputs: ['stepString:value']
})
export class StepComponent implements OnInit {
  stepString: EventEmitter<string> = new EventEmitter<string>();

  data: string = '';

  constructor(private nzMessageService: NzMessageService, private httpService: HttpCommonService) {
  }

  ngOnInit() {
  }

  postData() {
    this.stepString.emit(this.data);
  }
}
outputs: ['stepString:value']中stepString是子组件中EventEmitter名称,value是子组件对外暴露的方法。
父组件:
<p>
  <app-step (value)="acceptValue($event)" ></app-step>
</p>
(3) 双向绑定
相信大家了解我们可以使用[(ngModel)]可以实现双向绑定。从[] ()可以看出这里是有input output实现的。双向绑定是由两个单向绑定组成:
模型 -> 视图数据绑定
视图 -> 模型事件绑定
Angular中 [] 实现了模型到视图的数据绑定,() 实现了视图到模型的事件绑定。两个结合在一起 [()] 就实现了双向绑定。
5. @ViewChild & @ViewChildren
前面提到的@Input与@Output方式,是一种以子组件为中心的交互方式(我目前是这样理解的),接下来了解一下以父组件为中心的交互方式。(1)#LocalName 父组件本地变量进行数据交互
前两种方式的封装性比较好,每次交互都还是暴露自己想要暴露的东西。父组件不能使用数据绑定来读取子组件的属性或调用子组件的方法。但可以在父组件模板里,新建一个本地变量来代表子组件,然后利用这个变量来读取子组件的属性和调用子组件的方法。父组件模板:
<app-step #step></app-step>
<button (click)="step.plusCount()" nz-button [nzType]="'primary'">
  <span>plus</span>
</button>
<button (click)="step.reduceCount()" nz-button [nzType]="'primary'">
  <span>reduce</span>
</button>
子组件Class:
import {Component, Input, OnInit} from '@angular/core';
import {NzMessageService} from 'ng-zorro-antd';

@Component({
  selector: 'app-step',
  templateUrl: './step.component.html',
  styleUrls: ['./step.component.css']
})
export class StepComponent implements OnInit {
  countValue: number = 0;

  constructor(private _message: NzMessageService) { }

  ngOnInit() {
  }

  plusCount() {
    this.countValue++;
  }

  reduceCount() {
    this.countValue--;
  }
}(2)@ViewChild()
前一种方法最后提到了本地变量的局限性。如果父组件的类需要读取子组件的属性值或调用子组件的方法,就不能使用本地变量方法。当父组件类需要这种访问时,可以把子组件作为ViewChild,注入到父组件里面。ViewChild 是属性装饰器,用来从模板视图中获取匹配的元素。视图查询在 ngAfterViewInit 钩子函数调用前完成,因此在 ngAfterViewInit 钩子函数中,才能正确获取查询的元素。
父组件模板:
<app-step #stepComponent></app-step>
<button (click)="plusCount()" nz-button [nzType]="'primary'">
  <span>plus</span>
</button>
<button (click)="reduceCount()" nz-button [nzType]="'primary'">
  <span>reduce</span>
</button>
父组件Class:
import {AfterViewInit, Component, OnInit, ViewChild} from '@angular/core';
import {StepComponent} from '../../common/component/step/step.component';

@Component({
  selector: 'app-angular',
  templateUrl: './angular.component.html',
  styleUrls: ['./angular.component.css']
})
export class AngularComponent implements OnInit, AfterViewInit {
  @ViewChild('stepComponent')
  private stepComponent: StepComponent;

  constructor() { }

  ngOnInit() {
  }

  ngAfterViewInit(): void {
    console.log(this.stepComponent);
  }

  plusCount() {
    this.stepComponent.plusCount();
  }

  reduceCount() {
    this.stepComponent.reduceCount();
  }
}
//@ViewChild('stepComponent')
@ViewChild(StepComponent)(3)@ViewChildren()
上面的例子中提到的是一个子组件,如果是两个或者多个子组件,我们应该怎么做呢?第一种方式使用#template命名
在父组件中创建两个ViewChild,以templateName作为查询条件。
父组件模板:
<app-step #stepComponent></app-step>
<app-step #stepComponent2></app-step>
<button (click)="plusCount()" nz-button [nzType]="'primary'">
  <span>plus</span>
</button>
<button (click)="reduceCount()" nz-button [nzType]="'primary'">
  <span>reduce</span>
</button>
父组件Class
import {AfterViewInit, Component, OnInit, ViewChild} from '@angular/core';
import {StepComponent} from '../../common/component/step/step.component';

@Component({
  selector: 'app-angular',
  templateUrl: './angular.component.html',
  styleUrls: ['./angular.component.css']
})
export class AngularComponent implements OnInit, AfterViewInit {
  firstString: string;


  @ViewChild('stepComponent')
  private stepComponent: StepComponent;

  @ViewChild('stepComponent2')
  private stepComponent2: StepComponent;

  constructor() { }

  ngOnInit() {
    this.firstString = '1. install ng-ueditor';
  }

  ngAfterViewInit(): void {
    console.log(this.stepComponent);
  }

  plusCount() {
    this.stepComponent.plusCount();
  }

  reduceCount() {
    this.stepComponent2.reduceCount();
  }
}
第二种方式使用@ViewChildren()
ViewChildren 用来从模板视图中获取匹配的多个元素,返回的结果是一个 QueryList 集合。import {AfterViewInit, Component, OnInit, QueryList, ViewChild, ViewChildren} from '@angular/core';
import {StepComponent} from '../../common/component/step/step.component';
@Component({
selector: 'app-angular',
templateUrl: './angular.component.html',
styleUrls: ['./angular.component.css']
})
export class AngularComponent implements OnInit, AfterViewInit {
firstString: string;
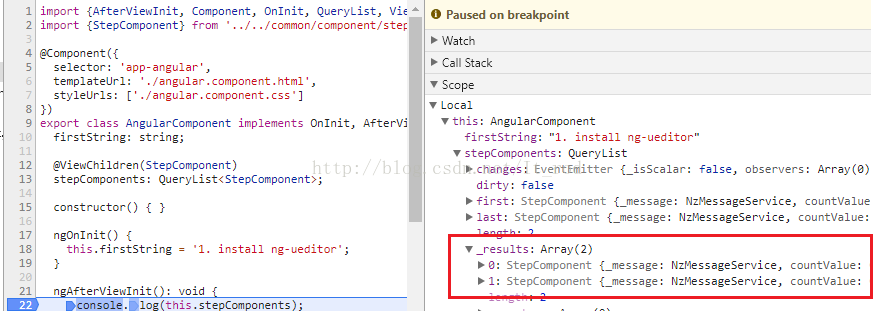
@ViewChildren(StepComponent)
stepComponents: QueryList<StepComponent>;
constructor() { }
ngOnInit() {
}
ngAfterViewInit(): void {
console.log(this.stepComponents);
}
}
6. ContentChild & ContentChildren
(1) ng-content
a) ng-content
ng-content的前身是ng-transclude.ng-translude字面意思就是嵌入,也就是说你需不需要将你的指令内部的元素(注意不是指令的模板)嵌入到你的模板中去,默认是false。
当我们使用ng-content就是会将指令内部的元素嵌入到指令的模板中去。并且可以对传入的元素可以进行选择,也叫内容投影。例如:
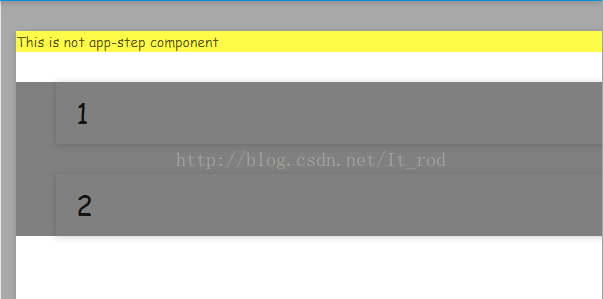
父组件:
<app-wrapper>
  <span>This is not app-step component</span>
  <app-step></app-step>
  <app-step></app-step>
</app-wrapper>子组件:
//wrapper.componet.html
<div class="box yellow">
  <ng-content></ng-content>
</div>
<div class="box gray">
  <ng-content select="app-step"></ng-content>
</div>
//wrapper.component.css
.yellow {
background: yellow;
}
.gray {
background: gray;
}
那么现在: 第二个ng-content select的是app-step标签,第一个ng-content则是渲染的是<span>This is not app-step component</span> 内容。如下图:
这里我的理解是如何将父组件自定以的内容传入子组件的template。
总结一下:父组件通过ng-content以及子组件的select将父组件中自定义的内容分块投影到子组件中去。

b) ngProjectAs
当我们将上面例子中的父组件改成如下的内容,此时我们的界面会渲染如下图:<app-wrapper>
<span>This is not app-step component</span>
<ng-container>
<app-step></app-step>
<app-step></app-step>
</ng-container>
</app-wrapper>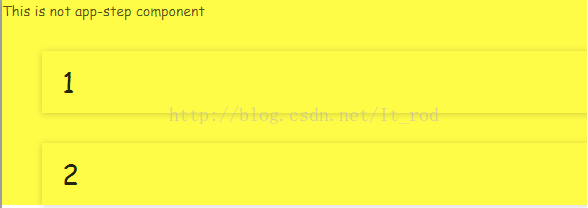
如果我们想达到原来的效果,需要在ng-container添加一个属性如下:
<app-wrapper>
  <span>This is not app-step component</span>
  <ng-container ngProjectAs="app-step">
    <app-step></app-step>
    <app-step></app-step>
  </ng-container>
</app-wrapper>(2) ContentChild
ContentChild 是属性装饰器,用来从通过 Content Projection(投影) 方式设置的视图中获取匹配的元素。对于前一小段的理解:
Content Projection: 父组件通过ng-content以及子组件的select将父组件中自定义的内容分块投影到子组件中去。
父组件:
//angular.component.html
<h4>Parent Componet</h4>
<app-wrapper>
  <app-step></app-step>
</app-wrapper>
子组件:
//wrapper.component.html
<p>child Component</p>
<ng-content></ng-content>
//wrapper.component.ts
import {AfterContentInit, Component, ContentChild, OnInit} from '@angular/core';
import {StepComponent} from '../step/step.component';
@Component({
selector: 'app-wrapper',
templateUrl: './wrapper.component.html',
styleUrls: ['./wrapper.component.css']
})
export class WrapperComponent implements OnInit, AfterContentInit {
@ContentChild(StepComponent)
stepComponent: StepComponent;
constructor() { }
ngOnInit() {
}
ngAfterContentInit() {
console.dir(this.stepComponent);
}
}(3) locationName
上面的方式使用的是组件名@ContentChild(StepComponent),我们也可以使用#locationName。如何修改呢?父组件:
//angular.component.html
<h4>Parent Componet</h4>
<app-wrapper>
  <app-step #content1></app-step>
  <div></div>
</app-wrapper>
子组件:
import {AfterContentInit, Component, ContentChild, OnInit} from '@angular/core';
import {StepComponent} from '../step/step.component';

@Component({
  selector: 'app-wrapper',
  templateUrl: './wrapper.component.html',
  styleUrls: ['./wrapper.component.css']
})
export class WrapperComponent implements OnInit, AfterContentInit {

  @ContentChild('content1')
  stepComponent: StepComponent;

  constructor() { }

  ngOnInit() {
  }

  ngAfterContentInit() {
    console.dir(this.stepComponent);
  }
}(4) ContentChildren
ContentChildren 属性装饰器用来从通过 Content Projection 方式设置的视图中获取匹配的多个元素,返回的结果是一个 QueryList 集合。只需要将
@ContentChild('content1')
stepComponent: StepComponent;@ContentChildren(StepComponent)
stepComponentArray: QueryList<StepComponent>;7. @content 和@ view区别
ContentChildren 与 ViewChildren 的定义
在 host 元素 <opening> 和 </closing> 标签中被称为 Content Children在组件的模板中定义的内容,它是组件的一部分,被称为 View Children
ContentChild 与 ViewChild 的异同点
相同点都是属性装饰器
都有对应的复数形式装饰器:ContentChildren、ViewChildren
都支持 Type<any>|Function|string 类型的选择器
不同点
ContentChild 用来从通过 Content Projection 方式 (ng-content) 设置的视图中获取匹配的元素
ViewChild 用来从模板视图中获取匹配的元素
在父组件的 ngAfterContentInit 生命周期钩子中才能成功获取通过 ContentChild 查询的元素
在父组件的 ngAfterViewInit 生命周期钩子中才能成功获取通过 ViewChild 查询的元素
8. HostListener & HostBinding
(1) Host Element
宿主元素的概念同时适用于指令和组件。对于指令来说,这个概念是相当简单的。应用指令的元素,就是宿主元素。对于组件来说,宿主元素就是自身。counting是一个指令,所以下面应用counting的宿主元素就是button & app-step组件。
<button counting>增加点击次数</button>
<app-step counting></app-step>
组件渲染的template为(app-step为例)
<app-step>
  ........
</app-step>(2) HostListener
HostListener 是属性装饰器,用来为宿主元素添加事件监听。HostListenerDecorator 装饰器定义
export interface HostListenerDecorator {
    (eventName: string, args?: string[]): any;
    new (eventName: string, args?: string[]): any;
}指令举例:
//counting.directive.ts
import { Directive, HostListener } from '@angular/core';

@Directive({
  selector: '[counting]'
})
export class CountingDirective {
  numberOfClicks = 0;

  @HostListener('click', ['$event.target'])
  onClick(element: HTMLElement) {
    console.log('element', element, 'number of clicks:', this.numberOfClicks++);
  }
}
//angular.component.html
<button counting>增加点击次数</button>
<app-step counting></app-step>
//step.componet.html
<div class="step">
<h1>step component</h1>
</div>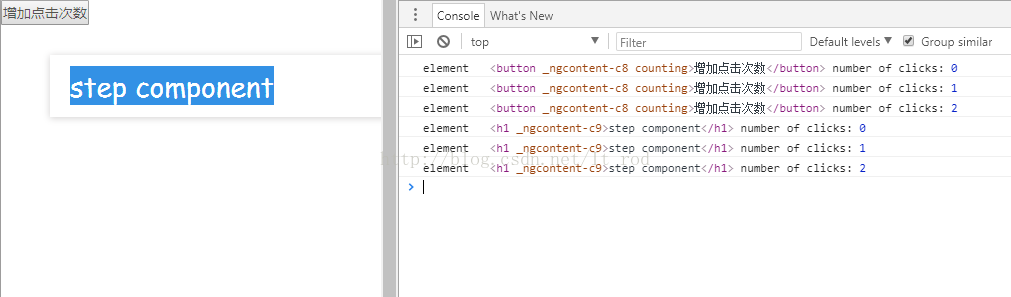
可以看到我们定义在指令中的事件已经执行了。
组件举例:
//step.component.ts
import {Component, HostListener} from '@angular/core';

@Component({
  selector: 'app-step',
  templateUrl: './step.component.html',
  styleUrls: ['./step.component.css']
})
export class StepComponent {

  constructor() {
  }

  @HostListener('click', ['$event.target'])
  onClick(element: HTMLElement) {
    console.log('element', element, 'number of clicks:');
  }
}
//修改angular.component.html
<app-step></app-step>更重要的是可以监听除了宿主元素之外的其他元素:如 window 或 document 对象。
@HostListener('document:click', ['$event'])
onClick(btn: Event) {

}
metadata设定宿主元素的事件监听信息, 例如将上面的指令改写成matadata信息中。
import { Directive, HostListener } from '@angular/core';

@Directive({
  selector: '[counting]',
  host: {
    '(click)': 'onClick($event.target)'
  }
})
export class CountingDirective {
  numberOfClicks = 0;

  onClick(element: HTMLElement) {
    console.log('element', element, 'number of clicks:', this.numberOfClicks++);
  }
}
(3) HostBinding
HostBinding 是属性装饰器,用来动态设置宿主元素的属性值。HostBinding 装饰器定义
export interface HostBindingDecorator {
    (hostPropertyName?: string): any;
    new (hostPropertyName?: string): any;
}
指令举例:
import {Directive, HostBinding, HostListener} from '@angular/core';

@Directive({
  selector: '[counting]',
})
export class CountingDirective {
  numberOfClicks = 0;

  @HostBinding('attr.role') role = 'button';
  @HostBinding('class.pressed') isPressed: boolean = true;
}
可以看到我们添加的属性和class都已经设置到了宿主元素上。
9. ElementRef
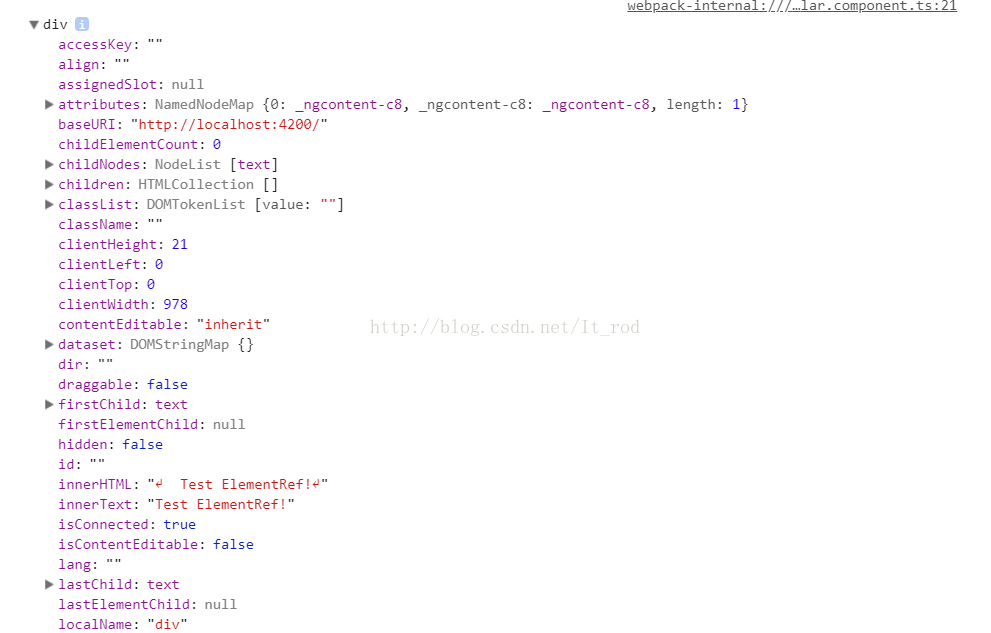
Angular的目标是:一套框架,多种平台。同时适用手机与桌面 (One framework.Mobile & desktop.),为了支持跨平台,Angular通过抽象层封装平台差异。统一了 API 接口。如定义了抽象类 Renderer 、抽象类 RootRenderer 等。此外还定义了以下引用类型:ElementRef、TemplateRef、ViewRef 、ComponentRef 和 ViewContainerRef 等。
ElementRef的作用
ElementRef 封装不同平台下视图层中的native元素,然后我们通过ElementRef去访问native元素。
举例:
//angular.component.html
<div>
  Test ElementRef!
</div>
//angular.component.ts
import {
AfterContentInit, AfterViewInit, Component, ContentChild, ElementRef, OnInit, QueryList, ViewChild,
ViewChildren
} from '@angular/core';
import {StepComponent} from '../../common/component/step/step.component';
@Component({
selector: 'app-angular',
templateUrl: './angular.component.html',
styleUrls: ['./angular.component.css']
})
export class AngularComponent implements OnInit, AfterViewInit {
constructor(private elementRef: ElementRef) {
}
ngOnInit() {
}
ngAfterViewInit(): void {
let divEle = this.elementRef.nativeElement.querySelector('div');
console.dir(divEle);
}
}
这里在应用的过程中基本上会有两个帮手。
第一个是@ViewChild, 这可以让class更快的获取到对应的元素。
@ViewChild('div')
greetDiv: ElementRef;
第二个是Renderer2, 用于设置元素的属性。下面是API

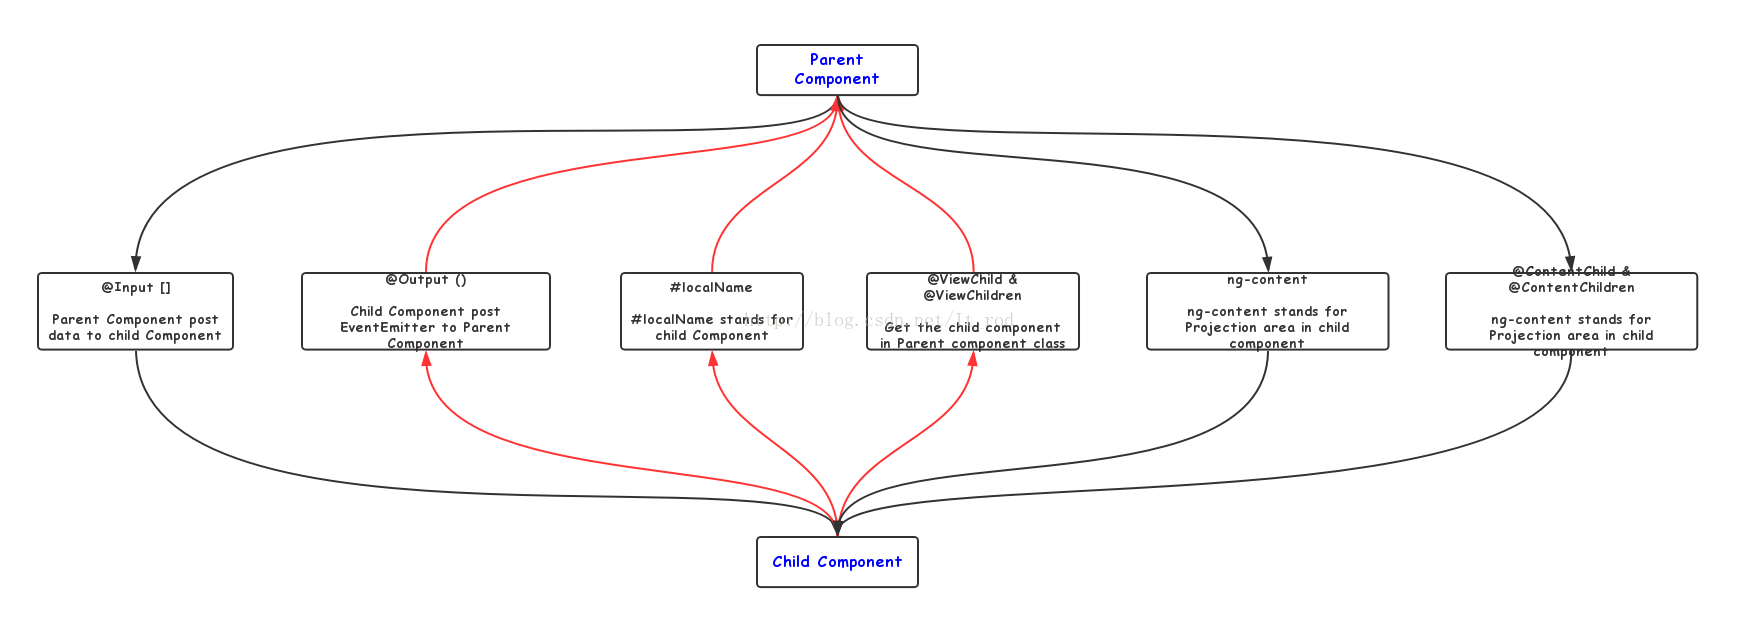
最后将文章中关于父子之间有数据访问交互的方式列一下:


 5891
5891


 被折叠的 条评论
为什么被折叠?
被折叠的 条评论
为什么被折叠?
 到【灌水乐园】发言


