


假设我们为游戏玩家提供一个很大的背景地图,这个背景地图是不可能在显示器上完全显示出来的,它只显示一部分。我们不是让角色在一个静态背景上到处移动,而通常是在滚动背景,并且同时保持主角在屏幕上居中。本文扩充了游戏引擎,使其支持滚动背景。
本文内容包括:
- 哪些游戏类型适合使用滚动背景
- 滚动背景的工作原理
- 如何向游戏引擎添加对滚动背景的支持
- 如何使用滚动背景开发冒险模拟游戏
什么是滚动背景
滚动背景是在游戏屏幕上以某种方式移动的背景,这可能是为了用户交互,也可能只是作为时间消逝的提示。滚动背景的移动可以很简单,比如在超级玛丽游戏中,背景从由右向左滚动,以便模拟角色从右向左滚动,它也可以是更复杂的效果,例如快速地前后移动背景,以便模拟游戏中的一次地震。
横向滚动的背景
超级玛丽这个例子代表了一个名为“卷轴游戏”的游戏类别。因为有些事物可以位于当前游戏屏幕的位图之外,所以横向滚动的游戏允许游戏开发人员向游戏玩家呈现一个更大的世界。玩家必须移动并滚动游戏屏幕才能看到更多事物。下面显示了在横向滚动的游戏中如何移动背景的。
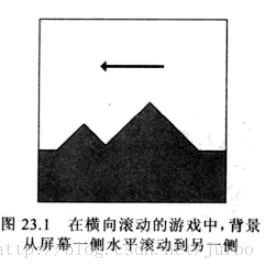
需要指出的是,在卷轴游戏中,背景图像不一定大于游戏屏幕,只要将图像创建为在边缘环绕,就可以滚动一个和游戏屏幕等大的图像。
纵向滚动的背景
除了横向滚动的游戏之外,还有一类纵向滚动的游戏,这包括使玩家仿佛垂直穿越太空的太空射击游戏以及一些较早的驾驶游戏,更不用说允许背景沿任意方向滚动的游戏了。
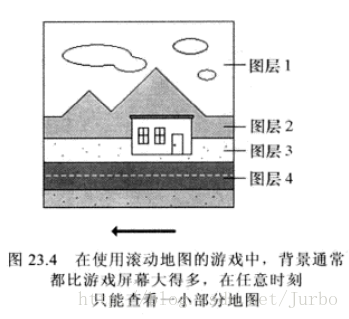
早期的大多数RPG游戏都属于后一种类型,在这类游戏中,世界地图比游戏屏幕大得多。玩家控制一个可以在地图上到处移动的角色,与生物交互并发现事物。这类游戏中的虚拟地图规定了这个虚拟世界的实际大小。在大多数情况下,它都大的有一种无边无际的效果。
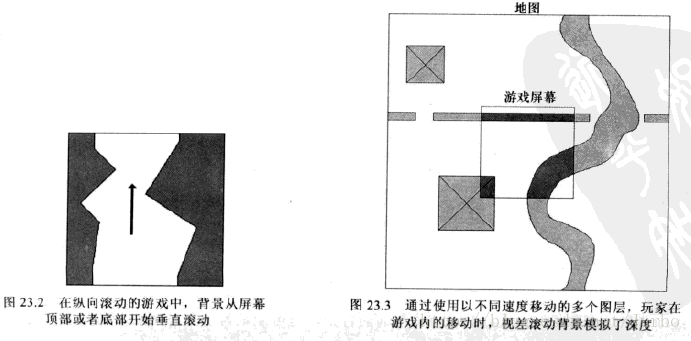
视差滚动背景
视差滚动背景涉及到以不同速度移动的多个图层。视差滚动背景的设计思想是在玩家看来,背景的各个图层代表了不同的距离,因此最远的图层的滚动速度比最近的图层更慢。最终结果就是视差滚动背景提供了一种现实性和深度,这是简单的单图层滚动背景所不可能实现的。
上图显示了视差滚动如何在滚动背景中模拟深度。视差滚动通常只用在一维上,因此通常只适用于横向滚动或纵向滚动的背景。
理解滚动背景的工作原理
最容易创建的一种滚动背景是只在一个单独的方向上滚动并且滚动不受用户交互影响的滚动背景。无论用户做什么,都从屏幕顶部滚动到底部的星星区域就是这种滚动背景的一个例子。在这种方案中,背景图像可以和游戏屏幕同样大小,如果我们希望滚动模式有更多的变化,那么它也可以更高一些。无论采用哪一种方法,我们基本上都是在游戏刚开始时设置滚动效果,然后就不用再管它了。
为了使滚动背景图像产生滚动的效果,必须将背景设计为在想要滚动的方向上环绕。例如,必须将垂直滚动的背景设计为垂直环绕的,这意味着图像的顶部和底部必须完美结合在一起,这样才能很好地彼此相连。下图显示了滚动背景图像是如何“缝合”在一起,以实现一种滚动效果的。(与游戏屏幕的滚等大动背景图像的例子)
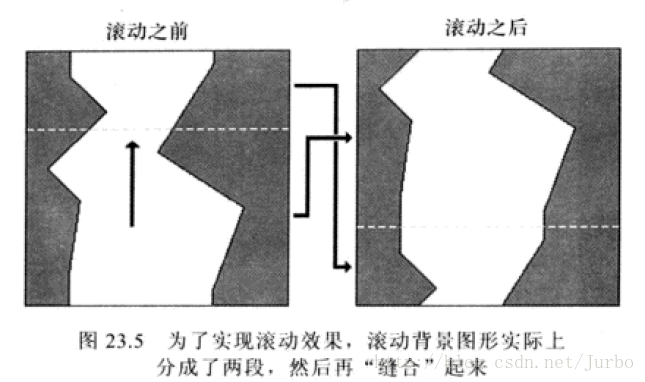
正如这幅图所显示的,滚动背景图形分成了两段,然后将它们的顶部和底部边缘重新连接起来。可以绘制这样一幅图,从游戏屏幕的一边(顶部)滚出,然后重新出现在另一边(底部)。从屏幕滚出的图像部分是分开的两段图像之一,而图像的剩余部分是另一段。不断滑动、分割并重新绘制背景图像,就可以获得滚动背景的效果。
图23.5 显示了一个与游戏屏幕瞪大的滚动背景图像的例子。但在实际应用中,使用比游戏屏幕更大的背景图像更常见。在这种情况下,当查看区域从一侧环绕到另一侧时,图像只是分为两段并缝合起来。
查看区域的概念很重要,我们将滚动背景的查看区域称为它的视口,就像望远镜提供了太空一部分的视图一样,视口也提供了背景图像的一个视图。这样,滚动背景就变成了移动视口的问题。
而对于分层滚动背景来说,与单层滚动背景相比,优点是可以创建有趣的滚动效果,例如视差滚动。开发分层滚动背景,在引入图层时,实际发生的事情就是更新和绘制多个背景图像。对滚动背景图形使用图层时,需要注意要以正确的顺序创建图层,以正确的顺序绘制它们。
向游戏引擎添加滚动背景支持
因为我们准备创建包括带有多个图层的滚动背景的功能,因此对滚动背景的支持需要两个类,一个用于背景图层的类(BackgroundLayer)以及一个用于由背景图层构成滚动背景的类(ScrollingBackground)。
BackgroundLayer 的类定义放在 ScrollingBackground 文件中。
创建背景图层类 BackgroundLayer
BackgroundLayer 类 代表了一个滚动背景的一个单独图层,更具体的说,BackgroundLayer 类 存储了一个特定图层的位图图像以及这个图层的视口、速度及方向。
滚动背景中的各个图层都有自己的视口、速度和方向,它们的工作方式如下。
- 视口:一个矩形,它确定了当前显示图层图像的哪一部分
- 速度:一个正整数,表示对各个游戏周期滚动这个图层的速度(单位是像素)
- 方向:一个方向常数值(上、右、下、左),表示这个图层的滚动方向
背景图层的视口、图层的速度和方向一起决定了图层究竟是如何随时间滚动的。BackgroundLayer 类 的源代码头文件(放在了 ScrollingBackground.h 中)指定了究竟对图层的方向部分使用哪些值。
//-----------------------------------------------------------------
// 用户自定义类型
//-----------------------------------------------------------------
typedef WORD        SCROLLDIR;      //图层的方向
const SCROLLDIR     SD_UP     = 0,  //上
                    SD_RIGHT  = 1,  //右
                    SD_DOWN   = 2,  //下
                    SD_LEFT   = 3;  //左
下面是 BackgroundLayer 类的整体设计:
//-----------------------------------------------------------------
// Background Layer 类 (背景图层类)
//-----------------------------------------------------------------
class BackgroundLayer : Bitmap
{
protected:
  // 成员变量
  RECT      m_rcViewport; //视口(决定了将背景的哪一部分实际绘制到游戏屏幕上)
  int       m_iSpeed;     //滚动图层的速度(单位像素)
  SCROLLDIR m_sdDirection;//滚动的方向

public:
  // 构造函数
  // 从文件中创建背景图层
  BackgroundLayer(HDC hDC, LPTSTR szFileName, int iSpeed,
    SCROLLDIR sdDirection);
  // 从资源中创建背景图层
  BackgroundLayer(HDC hDC, UINT uiResID, HINSTANCE hInstance, int iSpeed = 0,
    SCROLLDIR sdDirection = SD_LEFT);

  // 常规方法
  virtual void  Update();
  virtual void  Draw(HDC hDC, int x, int y, BOOL bTrans = FALSE,
    COLORREF crTransColor = RGB(255, 0, 255));

  void          SetSpeed(int iSpeed)
  {
      m_iSpeed = iSpeed;
  };
  void          SetDirection(SCROLLDIR sdDirection)
  {
      m_sdDirection = sdDirection;
  };
  void          SetViewport(RECT& rcViewport)
  {
      CopyRect(&m_rcViewport, &rcViewport);
  };
};
BackgroundLayer 类 是派生自Bitmap 类,是因为背景图层实际上就是一个特殊的位图图像。特殊之处在于向位图添加了关于其视口、速度以及方向的信息。重载了Draw( )方法和 Update( )方法。
理解了BackgroundLayer 类 的结构之后,接下来看一下具体代码。
BackgroundLayer::BackgroundLayer( )
//-----------------------------------------------------------------
// BackgroundLayer 构造函数
//-----------------------------------------------------------------

// 从一个位图文件中创建背景图层
BackgroundLayer::BackgroundLayer(HDC hDC, LPTSTR szFileName,
  int iSpeed, SCROLLDIR sdDirection)
  : Bitmap(hDC, szFileName), m_iSpeed(iSpeed), m_sdDirection(sdDirection)
{
  // 默认视口为整个图层图像
  m_rcViewport.left = m_rcViewport.top = 0;
  m_rcViewport.right = m_iWidth;
  m_rcViewport.bottom = m_iHeight;
}

// 从一个位图资源中创建背景图层
BackgroundLayer::BackgroundLayer(HDC hDC, UINT uiResID, HINSTANCE hInstance,
  int iSpeed, SCROLLDIR sdDirection)
  : Bitmap(hDC, uiResID, hInstance), m_iSpeed(iSpeed),
  m_sdDirection(sdDirection)
{
  // 默认视口为整个图层图像
  m_rcViewport.left = m_rcViewport.top = 0;
  m_rcViewport.right = m_iWidth;
  m_rcViewport.bottom = m_iHeight;
}
BackgroundLayer::Update( )
BackgroundLayer::Update( ) 方法负责移动视口以滚动图层。这个方法使用图层的速度和方向来将视口滑动特定的像素数。在这个方法中,唯一的难点是确保当视口完全滚出图像的一侧时,应该环绕到图像的另一侧。
// 更新背景图层
void BackgroundLayer::Update()
{
  switch (m_sdDirection)
  {
  case SD_UP:
    // 向上移动图层 (将视口向下滑动)
    m_rcViewport.top += m_iSpeed;
    m_rcViewport.bottom += m_iSpeed;
    // 如果视口已经完全从位图的底部滚出,则将其移动到位图的顶部
    if (m_rcViewport.top > m_iHeight)
    {
      m_rcViewport.bottom = m_rcViewport.bottom - m_rcViewport.top;
      m_rcViewport.top = 0;
    }
    break;

  case SD_RIGHT:
    // 向右移动图层 (将视口向左滑动)
    m_rcViewport.left -= m_iSpeed;
    m_rcViewport.right -= m_iSpeed;
    // 如果视口已经完全从位图的左侧滚出,则将其移动到位图的右侧
    if (m_rcViewport.right < 0)
    {
      m_rcViewport.left = m_iWidth - (m_rcViewport.right - m_rcViewport.left);
      m_rcViewport.right = m_iWidth;
    }
    break;

  case SD_DOWN:
    // 向下移动图层 (将视口向上滑动)
    m_rcViewport.top -= m_iSpeed;
    m_rcViewport.bottom -= m_iSpeed;
    if (m_rcViewport.bottom < 0)
    {
      m_rcViewport.top = m_iHeight - (m_rcViewport.bottom - m_rcViewport.top);
      m_rcViewport.bottom = m_iHeight;
    }
    break;

  case SD_LEFT:
    // 向左移动图层 (将视口向右滑动)
    m_rcViewport.left += m_iSpeed;
    m_rcViewport.right += m_iSpeed;
    if (m_rcViewport.left > m_iWidth)
    {
      m_rcViewport.right = (m_rcViewport.right - m_rcViewport.left);
      m_rcViewport.left = 0;
    }
    break;
  }
}
这个方法的工作就是将是视口移动一定的像素数(等于图层的速度),然后进行检查,以便确保视口还没有环绕到图层图像的另一侧。如果已经环绕到了另一侧,则必须将视口移动到图像的另一侧。
BackgroundLayer::Draw( )
BackgroundLayer::Draw( ) 方法,负责绘制背景图层,同时还要考虑到视口。
// 根据视口绘制背景图层
void BackgroundLayer::Draw(HDC hDC, int x, int y, BOOL bTrans,
  COLORREF crTransColor)
{
  // 只绘制通过视口看到的那一部分图层
  if (m_rcViewport.top < 0 && m_rcViewport.left < 0)
  {
    // 绘制拆开的视口,从顶部环绕到底部,从左侧环绕到右侧
    DrawPart(hDC, x, y,
      m_iWidth + m_rcViewport.left, m_iHeight + m_rcViewport.top,
      -m_rcViewport.left, -m_rcViewport.top,
      bTrans, crTransColor);
    DrawPart(hDC, x - m_rcViewport.left, y,
      0, m_iHeight + m_rcViewport.top,
      m_rcViewport.right, -m_rcViewport.top,
      bTrans, crTransColor);
    DrawPart(hDC, x, y - m_rcViewport.top,
      m_iWidth + m_rcViewport.left, 0,
      -m_rcViewport.left, m_rcViewport.bottom,
      bTrans, crTransColor);
    DrawPart(hDC, x - m_rcViewport.left, y - m_rcViewport.top,
      0, 0,
      m_rcViewport.right, m_rcViewport.bottom,
      bTrans, crTransColor);
  }
  else if (m_rcViewport.top < 0 && m_rcViewport.right > m_iWidth)
  {
    // 绘制拆开的视口,从顶部环绕到底部,从右侧环绕到左侧
    DrawPart(hDC, x, y,
      m_rcViewport.left, m_iHeight + m_rcViewport.top,
      m_iWidth - m_rcViewport.left, -m_rcViewport.top,
      bTrans, crTransColor);
    DrawPart(hDC, x + (m_iWidth - m_rcViewport.left), y,
      0, m_iHeight + m_rcViewport.top,
      m_rcViewport.right - m_iWidth, -m_rcViewport.top,
      bTrans, crTransColor);
    DrawPart(hDC, x, y - m_rcViewport.top,
      m_rcViewport.left, 0,
      m_iWidth - m_rcViewport.left, m_rcViewport.bottom,
      bTrans, crTransColor);
    DrawPart(hDC, x + (m_iWidth - m_rcViewport.left), y - m_rcViewport.top,
      0, 0,
      m_rcViewport.right - m_iWidth, m_rcViewport.bottom,
      bTrans, crTransColor);
  }
  else if (m_rcViewport.bottom > m_iHeight && m_rcViewport.left < 0)
  {
    // 绘制拆开的视口,从底部环绕到顶部,从左侧环绕到右侧
    DrawPart(hDC, x, y,
      m_iWidth + m_rcViewport.left, m_rcViewport.top,
      -m_rcViewport.left, m_iHeight - m_rcViewport.top,
      bTrans, crTransColor);
    DrawPart(hDC, x - m_rcViewport.left, y,
      0, m_rcViewport.top,
      m_rcViewport.right, m_iHeight - m_rcViewport.top,
      bTrans, crTransColor);
    DrawPart(hDC, x, y + (m_iHeight - m_rcViewport.top),
      m_iWidth + m_rcViewport.left, 0,
      -m_rcViewport.left, m_rcViewport.bottom - m_iHeight,
      bTrans, crTransColor);
    DrawPart(hDC, x - m_rcViewport.left, y + (m_iHeight - m_rcViewport.top),
      0, 0,
      m_rcViewport.right, m_rcViewport.bottom - m_iHeight,
      bTrans, crTransColor);
  }
  else if (m_rcViewport.bottom > m_iHeight && m_rcViewport.right > m_iWidth)
  {
    // 绘制拆开的视口,从底部环绕到顶部,从右侧环绕到左侧
    DrawPart(hDC, x, y,
      m_rcViewport.left, m_rcViewport.top,
      m_iWidth - m_rcViewport.left, m_iHeight - m_rcViewport.top,
      bTrans, crTransColor);
    DrawPart(hDC, x + (m_iWidth - m_rcViewport.left), y,
      0, m_rcViewport.top,
      m_rcViewport.right - m_iWidth, m_iHeight - m_rcViewport.top,
      bTrans, crTransColor);
    DrawPart(hDC, x, y + (m_iHeight - m_rcViewport.top),
      m_rcViewport.left, 0,
      m_iWidth - m_rcViewport.left, m_rcViewport.bottom - m_iHeight,
      bTrans, crTransColor);
    DrawPart(hDC, x + (m_iWidth - m_rcViewport.left), y + (m_iHeight - m_rcViewport.top),
      0, 0,
      m_rcViewport.right - m_iWidth, m_rcViewport.bottom - m_iHeight,
      bTrans, crTransColor);
  }
  else if (m_rcViewport.top < 0)
  {
    // 绘制拆开的视口,从顶部环绕到底部
    DrawPart(hDC, x, y,
      m_rcViewport.left, m_iHeight + m_rcViewport.top,
      m_rcViewport.right - m_rcViewport.left, -m_rcViewport.top,
      bTrans, crTransColor);
    DrawPart(hDC, x, y - m_rcViewport.top,
      m_rcViewport.left, 0,
      m_rcViewport.right - m_rcViewport.left, m_rcViewport.bottom,
      bTrans, crTransColor);
  }
  else if (m_rcViewport.right > m_iWidth)
  {
    //  绘制拆开的视口,从右侧环绕到左侧
    DrawPart(hDC, x, y,
      m_rcViewport.left, m_rcViewport.top,
      m_iWidth - m_rcViewport.left, m_rcViewport.bottom - m_rcViewport.top,
      bTrans, crTransColor);
    DrawPart(hDC, x + (m_iWidth - m_rcViewport.left), y,
      0, m_rcViewport.top,
      m_rcViewport.right - m_iWidth, m_rcViewport.bottom - m_rcViewport.top,
      bTrans, crTransColor);
  }
  else if (m_rcViewport.bottom > m_iHeight)
  {
    // 绘制拆开的视口,从底部环绕到顶部
    DrawPart(hDC, x, y,
      m_rcViewport.left, m_rcViewport.top,
      m_rcViewport.right - m_rcViewport.left, m_iHeight - m_rcViewport.top,
      bTrans, crTransColor);
    DrawPart(hDC, x, y + (m_iHeight - m_rcViewport.top),
      m_rcViewport.left, 0,
      m_rcViewport.right - m_rcViewport.left, m_rcViewport.bottom - m_iHeight,
      bTrans, crTransColor);
  }
  else if (m_rcViewport.left < 0)
  {
    // 绘制拆开的视口,从左侧环绕到右侧
    DrawPart(hDC, x, y,
      m_iWidth + m_rcViewport.left, m_rcViewport.top,
      -m_rcViewport.left, m_rcViewport.bottom - m_rcViewport.top,
      bTrans, crTransColor);
    DrawPart(hDC, x - m_rcViewport.left, y,
      0, m_rcViewport.top,
      m_rcViewport.right, m_rcViewport.bottom - m_rcViewport.top,
      bTrans, crTransColor);
  }
  else
    // 一次绘制整个视口
    DrawPart(hDC, x, y,
      m_rcViewport.left, m_rcViewport.top,
      m_rcViewport.right - m_rcViewport.left, m_rcViewport.bottom - m_rcViewport.top,
      bTrans, crTransColor);
}
代码之所以那么复杂,是因为当视口环绕到图层图像的另一侧时,存在几个不同的特别情况,必须对其作出处理。其中每一种特别情况都需要各自的方法,根据视口的特定环绕方式来绘制图层。
更具体地说,当视口环绕到图层图像的另一侧时,必须多步(分段)绘制图像。例如,如果视口从图像的顶部边缘卷出,那么必须将图层绘制为沿着图像顶部边缘的一段和沿着图像的底部边缘一段。
如果视口碰巧同时从水平边缘和垂直边缘卷出,则需要4段来组成最后的视口图像。
这种代码调试起来很困难,经常需要多次尝试才能使其正常运行。在编写这一部分时,需要在几张纸上话草图,列出视口环绕图像图层所涉及的所有可能情况。
创建滚动背景类 ScrollingBackground
ScrollingBackground 类负责将图层合并到一个滚动背景中。ScrollingBackground 类派生自我们熟悉的 Background 类,它与 Background 类非常相似,只是它侧重于管理、更新和绘制背景图层而不只是单独的背景图像或颜色。
下面是 ScrollingBackground 类的定义:
//-----------------------------------------------------------------
// Scrolling Background 类  滚动背景类
//-----------------------------------------------------------------
class ScrollingBackground : Background
{
protected:
  // 成员变量
  int               m_iNumLayers;   //图层数
  BackgroundLayer*  m_pLayers[10];  //各个图层的指针

public:
  // 构造函数/析构函数
          ScrollingBackground(int iWidth, int iHeight);
  virtual ~ScrollingBackground();

  // 常规方法
  virtual void  Update();
  virtual void  Draw(HDC hDC, BOOL bTrans = FALSE,
    COLORREF crTransColor = RGB(255, 0, 255));

  // 向一个滚动背景添加单独的图层
  void          AddLayer(BackgroundLayer* pLayer);
};
ScrollingBackground::Update( )
ScrollingBackground::Update( ) 方法用来更新滚动背景中的图层。
// 更新滚动背景中的图层
void ScrollingBackground::Update()
{
  // 更新图层
  for (int i = 0; i < m_iNumLayers; i++)
    m_pLayers[i]->Update();
}
ScrollingBackground::Draw( )
ScrollingBackground::Draw( ) 方法用来绘制滚动背景中的图层。
// 绘制滚动背景中的图层
void ScrollingBackground::Draw(HDC hDC, BOOL bTrans,
  COLORREF crTransColor)
{
  // 绘制图层
  for (int i = 0; i < m_iNumLayers; i++)
    m_pLayers[i]->Draw(hDC, 0, 0, bTrans, crTransColor);
}
ScrollingBackground::AddLayer( )
ScrollingBackground::AddLayer( ) 方法用来向滚动背景添加图层。
// 向滚动背景添加图层
void ScrollingBackground::AddLayer(BackgroundLayer* pLayer)
{
  // 添加图层
  if (m_iNumLayers < 10)
    m_pLayers[m_iNumLayers++] = pLayer;
}
ScrollingBackground 类将大多数滚动背景工作都委托给了 BackgroundLayer类,这大大简化了ScrollingBackground 滚动背景类的代码。
开发 Wanderer 示例
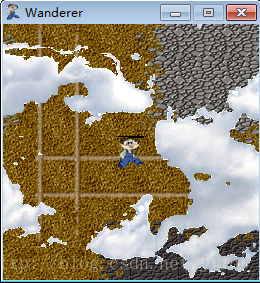
本文开发一个 Wanderer 示例,它使用一副大型地图(大于游戏窗口),我们可以在任何方向上滚动它。角色一直停在游戏屏幕的中央,不过因为地图在角色下面滚动,所以它看起来在走动。(相当于一个冒险模拟游戏,不过完整的游戏还需要添加怪物之类的特性)
Wanderer 示例使用了两个不同的滚动背景。实际上,一个是背景,另一个是前景。也就是说,一个是在角色后面绘制的,一个是在角色上面绘制的。在一个游戏中,我们为什么要绘制“前景”呢?因为,我们希望通过在角色上面显示漂浮的云彩来增加一些真实感。通过将云彩创建为滚动的前景,效果比只是创建一些云彩子画面并导出移动它们显得好得多。
注意:若出现编译错误,请在项目设置->连接->对象/库模块中 加入 msimg32.lib winmm.lib
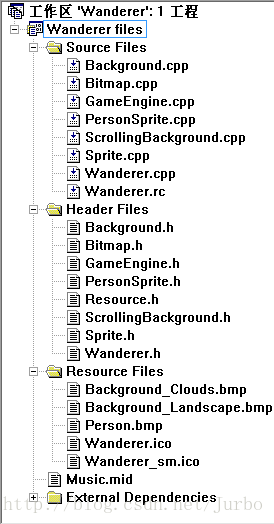
Wanderer 目录结构和效果图
Wanderer 目录结构:
Wanderer 效果图:
编写程序代码
Wanderer.h
#pragma once

//-----------------------------------------------------------------
// 包含的文件
//-----------------------------------------------------------------
#include <windows.h>
#include "Resource.h"
#include "GameEngine.h"
#include "Bitmap.h"
#include "Sprite.h"
#include "ScrollingBackground.h"
#include "PersonSprite.h"

//-----------------------------------------------------------------
// 全局变量
//-----------------------------------------------------------------
HINSTANCE             g_hInstance;        //程序实例句柄
GameEngine*           g_pGame;            //游戏引擎指针
HDC                   g_hOffscreenDC;     //屏幕外设备环境
HBITMAP               g_hOffscreenBitmap; //屏幕外位图
BackgroundLayer*      g_pBGLandscapeLayer;//风景背景图层
BackgroundLayer*      g_pFGCloudsLayer;   //云彩前景图层
ScrollingBackground*  g_pBackground;      //滚动背景
ScrollingBackground*  g_pForeground;      //滚动前景
Bitmap*               g_pPersonBitmap;    //人位图
PersonSprite*         g_pPersonSprite;    //人子画面
int                   g_iInputDelay;      //输入延迟
GameStart( )
GameStart( ) 函数初始化风景背景、云彩前景以及人的子画面。
// 开始游戏
void GameStart(HWND hWindow)
{
  // 创建屏幕外设备环境和位图
  g_hOffscreenDC = CreateCompatibleDC(GetDC(hWindow));
  g_hOffscreenBitmap = CreateCompatibleBitmap(GetDC(hWindow),
    g_pGame->GetWidth(), g_pGame->GetHeight());
  SelectObject(g_hOffscreenDC, g_hOffscreenBitmap);

  // 创建滚动背景和风景图层
  HDC hDC = GetDC(hWindow);
  g_pBackground = new ScrollingBackground(256, 256);
  g_pBGLandscapeLayer = new BackgroundLayer(hDC, IDB_BG_LANDSCAPE, g_hInstance);
  RECT rcViewport = { 352, 352, 608, 608 };
  g_pBGLandscapeLayer->SetViewport(rcViewport);
  g_pBackground->AddLayer(g_pBGLandscapeLayer);

  // 创建滚动前景和云彩图层
  g_pForeground = new ScrollingBackground(256, 256);
  g_pFGCloudsLayer = new BackgroundLayer(hDC, IDB_BG_CLOUDS, g_hInstance);
  rcViewport.left = rcViewport.top = 64;
  rcViewport.right = rcViewport.bottom = 320;
  g_pFGCloudsLayer->SetViewport(rcViewport);
  g_pForeground->AddLayer(g_pFGCloudsLayer);

  // 创建并加载人的位图
  g_pPersonBitmap = new Bitmap(hDC, IDB_PERSON, g_hInstance);

  // 创建人的子画面
  RECT rcBounds = { 115, 112, 26, 32 };
  g_pPersonSprite = new PersonSprite(g_pPersonBitmap, rcBounds, BA_STOP);
  g_pPersonSprite->SetNumFrames(2);
  g_pPersonSprite->SetPosition(115, 112);
  g_pGame->AddSprite(g_pPersonSprite);

  // 播放背景音乐
  g_pGame->PlayMIDISong(TEXT("Music.mid"));
}
创建的背景大小为 256*256(和游戏屏幕大小相同),风景图层是从一个位图资源中创建的,其视口设置为图层图像的中央。风景图层的大小为 960*960,云彩图层的大小为 384*384。
在云彩图层图像中,可以看到存在很大的“透明”区域,这些透明很有必要,如果没有透明区域,因为云彩图层作为前景,那么很可能会盖住人的子画面以及风景背景。
GameEnd( )
GameEnd( ) 函数清理背景、前景以及人的子画面。
// 游戏结束
void GameEnd()
{
  // 关闭MIDI的播放器
  g_pGame->CloseMIDIPlayer();

  // 清理屏幕外设备环境和位图
  DeleteObject(g_hOffscreenBitmap);
  DeleteDC(g_hOffscreenDC);

  // 清理位图
  delete g_pPersonBitmap;

  // 清理滚动背景和风景图层
  delete g_pBackground;
  delete g_pBGLandscapeLayer;

  // 清理滚动前景和云彩图层
  delete g_pForeground;
  delete g_pFGCloudsLayer;

  // 清理子画面
  g_pGame->CleanupSprites();

  // 清理游戏引擎
  delete g_pGame;
}
GamePaint( )
GamePaint( ) 负责绘制滚动背景、子画面以及滚动前景。
// 绘制游戏
void GamePaint(HDC hDC)
{
  // 绘制滚动背景
  g_pBackground->Draw(hDC);

  // 绘制子画面
  g_pGame->DrawSprites(hDC);

  // 绘制滚动背景
  g_pForeground->Draw(hDC, TRUE); // 绘制时包括透明效果
}
HandleKeys( )
HandleKeys( ) 负责处理键盘输入并使用它来控制人的子画面并滚动背景和前景。
// 监听键盘事件
void HandleKeys()
{
  // 移动方向键时移动风景/云彩图层
  if (g_iInputDelay++ > 1)
  {
    if (GetAsyncKeyState(VK_LEFT) < 0)
    {
      // 人走动
      g_pPersonSprite->Walk();

      // 向右移动风景图层(为了使人看起来向右走)
      g_pBGLandscapeLayer->SetSpeed(16);
      g_pBGLandscapeLayer->SetDirection(SD_RIGHT);
      g_pBGLandscapeLayer->Update();
      g_pBGLandscapeLayer->SetSpeed(0);

      // 向右移动云彩图层
      g_pFGCloudsLayer->SetSpeed(4);
      g_pFGCloudsLayer->SetDirection(SD_RIGHT);
      g_pFGCloudsLayer->Update();
      g_pFGCloudsLayer->SetSpeed(0);
    }
    else if (GetAsyncKeyState(VK_RIGHT) < 0)
    {
      // 人走动
      g_pPersonSprite->Walk();

      // 向左移动风景图层
      g_pBGLandscapeLayer->SetSpeed(16);
      g_pBGLandscapeLayer->SetDirection(SD_LEFT);
      g_pBGLandscapeLayer->Update();
      g_pBGLandscapeLayer->SetSpeed(0);

      // 向右移动云彩图层
      g_pFGCloudsLayer->SetSpeed(4);
      g_pFGCloudsLayer->SetDirection(SD_LEFT);
      g_pFGCloudsLayer->Update();
      g_pFGCloudsLayer->SetSpeed(0);
    }
    else if (GetAsyncKeyState(VK_UP) < 0)
    {
      // 使人走动
      g_pPersonSprite->Walk();

      // 向下移动风景图层
      g_pBGLandscapeLayer->SetSpeed(16);
      g_pBGLandscapeLayer->SetDirection(SD_DOWN);
      g_pBGLandscapeLayer->Update();
      g_pBGLandscapeLayer->SetSpeed(0);

      // 向下移动云彩图层
      g_pFGCloudsLayer->SetSpeed(4);
      g_pFGCloudsLayer->SetDirection(SD_DOWN);
      g_pFGCloudsLayer->Update();
      g_pFGCloudsLayer->SetSpeed(0);
    }
    else if (GetAsyncKeyState(VK_DOWN) < 0)
    {
      // 人走动
      g_pPersonSprite->Walk();

      // 向上移动风景图层
      g_pBGLandscapeLayer->SetSpeed(16);
      g_pBGLandscapeLayer->SetDirection(SD_UP);
      g_pBGLandscapeLayer->Update();
      g_pBGLandscapeLayer->SetSpeed(0);

      // 向上移动云彩图层
      g_pFGCloudsLayer->SetSpeed(4);
      g_pFGCloudsLayer->SetDirection(SD_UP);
      g_pFGCloudsLayer->Update();
      g_pFGCloudsLayer->SetSpeed(0);
    }

    // 重置输入延迟
    g_iInputDelay = 0;
  }
}
在 HandleKeys( )函数中,每次按一个键,设置风景背景的速度和方向,更新背景以使其滚动,然后将其速度设置为0。对云彩前景执行相同的步骤,只是速度总是更小一点,这样可以使云彩移动地更慢。此外,背景和前景的移动方向与人的方向相反,这是制造人在走动的错觉。
PersonSprite 类
这个类派生 Sprite 类,为人子画面派生一个新类,是因为常规的 Sprite 类没有提供细致控制动画帧的方法。更具体地说,我们需要能够手工改变人的动画帧,使其响应用户输入,看起来就像是在走路。
PersonSprite 类 用一个子画面,这个子画面的动画帧用来模拟走路。
class PersonSprite : public Sprite
{
public:
  // 构造函数和析构函数
          PersonSprite(Bitmap* pBitmap, RECT& rcBounds,
            BOUNDSACTION baBoundsAction = BA_STOP);
  virtual ~PersonSprite();

  // 帮助器方法
  virtual void  UpdateFrame();

  // 常规方法
  void Walk();
};
PersonSprite::UpdateFrame( )
PersonSprite::UpdateFrame( ) 重写了默认的子画面行为。因为默认的Sprite::UpdateFrame( )方法会自动更新动画帧。
inline void PersonSprite::UpdateFrame()
{
}
PersonSprite::Walk( )
PersonSprite::Walk( ) 方法提供一种手工更新动画帧的方法,以便使人的子画面看起来像是在走路。
void PersonSprite::Walk()
{
  // 在两个帧之间切换,制造一种走动的错觉
  m_iCurFrame = 1 - m_iCurFrame;
}


 1万+
1万+


 被折叠的 条评论
为什么被折叠?
被折叠的 条评论
为什么被折叠?
 到【灌水乐园】发言


