 Django MySQL教程


 本文详细介绍如何使用Django连接MySQL数据库,包括安装配置、创建数据库、数据表,以及实现基本的CRUD操作。
1. 创建数据库
使用mysql 之前首先使用anaconda安装 pymysql
命令如下:
conda install pymysql如果没有mysql,先 安装mysql 哈
(1)登陆 root
D:\test\mysite>mysql -u root -p
Enter password: ****
Welcome to the MySQL monitor.  Commands end with ; or \g.
Your MySQL connection id is 216
Server version: 5.6.26-log MySQL Community Server (GPL)

Copyright (c) 2000, 2015, Oracle and/or its affiliates. All rights reserved.

Oracle is a registered trademark of Oracle Corporation and/or its
affiliates. Other names may be trademarks of their respective
owners.

Type 'help;' or '\h' for help. Type '\c' to clear the current input statement.

mysql>
(2)创建数据库 : store
mysql> create database store;
Query OK, 1 row affected (0.00 sec)

mysql> show databases;
+--------------------+
| Database           |
+--------------------+
| information_schema |
| demo1              |
| mysql              |
| performance_schema |
| sakila             |
| store              |
| test               |
| world              |
+--------------------+
8 rows in set (0.00 sec)
(3)给 数据库 store 添加 数据库登陆用户 yuan
mysql> grant all on store.* to yuan@localhost identified by 'yuan';
Query OK, 0 rows affected (0.00 sec)

mysql> exit
Bye
#测试使用新用户登陆
D:\test\mysite>mysql -u yuan -p
Enter password: ****
Welcome to the MySQL monitor.  Commands end with ; or \g.
这样我们就建立了数据库名为 store ,登陆用户为 yuan 配置;
2. 新建 store app
使用下面命令新建名字为 store的 app模块
D:\test\mysite>python manage.py startapp store
新建成功后会在 pycharm上看见,查看store app的目录结构
D:\test\mysite>tree store /f
Folder PATH listing for volume data-one
Volume serial number is 263B-D486
D:\TEST\MYSITE\STORE
│  admin.py
│  apps.py
│  models.py
│  tests.py
│  views.py
│  __init__.py
│
└─migrations
        __init__.py
配置 store
mysite/setting.py
每新建一个store,都需要在这里添加,比如说 testapp , store app .
INSTALLED_APPS = [
    'django.contrib.admin',
    'django.contrib.auth',
    'django.contrib.contenttypes',
    'django.contrib.sessions',
    'django.contrib.messages',
    'django.contrib.staticfiles',
    'testapp',
    'store', #添加store app
]
3. 配置数据库信息与生成表
配置 连接信息
- mysite/setting.py
配置数据库信息,在项目配置文件下的setting.py下DATABASES进行配置 ,默认的是sqlite数据库,如下:
# Database
# https://docs.djangoproject.com/en/1.10/ref/settings/#databases

DATABASES = {
    'default': {
        'ENGINE': 'django.db.backends.sqlite3',
        'NAME': os.path.join(BASE_DIR, 'db.sqlite3'),
    }
}
实现mysql数据库连接,配置如下:
# Database
# https://docs.djangoproject.com/en/1.10/ref/settings/#databases

DATABASES = {
    'default': {
        'ENGINE': 'django.db.backends.mysql',
        'NAME': 'store', #数据库名称
        'USER': 'yuan', #连接用户名
        'PASSWORD': 'yuan',#连接密码
        'HOST': 'localhost',
        'PORT': '3306'
    }
}
配置 pymysql
配置store目录的 __init__.py文件
store/
__init__.py
配置如下:
import pymysql
pymysql.install_as_MySQLdb()
生成数据表
使用下面命令: python manage.py migrate
D:\test\mysite>python manage.py migrate
Operations to perform:
  Apply all migrations: admin, auth, contenttypes, sessions
Running migrations:
  Applying contenttypes.0001_initial... OK
  Applying auth.0001_initial... OK
  Applying admin.0001_initial... OK
  Applying admin.0002_logentry_remove_auto_add... OK
  Applying contenttypes.0002_remove_content_type_name... OK
  Applying auth.0002_alter_permission_name_max_length... OK
  Applying auth.0003_alter_user_email_max_length... OK
  Applying auth.0004_alter_user_username_opts... OK
  Applying auth.0005_alter_user_last_login_null... OK
  Applying auth.0006_require_contenttypes_0002... OK
  Applying auth.0007_alter_validators_add_error_messages... OK
  Applying auth.0008_alter_user_username_max_length... OK
  Applying sessions.0001_initial... OK
登陆查看
会生成 django 自带app的数据库表
mysql> use store;
Database changed
mysql> show tables;
+----------------------------+
| Tables_in_store            |
+----------------------------+
| auth_group                 |
| auth_group_permissions     |
| auth_permission            |
| auth_user                  |
| auth_user_groups           |
| auth_user_user_permissions |
| django_admin_log           |
| django_content_type        |
| django_migrations          |
| django_session             |
+----------------------------+
10 rows in set (0.00 sec)
4. 实现查功能
需求:
商店:name , address
增 : 添加 商店信息
查 : 显示所有
删 : 删除商店信息
(1) 编辑 model.py
store/model.py
定义实体,对应数据表,如下定义:
from django.db import models


# Create your models here.
# 这里注意:需要继承 models.Model ,不然没办法生成表的哈
class StoreInfo(models.Model):
    name = models.CharField(max_length=20, default='') #name属性,字段
    address = models.CharField(max_length=50, default="China") #address属性,字段

    #此方法在print对象的时候,可以打印字符串,类似java中的toString()方法
    def __str__(self):
        return self.name + self.address
(2)生成数据库表
执行命令 python manage.py makemigrations :当model改变后,会创建一个新的model
然后执行python manage.py migrate : 应用到数据库
D:\test\mysite>python manage.py makemigrations
Migrations for 'store':
  store\migrations\0001_initial.py:
    - Create model StoreInfo

D:\test\mysite>python manage.py migrate
Operations to perform:
  Apply all migrations: admin, auth, contenttypes, sessions, store
Running migrations:
  Applying store.0001_initial... OK
查看所有表 :
mysql> use store;
Database changed
mysql> show tables;
+----------------------------+
| Tables_in_store            |
+----------------------------+
| auth_group                 |
| auth_group_permissions     |
| auth_permission            |
| auth_user                  |
| auth_user_groups           |
| auth_user_user_permissions |
| django_admin_log           |
| django_content_type        |
| django_migrations          |
| django_session             |
| store_storeinfo            |  #这里创建好的storeinfo表
+----------------------------+
11 rows in set (0.00 sec)
查看 storeinfo 表结构 : name字段和address**字段**
mysql> show columns from store_storeinfo;
+---------+-------------+------+-----+---------+----------------+
| Field   | Type        | Null | Key | Default | Extra          |
+---------+-------------+------+-----+---------+----------------+
| id      | int(11)     | NO   | PRI | NULL    | auto_increment |
| name    | varchar(20) | NO   |     | NULL    |                |
| address | varchar(50) | NO   |     | NULL    |                |
+---------+-------------+------+-----+---------+----------------+
3 rows in set (0.02 sec)
这样数据表就建好了。
添加测试数据
在Terminal 中执行 ,下面命令 :
D:\test\mysite>python manage.py shell
Python 3.5.2 |Anaconda 4.2.0 (64-bit)| (default, Jul  5 2016, 11:41:13) [MSC v.1900 64 bit (AMD64)]
Type "copyright", "credits" or "license" for more information.

IPython 5.1.0 -- An enhanced Interactive Python.
?         -> Introduction and overview of IPython's features.
%quickref -> Quick reference.
help      -> Python's own help system.
object?   -> Details about 'object', use 'object??' for extra details.
添加数据:
In [1]: from store.models import StoreInfo #1.引入刚才创建的 Model

In [2]: store_list=StoreInfo.objects.all() #2.查询操作

In [3]: print(store_list) #3.打印查询结果
<QuerySet []>

In [4]: create=StoreInfo.objects.create(name='LMP',address="ShangHai") #4.添加数据操作

In [5]: print(create)#5.打印添加后的返回值
LMPShangHai
(2) 查询 操作 实现View.py
显示所有 商店信息 store/view.py
1)实现代码如下:
from django.http import HttpResponse
from django.shortcuts import render

from store.models import StoreInfo


# Create your views here.

# 查下store全部信息
def select_store_list(request):
    store_list = StoreInfo.objects.all() #查询所有的信息
    print(type(store_list), store_list)  #打印结果类型与结果值
return render(request, "store_list.html", {"content": store_list}) #返回界面上面将查寻结果在store_list.html中进行填充,见下文。
sotre_list.html 实现如下:
<!DOCTYPE html>
<html lang="en">
<head>
    <meta charset="UTF-8">
    <title>Store</title>
</head>
<body>

<table border="1">
    <thead>
    <tr>
        <th>名称</th>
        <th>地址</th>
        <th>操作</th>
    </tr>
    </thead>
    <tbody>
    #这里是模板语言,for循环,最后需要 endfor
    {% for foo in content %}
        <tr>
            <td>{{ foo.name }}</td>
            <td>{{ foo.address }}</td>
            <td></td>
        </tr>
    {% endfor %}
    </tbody>
</table>


</body>
</html>2)添加 templates 模板
上面代码中的 store_list.html 就属于html模板,在store app下新建 templates文件夹,来存放html模板,这时候的 store app结构如下:
D:\test\mysite>tree store /f
Folder PATH listing for volume data-one
Volume serial number is 263B-D486
D:\TEST\MYSITE\STORE
│  admin.py
│  apps.py
│  models.py
│  tests.py
│  urls.py      #注意: 需要新建
│  views.py
│  __init__.py
│
├─migrations
│  │  0001_initial.py
│  │  __init__.py
│  │
│  └─__pycache__
│          0001_initial.cpython-35.pyc
│          __init__.cpython-35.pyc
│
├─templates #模板文件夹
│      store_list.html
│
└─__pycache__
        admin.cpython-35.pyc
        models.cpython-35.pyc
        urls.cpython-35.pyc
        views.cpython-35.pyc
        __init__.cpython-35.pyc
3)配置模板文件夹
mysite / setting.py
在项目配置文件夹下的setting.py进行配置,之前配置过 INSTALLED_APPS 和 DATABASES ,现在配置的 TEMPLATES 。配置如下 :
TEMPLATES = [
    {
        'BACKEND': 'django.template.backends.django.DjangoTemplates',
        'DIRS': [
            BASE_DIR + "/store/templates", #在这里进行配置,默认是空的list
        ],
        'APP_DIRS': True,
        'OPTIONS': {
            'context_processors': [
                'django.template.context_processors.debug',
                'django.template.context_processors.request',
                'django.contrib.auth.context_processors.auth',
                'django.contrib.messages.context_processors.messages',
            ],
        },
    },
]4)配置Urls
sotre/urls.py
新建urls.py文件,代码如下 :
from django.conf.urls import url

from store import views

urlpatterns = [
    url(r'^list$', views.select_store_list),
]5)配置 store app urls
mysite/urls.py
添加store app的 urls ,实现如下 :
urlpatterns = [
    url(r'^admin/', admin.site.urls),
    url(r'^test/', include('testapp.urls')),
    url(r'^store/', include('store.urls')), # store的urls
]6)运行 访问
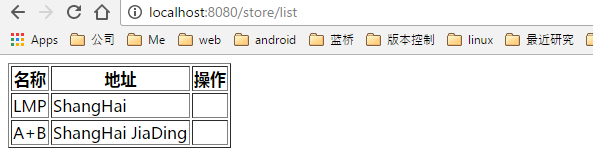
直接 run OR python manage.py runserver 8080
这里写代码片5. 总结
这里总结下 文中使用的命令。
conda 命令 :
conda install pymysql #安装pymysql , 注意在mysite/__init__.py中进行初始化mysql 命令 :
#创建名为store的 数据库
create database store;
#给store数据库下的表添加一个拥有所有权限的用户名为yuan,密码为yuan的用户;
grant all on store.* to yuan@localhost identified by 'yuan';
#显示store_storeinfo表的列信息
show columns from store_storeinfo;
manage.py 相关 :
python manage.py startapp store #新建名为store的app
python manage.py shell #控制台,可以输入相关内容进行测试
python manage.py makemigrations #当Model有变化的时候,执行这条命令重新生成 model相关文件
python manage.py migrate #根据model,生成数据库表
下文实现添加和删除功能。


 1672
1672

 被折叠的 条评论
为什么被折叠?
被折叠的 条评论
为什么被折叠?
 到【灌水乐园】发言


