已经不负责图像拼接相关工作,有技术问题请自己解决,谢谢。
一、stitching_detail程序运行流程
1.命令行调用程序,输入源图像以及程序的参数
2.特征点检测,判断是使用surf还是orb,默认是surf。
3.对图像的特征点进行匹配,使用最近邻和次近邻方法,将两个最优的匹配的置信度保存下来。
4.对图像进行排序以及将置信度高的图像保存到同一个集合中,删除置信度比较低的图像间的匹配,得到能正确匹配的图像序列。这样将置信度高于门限的所有匹配合并到一个集合中。
5.对所有图像进行相机参数粗略估计,然后求出旋转矩阵
6.使用光束平均法进一步精准的估计出旋转矩阵。
7.波形校正,水平或者垂直
8.拼接
9.融合,多频段融合,光照补偿,
二、stitching_detail程序接口介绍
img1 img2 img3 输入图像
--preview 以预览模式运行程序,比正常模式要快,但输出图像分辨率低,拼接的分辨率compose_megapix 设置为0.6
--try_gpu (yes|no) 是否使用GPU(图形处理器),默认为no
/* 运动估计参数 */
--work_megapix <--work_megapix <float>> 图像匹配的分辨率大小,图像的面积尺寸变为work_megapix*100000,默认为0.6
--features (surf|orb) 选择surf或者orb算法进行特征点计算,默认为surf
--match_conf <float> 特征点检测置信等级,最近邻匹配距离与次近邻匹配距离的比值,surf默认为0.65,orb默认为0.3
--conf_thresh <float> 两幅图来自同一全景图的置信度,默认为1.0
--ba (reproj|ray) 光束平均法的误差函数选择,默认是ray方法
--ba_refine_mask (mask) ---------------
--wave_correct (no|horiz|vert) 波形校验 水平,垂直或者没有 默认是horiz
--save_graph <file_name> 将匹配的图形以点的形式保存到文件中, Nm代表匹配的数量,NI代表正确匹配的数量,C表示置信度
/*图像融合参数:*/
--warp (plane|cylindrical|spherical|fisheye|stereographic|compressedPlaneA2B1|compressedPlaneA1.5B1|compressedPlanePortraitA2B1
|compressedPlanePortraitA1.5B1|paniniA2B1|paniniA1.5B1|paniniPortraitA2B1|paniniPortraitA1.5B1|mercator|transverseMercator)
选择融合的平面,默认是球形
--seam_megapix <float> 拼接缝像素的大小 默认是0.1 ------------
--seam (no|voronoi|gc_color|gc_colorgrad) 拼接缝隙估计方法 默认是gc_color
--compose_megapix <float> 拼接分辨率,默认为-1
--expos_comp (no|gain|gain_blocks) 光照补偿方法,默认是gain_blocks
--blend (no|feather|multiband) 融合方法,默认是多频段融合
--blend_strength <float> 融合强度,0-100.默认是5.
--output <result_img> 输出图像的文件名,默认是result,jpg
命令使用实例,以及程序运行时的提示:
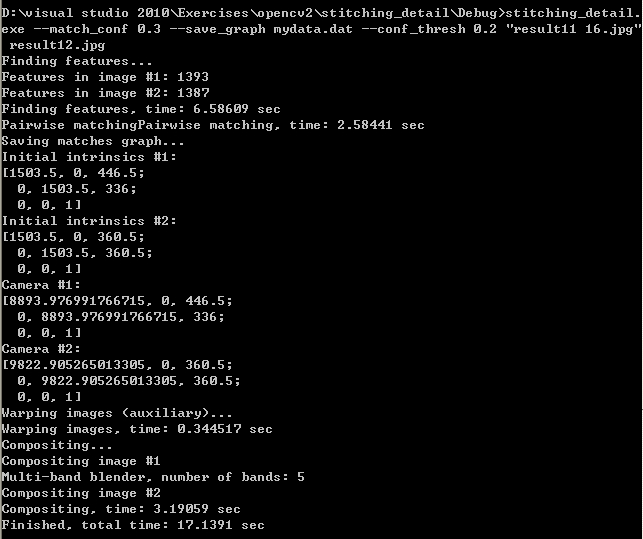
三、程序代码分析
1.参数读入
程序参数读入分析,将程序运行是输入的参数以及需要拼接的图像读入内存,检查图像是否多于2张。
- int retval = parseCmdArgs(argc, argv);
- if (retval)
- return retval;
-
-
- int num_images = static_cast<int>(img_names.size());
- if (num_images < 2)
- {
- LOGLN("Need more images");
- return -1;
- }
2.特征点检测
判断选择是surf还是orb特征点检测(默认是surf)以及对图像进行预处理(尺寸缩放),然后计算每幅图形的特征点,以及特征点描述子
2.1 计算work_scale,将图像resize到面积在work_megapix*10^6以下,(work_megapix 默认是0.6)
- work_scale = min(1.0, sqrt(work_megapix * 1e6 / full_img.size().area()));
- resize(full_img, img, Size(), work_scale, work_scale);
图像大小是740*830,面积大于6*10^5,所以计算出work_scale = 0.98,然后对图像resize。

2.2 计算seam_scale,也是根据图像的面积小于seam_megapix*10^6,(seam_megapix 默认是0.1),seam_work_aspect目前还没用到
- seam_scale = min(1.0, sqrt(seam_megapix * 1e6 / full_img.size().area()));
- seam_work_aspect = seam_scale / work_scale;
 2.3 计算图像特征点,以及计算特征点描述子,并将img_idx设置为i。
- (*finder)(img, features[i]);
- features[i].img_idx = i;
特征点描述的结构体定义如下:
- struct detail::ImageFeatures
- Structure containing image keypoints and descriptors.
- struct CV_EXPORTS ImageFeatures
- {
- int img_idx;
- Size img_size;
- std::vector<KeyPoint> keypoints;
- Mat descriptors;
- };

2.4 将源图像resize到seam_megapix*10^6,并存入image[]中
- resize(full_img, img, Size(), seam_scale, seam_scale);
- images[i] = img.clone();
3.图像匹配
对任意两副图形进行特征点匹配,然后使用查并集法,将图片的匹配关系找出,并删除那些不属于同一全景图的图片。
3.1 使用最近邻和次近邻匹配,对任意两幅图进行特征点匹配。
- vector<MatchesInfo> pairwise_matches;
- BestOf2NearestMatcher matcher(try_gpu, match_conf);
- matcher(features, pairwise_matches);
介绍一下BestOf2NearestMatcher 函数:
-
- detail::BestOf2NearestMatcher::BestOf2NearestMatcher(bool try_use_gpu=false,float match_conf=0.3f,
- intnum_matches_thresh1=6, int num_matches_thresh2=6)
- Parameters: try_use_gpu – Should try to use GPU or not
- match_conf – Match distances ration threshold
- num_matches_thresh1 – Minimum number of matches required for the 2D projective
- transform estimation used in the inliers classification step
- num_matches_thresh2 – Minimum number of matches required for the 2D projective
- transform re-estimation on inliers
函数的定义(只是设置一下参数,属于构造函数):
- BestOf2NearestMatcher::BestOf2NearestMatcher(bool try_use_gpu, float match_conf, int num_matches_thresh1, int num_matches_thresh2)
- {
- #ifdef HAVE_OPENCV_GPU
- if (try_use_gpu && getCudaEnabledDeviceCount() > 0)
- impl_ = new GpuMatcher(match_conf);
- else
- #else
- (void)try_use_gpu;
- #endif
- impl_ = new CpuMatcher(match_conf);
-
- is_thread_safe_ = impl_->isThreadSafe();
- num_matches_thresh1_ = num_matches_thresh1;
- num_matches_thresh2_ = num_matches_thresh2;
- }
以及MatchesInfo的结构体定义:
- Structure containing information about matches between two images. It’s assumed that there is a homography between those images.
- struct CV_EXPORTS MatchesInfo
- {
- MatchesInfo();
- MatchesInfo(const MatchesInfo &other);
- const MatchesInfo& operator =(const MatchesInfo &other);
- int src_img_idx, dst_img_idx;
- std::vector<DMatch> matches;
- std::vector<uchar> inliers_mask;
- int num_inliers;
- Mat H;
- double confidence;
- };
求出图像匹配的结果如下(具体匹配参见sift特征点匹配),任意两幅图都进行匹配(3*3=9),其中1-》2和2-》1只计算了一次,以1-》2为准,:
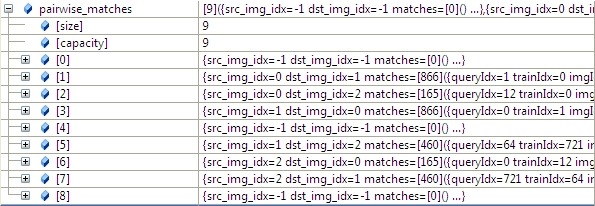
3.2 根据任意两幅图匹配的置信度,将所有置信度高于conf_thresh(默认是1.0)的图像合并到一个全集中。
我们通过函数的参数 save_graph打印匹配结果如下(我稍微修改了一下输出):
- "outimage101.jpg" -- "outimage102.jpg"[label="Nm=866, Ni=637, C=2.37864"];
- "outimage101.jpg" -- "outimage103.jpg"[label="Nm=165, Ni=59, C=1.02609"];
- "outimage102.jpg" -- "outimage103.jpg"[label="Nm=460, Ni=260, C=1.78082"];
Nm代表匹配的数量,NI代表正确匹配的数量,C表示置信度
通过查并集方法,查并集介绍请参见博文:
http://blog.csdn.net/skeeee/article/details/20471949
- vector<int> indices = leaveBiggestComponent(features, pairwise_matches, conf_thresh);
- vector<Mat> img_subset;
- vector<string> img_names_subset;
- vector<Size> full_img_sizes_subset;
- for (size_t i = 0; i < indices.size(); ++i)
- {
- img_names_subset.push_back(img_names[indices[i]]);
- img_subset.push_back(images[indices[i]]);
- full_img_sizes_subset.push_back(full_img_sizes[indices[i]]);
- }
-
- images = img_subset;
- img_names = img_names_subset;
- full_img_sizes = full_img_sizes_subset;
4.根据单应性矩阵粗略估计出相机参数(焦距)
4.1 焦距参数的估计
根据前面求出的任意两幅图的匹配,我们根据两幅图的单应性矩阵H,求出符合条件的f,(4副图,16个匹配,求出8个符合条件的f),然后求出f的均值或者中值当成所有图形的粗略估计的f。
- estimateFocal(features, pairwise_matches, focals);
函数的主要源码如下:
- for (int i = 0; i < num_images; ++i)
- {
- for (int j = 0; j < num_images; ++j)
- {
- const MatchesInfo &m = pairwise_matches[i*num_images + j];
- if (m.H.empty())
- continue;
- double f0, f1;
- bool f0ok, f1ok;
- focalsFromHomography(m.H, f0, f1, f0ok, f1ok);
-
- if (f0ok && f1ok)
- all_focals.push_back(sqrt(f0 * f1));
- }
- }
其中函数focalsFromHomography的定义如下:
- Tries to estimate focal lengths from the given homography
- under the assumption that the camera undergoes rotations around its centre only.
- Parameters
- H – Homography.
- f0 – Estimated focal length along X axis.
- f1 – Estimated focal length along Y axis.
- f0_ok – True, if f0 was estimated successfully, false otherwise.
- f1_ok – True, if f1 was estimated successfully, false otherwise.
函数的源码:
- void focalsFromHomography(const Mat& H, double &f0, double &f1, bool &f0_ok, bool &f1_ok)
- {
- CV_Assert(H.type() == CV_64F && H.size() == Size(3, 3));
-
- const double* h = reinterpret_cast<const double*>(H.data);
-
- double d1, d2;
- double v1, v2;
-
-
- f1_ok = true;
- d1 = h[6] * h[7];
- d2 = (h[7] - h[6]) * (h[7] + h[6]);
- v1 = -(h[0] * h[1] + h[3] * h[4]) / d1;
- v2 = (h[0] * h[0] + h[3] * h[3] - h[1] * h[1] - h[4] * h[4]) / d2;
- if (v1 < v2) std::swap(v1, v2);
- if (v1 > 0 && v2 > 0) f1 = sqrt(std::abs(d1) > std::abs(d2) ? v1 : v2);
- else if (v1 > 0) f1 = sqrt(v1);
- else f1_ok = false;
-
- f0_ok = true;
- d1 = h[0] * h[3] + h[1] * h[4];
- d2 = h[0] * h[0] + h[1] * h[1] - h[3] * h[3] - h[4] * h[4];
- v1 = -h[2] * h[5] / d1;
- v2 = (h[5] * h[5] - h[2] * h[2]) / d2;
- if (v1 < v2) std::swap(v1, v2);
- if (v1 > 0 && v2 > 0) f0 = sqrt(std::abs(d1) > std::abs(d2) ? v1 : v2);
- else if (v1 > 0) f0 = sqrt(v1);
- else f0_ok = false;
- }
求出的焦距有8个

求出的焦距取中值或者平均值,然后就是所有图片的焦距。
并构建camera参数,将矩阵写入camera:
- cameras.assign(num_images, CameraParams());
- for (int i = 0; i < num_images; ++i)
- cameras[i].focal = focals[i];
4.2 根据匹配的内点构建最大生成树,然后广度优先搜索求出根节点,并求出camera的R矩阵,K矩阵以及光轴中心
camera其他参数:
aspect = 1.0,ppx,ppy目前等于0,最后会赋值成图像中心点的。
K矩阵的值:
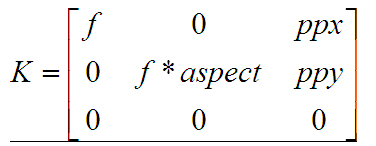
- Mat CameraParams::K() const
- {
- Mat_<double> k = Mat::eye(3, 3, CV_64F);
- k(0,0) = focal; k(0,2) = ppx;
- k(1,1) = focal * aspect; k(1,2) = ppy;
- return k;
- }
R矩阵的值:

- void operator ()(const GraphEdge &edge)
- {
- int pair_idx = edge.from * num_images + edge.to;
-
- Mat_<double> K_from = Mat::eye(3, 3, CV_64F);
- K_from(0,0) = cameras[edge.from].focal;
- K_from(1,1) = cameras[edge.from].focal * cameras[edge.from].aspect;
- K_from(0,2) = cameras[edge.from].ppx;
- K_from(0,2) = cameras[edge.from].ppy;
-
- Mat_<double> K_to = Mat::eye(3, 3, CV_64F);
- K_to(0,0) = cameras[edge.to].focal;
- K_to(1,1) = cameras[edge.to].focal * cameras[edge.to].aspect;
- K_to(0,2) = cameras[edge.to].ppx;
- K_to(0,2) = cameras[edge.to].ppy;
-
- Mat R = K_from.inv() * pairwise_matches[pair_idx].H.inv() * K_to;
- cameras[edge.to].R = cameras[edge.from].R * R;
- }
光轴中心的值
- for (int i = 0; i < num_images; ++i)
- {
- cameras[i].ppx += 0.5 * features[i].img_size.width;
- cameras[i].ppy += 0.5 * features[i].img_size.height;
- }
5.使用Bundle Adjustment方法对所有图片进行相机参数校正
Bundle Adjustment(光束法平差)算法主要是解决所有相机参数的联合。这是全景拼接必须的一步,因为多个成对的单应性矩阵合成全景图时,会忽略全局的限制,造成累积误差。因此每一个图像都要加上光束法平差值,使图像被初始化成相同的旋转和焦距长度。
光束法平差的目标函数是一个具有鲁棒性的映射误差的平方和函数。即每一个特征点都要映射到其他的图像中,计算出使误差的平方和最小的相机参数。具体的推导过程可以参见Automatic Panoramic Image Stitching using Invariant Features.pdf的第五章,本文只介绍一下opencv实现的过程(完整的理论和公式 暂时还没看懂,希望有人能一起交流)
opencv中误差描述函数有两种如下:(opencv默认是BundleAdjusterRay ):
- BundleAdjusterReproj
- Implementation of the camera parameters refinement algorithm which minimizes sum of the reprojection error squares
-
- BundleAdjusterRay
- Implementation of the camera parameters refinement algorithm which minimizes sum of the distances between the
- rays passing through the camera center and a feature.
5.1 首先计算cam_params_的值:
- setUpInitialCameraParams(cameras);
函数主要源码:
- cam_params_.create(num_images_ * 4, 1, CV_64F);
- SVD svd;
- for (int i = 0; i < num_images_; ++i)
- {
- cam_params_.at<double>(i * 4, 0) = cameras[i].focal;
-
- svd(cameras[i].R, SVD::FULL_UV);
- Mat R = svd.u * svd.vt;
- if (determinant(R) < 0)
- R *= -1;
-
- Mat rvec;
- Rodrigues(R, rvec);
- CV_Assert(rvec.type() == CV_32F);
- cam_params_.at<double>(i * 4 + 1, 0) = rvec.at<float>(0, 0);
- cam_params_.at<double>(i * 4 + 2, 0) = rvec.at<float>(1, 0);
- cam_params_.at<double>(i * 4 + 3, 0) = rvec.at<float>(2, 0);
- }
计算cam_params_的值,先初始化cam_params(num_images_*4,1,CV_64F);
cam_params_[i*4+0] = cameras[i].focal;
cam_params_后面3个值,是cameras[i].R先经过奇异值分解,然后对u*vt进行Rodrigues运算,得到的rvec第一行3个值赋给cam_params_。
奇异值分解的定义:
在矩阵M的奇异值分解中 M = UΣV*
·U的列(columns)组成一套对M的正交"输入"或"分析"的基向量。这些向量是MM*的特征向量。
·V的列(columns)组成一套对M的正交"输出"的基向量。这些向量是M*M的特征向量。
·Σ对角线上的元素是奇异值,可视为是在输入与输出间进行的标量的"膨胀控制"。这些是M*M及MM*的奇异值,并与U和V的行向量相对应。
5.2 删除置信度小于门限的匹配对
-
- edges_.clear();
- for (int i = 0; i < num_images_ - 1; ++i)
- {
- for (int j = i + 1; j < num_images_; ++j)
- {
- const MatchesInfo& matches_info = pairwise_matches_[i * num_images_ + j];
- if (matches_info.confidence > conf_thresh_)
- edges_.push_back(make_pair(i, j));
- }
- }
5.3 使用LM算法计算camera参数。
首先初始化LM的参数(具体理论还没有看懂)
-
- for (size_t i = 0; i < edges_.size(); ++i)
- total_num_matches_ += static_cast<int>(pairwise_matches[edges_[i].first * num_images_ +
- edges_[i].second].num_inliers);
-
- CvLevMarq solver(num_images_ * num_params_per_cam_,
- total_num_matches_ * num_errs_per_measurement_,
- term_criteria_);
-
- Mat err, jac;
- CvMat matParams = cam_params_;
- cvCopy(&matParams, solver.param);
-
- int iter = 0;
- for(;;)
- {
- const CvMat* _param = 0;
- CvMat* _jac = 0;
- CvMat* _err = 0;
-
- bool proceed = solver.update(_param, _jac, _err);
-
- cvCopy(_param, &matParams);
-
- if (!proceed || !_err)
- break;
-
- if (_jac)
- {
- calcJacobian(jac);
- CvMat tmp = jac;
- cvCopy(&tmp, _jac);
- }
-
- if (_err)
- {
- calcError(err);
- LOG_CHAT(".");
- iter++;
- CvMat tmp = err;
- cvCopy(&tmp, _err);
- }
- }
计算camera
- obtainRefinedCameraParams(cameras);
函数源代码:
- void BundleAdjusterRay::obtainRefinedCameraParams(vector<CameraParams> &cameras) const
- {
- for (int i = 0; i < num_images_; ++i)
- {
- cameras[i].focal = cam_params_.at<double>(i * 4, 0);
-
- Mat rvec(3, 1, CV_64F);
- rvec.at<double>(0, 0) = cam_params_.at<double>(i * 4 + 1, 0);
- rvec.at<double>(1, 0) = cam_params_.at<double>(i * 4 + 2, 0);
- rvec.at<double>(2, 0) = cam_params_.at<double>(i * 4 + 3, 0);
- Rodrigues(rvec, cameras[i].R);
-
- Mat tmp;
- cameras[i].R.convertTo(tmp, CV_32F);
- cameras[i].R = tmp;
- }
- }
求出根节点,然后归一化旋转矩阵R
-
- Graph span_tree;
- vector<int> span_tree_centers;
- findMaxSpanningTree(num_images_, pairwise_matches, span_tree, span_tree_centers);
- Mat R_inv = cameras[span_tree_centers[0]].R.inv();
- for (int i = 0; i < num_images_; ++i)
- cameras[i].R = R_inv * cameras[i].R;
6 波形校正
前面几节把相机旋转矩阵计算出来,但是还有一个因素需要考虑,就是由于拍摄者拍摄图片的时候不一定是水平的,轻微的倾斜会导致全景图像出现飞机曲线,因此我们要对图像进行波形校正,主要是寻找每幅图形的“上升向量”(up_vector),使他校正成 。
。
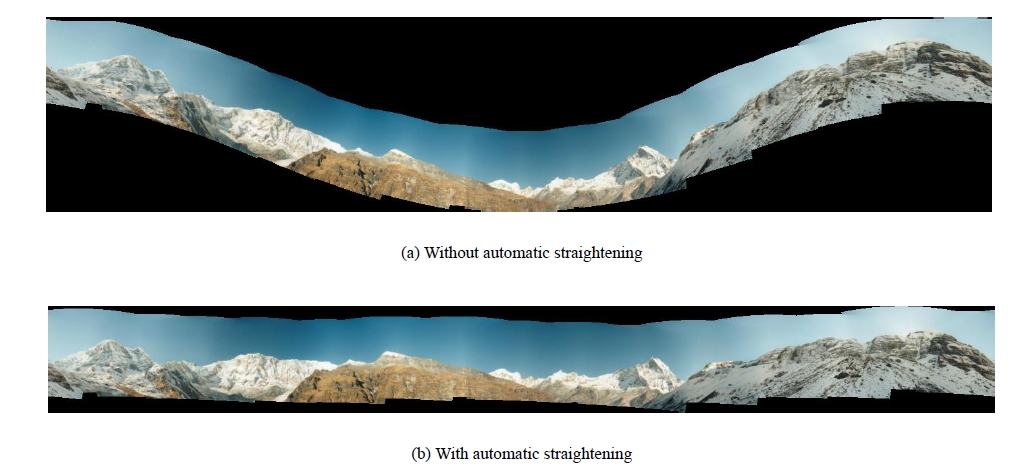
波形校正的效果图
opencv实现的源码如下(也是暂时没看懂,囧)
- <span style="white-space:pre"> </span>vector<Mat> rmats;
- for (size_t i = 0; i < cameras.size(); ++i)
- rmats.push_back(cameras[i].R);
- waveCorrect(rmats, wave_correct);
- for (size_t i = 0; i < cameras.size(); ++i)
- cameras[i].R = rmats[i];
其中waveCorrect(rmats, wave_correct)源码如下:
- void waveCorrect(vector<Mat> &rmats, WaveCorrectKind kind)
- {
- LOGLN("Wave correcting...");
- #if ENABLE_LOG
- int64 t = getTickCount();
- #endif
-
- Mat moment = Mat::zeros(3, 3, CV_32F);
- for (size_t i = 0; i < rmats.size(); ++i)
- {
- Mat col = rmats[i].col(0);
- moment += col * col.t();
- }
- Mat eigen_vals, eigen_vecs;
- eigen(moment, eigen_vals, eigen_vecs);
-
- Mat rg1;
- if (kind == WAVE_CORRECT_HORIZ)
- rg1 = eigen_vecs.row(2).t();
- else if (kind == WAVE_CORRECT_VERT)
- rg1 = eigen_vecs.row(0).t();
- else
- CV_Error(CV_StsBadArg, "unsupported kind of wave correction");
-
- Mat img_k = Mat::zeros(3, 1, CV_32F);
- for (size_t i = 0; i < rmats.size(); ++i)
- img_k += rmats[i].col(2);
- Mat rg0 = rg1.cross(img_k);
- rg0 /= norm(rg0);
-
- Mat rg2 = rg0.cross(rg1);
-
- double conf = 0;
- if (kind == WAVE_CORRECT_HORIZ)
- {
- for (size_t i = 0; i < rmats.size(); ++i)
- conf += rg0.dot(rmats[i].col(0));
- if (conf < 0)
- {
- rg0 *= -1;
- rg1 *= -1;
- }
- }
- else if (kind == WAVE_CORRECT_VERT)
- {
- for (size_t i = 0; i < rmats.size(); ++i)
- conf -= rg1.dot(rmats[i].col(0));
- if (conf < 0)
- {
- rg0 *= -1;
- rg1 *= -1;
- }
- }
-
- Mat R = Mat::zeros(3, 3, CV_32F);
- Mat tmp = R.row(0);
- Mat(rg0.t()).copyTo(tmp);
- tmp = R.row(1);
- Mat(rg1.t()).copyTo(tmp);
- tmp = R.row(2);
- Mat(rg2.t()).copyTo(tmp);
-
- for (size_t i = 0; i < rmats.size(); ++i)
- rmats[i] = R * rmats[i];
-
- LOGLN("Wave correcting, time: " << ((getTickCount() - t) / getTickFrequency()) << " sec");
- }
7.单应性矩阵变换
由图像匹配,Bundle Adjustment算法以及波形校验,求出了图像的相机参数以及旋转矩阵,接下来就对图形进行单应性矩阵变换,亮度的增量补偿以及多波段融合(图像金字塔)。首先介绍的就是单应性矩阵变换:
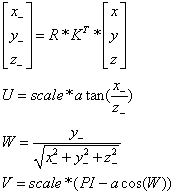
源图像的点(x,y,z=1),图像的旋转矩阵R,图像的相机参数矩阵K,经过变换后的同一坐标(x_,y_,z_),然后映射到球形坐标(u,v,w),他们之间的关系如下:
- void SphericalProjector::mapForward(float x, float y, float &u, float &v)
- {
- float x_ = r_kinv[0] * x + r_kinv[1] * y + r_kinv[2];
- float y_ = r_kinv[3] * x + r_kinv[4] * y + r_kinv[5];
- float z_ = r_kinv[6] * x + r_kinv[7] * y + r_kinv[8];
-
- u = scale * atan2f(x_, z_);
- float w = y_ / sqrtf(x_ * x_ + y_ * y_ + z_ * z_);
- v = scale * (static_cast<float>(CV_PI) - acosf(w == w ? w : 0));
- }
根据映射公式,对图像的上下左右四个边界求映射后的坐标,然后确定变换后图像的左上角和右上角的坐标,
如果是球形拼接,则需要再加上判断(暂时还没研究透):
- float tl_uf = static_cast<float>(dst_tl.x);
- float tl_vf = static_cast<float>(dst_tl.y);
- float br_uf = static_cast<float>(dst_br.x);
- float br_vf = static_cast<float>(dst_br.y);
-
- float x = projector_.rinv[1];
- float y = projector_.rinv[4];
- float z = projector_.rinv[7];
- if (y > 0.f)
- {
- float x_ = (projector_.k[0] * x + projector_.k[1] * y) / z + projector_.k[2];
- float y_ = projector_.k[4] * y / z + projector_.k[5];
- if (x_ > 0.f && x_ < src_size.width && y_ > 0.f && y_ < src_size.height)
- {
- tl_uf = min(tl_uf, 0.f); tl_vf = min(tl_vf, static_cast<float>(CV_PI * projector_.scale));
- br_uf = max(br_uf, 0.f); br_vf = max(br_vf, static_cast<float>(CV_PI * projector_.scale));
- }
- }
-
- x = projector_.rinv[1];
- y = -projector_.rinv[4];
- z = projector_.rinv[7];
- if (y > 0.f)
- {
- float x_ = (projector_.k[0] * x + projector_.k[1] * y) / z + projector_.k[2];
- float y_ = projector_.k[4] * y / z + projector_.k[5];
- if (x_ > 0.f && x_ < src_size.width && y_ > 0.f && y_ < src_size.height)
- {
- tl_uf = min(tl_uf, 0.f); tl_vf = min(tl_vf, static_cast<float>(0));
- br_uf = max(br_uf, 0.f); br_vf = max(br_vf, static_cast<float>(0));
- }
- }
然后利用反投影将图形反投影到变换的图像上,像素计算默认是二维线性插值。
反投影的公式:
- void SphericalProjector::mapBackward(float u, float v, float &x, float &y)
- {
- u /= scale;
- v /= scale;
-
- float sinv = sinf(static_cast<float>(CV_PI) - v);
- float x_ = sinv * sinf(u);
- float y_ = cosf(static_cast<float>(CV_PI) - v);
- float z_ = sinv * cosf(u);
-
- float z;
- x = k_rinv[0] * x_ + k_rinv[1] * y_ + k_rinv[2] * z_;
- y = k_rinv[3] * x_ + k_rinv[4] * y_ + k_rinv[5] * z_;
- z = k_rinv[6] * x_ + k_rinv[7] * y_ + k_rinv[8] * z_;
-
- if (z > 0) { x /= z; y /= z; }
- else x = y = -1;
- }
然后将反投影求出的x,y值写入Mat矩阵xmap和ymap中
- xmap.create(dst_br.y - dst_tl.y + 1, dst_br.x - dst_tl.x + 1, CV_32F);
- ymap.create(dst_br.y - dst_tl.y + 1, dst_br.x - dst_tl.x + 1, CV_32F);
-
- float x, y;
- for (int v = dst_tl.y; v <= dst_br.y; ++v)
- {
- for (int u = dst_tl.x; u <= dst_br.x; ++u)
- {
- projector_.mapBackward(static_cast<float>(u), static_cast<float>(v), x, y);
- xmap.at<float>(v - dst_tl.y, u - dst_tl.x) = x;
- ymap.at<float>(v - dst_tl.y, u - dst_tl.x) = y;
- }
- }
最后使用opencv自带的remap函数将图像重新绘制:
- remap(src, dst, xmap, ymap, interp_mode, border_mode);
8.光照补偿
图像拼接中,由于拍摄的图片有可能因为光圈或者光线的问题,导致相邻图片重叠区域出现亮度差,所以在拼接时就需要对图像进行亮度补偿,(opencv只对重叠区域进行了亮度补偿,这样会导致图像融合处虽然光照渐变,但是图像整体的光强没有柔和的过渡)。
首先,将所有图像,mask矩阵进行分块(大小在32*32附近)。
- for (int img_idx = 0; img_idx < num_images; ++img_idx)
- {
- Size bl_per_img((images[img_idx].cols + bl_width_ - 1) / bl_width_,
- (images[img_idx].rows + bl_height_ - 1) / bl_height_);
- int bl_width = (images[img_idx].cols + bl_per_img.width - 1) / bl_per_img.width;
- int bl_height = (images[img_idx].rows + bl_per_img.height - 1) / bl_per_img.height;
- bl_per_imgs[img_idx] = bl_per_img;
- for (int by = 0; by < bl_per_img.height; ++by)
- {
- for (int bx = 0; bx < bl_per_img.width; ++bx)
- {
- Point bl_tl(bx * bl_width, by * bl_height);
- Point bl_br(min(bl_tl.x + bl_width, images[img_idx].cols),
- min(bl_tl.y + bl_height, images[img_idx].rows));
-
- block_corners.push_back(corners[img_idx] + bl_tl);
- block_images.push_back(images[img_idx](Rect(bl_tl, bl_br)));
- block_masks.push_back(make_pair(masks[img_idx].first(Rect(bl_tl, bl_br)),
- masks[img_idx].second));
- }
- }
- }
然后,求出任意两块图像的重叠区域的平均光强,
-
-
- for (int i = 0; i < num_images; ++i)
- {
- for (int j = i; j < num_images; ++j)
- {
- Rect roi;
-
- if (overlapRoi(corners[i], corners[j], images[i].size(), images[j].size(), roi))
- {
- subimg1 = images[i](Rect(roi.tl() - corners[i], roi.br() - corners[i]));
- subimg2 = images[j](Rect(roi.tl() - corners[j], roi.br() - corners[j]));
-
- submask1 = masks[i].first(Rect(roi.tl() - corners[i], roi.br() - corners[i]));
- submask2 = masks[j].first(Rect(roi.tl() - corners[j], roi.br() - corners[j]));
- intersect = (submask1 == masks[i].second) & (submask2 == masks[j].second);
-
- N(i, j) = N(j, i) = max(1, countNonZero(intersect));
-
- double Isum1 = 0, Isum2 = 0;
- for (int y = 0; y < roi.height; ++y)
- {
- const Point3_<uchar>* r1 = subimg1.ptr<Point3_<uchar> >(y);
- const Point3_<uchar>* r2 = subimg2.ptr<Point3_<uchar> >(y);
- for (int x = 0; x < roi.width; ++x)
- {
- if (intersect(y, x))
- {
- Isum1 += sqrt(static_cast<double>(sqr(r1[x].x) + sqr(r1[x].y) + sqr(r1[x].z)));
- Isum2 += sqrt(static_cast<double>(sqr(r2[x].x) + sqr(r2[x].y) + sqr(r2[x].z)));
- }
- }
- }
- I(i, j) = Isum1 / N(i, j);
- I(j, i) = Isum2 / N(i, j);
- }
- }
- }
建立方程,求出每个光强的调整系数
- Mat_<double> A(num_images, num_images); A.setTo(0);
- Mat_<double> b(num_images, 1); b.setTo(0);
- for (int i = 0; i < num_images; ++i)
- {
- for (int j = 0; j < num_images; ++j)
- {
- b(i, 0) += beta * N(i, j);
- A(i, i) += beta * N(i, j);
- if (j == i) continue;
- A(i, i) += 2 * alpha * I(i, j) * I(i, j) * N(i, j);
- A(i, j) -= 2 * alpha * I(i, j) * I(j, i) * N(i, j);
- }
- }
-
- solve(A, b, gains_);
gains_原理分析:
num_images :表示图像分块的个数,零num_images = n
N矩阵,大小n*n,N(i,j)表示第i幅图像与第j幅图像重合的像素点数,N(i,j)=N(j,i)
I矩阵,大小n*n,I(i,j)与I(j,i)表示第i,j块区域重合部分的像素平均值,I(i,j)是重合区域中i快的平均亮度值,

参数alpha和beta,默认值是alpha=0.01,beta=100.
A矩阵,大小n*n,公式图片不全

b矩阵,大小n*1,

然后根据求解矩阵
gains_矩阵,大小1*n,A*gains = B
然后将gains_进行线性滤波
- Mat_<float> ker(1, 3);
- ker(0,0) = 0.25; ker(0,1) = 0.5; ker(0,2) = 0.25;
-
- int bl_idx = 0;
- for (int img_idx = 0; img_idx < num_images; ++img_idx)
- {
- Size bl_per_img = bl_per_imgs[img_idx];
- gain_maps_[img_idx].create(bl_per_img);
-
- for (int by = 0; by < bl_per_img.height; ++by)
- for (int bx = 0; bx < bl_per_img.width; ++bx, ++bl_idx)
- gain_maps_[img_idx](by, bx) = static_cast<float>(gains[bl_idx]);
-
- sepFilter2D(gain_maps_[img_idx], gain_maps_[img_idx], CV_32F, ker, ker);
- sepFilter2D(gain_maps_[img_idx], gain_maps_[img_idx], CV_32F, ker, ker);
- }
然后构建一个gain_maps的三维矩阵,gain_main[图像的个数][图像分块的行数][图像分块的列数],然后对没一副图像的gain进行滤波。
9.Seam Estimation
缝隙估计有6种方法,默认就是第三种方法,seam_find_type == "gc_color",该方法是利用最大流方法检测。
- if (seam_find_type == "no")
- seam_finder = new detail::NoSeamFinder();
- else if (seam_find_type == "voronoi")
- seam_finder = new detail::VoronoiSeamFinder();
- else if (seam_find_type == "gc_color")
- {
- #ifdef HAVE_OPENCV_GPU
- if (try_gpu && gpu::getCudaEnabledDeviceCount() > 0)
- seam_finder = new detail::GraphCutSeamFinderGpu(GraphCutSeamFinderBase::COST_COLOR);
- else
- #endif
- seam_finder = new detail::GraphCutSeamFinder(GraphCutSeamFinderBase::COST_COLOR);
- }
- else if (seam_find_type == "gc_colorgrad")
- {
- #ifdef HAVE_OPENCV_GPU
- if (try_gpu && gpu::getCudaEnabledDeviceCount() > 0)
- seam_finder = new detail::GraphCutSeamFinderGpu(GraphCutSeamFinderBase::COST_COLOR_GRAD);
- else
- #endif
- seam_finder = new detail::GraphCutSeamFinder(GraphCutSeamFinderBase::COST_COLOR_GRAD);
- }
- else if (seam_find_type == "dp_color")
- seam_finder = new detail::DpSeamFinder(DpSeamFinder::COLOR);
- else if (seam_find_type == "dp_colorgrad")
- seam_finder = new detail::DpSeamFinder(DpSeamFinder::COLOR_GRAD);
- if (seam_finder.empty())
- {
- cout << "Can't create the following seam finder '" << seam_find_type << "'\n";
- return 1;
- }
程序解读可参见:
http://blog.csdn.net/chlele0105/article/details/12624541
http://blog.csdn.net/zouxy09/article/details/8534954
http://blog.csdn.net/yangtrees/article/details/7930640
10.多波段融合
由于以前进行处理的图片都是以work_scale(3.1节有介绍)进行缩放的,所以图像的内参,corner(同一坐标后的顶点),mask(融合的掩码)都需要重新计算。以及将之前计算的光照增强的gain也要计算进去。
-
- full_img = imread(img_names[img_idx]);
- if (!is_compose_scale_set)
- {
- if (compose_megapix > 0)
- compose_scale = min(1.0, sqrt(compose_megapix * 1e6 / full_img.size().area()));
- is_compose_scale_set = true;
-
-
-
- compose_work_aspect = compose_scale / work_scale;
-
-
- warped_image_scale *= static_cast<float>(compose_work_aspect);
- warper = warper_creator->create(warped_image_scale);
-
-
- for (int i = 0; i < num_images; ++i)
- {
-
- cameras[i].focal *= compose_work_aspect;
- cameras[i].ppx *= compose_work_aspect;
- cameras[i].ppy *= compose_work_aspect;
-
-
- Size sz = full_img_sizes[i];
- if (std::abs(compose_scale - 1) > 1e-1)
- {
- sz.width = cvRound(full_img_sizes[i].width * compose_scale);
- sz.height = cvRound(full_img_sizes[i].height * compose_scale);
- }
-
- Mat K;
- cameras[i].K().convertTo(K, CV_32F);
- Rect roi = warper->warpRoi(sz, K, cameras[i].R);
- corners[i] = roi.tl();
- sizes[i] = roi.size();
- }
- }
- if (abs(compose_scale - 1) > 1e-1)
- resize(full_img, img, Size(), compose_scale, compose_scale);
- else
- img = full_img;
- full_img.release();
- Size img_size = img.size();
-
- Mat K;
- cameras[img_idx].K().convertTo(K, CV_32F);
-
-
- warper->warp(img, K, cameras[img_idx].R, INTER_LINEAR, BORDER_REFLECT, img_warped);
-
- mask.create(img_size, CV_8U);
- mask.setTo(Scalar::all(255));
- warper->warp(mask, K, cameras[img_idx].R, INTER_NEAREST, BORDER_CONSTANT, mask_warped);
-
- compensator->apply(img_idx, corners[img_idx], img_warped, mask_warped);
- img_warped.convertTo(img_warped_s, CV_16S);
- img_warped.release();
- img.release();
- mask.release();
-
- dilate(masks_warped[img_idx], dilated_mask, Mat());
- resize(dilated_mask, seam_mask, mask_warped.size());
- mask_warped = seam_mask & mask_warped;
对图像进行光照补偿,就是将对应区域乘以gain:
-
- void BlocksGainCompensator::apply(int index, Point , Mat &image, const Mat &)
- {
- CV_Assert(image.type() == CV_8UC3);
-
- Mat_<float> gain_map;
- if (gain_maps_[index].size() == image.size())
- gain_map = gain_maps_[index];
- else
- resize(gain_maps_[index], gain_map, image.size(), 0, 0, INTER_LINEAR);
-
- for (int y = 0; y < image.rows; ++y)
- {
- const float* gain_row = gain_map.ptr<float>(y);
- Point3_<uchar>* row = image.ptr<Point3_<uchar> >(y);
- for (int x = 0; x < image.cols; ++x)
- {
- row[x].x = saturate_cast<uchar>(row[x].x * gain_row[x]);
- row[x].y = saturate_cast<uchar>(row[x].y * gain_row[x]);
- row[x].z = saturate_cast<uchar>(row[x].z * gain_row[x]);
- }
- }
- }
进行多波段融合,首先初始化blend,确定blender的融合的方式,默认是多波段融合MULTI_BAND,以及根据corners顶点和图像的大小确定最终全景图的尺寸。
- <span> </span>
- if (blender.empty())
- {
- blender = Blender::createDefault(blend_type, try_gpu);
- Size dst_sz = resultRoi(corners, sizes).size();
- float blend_width = sqrt(static_cast<float>(dst_sz.area())) * blend_strength / 100.f;
- if (blend_width < 1.f)
- blender = Blender::createDefault(Blender::NO, try_gpu);
- else if (blend_type == Blender::MULTI_BAND)
- {
- MultiBandBlender* mb = dynamic_cast<MultiBandBlender*>(static_cast<Blender*>(blender));
- mb->setNumBands(static_cast<int>(ceil(log(blend_width)/log(2.)) - 1.));
- LOGLN("Multi-band blender, number of bands: " << mb->numBands());
- }
- else if (blend_type == Blender::FEATHER)
- {
- FeatherBlender* fb = dynamic_cast<FeatherBlender*>(static_cast<Blender*>(blender));
- fb->setSharpness(1.f/blend_width);
- LOGLN("Feather blender, sharpness: " << fb->sharpness());
- }
- blender->prepare(corners, sizes);
- }
然后对每幅图图形构建金字塔,层数可以由输入的系数确定,默认是5层。
先对顶点以及图像的宽和高做处理,使其能被2^num_bands除尽,这样才能将进行向下采样num_bands次,首先从源图像pyrDown向下采样,在由最底部的图像pyrUp向上采样,把对应层得上采样和下采样的相减,就得到了图像的高频分量,存储到每一个金字塔中。然后根据mask,将每幅图像的各层金字塔分别写入最终的金字塔层src_pyr_laplace中。
最后将各层的金字塔叠加,就得到了最终完整的全景图。
- blender->feed(img_warped_s, mask_warped, corners[img_idx]);
源码:
- void MultiBandBlender::feed(const Mat &img, const Mat &mask, Point tl)
- {
- CV_Assert(img.type() == CV_16SC3 || img.type() == CV_8UC3);
- CV_Assert(mask.type() == CV_8U);
-
-
- int gap = 3 * (1 << num_bands_);
- Point tl_new(max(dst_roi_.x, tl.x - gap),
- max(dst_roi_.y, tl.y - gap));
- Point br_new(min(dst_roi_.br().x, tl.x + img.cols + gap),
- min(dst_roi_.br().y, tl.y + img.rows + gap));
-
-
-
-
-
-
-
- tl_new.x = dst_roi_.x + (((tl_new.x - dst_roi_.x) >> num_bands_) << num_bands_);
- tl_new.y = dst_roi_.y + (((tl_new.y - dst_roi_.y) >> num_bands_) << num_bands_);
- int width = br_new.x - tl_new.x;
- int height = br_new.y - tl_new.y;
- width += ((1 << num_bands_) - width % (1 << num_bands_)) % (1 << num_bands_);
- height += ((1 << num_bands_) - height % (1 << num_bands_)) % (1 << num_bands_);
- br_new.x = tl_new.x + width;
- br_new.y = tl_new.y + height;
- int dy = max(br_new.y - dst_roi_.br().y, 0);
- int dx = max(br_new.x - dst_roi_.br().x, 0);
- tl_new.x -= dx; br_new.x -= dx;
- tl_new.y -= dy; br_new.y -= dy;
-
- int top = tl.y - tl_new.y;
- int left = tl.x - tl_new.x;
- int bottom = br_new.y - tl.y - img.rows;
- int right = br_new.x - tl.x - img.cols;
-
-
- Mat img_with_border;
- copyMakeBorder(img, img_with_border, top, bottom, left, right,
- BORDER_REFLECT);
- vector<Mat> src_pyr_laplace;
- if (can_use_gpu_ && img_with_border.depth() == CV_16S)
- createLaplacePyrGpu(img_with_border, num_bands_, src_pyr_laplace);
- else
- createLaplacePyr(img_with_border, num_bands_, src_pyr_laplace);
-
-
- Mat weight_map;
- vector<Mat> weight_pyr_gauss(num_bands_ + 1);
-
- if(weight_type_ == CV_32F)
- {
- mask.convertTo(weight_map, CV_32F, 1./255.);
- }
- else
- {
- mask.convertTo(weight_map, CV_16S);
- add(weight_map, 1, weight_map, mask != 0);
- }
-
- copyMakeBorder(weight_map, weight_pyr_gauss[0], top, bottom, left, right, BORDER_CONSTANT);
-
- for (int i = 0; i < num_bands_; ++i)
- pyrDown(weight_pyr_gauss[i], weight_pyr_gauss[i + 1]);
-
- int y_tl = tl_new.y - dst_roi_.y;
- int y_br = br_new.y - dst_roi_.y;
- int x_tl = tl_new.x - dst_roi_.x;
- int x_br = br_new.x - dst_roi_.x;
-
-
- if(weight_type_ == CV_32F)
- {
- for (int i = 0; i <= num_bands_; ++i)
- {
- for (int y = y_tl; y < y_br; ++y)
- {
- int y_ = y - y_tl;
- const Point3_<short>* src_row = src_pyr_laplace[i].ptr<Point3_<short> >(y_);
- Point3_<short>* dst_row = dst_pyr_laplace_[i].ptr<Point3_<short> >(y);
- const float* weight_row = weight_pyr_gauss[i].ptr<float>(y_);
- float* dst_weight_row = dst_band_weights_[i].ptr<float>(y);
-
- for (int x = x_tl; x < x_br; ++x)
- {
- int x_ = x - x_tl;
- dst_row[x].x += static_cast<short>(src_row[x_].x * weight_row[x_]);
- dst_row[x].y += static_cast<short>(src_row[x_].y * weight_row[x_]);
- dst_row[x].z += static_cast<short>(src_row[x_].z * weight_row[x_]);
- dst_weight_row[x] += weight_row[x_];
- }
- }
- x_tl /= 2; y_tl /= 2;
- x_br /= 2; y_br /= 2;
- }
- }
- else
- {
- for (int i = 0; i <= num_bands_; ++i)
- {
- for (int y = y_tl; y < y_br; ++y)
- {
- int y_ = y - y_tl;
- const Point3_<short>* src_row = src_pyr_laplace[i].ptr<Point3_<short> >(y_);
- Point3_<short>* dst_row = dst_pyr_laplace_[i].ptr<Point3_<short> >(y);
- const short* weight_row = weight_pyr_gauss[i].ptr<short>(y_);
- short* dst_weight_row = dst_band_weights_[i].ptr<short>(y);
-
- for (int x = x_tl; x < x_br; ++x)
- {
- int x_ = x - x_tl;
- dst_row[x].x += short((src_row[x_].x * weight_row[x_]) >> 8);
- dst_row[x].y += short((src_row[x_].y * weight_row[x_]) >> 8);
- dst_row[x].z += short((src_row[x_].z * weight_row[x_]) >> 8);
- dst_weight_row[x] += weight_row[x_];
- }
- }
- x_tl /= 2; y_tl /= 2;
- x_br /= 2; y_br /= 2;
- }
- }
- }
其中,金字塔构建的源码:
- void createLaplacePyr(const Mat &img, int num_levels, vector<Mat> &pyr)
- {
- #ifdef HAVE_TEGRA_OPTIMIZATION
- if(tegra::createLaplacePyr(img, num_levels, pyr))
- return;
- #endif
-
- pyr.resize(num_levels + 1);
-
- if(img.depth() == CV_8U)
- {
- if(num_levels == 0)
- {
- img.convertTo(pyr[0], CV_16S);
- return;
- }
-
- Mat downNext;
- Mat current = img;
- pyrDown(img, downNext);
-
- for(int i = 1; i < num_levels; ++i)
- {
- Mat lvl_up;
- Mat lvl_down;
-
- pyrDown(downNext, lvl_down);
- pyrUp(downNext, lvl_up, current.size());
- subtract(current, lvl_up, pyr[i-1], noArray(), CV_16S);
-
- current = downNext;
- downNext = lvl_down;
- }
-
- {
- Mat lvl_up;
- pyrUp(downNext, lvl_up, current.size());
- subtract(current, lvl_up, pyr[num_levels-1], noArray(), CV_16S);
-
- downNext.convertTo(pyr[num_levels], CV_16S);
- }
- }
- else
- {
- pyr[0] = img;
-
- for (int i = 0; i < num_levels; ++i)
- pyrDown(pyr[i], pyr[i + 1]);
- Mat tmp;
- for (int i = 0; i < num_levels; ++i)
- {
- pyrUp(pyr[i + 1], tmp, pyr[i].size());
- subtract(pyr[i], tmp, pyr[i]);
- }
- }
- }
最终把所有层得金字塔叠加的程序:
- Mat result, result_mask;
- blender->blend(result, result_mask);
源码:
- void MultiBandBlender::blend(Mat &dst, Mat &dst_mask)
- {
- for (int i = 0; i <= num_bands_; ++i)
- normalizeUsingWeightMap(dst_band_weights_[i], dst_pyr_laplace_[i]);
-
- if (can_use_gpu_)
- restoreImageFromLaplacePyrGpu(dst_pyr_laplace_);
- else
- restoreImageFromLaplacePyr(dst_pyr_laplace_);
-
- dst_ = dst_pyr_laplace_[0];
- dst_ = dst_(Range(0, dst_roi_final_.height), Range(0, dst_roi_final_.width));
- dst_mask_ = dst_band_weights_[0] > WEIGHT_EPS;
- dst_mask_ = dst_mask_(Range(0, dst_roi_final_.height), Range(0, dst_roi_final_.width));
- dst_pyr_laplace_.clear();
- dst_band_weights_.clear();
-
- Blender::blend(dst, dst_mask);
- }




 2万+
2万+


 被折叠的 条评论
为什么被折叠?


