


一,KVO的定义
KVO(Key-Value Observing),俗称键值监听。它提供一种机制,当指定的对象的属性被修改后,则对象就会接受到通知。简单的说就是每次指定的被观察的对象的属性被修改后,KVO就会自动通知相应的观察者了。KVO是“观察者”设计模式的一种应用,利用它可以很容易实现视图组件和数据模型的分离,当数据模型的属性值改变之后作为监听器的视图组件就会被激发,激发时就会回调监听器自身。这种模式有利于两个类间的解耦合,尤其是对于业务逻辑与视图控制 这两个功能的解耦合。
和KVC类似,在ObjC中要实现KVO则必须实现NSKeyValueObServing协议,但不用担心,因为NSObject已经实现了该协议,因此几乎所有的ObjC对象都可以使用KVO.
KVO常用的方法
1>注册指定Key路径的监听器
- (void)addObserver:(NSObject *)observer forKeyPath:(NSString *)keyPath options:(NSKeyValueObservingOptions)options context:(void *)context
相关参数:
observer:观察者,也就是KVO通知的订阅者。订阅着必须实现
observeValueForKeyPath:ofObject:change:context:方法
keyPath:描述将要观察的属性,相对于被观察者。
options:KVO的一些属性配置;有四个选项。
options所包括的内容:
NSKeyValueObservingOptionNew:change字典包括改变后的值
NSKeyValueObservingOptionOld: change字典包括改变前的值
NSKeyValueObservingOptionInitial:注册后立刻触发KVO通知
NSKeyValueObservingOptionPrior:值改变前是否也要通知(这个key决定了是否在改变前改变后通知两次)
context: 上下文,这个会传递到订阅着的函数中,用来区分消息,所以应当是不同的。
注意:不要忘记解除注册,否则会导致资源泄露
2>删除指定Key路径的监听器:
- (void)removeObserver:(NSObject *)anObserver forKeyPath:(NSString *)keyPath
- (void)removeObserver:(NSObject *)observer forKeyPath:(NSString *)keyPath context:(void *)context
3>回调监听
- (void)observeValueForKeyPath:(NSString *)keyPath ofObject:(id)object change:(NSDictionary *)change context:(void *)context;
keyPath:被监听的keyPath , 用来区分不同的KVO监听。
object: 被观察修改后的对象(可以通过object获得修改后的值)
change:保存信息改变的字典(可能有旧的值,新的值等)
context:上下文,用来区分不同的KVO监听
KVO的使用步骤也比较简单
1>注册,指定被观察者的属性
2> 实现回调方法
3>移除观察
实例(ARC)
#import "ViewController.h"
#import "Person.h"
@interface ViewController ()
@property(nonatomic,strong) Person * person;
@end
@implementation ViewController
-(id)initWithNibName:(NSString *)nibNameOrNil bundle:(NSBundle *)nibBundleOrNil{
    if(self = [super initWithNibName:nibNameOrNil bundle:nibBundleOrNil]){
        [self testKVO];
    }
    return self;
}
- (void)viewDidLoad {
    [super viewDidLoad];
    self.view.backgroundColor = [UIColor whiteColor];
    [self ChangeNameValue];
}
/*1.注册,指定被观察者的属性*/
-(void)testKVO{
   Person * testPerson = [[Person alloc]init];
   self.person = testPerson;
   [testPerson addObserver:self forKeyPath:@"name" options:NSKeyValueObservingOptionNew context:nil];
}
/*2.实现回调方法*/
-(void)observeValueForKeyPath:(NSString *)keyPath ofObject:(id)object change:(NSDictionary<NSString *,id> *)change context:(void *)context{
    if ([keyPath isEqualToString:@"name"]) {
        NSLog(@"Name is changed! new = %@",[change valueForKey:NSKeyValueChangeNewKey]);
    }else{
        [super observeValueForKeyPath:keyPath ofObject:object change:change context:context];
    }
}
/*3.移除通知*/
-(void)dealloc{
    [self.person removeObserver:self forKeyPath:@"name" context:nil];
}
//改变name的属性,测试结果
-(void)ChangeNameValue{
    [self.person setValue:@"你妹" forKey:@"name"];
}
结果:
二,KVO的典型使用场景(model 与 view的同步)

#import "ViewController.h"
#import "Person.h"
@interface ViewController ()
@property(nonatomic,strong) Person * person;
@property(nonatomic,strong) UILabel * newsValue;//展示新值
@property(nonatomic,strong) UILabel * oldValue;//展示旧值
@property(nonatomic,strong) UIButton * TouchButton; //随机button
@end
@implementation ViewController
-(id)initWithNibName:(NSString *)nibNameOrNil bundle:(NSBundle *)nibBundleOrNil{
if(self = [super initWithNibName:nibNameOrNil bundle:nibBundleOrNil]){
[self testKVO];//注册KVO
}
return self;
}
- (void)viewDidLoad {
[super viewDidLoad];
self.view.backgroundColor = [UIColor whiteColor];
[self setViewSegment];//布局View
}
/*1.注册,指定被观察者的属性*/
-(void)testKVO{
Person * testPerson = [[Person alloc]init];
self.person = testPerson;
[testPerson addObserver:self forKeyPath:@"age" options:NSKeyValueObservingOptionNew|NSKeyValueObservingOptionOld context:nil];
}
/*2.实现回调方法*/
-(void)observeValueForKeyPath:(NSString *)keyPath ofObject:(id)object change:(NSDictionary<NSString *,id> *)change context:(void *)context{
if ([keyPath isEqualToString:@"age"]) {
NSNumber * old = [change objectForKey:NSKeyValueChangeOldKey];
NSNumber * new = [change objectForKey:NSKeyValueChangeNewKey];
self.newsValue.text =[NSString stringWithFormat:@"%@",old];
self.oldValue.text =[NSString stringWithFormat:@"%@",new];
NSLog(@"Name is changed! new = %@",[change valueForKey:NSKeyValueChangeNewKey]);
}else{
[super observeValueForKeyPath:keyPath ofObject:object change:change context:context];
}
}
/*3.移除通知*/
-(void)dealloc{
[self.person removeObserver:self forKeyPath:@"age" context:nil];
}
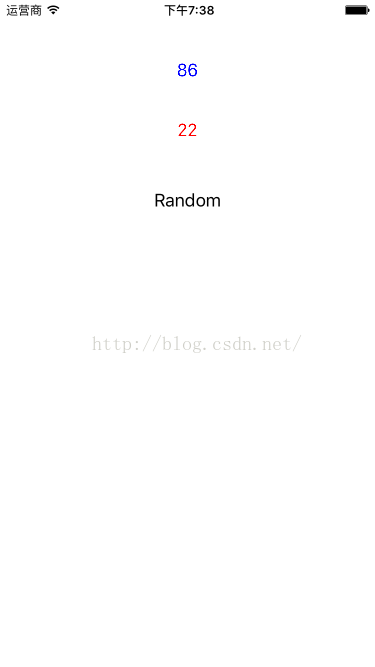
-(void)setViewSegment{
self.newsValue = [[UILabel alloc]initWithFrame:CGRectMake(150, 50, 75, 40)];
self.newsValue.textColor = [UIColor blueColor];
self.newsValue.text = @"00";
self.newsValue.textAlignment =NSTextAlignmentCenter;
[self.view addSubview:self.newsValue];
self.oldValue = [[UILabel alloc]initWithFrame:CGRectMake(150, 110, 75, 40)];
self.oldValue.textColor = [UIColor redColor];
self.oldValue.text = @"00";
self.oldValue.textAlignment = NSTextAlignmentCenter;
[self.view addSubview:self.oldValue];
self.TouchButton = [UIButton buttonWithType:UIButtonTypeCustom];
[self.TouchButton setTitle:@"Random" forState:UIControlStateNormal];
[self.TouchButton setFrame:CGRectMake(0, 0, 100, 60)];
[self.TouchButton setTitleColor:[UIColor blackColor] forState:UIControlStateNormal];
[self.TouchButton setCenter:CGPointMake(self.view.bounds.size.width/2, 200)];
[self.TouchButton addTarget:self action:@selector(touchButtonAction:) forControlEvents:UIControlEventTouchUpInside];
[self.view addSubview:self.TouchButton];
}
-(void)touchButtonAction:(UIButton *)sender{
self.person.age =arc4random()%100;//随机
}
三,手动KVO
自动生成的KVO固然很好,但是它的灵活性,比较差.手动通知的好处就是,可以灵活加上自己想要的判断条件
首先,需要手动实现属性的 setter 方法,并在设置操作的前后分别调用 willChangeValueForKey: 和 didChangeValueForKey方法,这两个方法用于通知系统该 key 的属性值即将和已经变更了;
-(void)setAge:(NSUInteger)age{
    if (age < 22) {
        return;
    }
    [self willChangeValueForKey:@age];
    _age = age;
[self didChangeValueForKey:@age] <span style="font-family: Arial, Helvetica, sans-serif;">}</span>+(BOOL)automaticallyNotifiesObserversOfAge{
return NO;
}四,键值观察依赖键
1,观察依赖键
观察依赖键的方式与前面描述的一样,下面先在 Observer 的 observeValueForKeyPath:ofObject:change:context: 中添加处理变更通知的代码
有时候一个属性的值依赖于另一对象中的一个或多个属性,如果这些属性中任一属性的值发生变更,被依赖的属性值也应当为其变更进行标记。因此,object 引入了依赖键。
#import "TargetWrapper.h"
- (void) observeValueForKeyPath:(NSString *)keyPath
                       ofObject:(id)object
                         change:(NSDictionary *)change
                        context:(void *)context
{
    if ([keyPath isEqualToString:@"age"])
    {
        Class classInfo = (Class)context;
        NSString * className = [NSString stringWithCString:object_getClassName(classInfo)
                                                  encoding:NSUTF8StringEncoding];
        NSLog(@" >> class: %@, Age changed", className);

        NSLog(@" old age is %@", [change objectForKey:@"old"]);
        NSLog(@" new age is %@", [change objectForKey:@"new"]);
    }
    else if ([keyPath isEqualToString:@"information"])
    {
        Class classInfo = (Class)context;
        NSString * className = [NSString stringWithCString:object_getClassName(classInfo)
                                                  encoding:NSUTF8StringEncoding];
        NSLog(@" >> class: %@, Information changed", className);
        NSLog(@" old information is %@", [change objectForKey:@"old"]);
        NSLog(@" new information is %@", [change objectForKey:@"new"]);
    }
    else
    {
        [super observeValueForKeyPath:keyPath
                             ofObject:object
                               change:change
                              context:context];
    }
}在这里,观察的是 TargetWrapper 类的 information 属性,该属性是依赖于 Target 类的 age 和 grade 属性。为此,我在 Target 中添加了 grade 属性:
@interface Target : NSObject
@property (nonatomic, readwrite) int grade;
@property (nonatomic, readwrite) int age;
@end
@implementation Target

@end@class Target;
@interface TargetWrapper : NSObject
{
@private
Target * _target;
}
@property(nonatomic, assign) NSString * information;
@property(nonatomic, retain) Target * target;
-(id) init:(Target *)aTarget;
@end
#import "TargetWrapper.h"
#import "Target.h"
@implementation TargetWrapper
@synthesize target = _target;
-(id) init:(Target *)aTarget
{
self = [super init];
if (nil != self) {
_target = [aTarget retain];
}
return self;
}
-(void) dealloc
{
self.target = nil;
[super dealloc];
}
- (NSString *)information
{
return [[[NSString alloc] initWithFormat:@"%d#%d", [_target grade], [_target age]] autorelease];
}
- (void)setInformation:(NSString *)theInformation
{
NSArray * array = [theInformation componentsSeparatedByString:@"#"];
[_target setGrade:[[array objectAtIndex:0] intValue]];
[_target setAge:[[array objectAtIndex:1] intValue]];
}
+ (NSSet *)keyPathsForValuesAffectingInformation
{
NSSet * keyPaths = [NSSet setWithObjects:@"target.age", @"target.grade", nil];
return keyPaths;
}
//+ (NSSet *)keyPathsForValuesAffectingValueForKey:(NSString *)key
//{
// NSSet * keyPaths = [super keyPathsForValuesAffectingValueForKey:key];
// NSArray * moreKeyPaths = nil;
//
// if ([key isEqualToString:@"information"])
// {
// moreKeyPaths = [NSArray arrayWithObjects:@"target.age", @"target.grade", nil];
// }
//
// if (moreKeyPaths)
// {
// keyPaths = [keyPaths setByAddingObjectsFromArray:moreKeyPaths];
// }
//
// return keyPaths;
//}
@end首先,要手动实现属性 information 的 setter/getter 方法,在其中使用 Target 的属性来完成其 setter 和 getter。
其次,要实现 keyPathsForValuesAffectingInformation 或 keyPathsForValuesAffectingValueForKey: 方法来告诉系统 information 属性依赖于哪些其他属性,这两个方法都返回一个key-path 的集合。在这里要多说几句,如果选择实现 keyPathsForValuesAffectingValueForKey,要先获取 super 返回的结果 set,然后判断 key 是不是目标 key,如果是就将依赖属性的 key-path 结合追加到 super 返回的结果 set 中,否则直接返回 super的结果。
在这里,information 属性依赖于 target 的 age 和 grade 属性,target 的 age/grade 属性任一发生变化,information 的观察者都会得到通知。
3,使用示例:
Observer * observer = [[[Observer alloc] init] autorelease];
Target * target = [[[Target alloc] init] autorelease];
TargetWrapper * wrapper = [[[TargetWrapper alloc] init:target] autorelease];
[wrapper addObserver:observer
          forKeyPath:@"information"
             options:NSKeyValueObservingOptionNew | NSKeyValueObservingOptionOld
             context:[TargetWrapper class]];
[target setAge:30];
[target setGrade:1];
[wrapper removeObserver:observer forKeyPath:@"information"];>> class: TargetWrapper, Information changed
old information is 0#10
new information is 0#30
>> class: TargetWrapper, Information changed
old information is 0#30
new information is 1#30
五,最后的注意点
KVO要提到的几点
KVO和Context
由于Context通常用来区分不同的KVO,所以context的唯一性很重要。通常,我的使用方式是通过在当前.m文件里用静态变量定义。
static void * privateContext = 0;
KVO与线程
KVO的响应和KVO观察的值变化是在一个线程上的,所以,大多数时候,不要把KVO与多线程混合起来。除非能够保证所有的观察者都能线程安全的处理KVO
KVO监听变化的值
改变前和改变后分别为
id oldValue = change[NSKeyValueChangeOldKey];
id newValue = change[NSKeyValueChangeNewKey];


 3792
3792


 被折叠的 条评论
为什么被折叠?
被折叠的 条评论
为什么被折叠?
 到【灌水乐园】发言


