


其他参考文章:
http://www.cnblogs.com/bmbm/archive/2011/12/08/2342261.html
http://www.cnblogs.com/xuyuanjia/p/5886056.html
这是一个struts2的action:
import java.io.ByteArrayOutputStream;
import javax.servlet.http.HttpServletResponse;
import org.apache.poi.hssf.usermodel.HSSFCell;
import org.apache.poi.hssf.usermodel.HSSFCellStyle;
import org.apache.poi.hssf.usermodel.HSSFFont;
import org.apache.poi.hssf.usermodel.HSSFRow;
import org.apache.poi.hssf.usermodel.HSSFSheet;
import org.apache.poi.hssf.usermodel.HSSFWorkbook;
import org.apache.poi.ss.util.CellRangeAddress;
import org.apache.struts2.convention.annotation.Namespace;
@Namespace("/test")
@SuppressWarnings("serial")
public class testAction {
public void printTender(){
// 第一步,创建一个webbook,对应一个Excel文件
HSSFWorkbook wb = new HSSFWorkbook();
// 第二步,在webbook中添加一个sheet,对应Excel文件中的sheet
HSSFSheet sheet = wb.createSheet("招标");
// 第四步,创建单元格,并设置值表头 设置表头居中
HSSFCellStyle style = wb.createCellStyle();
style.setVerticalAlignment(HSSFCellStyle.VERTICAL_CENTER);//垂直
style.setAlignment(HSSFCellStyle.ALIGN_CENTER);//水平
// 表头标题样式
HSSFFont headfont = wb.createFont();
headfont.setFontName("宋体");
headfont.setFontHeightInPoints((short) 20);// 字体大小
HSSFCellStyle headstyle = wb.createCellStyle();
headstyle.setFont(headfont);
headstyle.setAlignment(HSSFCellStyle.ALIGN_CENTER);// 左右居中
headstyle.setVerticalAlignment(HSSFCellStyle.VERTICAL_CENTER);// 上下居中
headstyle.setLocked(true);
// 普通单元格样式(中文)
HSSFFont font2 = wb.createFont();
font2.setFontName("宋体");
font2.setFontHeightInPoints((short) 12);
HSSFCellStyle style2 = wb.createCellStyle();
style2.setBorderBottom(HSSFCellStyle.BORDER_THIN); //下边框
style2.setBorderLeft(HSSFCellStyle.BORDER_THIN);//左边框
style2.setBorderTop(HSSFCellStyle.BORDER_THIN);//上边框
style2.setBorderRight(HSSFCellStyle.BORDER_THIN);//右边框
style2.setFont(font2);
style2.setAlignment(HSSFCellStyle.ALIGN_CENTER);// 左右居中
style2.setWrapText(true); // 换行
style2.setVerticalAlignment(HSSFCellStyle.VERTICAL_CENTER);// 上下居中
// 普通单元格样式(中文) 无边框
HSSFCellStyle style3 = wb.createCellStyle();
style3.setFont(font2);
style3.setWrapText(true); // 换行
style3.setVerticalAlignment(HSSFCellStyle.VERTICAL_CENTER);// 上下居中
// 普通单元格样式(中文) 无边框
HSSFCellStyle style4 = wb.createCellStyle();
style4.setFont(font2);
style4.setWrapText(true); // 换行
style4.setVerticalAlignment(HSSFCellStyle.VERTICAL_TOP);// 顶端对齐
style4.setBorderRight(HSSFCellStyle.BORDER_THIN);//右边框
// 下边框
HSSFCellStyle styleBottom = wb.createCellStyle();
styleBottom.setBorderBottom(HSSFCellStyle.BORDER_THIN); //下边框
// 右边框
HSSFCellStyle styleRight = wb.createCellStyle();
styleRight.setBorderRight(HSSFCellStyle.BORDER_THIN);//右边框
// 右——下边框
HSSFCellStyle style_RB = wb.createCellStyle();
style_RB.setBorderRight(HSSFCellStyle.BORDER_THIN);//右边框
style_RB.setBorderBottom(HSSFCellStyle.BORDER_THIN); //下边框
// 设置列宽 (第几列,宽度)
sheet.setColumnWidth( 0, 3200);
sheet.setColumnWidth( 1, 3200);
sheet.setColumnWidth( 2, 3200);
sheet.setColumnWidth( 3, 3200);
sheet.setColumnWidth( 4, 3200);
sheet.setColumnWidth( 5, 3200);
sheet.setColumnWidth( 6, 3200);
sheet.setColumnWidth( 7, 3800);
sheet.setDefaultRowHeight((short) 0x270);//设置行高----貌似没有效果,所以下面每行独立设置行高
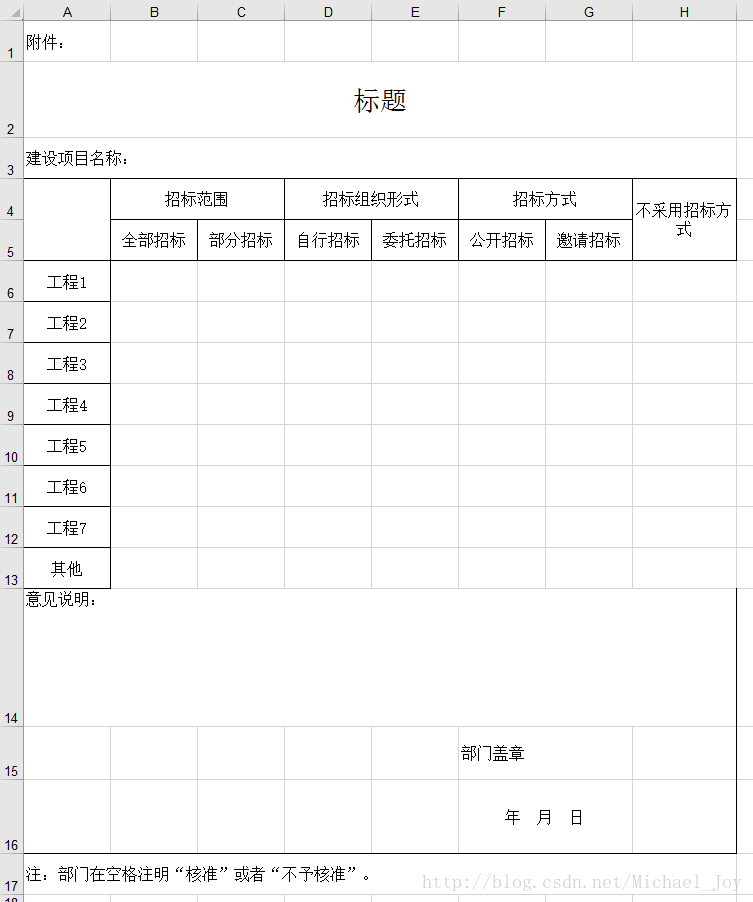
String[] head0 = new String[] { " ", "招标范围", "招标范围", "招标组织形式", "招标组织形式", "招标方式",
"招标方式", "不采用招标方式" };//在excel中的第4行每列的参数
String[] head1 = new String[] { "全部招标", "部分招标", "自行招标", "委托招标", "公开招标", "邀请招标" };//在excel中的第5行每列(合并列)的参数
String[] headnum0 = new String[] { "3,4,0,0", "3,3,1,2", "3,3,3,4",
"3,3,5,6", "3,4,7,7" };//对应excel中的行和列,下表从0开始{"开始行,结束行,开始列,结束列"}
String[] headnum1 = new String[] { "4,4,1,1", "4,4,2,2", "4,4,3,3", "4,4,4,4", "4,4,5,5",
"4,4,6,6" };
String[] column0 = new String[] { "工程1", "工程2", "工程3", "工程4", "工程5", "工程6",
"工程7", "其他" };
//第一行
HSSFRow row = sheet.createRow(0);
HSSFCell cell = row.createCell(0);
row.setHeight((short) 0x270);//设置行高
cell.setCellValue("附件:");
cell.setCellStyle(style3);
//第二行表头标题
sheet.addMergedRegion(new CellRangeAddress(1, 1, 0, head0.length-1));//起始行号,终止行号, 起始列号,终止列号
HSSFRow row2 = sheet.createRow(1);
row2.setHeight((short) 0x480);
cell = row2.createCell(0);
cell.setCellValue("标题");
cell.setCellStyle(headstyle);
/*row2.createCell(0).setCellValue("招标表");
row2.createCell(0).setCellStyle(headstyle);*/ //这种写法会把value值冲掉,因为是重新create
// 第三行标题
sheet.addMergedRegion(new CellRangeAddress(2, 2, 0, head0.length-1));
row = sheet.createRow(2);
row.setHeight((short) 0x270);
cell = row.createCell(0);
cell.setCellValue("建设项目名称:");
cell.setCellStyle(style3);
// 第四行表头列名
row = sheet.createRow(3);
for (int i = 0; i < head0.length; i++) {
cell = row.createCell(i);
row.setHeight((short) 0x270);
cell.setCellValue(head0[i]);
cell.setCellStyle(style2);
}
//动态合并单元格
for (int i = 0; i < headnum0.length; i++) {
String[] temp = headnum0[i].split(",");
Integer startrow = Integer.parseInt(temp[0]);
Integer overrow = Integer.parseInt(temp[1]);
Integer startcol = Integer.parseInt(temp[2]);
Integer overcol = Integer.parseInt(temp[3]);
sheet.addMergedRegion(new CellRangeAddress(startrow, overrow,
startcol, overcol));
}
//设置合并单元格的参数并初始化带边框的表头(这样做可以避免因为合并单元格后有的单元格的边框显示不出来)
row = sheet.createRow(4);//因为下标从0开始,所以这里表示的是excel中的第五行
for (int i = 0; i < head0.length; i++) {
cell = row.createCell(i);
cell.setCellStyle(style2);//设置excel中第五行的1、8列的边框 ,即合并单元的上下单元格都要添加边框
}
for (int j = 0; j < head1.length; j++) {
cell = row.createCell(j + 1);
row.setHeight((short) 0x270);
cell.setCellValue(head1[j]);
cell.setCellStyle(style2);
}
//动态合并单元格
for (int i = 0; i < headnum1.length; i++) {
String[] temp = headnum1[i].split(",");
Integer startrow = Integer.parseInt(temp[0]);
Integer overrow = Integer.parseInt(temp[1]);
Integer startcol = Integer.parseInt(temp[2]);
Integer overcol = Integer.parseInt(temp[3]);
sheet.addMergedRegion(new CellRangeAddress(startrow, overrow,
startcol, overcol));
}
//列名
for (int i = 0; i < column0.length; i++) {
row = sheet.createRow(i+5);
row.setHeight((short) 0x270);
cell = row.createCell(0);
cell.setCellValue(column0[i]);
cell.setCellStyle(style2);
}
sheet.addMergedRegion(new CellRangeAddress(column0.length+5, column0.length+5, 0, head0.length-1));
row = sheet.createRow(column0.length+5);
row.setHeight((short) 0x820);
cell = row.createCell(0);
cell.setCellValue("意见说明:");
cell.setCellStyle(style4);
cell = row.createCell(head0.length-1);//最后一格加上右边框
cell.setCellStyle(styleRight);
sheet.addMergedRegion(new CellRangeAddress(column0.length+6, column0.length+6, 5, 6));
row = sheet.createRow(column0.length+6);
row.setHeight((short) 0x320);
cell = row.createCell(5);
cell.setCellValue("部门盖章");
cell.setCellStyle(style3);
cell = row.createCell(head0.length-1);//最后一格加上右边框
cell.setCellStyle(styleRight);
// 普通单元格样式(中文) 无边框
HSSFCellStyle styleDate = wb.createCellStyle();
styleDate.setFont(font2);
styleDate.setWrapText(true); // 换行
styleDate.setVerticalAlignment(HSSFCellStyle.VERTICAL_CENTER);// 上下居中
styleDate.setAlignment(HSSFCellStyle.ALIGN_CENTER);// 左右居中
styleDate.setBorderBottom(HSSFCellStyle.BORDER_THIN); //下边框
sheet.addMergedRegion(new CellRangeAddress(column0.length+7, column0.length+7, 5, 6));
row = sheet.createRow(column0.length+7);
row.setHeight((short) 0x460);
//表格底部添加下边框
for (int i = 0; i < head0.length; i++) {
cell = row.createCell(i);
cell.setCellStyle(styleBottom);
}
cell = row.createCell(5);
cell.setCellValue("年 月 日");
cell.setCellStyle(styleDate);
cell = row.createCell(head0.length-1);//最后一格加上右边框,下边框
cell.setCellStyle(style_RB);
sheet.addMergedRegion(new CellRangeAddress(column0.length+8, column0.length+8, 0, head0.length-1));
row = sheet.createRow(column0.length+8);
row.setHeight((short) 0x270);
cell = row.createCell(0);
cell.setCellValue("注:部门在空格注明“核准”或者“不予核准”。");
cell.setCellStyle(style3);
// 第五步,写入实体数据 实际应用中这些数据从数据库得到,
// 第六步,将文件存到指定位置
try
{
//普通文件流下载方式
/*FileOutputStream fout = new FileOutputStream("E:/students.xls");
wb.write(fout);
fout.close(); */
ByteArrayOutputStream os = new ByteArrayOutputStream();
wb.write(os);
HttpServletResponse response = Struts2Utils.getResponse();
//调用浏览器自带的下载器,要先将数据转成byte流
byte[] content = os.toByteArray();
response.setContentType("application/x-download");
response.setHeader("Content-disposition", "attachment; filename=" +"ApprovalBidding.xls");
response.getOutputStream().write(content);
response.getOutputStream().flush();
response.getOutputStream().close();
os.flush();
os.close();
}
catch (Exception e)
{
e.printStackTrace();
}
}
}
效果图:
在获取数据插入时,同样对数据单元格调用边框样式,即可补全表格边框。
如要错误或更好方法,欢迎各位大V指导学习
对于一些小表格可以采用poi进行绘制,
另一种方便的方式是使用Excel模板(即自己先用excel绘制好表格模板),然后通过代码读取,定位单元格插入数据
http://bbs.it-home.org/thread-3238-1-1.html


 765
765

 被折叠的 条评论
为什么被折叠?
被折叠的 条评论
为什么被折叠?
 到【灌水乐园】发言


