五、文件上传
1、服务端
文件上传需要服务端的配合。我们可在本机搭建tomcat测试环境。关于tomcat在Mac OSX下的安装配置,参考作者另一博文《安装Tomcat到Mac OSX》。
打开Eclipse,新建web工程。在其中新建一个Servlet UploadServlet:
import java.io.*;
import java.util.*;

import javax.servlet.ServletException;
import javax.servlet.http.HttpServlet;
import javax.servlet.http.HttpServletRequest;
import javax.servlet.http.HttpServletResponse;

import org.apache.commons.fileupload.FileItem;
import org.apache.commons.fileupload.disk.DiskFileItemFactory;
import org.apache.commons.fileupload.servlet.ServletFileUpload;

public class UploadServlet extends HttpServlet {

   private boolean isMultipart ;
   private String filePath , title ;
   private int maxFileSize = 500 * 1024;
   private int maxMemSize = 4 * 1024;
   private File file ;

   public void init( ){
      // 从 web.xml 的 context_param 中获得上传文件目录( /data ) .
      filePath =
             getServletContext().getInitParameter( "file-upload" );
   }
   public void doPost(HttpServletRequest request,
               HttpServletResponse response)
                throws ServletException, java.io.IOException {

      // 检查表单是否带有 ENCTYPE="multipart /form-data"
       isMultipart = ServletFileUpload.isMultipartContent (request);
      response.setContentType( "text/html" );
      response.setCharacterEncoding( "GBK" );
      java.io.PrintWriter out = response.getWriter( );
      if ( ! isMultipart ){
         out.println( "<html>" );
         out.println( "<head>" );
         out.println( "<title>Servlet upload</title>" );
         out.println( "</head>" );
         out.println( "<body>" );
         out.println( "<p>No file uploaded</p>" );
         out.println( "</body>" );
         out.println( "</html>" );
         return ;
      }
       DiskFileItemFactory factory = new DiskFileItemFactory();
      // 内存最大可缓存尺寸
       factory.setSizeThreshold( maxMemSize );
      // 指定当数据超过内存最大可缓存尺寸时,临时文件的目录
       factory.setRepository( new File( filePath + "temp" ));

      // 文件上传对象
      ServletFileUpload upload = new ServletFileUpload(factory);
      // 设置文件上传最大允许尺寸
       upload.setSizeMax( maxFileSize );

       try {
      out.println( "<%@page contentType='text/html; charset=GBK'%>" );
      out.println( "<html>" );
      out.println( "<head>" );
      out.println( "<title>Servlet upload</title>" );
      out.println( "</head>" );
      out.println( "<body>" );
      // 获取 multipart /form-data 内容,其中每个 field 被分成不同 part
      List fileItems = upload.parseRequest(request);
      // 枚举每个 field
      Iterator i = fileItems.iterator();
      while ( i.hasNext () )
      {
         FileItem fi = (FileItem)i.next();
         if ( !fi.isFormField () ) // 如果 field 为 File
         {
            // 获取 field 的 name 或 id
            String fieldName = fi.getFieldName();
            String fileName = fi.getName();
            // 文件名中文处理
              fileName= new String(fileName.getBytes(), "gbk" );
            out.println( "file name:" +fileName+ "<br>" );
            String contentType = fi.getContentType();
            boolean isInMemory = fi.isInMemory();
            long sizeInBytes = fi.getSize();
            // 把上传数据写入本地磁盘
              if ( fileName.lastIndexOf( "//" ) >= 0 ){
               file = new File( filePath +
               fileName.substring( fileName.lastIndexOf( "//" ))) ;
            } else {
               file = new File( filePath +
               fileName.substring(fileName.lastIndexOf( "//" )+1)) ;
            }
              fi.write( file ) ;
            out.println( "Uploaded Filename: " + fileName + "<br>" );
         } else { // 如果 field 为 Form Field
          title =fi.getFieldName();
          if ( title .equals( "title" )){
          title = new String(fi.get(), "gbk" );
          out.println( "title:" + title + "<br>" );
          }
         }
      }
       out.println( "</body>" );
      out.println( "</html>" );
   } catch (Exception ex) {
       System. out .println(ex);
   }
    }
   public void doGet(HttpServletRequest request,
                       HttpServletResponse response)
          throws ServletException, java.io.IOException {

          throw new ServletException( "GET method used with " +
                getClass( ).getName( )+ ": POST method required." );
   }
}
再新建一个 upload.jsp页面作为测试:
<%@ page contentType = "text/html; charset=GBK" language = "java" import = "java.util.*" %>
< html >
< head >
< title > fbysss UploadBean 示例 </ title >
<!--meta http -equiv ="Content-Type" content="text/html ; charset =iso -8859-1"-->
<!--meta http -equiv ="Content-Type" content="text/html ; charset =gb2312"-->
</ head >
< FORM name = "form1" METHOD = "POST" ACTION = "UploadServlet" ENCTYPE = "multipart/form-data" >
< input name = "title" type = "text" value = " 请选择文件 " >
< p > 附件 </ p >
< p > < input name = "attach" type = "FILE" id = "attach" size = "50" > </ p >
< input name = "ok" type = "submit" value = " 提交 " >
</ form >
</ html >
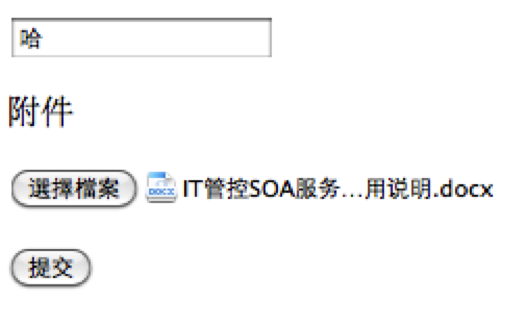
将工程部署到tomcat中,启动tomcat,访问 http://localhost:8080/test/upload.jsp ,显示界面如下:

选择一个文件进行上传,然后到/data目录下检查该文件是否上传成功。
2、iPhone客户端
新建类,选择UIViewController subclass,并勾上“With XIB for user interface”,命名为 UploadViewController。
用 IB 打开 Xib 文件,在其中拖入1个 UIToolBar 、1个 UIBarButtonItem 和1个 UIWebView、1个UIProgressView:

在Xcode中声明必要的变量和 IBOutlet/IBAction:
#import <UIKit/UIKit.h>
#import "ASIFormDataRequest.h"
#import "ASIHTTPRequest.h"

@interface UploadViewController : UIViewController {
UIBarItem * button ;
UIWebView * webView ;
UIProgressView * progress ;
ASIFormDataRequest * request ;
NSURL * url ;
}
@property ( retain , nonatomic ) IBOutlet UIBarItem* button;
@property ( retain , nonatomic ) IBOutlet UIProgressView* progress;
@property ( retain , nonatomic ) IBOutlet UIWebView* webView;
-( IBAction )go;
-( void )printBytes:( NSString *)str encoding:( NSStringEncoding )enc;
@end
将所有出口正确地连接到 UpdateController.xib 中,保存。
打开MainWindow.xib,拖一个UIViewController进去并将其Identifier改为UpdateController,再将它连接到Window对象的的rootViewController。
编写 UIButton 的 Touch up inside 事件代码如下:
-( IBAction )go{
NSString * s= @" 哈哈哈 " ;
url =[ NSURL URLWithString : @"http://localhost:8080/test/UploadServlet" ];
request = [ ASIFormDataRequest requestWithURL : url ];
// 字符串使用 GBK 编码,因为 servlet 只识别 GBK
NSStringEncoding enc= CFStringConvertEncodingToNSStringEncoding ( kCFStringEncodingMacChineseSimp );
[ request setStringEncoding :enc];
[ self printBytes :s encoding :enc]; // 打印 GBK 编码字符
[ request setPostValue :s forKey : @"title" ];
[ request setFile : @"/Users/kmyhy/Documents/iphone/Iphone 开发介绍 .doc" forKey : @"attach" ];
[ request setDelegate : self ];
[ request setDidFinishSelector : @selector ( responseComplete )];
[ request setDidFailSelector : @selector (responseFailed)];
[ button setEnabled : NO ];
[ request startSynchronous ];
}
-( void )responseComplete{
// 请求响应结束,返回 responseString
NSString *responseString = [ request responseString ];
[ webView loadHTMLString :responseString baseURL : url ];
[ button setEnabled : YES ];

}
-( void )respnoseFailed{
// 请求响应失败,返回错误信息
NSError *error = [ request error ];
[ webView loadHTMLString :[error description ] baseURL : url ];
[ button setEnabled : YES ];
}
-( void )printBytes:( NSString *)str encoding:( NSStringEncoding )enc{
NSLog ( @"defaultCStringEncoding:%d" ,[ NSString defaultCStringEncoding ]);
// 根据给定的字符编码,打印出编码后的字符数组
const char *bytes= [str cStringUsingEncoding :enc];
for ( int i= 0 ;i< strlen (bytes);i++) {
NSLog ( @"%d %X" ,(i+ 1 ),bytes[i]);
}
}
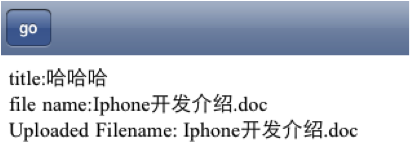
编译、运行。点击go按钮,程序运行效果如下:

转帖:http://blog.csdn.net/kmyhy/article/details/6524927
//
ASIHttprequest 下载图片的代码例子
附件下载:ASINetWorkQueue_imageDataDownLoadDemo.zip (951 K)
转帖:http://www.cocoachina.com/downloads/video/2011/0523/2877.html
iPhone开发 - ASIHttpRequest详解 二
向服务器端上传数据
ASIFormDataRequest ,模拟 Form表单提交,其提交格式与 Header会自动识别。
没有文件:application/x-www-form-urlencoded
有文件:multipart/form-data
| ASIFormDataRequest *request = [ASIFormDataRequest requestWithURL:url]; [request setPostValue:@"Ben" forKey:@"first_name"]; [request setPostValue:@"Copsey" forKey:@"last_name"]; [request setFile:@"/Users/ben/Desktop/ben.jpg" forKey:@"photo"]; [request addData:imageData withFileName:@"george.jpg" andContentType:@"image/jpeg"forKey:@"photos"]; |
如果要发送自定义数据:
| ASIHTTPRequest *request = [ASIHTTPRequest requestWithURL:url]; [request appendPostData:[@"This is my data" dataUsingEncoding:NSUTF8StringEncoding]]; // Default becomes POST when you use appendPostData: / appendPostDataFromFile: / setPostBody: [request setRequestMethod:@"PUT"]; |
下载文件
通过设置request的setDownloadDestinationPath,可以设置下载文件用的下载目标目录。
首先,下载过程文件会保存在temporaryFileDownloadPath目录下。如果下载完成会做以下事情:
1,如果数据是压缩的,进行解压,并把文件放在downloadDestinationPath目录中,临时文件被删除
2,如果下载失败,临时文件被直接移到downloadDestinationPath目录,并替换同名文件。
如果你想获取下载中的所有数据,可以实现delegate中的request:didReceiveData:方法。但如果你实现了这个方法,request在下载完后,request并不把文件放在downloadDestinationPath中,需要手工处理。
获取响应信息
信息:status , header, responseEncoding
| [request responseStatusCode]; [[request responseHeaders] objectForKey:@"X-Powered-By"]; [request responseEncoding]; |
获取请求进度
有两个回调方法可以获取请求进度,
1,downloadProgressDelegate,可以获取下载进度
2,uploadProgressDelegate,可以获取上传进度
cookie的支持
如果Cookie存在的话,会把这些信息放在NSHTTPCookieStorage容器中共享,并供下次使用。
你可以用[ ASIHTTPRequest setSessionCookies:nil ] ; 清空所有Cookies。
当然,你也可以取消默认的Cookie策略,而使自定义的Cookie:
| //Create a cookie NSDictionary *properties = [[[NSMutableDictionary alloc] init] autorelease]; [properties setValue:[@"Test Value" encodedCookieValue] forKey:NSHTTPCookieValue]; [properties setValue:@"ASIHTTPRequestTestCookie" forKey:NSHTTPCookieName]; [properties setValue:@".allseeing-i.com" forKey:NSHTTPCookieDomain]; [properties setValue:[NSDate dateWithTimeIntervalSinceNow:60*60] forKey:NSHTTPCookieExpires]; [properties setValue:@"/asi-http-request/tests" forKey:NSHTTPCookiePath]; NSHTTPCookie *cookie = [[[NSHTTPCookie alloc] initWithProperties:properties] autorelease];
//This url will return the value of the 'ASIHTTPRequestTestCookie' cookie url = [NSURL URLWithString:@"http://allseeing-i.com/ASIHTTPRequest/tests/read_cookie"]; request = [ASIHTTPRequest requestWithURL:url]; [request setUseCookiePersistence:NO]; [request setRequestCookies:[NSMutableArray arrayWithObject:cookie]]; [request startSynchronous];
//Should be: I have 'Test Value' as the value of 'ASIHTTPRequestTestCookie' NSLog(@"%@",[request responseString]); |
大文件断点续传
0.94以后支持大文件的断点下载,只需要设置:
[ request setAllowResumeForFileDownloads:YES ];
[ request setDownloadDestinationPath:downloadPath ];
就可以了。
ASIHTTPRequest会自动保存访问过的URL信息,并备之后用。在以下几个场景非常有用:
1,当没有网络连接的时候。
2,已下载的数据再次请求时,仅当它与本地版本不样时才进行下载。
ASIDownloadCache 设置下载缓存
它对Get请求的响应数据进行缓存(被缓存的数据必需是成功的200请求):
| [ASIHTTPRequest setDefaultCache:[ASIDownloadCache sharedCache]]; |
当设置缓存策略后,所有的请求都被自动的缓存起来。
另外,如果仅仅希望某次请求使用缓存操作,也可以这样使用:
| ASIHTTPRequest *request = [ASIHTTPRequest requestWithURL:url]; [request setDownloadCache:[ASIDownloadCache sharedCache]]; |
多种的缓存并存
仅仅需要创建不同的ASIDownloadCache,并设置缓存所使用的路径,并设置到需要使用的request实例中:
| ASIDownloadCache *cache = [[[ASIDownloadCache alloc] init] autorelease]; [cache setStoragePath:@"/Users/ben/Documents/Cached-Downloads"]; [self setMyCache:cache]; ASIHTTPRequest *request = [ASIHTTPRequest requestWithURL:url]; [request setDownloadCache:[self myCache]]; |
缓存策略
缓存策略是我们控制缓存行为的主要方式,如:什么时候进行缓存,缓存数据的利用方式。
以下是策略可选列表(可组合使用):
| ASIUseDefaultCachePolicy | 这是一个默认的缓存策略“ASIAskServerIfModifiedWhenStaleCachePolicy”,这个很明白,见名知意(它不能与其它策略组合使用) |
| ASIDoNotReadFromCacheCachePolicy | 所读数据不使用缓存 |
| ASIDoNotWriteToCacheCachePolicy | 不对缓存数据进行写操作 |
| ASIAskServerIfModifiedWhenStaleCachePolicy | 默认缓存行为,request会先判断是否存在缓存数据。a, 如果没有再进行网络请求。 b,如果存在缓存数据,并且数据没有过期,则使用缓存。c,如果存在缓存数据,但已经过期,request会先进行网络请求,判断服务器版本与本地版本是否一样,如果一样,则使用缓存。如果服务器有新版本,会进行网络请求,并更新本地缓存 |
| ASIAskServerIfModifiedCachePolicy | 与默认缓存大致一样,区别仅是每次请求都会 去服务器判断是否有更新 |
| ASIOnlyLoadIfNotCachedCachePolicy | 如果有缓存在本地,不管其过期与否,总会拿来使用 |
| ASIDontLoadCachePolicy | 仅当有缓存的时候才会被正确执行,如果没有缓存,request将被取消(没有错误信息) |
| ASIFallbackToCacheIfLoadFailsCachePolicy | 这个选项经常被用来与其它选项组合使用。请求失败时,如果有缓存当网络则返回本地缓存信息(这个在处理异常时非常有用) |
| | 如果设置了“defaultCachePolicy”则所有的请求都会使用此缓存。 |
缓存存储方式
你可以设置缓存的数据需要保存多长时间,ASIHTTPRequest提供了两种策略:
a,ASICacheForSessionDurationCacheStoragePolicy,默认策略,基于session的缓存数据存储。当下次运行或[ASIHTTPRequest clearSession]时,缓存将失效。
b,ASICachePermanentlyCacheStoragePolicy,把缓存数据永久保存在本地,
如:
| ASIHTTPRequest *request = [ ASIHTTPRequest requestWithURL:url ]; [ request setCacheStoragePolicy:ASICachePermanentlyCacheStoragePolicy ]; |
另外,也可以使用clearCachedResponsesForStoragePolicy来清空指定策略下的缓存数据。
缓存其它特性
设置是否按服务器在Header里指定的是否可被缓存或过期策略进行缓存:
| [[ ASIDownloadCache sharedCache ] setShouldRespectCacheControlHeaders:NO ]; |
设置request缓存的有效时间:
| [ request setSecondsToCache:60*60*24*30 ]; // 缓存30天 |
可以判断数据是否从缓存读取:
| [ request didUseCachedResponse ]; |
设置缓存所使用的路径:
| [ request setDownloadDestinationPath:[[ ASIDownloadCache sharedCache ] pathToStoreCachedResponseDataForRequest:request ]]; |
实现自定义的缓存
只要简单的实现ASICacheDelegate接口就可以被用来使用。
使用代理请求
默认的情况下,ASIHTTPRequest会使用被设置的默认代理。但你也可以手动修改http代理:
| // Configure a proxy server manually NSURL *url = [ NSURL URLWithString:@"http://allseeing-i.com/ignore" ]; ASIHTTPRequest *request = [ ASIHTTPRequest requestWithURL:url ]; [ request setProxyHost:@"192.168.0.1" ]; [ request setProxyPort:3128 ];
// Alternatively, you can use a manually-specified Proxy Auto Config file (PAC) // (It's probably best if you use a local file) [request setPACurl:[NSURL URLWithString:@"file:///Users/ben/Desktop/test.pac"]]; |
ASIHTTPRequest, 请求的其它特性
iOS4中,当应用后台运行时仍然请求数据:
| [ request setShouldContinueWhenAppEntersBackground:YES ]; |
是否有网络请求:
| [ ASIHTTPRequest isNetworkInUse ] |
是否显示网络请求信息在status bar上:
| [ ASIHTTPRequest setShouldUpdateNetworkActivityIndicator:NO ]; |
设置请求超时时,设置重试的次数:
| [ request setNumberOfTimesToRetryOnTimeout:2 ]; |
KeepAlive的支持:
| // Set the amount of time to hang on to a persistent connection before it should expire to 2 minutes [ request setPersistentConnectionTimeoutSeconds:120 ];
// Disable persistent connections entirely [ request setShouldAttemptPersistentConnection:NO ]; |
版权归旺财勇士所有~转载自 http://wiki.magiche.net/pages/viewpage.action?pageId=2064410&focusedCommentId=8814656#comment-8814656~
转帖: http://tr4work.blog.163.com/blog/static/137149314201199105436532/


 185
185

 被折叠的 条评论
为什么被折叠?


