


原著是英文,本文只是一个个人的简单理解的中文的非正式翻译,供自己学习使用,参考需谨慎。
向原著的作者SlackMoehrle, Ricardo, Justin, Nite , Kai, Minggo, Wenhai, Tony, Yingtao, Rao 致敬。
第4章 动作
就像它字面表达的一样,动作对能够是节点的属性发生改变。动作对象可以让节点的属性随着时间发生变化,任何继承自节点的对象,都可以是动作的作用对象。比如:你可以让一个精灵在一段时间中从一个点移动到另一个点。
MoveTo 和MoveBy的例子:
// Move sprite to postion 50,10 in 2seconds
auto moveTo = MoveTo::create(2, Vec2(50, 10));
mySprite1->runAction(moveTo);

// Move sprite 20 points to right in seconds
auto moveBy = MoveTy::create(2, Vec2(20, 0));
mySprite2->runAction(moveBy);
By and To(过和到),有什么不同?(比如moveTo和moveBy有什么不一样?)
你可能已经注意到了每一个动作有By和To两个版本。他们的实现是是不同的。By是相对于目前的状态来说的。To是绝对的,与节点的当前状态无关。看几个例子:
auto mySprite = Sprite::create("mySprite.png");
mySprite->setPositon(Vec2(200, 256));

//MoveBy-lets move the sprite by 500 on the x axis over 2 seconds
//MoveBy is relative-since x = 200 + 200 move = x is now 400
//after the move
auto moveBy = MoveBy::create(2, Vec2(500, mySprite->getPositionY()));
//moveTo-lets move the new sprite to 300 x 256 over 2s
//moveTo is absolute -The sprite gets moved to 300 x 256 regardless of
//where it is located now.
auto moveTo = MoveTo::create(2, Vec2(300, mySprite->getPositinY()));
auto seq = Sequence::create(moveBy, delay, moveTo, nullptr);
mySprite->runAction(seq);
基本动画和动画运行
基本动画通常是一些为实现特定目标的特定动画。
看几个例子:
Move
在一段时间中移动一个节点(Node)
auto mySprite = Spriet::create("mysprite.png");
//Move a sprite to specific location over 2s.
auto moveTo = MoveTo::create(2, Vec2(50, 0));
mySprite->runAction(moveTo);

//Move a sprite 50 pixels to right, and 0 pixels to the top
//over 2 seconds.
auto moveBy = MoveBy::create(2, Vec2(50, 0));

mySprite->runAction(moveBy);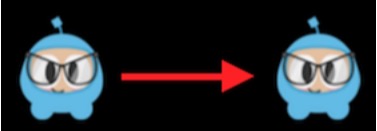
Rotate(旋转)
在两面中顺时针旋转一个节点。
auto  mySprite = Sprite::create("mysprite.png");

//Rotates a Node to the specific angle over 2 seconds
auto rotateTo = RotateTo::create(2.0f, 40.0f);
mySprite->runAction(rotateTo);

//Rotates a Node clockwise by 40 degree over 2 seconds
auto rotateBy = RotateBy::create(2.0f, 40.0f);
mySprite->runAction(rotateBy);
Scale(放缩)
2秒钟的时间将一个节点放大10倍。
auto mySprite = Sprite::create("mysprite.png");

//Scale uniformly by 3x over 2 seconds
auto scaleBy = ScaleBy::create(2.0f, 3.0f);
mySprite->runAction(scaleBy);

//Scale X by 5 and Y by 3x over 2 seconds
auto scaleBy = ScaleBy::create(2.0f, 3.0f, 3.0f);

mySprite->runAction(scaleBy);

//Scale to uniformly to 3x over 2 seconds
auto scaleTo = ScaleTo::create(2.0f, 3.0f);
mySprite->runAction(scaleTo);

//Scale X to 5 and Y to 3x over 2 seconds
auto scaleTo ScaleTo::create(2.0f, 3.0f, 3.0f);
mySprite->runAction(scaleTo);
Fade In/Out(淡入淡出)
让一个节点渐变进入。
不透明度从0变到255 。逆向动画是FadeOut
auto mySprite = Sprite::create("mysprite.png");

//fades in the sprite in 1 seconds
auto fadeIn = FadeIn::create(1.0f);
mySprite->runAction(fadeIn);

//fades out the sprite in 2 seconds
auto fadeOut = FadeOut::create(2.0f);
mySprite->runAction(fadeOut);
Tint(色调动画)
色调动画可以改变节点的色调。
auto mySprite = Sprite::create("mySprite.png");

//Tints a node to specified RGB values
auto tintTo = TintTo::create(2.0f, 120.0f, 232.0f, 254.0f);
mySprite->runAction(tintTo);

//Tints a node BY the delta of the specified RGB values.
auto tintBy = TintBy::create(2.0f, 120.0f, 232.0f, 254.0f);
mySprite->runAction(tintBy);
Animate(帧动画)
使用Animate可以在精灵上实现简单的翻书动画。就是在动画播放的时间段里,连续替换精灵的显示帧。看一段例子:
auto mySprite = Sprite::create("mysprite.png");
//now lets animate the sprite we moved

Vector(SpriteFrame*) animaFrames;
animFrames.reserve(12);
animFrames.pushBack(SpriteFrame::create("Blue_Front1.png", Rect(0, 0, 65, 81)));
animFrames.pushBack(SpriteFrame::create("Blue_Front2.png", Rect(0, 0, 65, 81)));
animFrames.pushBack(SpriteFrame::create("Blue_Front3.png", Rect(0, 0, 65, 81)));
animFrames.pushBack(SpriteFrame::create("Blue_Left1.png", Rect(0, 0, 65, 81)));
animFrames.pushBack(SpriteFrame::create("Blue_Left2.png", Rect(0, 0, 65, 81)));
animFrames.pushBack(SpriteFrame::create("Blue_Left3.png", Rect(0, 0, 65, 81)));
animFrames.pushBack(SpriteFrame::create("Blue_Back1.png", Rect(0, 0, 65, 81)));
animFrames.pushBack(SpriteFrame::create("Blue_Back2.png", Rect(0, 0, 65, 81)));
animFrames.pushBack(SpriteFrame::create("Blue_Back3.png", Rect(0, 0, 65, 81)));
animFrames.pushBack(SpriteFrame::create("Blue_Right1.png", Rect(0, 0, 65, 81)));
animFrames.pushBack(SpriteFrame::create("Blue_Right2.png", Rect(0, 0, 65, 81)));
animFrames.pushBack(SpriteFrame::create("Blue_Right3.png", Rect(0, 0, 65, 81)));

//create the animation out of the frames
Animation* animation = Animation::createWithSpriteFrames(animFrames, 0.1f);
Animate* animate = Animate::create(animation);

//run is and repeat if forever
mySprite->runAction(RepeatForever::create(animate));
用文本展示animation不太容易,所以读者可以跑一下代码。
Easing(缓释动画)
缓释动画是给予动画一定的加速度,让动画更平滑。重要的一点是不考虑速度,缓释动画开始和结束的时间和原来的动画是相同的。缓释动画是模拟物理效果的好方法:有可能你希望给你游戏中的一些基本动画加一些模拟物理效果但是又不希望多附在的实现。另一个很好的例子是帧动画菜单和按钮。
下面是一些常见的的缓释动画函数的图形展示:
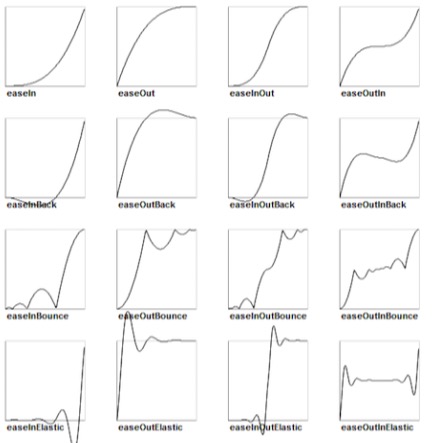
Cocos2d-x 支持所有上面的缓释函数图形。实现也非常简单。我们来看一些简单的情况。我们模拟一个从屏幕上端掉下来并且弹起来的精灵。
//create a sprite
auto mySprite = Sprite::create("mysprite.png");

//create a MoveBy Action to where we want the sprite to drop from.
auto move = MoveBy::create(2, Vec2(200, dirs->setVisibleSize().height- newSprite2->getContentSize().height))
auto move_back = move->reverse();

//create a BounceIn Ease Action
auto move_ease_in = EaseBounceIn::create(move->clone());

//create a delay that is run in between sequence events
auto delay = DelayTime::create(0.25f);

//create the sequence of actions, in the order we want to run them
auto seq1 = Sequence::create(move_ease_in ,delay, move_ease_in_back, delay->clone(), nullptr);

//run the sequence and repeat forever.
mySprite->runAction(RepeatForever::create(seq1));
运行代码看效果啦!
队列动画(Sequences)和运行队列动画
Sequences 就是一些列的按顺序执行的动画对象。可以是任意数量的动画,回调(Functions)甚至是其他队列动画的组合。(回调)Functions?是的,Cocos2d-x提供CallFunc对象,可以让你创建function()(函数回调)添加到队列动画中。这样,除了那些cocos2d-x提供的动画以外你还可以向队列中添加自己的函数。Sequence运行的时候看上去是这样的?

一个简单的例子:
auto mySprite = Sprite::create("mysprite.png");

//create a few actions.
auto jump = JumpBy::create(0.5, Vec2(0, 0), 100, 1);
auto rotate = RotateTo::create(2.0f, 10);

//create a few callbacks
auto callbackJump = CallFunc::create([](){
    log("Jumped!");
});

auto callbackRotate = CallFunc::create([](){
    log("Rotated!");
});

//create a sequence with the actions an callbacks
auto seq = Sequence::create(jump, callbackJump, rotate, callbackRotate, nullptr);

//run it
mySprite->runAction(seq);
上面的队列动画会怎样执行?
它会按照顺序执行这些动画的:
Jump->callbackJump->Rotate->callbackRotate
可以运行代码看效果!
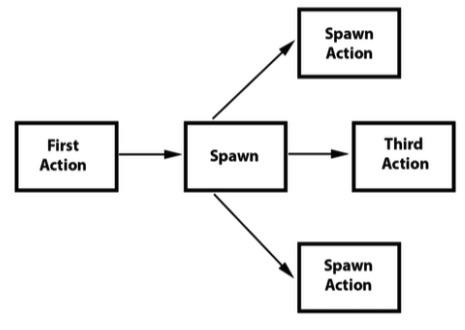
Spawn(并行动画)
并行动画与队列动画很相似,只是所有的动画都是同时运行的。同样你也可以添加任意数量的动画甚至是其他的并行动画!
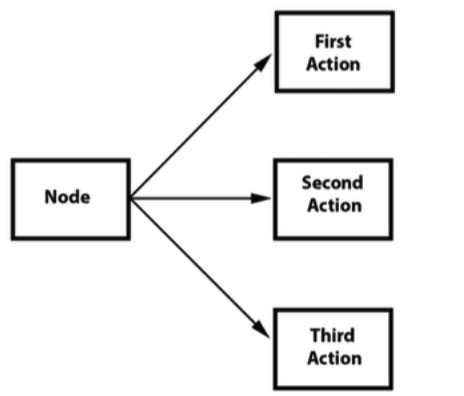
并行动画和多个并列的runAction()语句的效果是相同的。然而并行动画可以放进队列动画中实现一些特殊的效果。结合两者是非常强大的特性。
例子:
// create 2 actions and run spawn on a Sprite
auto mySprite = Sprite:create("mysprite.png");

auto moveBy = MoveBy::create(10, Vec2(400, 100));
auto fadeTo = FadeTo::create(2.0f, 120.0f);
使用并行动画(Spawn):
//running the above Actions with Spawn
auto mySpawn = Spawn::createWithTwoActions(moveBy, fadeTo);
mySprite->runAction(mySpawn);
连续的runAction()语句:
//running the above Actions with consecutive runAction() statements.
mySprite->runAction(moveBy);
mySprite->runAction(fadeTo);
两者的效果是一样的。但是,第一种我们可以在队列动画中使用并行动画。下面的流程度展示这种情形:
// create a Sprite
auto mySprite = Sprite::create("mysprite.png");

// create a few Actions
auto moveBy = MoveBy::create(10, Vec2(400,100));
auto fadeTo = FadeTo::create(2.0f, 120.0f);
auto scaleBy = ScaleBy::create(2.0f, 3.0f);

// create a Spawn to use
auto mySpawn = Spawn::createWithTwoActions(scaleBy, fadeTo);

// tie everything together in a sequence
auto seq = Sequence::create(moveBy, mySpawn, moveBy, nullptr);

// run it
mySprite->runAction(seq);
运行代码看效果!
逆向动画(Reverse)
和字面意思一样。如果你运行了一组动画,以可以调用reverse()反向运行。它是简单的反向运行,事实上反向操作队列或者并行动画的原始属性。
使用Spawn的逆向动画的例子。
// reverse a sequence, spawn or action
mySprite->runAction(mySpawn->reverse());
绝大多数的动画和动画队列都可以逆向!
这十分容易,但是我们还是确认一下这是怎么运作的。例子:
// create a Sprite
auto mySprite = Sprite::create("mysprite.png");
mySprite->setPosition(50, 56);

// create a few Actions
auto moveBy = MoveBy::create(2.0f, Vec2(500,0));
auto scaleBy = ScaleBy::create(2.0f, 2.0f);
auto delay = DelayTime::create(2.0f);

// create a sequence
auto delaySequence = Sequence::create(delay, delay->clone(), delay->clone(), delay->clone(), nullptr);
auto sequence = Sequence::create(moveBy, delay, scaleBy, delaySequence, nullptr);

// run it
newSprite2->runAction(sequence);
// reverse it
newSprite2->runAction(sequence->reverse());
到底是怎么运行的呢?如果你列出所有步骤,就会看得很清楚。
1. mySprite 创建
• mySprite 位置设为 (50, 56)
• sequence 开始运行
• sequence 移动 mySprite by 500,消耗2秒, mySprite 的新位置(550, 56)
• sequence 延迟两秒
• sequence 放缩 mySprite 两倍 耗时两秒
• sequence 再延时6秒 (注意:我们运行了另外一个队列)
• 我们运行了sequence的逆向动画,所以我们逆向运行了之前的每一个动画
• sequence 延时6秒
• sequence 放缩 mySprite -2被,耗时2秒
• sequence 延时两秒
• sequence 移动 mySprite -500, 耗时2秒, mySprite 新位置
(50, 56)
如你所见reverse()使用起来非常简单,但是内部逻辑实现并不简单。Cocos2d-x 帮助游戏开发分担了很多任务!


 被折叠的 条评论
为什么被折叠?
被折叠的 条评论
为什么被折叠?
 到【灌水乐园】发言


