


参考:
1. Android应用setContentView与LayoutInflater加载解析机制源码分析
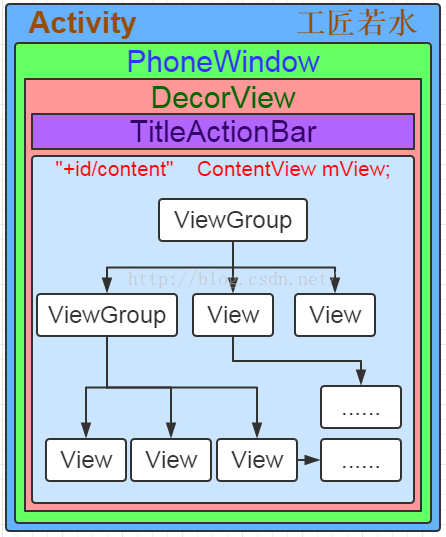
之前一直不明白为什么android的view层次是这么个布局,现在终于有所了解了。。其实上图还有点问题,其实在DecorWindow中还有一个id为statusBarBackgroud和一个id为navigationBarBackground的View,分别表示手机的顶部的状态栏和手机底部的导航栏。。
Activity中加载布局,都是通过在onCreate中调用setContentView方法开始:
    @Override
    protected void onCreate(Bundle savedInstanceState) {
        // TODO Auto-generated method stub
        super.onCreate(savedInstanceState);
        setContentView(R.layout.main_layout);
        ButterKnife.bind(this);
    }
Activity中有setContentView重载方法,一个是layoutid,一个直接传入view
    public void setContentView(@LayoutRes int layoutResID) {
        getWindow().setContentView(layoutResID);
        initWindowDecorActionBar();
    }
	public void setContentView(View view) {
        getWindow().setContentView(view);
        initWindowDecorActionBar();
    }
实际上调用的都是PhoneWindow的setContentView方法。initWindowDecorActionBar一看就知道是初始化actionbar的
    @Override
    public void setContentView(int layoutResID) {
        // Note: FEATURE_CONTENT_TRANSITIONS may be set in the process of installing the window
        // decor, when theme attributes and the like are crystalized. Do not check the feature
        // before this happens.
        if (mContentParent == null) {
            installDecor();//如果mContentParent为空调用installDecor,初始化
        } else if (!hasFeature(FEATURE_CONTENT_TRANSITIONS)) {
            mContentParent.removeAllViews();
        }

        if (hasFeature(FEATURE_CONTENT_TRANSITIONS)) {
            final Scene newScene = Scene.getSceneForLayout(mContentParent, layoutResID,
                    getContext());
            transitionTo(newScene);
        } else {
            //可以看到mContentParent这个view作为layoutResID的parent,所以layoutResID根width/height参数有效
            mLayoutInflater.inflate(layoutResID, mContentParent);
        }
        mContentParent.requestApplyInsets();
        final Callback cb = getCallback();
        if (cb != null && !isDestroyed()) {
            cb.onContentChanged();
        }
    }

    @Override
    public void setContentView(View view) {
        setContentView(view, new ViewGroup.LayoutParams(MATCH_PARENT, MATCH_PARENT));//所以始终是MATCH_PARENT,所以该view的width/height无效
    }

    @Override
    public void setContentView(View view, ViewGroup.LayoutParams params) {
        // Note: FEATURE_CONTENT_TRANSITIONS may be set in the process of installing the window
        // decor, when theme attributes and the like are crystalized. Do not check the feature
        // before this happens.
        if (mContentParent == null) {
            installDecor();
        } else if (!hasFeature(FEATURE_CONTENT_TRANSITIONS)) {
            mContentParent.removeAllViews();
        }

        if (hasFeature(FEATURE_CONTENT_TRANSITIONS)) {
            view.setLayoutParams(params);
            final Scene newScene = new Scene(mContentParent, view);
            transitionTo(newScene);
        } else {
            mContentParent.addView(view, params);//把这个view加入到mContentParent中了,同时layoutparam为MATCH_PARENT
        }
        mContentParent.requestApplyInsets();
        final Callback cb = getCallback();
        if (cb != null && !isDestroyed()) {
            cb.onContentChanged();
        }
}setContentView(int layoutResID) 因为是通过inflate(id,mParent) 所以设置的layout_width/layout_height有效。。。
inflate方法的解析,可以查看Android LayoutInflater原理分析
既然mContentParent是在installDecor方法中初始化的,那么
      private void installDecor() {
        if (mDecor == null) {
            mDecor = generateDecor();//初始化mDecor这个View
            mDecor.setDescendantFocusability(ViewGroup.FOCUS_AFTER_DESCENDANTS);
            mDecor.setIsRootNamespace(true);
            if (!mInvalidatePanelMenuPosted && mInvalidatePanelMenuFeatures != 0) {
                mDecor.postOnAnimation(mInvalidatePanelMenuRunnable);
            }
        }
        if (mContentParent == null) {
            mContentParent = generateLayout(mDecor);//通过mDecor对象初始化mContentParent
            .....
	    }
	.....
}private final class DecorView extends FrameLayout implements RootViewSurfaceTaker然后在generateLayout方法中初始化了mContentParent对象
    protected ViewGroup generateLayout(DecorView decor) {
        // Apply data from current theme.
        TypedArray a = getWindowStyle();
		.........

        if (a.getBoolean(R.styleable.Window_windowNoTitle, false)) { //获取theme中的设置,如果是NoTitle
            requestFeature(FEATURE_NO_TITLE);//调用该方法,表示无标题
        } else if (a.getBoolean(R.styleable.Window_windowActionBar, false)) { //获取theme中的设置,如果是ActionBar
            // Don't allow an action bar if there is no title.
            requestFeature(FEATURE_ACTION_BAR);//调用该方法,表示actionbar
        }
	.........

        int layoutResource;
        int features = getLocalFeatures();//记得上文中的requestFeature,然后就可以通过getLocalFeatures方法获取了。。其实在activity中可以调用requestFeature
        // System.out.println("Features: 0x" + Integer.toHexString(features));
        if ((features & (1 << FEATURE_SWIPE_TO_DISMISS)) != 0) {
            layoutResource = R.layout.screen_swipe_dismiss;
        }
	..........
  	else if ((features & (1 << FEATURE_NO_TITLE)) == 0) {
            // If no other features and not embedded, only need a title.
            // If the window is floating, we need a dialog layout
            if (mIsFloating) {
                TypedValue res = new TypedValue();
                getContext().getTheme().resolveAttribute(
                        R.attr.dialogTitleDecorLayout, res, true);
                layoutResource = res.resourceId;
            } else if ((features & (1 << FEATURE_ACTION_BAR)) != 0) {
                layoutResource = a.getResourceId(
                        R.styleable.Window_windowActionBarFullscreenDecorLayout,
                        R.layout.screen_action_bar);
            } else {
                layoutResource = R.layout.screen_title;
            }
            // System.out.println("Title!");
        } else if ((features & (1 << FEATURE_ACTION_MODE_OVERLAY)) != 0) {
            layoutResource = R.layout.screen_simple_overlay_action_mode;
        } else {
            // Embedded, so no decoration is needed.
            layoutResource = R.layout.screen_simple;
            // System.out.println("Simple!");
        }
	............

        View in = mLayoutInflater.inflate(layoutResource, null);
        decor.addView(in, new ViewGroup.LayoutParams(MATCH_PARENT, MATCH_PARENT));//把上述得到的layoutResource添加到decor中
        mContentRoot = (ViewGroup) in;

        ViewGroup contentParent = (ViewGroup)findViewById(ID_ANDROID_CONTENT);//获取id=content的view作为contenparent
	............
}另一方面如果要设置窗口风格,必须放在setContentView的前面
        requestWindowFeature(Window.FEATURE_NO_TITLE);//getLocalFeatures方法中被获取
        setContentView(R.layout.test_layout);
当窗口风格是NoTitle,同时没有actionbar的时候,那么窗口根布局就是screen_title.xml.xml
<LinearLayout xmlns:android="http://schemas.android.com/apk/res/android"
    android:orientation="vertical"
    android:fitsSystemWindows="true">
    <!-- Popout bar for action modes -->
    <ViewStub android:id="@+id/action_mode_bar_stub"
              android:inflatedId="@+id/action_mode_bar"
              android:layout="@layout/action_mode_bar"
              android:layout_width="match_parent"
              android:layout_height="wrap_content"
              android:theme="?attr/actionBarTheme" />
    <FrameLayout
        android:layout_width="match_parent"
        android:layout_height="?android:attr/windowTitleSize"
        style="?android:attr/windowTitleBackgroundStyle">
        <TextView android:id="@android:id/title"
            style="?android:attr/windowTitleStyle"
            android:background="@null"
            android:fadingEdge="horizontal"
            android:gravity="center_vertical"
            android:layout_width="match_parent"
            android:layout_height="match_parent" />
    </FrameLayout>
    <FrameLayout android:id="@android:id/content"
        android:layout_width="match_parent"
        android:layout_height="0dip"
        android:layout_weight="1"
        android:foregroundGravity="fill_horizontal|top"
        android:foreground="?android:attr/windowContentOverlay" />
</LinearLayout>
为了验证这个猜测,打开Android\android-sdk\tools\hierarchyviewer工具验证
在我的代码中,既没有设置title也没有设置actionbar
main_activity.xml
<LinearLayout xmlns:android="http://schemas.android.com/apk/res/android"
              android:layout_width="match_parent"
              android:layout_height="match_parent"
              android:gravity="center"
              android:orientation="vertical">

    <Button
        android:id="@+id/test"
        android:text="Test"
        android:layout_width="wrap_content"
        android:layout_height="wrap_content"/>
    <Button
        android:id="@+id/startAnim"
        android:layout_marginTop="100dp"
        android:background="@android:color/holo_red_dark"
        android:layout_width="wrap_content"
        android:layout_height="wrap_content"
        android:text="start"/>

</LinearLayout>
<style name="AppTheme.NoActionBar">
<item name="windowActionBar">false</item>
<item name="windowNoTitle">true</item>
</style>
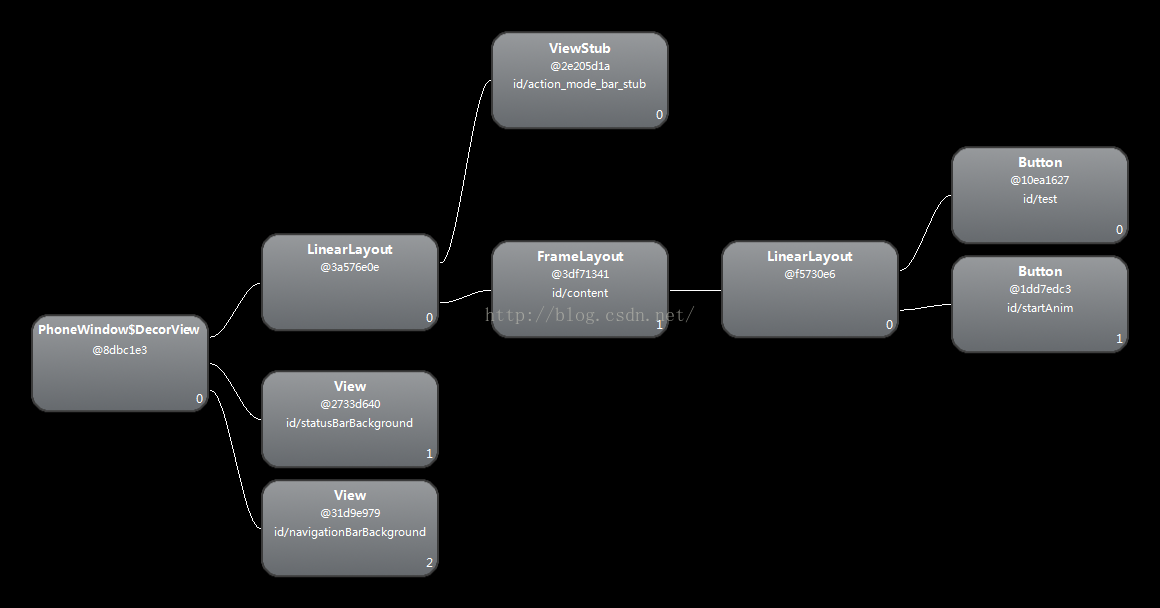
DecorView果然作为根View,其下有三个子view,id为statusBarBackgroud和id为navigationBarBackground的View,分别表示手机的顶部的状态栏和手机底部的导航栏。然后是一个LinearLayout,很明显这个就是上面提到的screen_title.xml.xml中的根LinearLayout。然后包括一个@+id/action_mode_bar_stub的ViewStub,一个@android:id/content的FrameLayout,,,然后因为在setContentView中,下面两种方式都把这个FrameLayout作为了main_activity.xml的根视图。。
mLayoutInflater.inflate(layoutResID, mContentParent);
mContentParent.addView(view, params);
最后inflate内部其实还是调用addview,然后一直如果该view是viewgroup,那么viewgroup又会把其中所有的子view都add进去,所以最后view就形成了一个视图层次。
inflate原理可以参考 Android LayoutInflater原理分析
那最后知道了所有的view的根viewgroup就是上面的decorview,那么这个decorview又是在哪里被添加的呢?
handler机制我们知道了启动Activity其实都会启动activityThread的main方法,这个方法里面会创建主线程的looper。
启动Activity调用完ActivityThread的main方法之后,接着调用ActivityThread类performLaunchActivity来创建要启动的Activity组件,
在创建Activity组件的过程中,还会为该Activity组件创建窗口对象和视图对象;接着Activity组件创建完成之后,通过调用ActivityThread类的handleResumeActivity将它激活。
(在onCreate中调用了setContentView,所以把除了decorView之外的所有的view都已经添加进去了。)handleResumeActivity中把decorView添加进去了
handleResumeActivity方法中调用了r.activity.makeVisible();
    final void handleResumeActivity(IBinder token,
            boolean clearHide, boolean isForward, boolean reallyResume) {
        // If we are getting ready to gc after going to the background, well
        // we are back active so skip it.
        ......
        // TODO Push resumeArgs into the activity for consideration
        ActivityClientRecord r = performResumeActivity(token, clearHide);

        if (r != null) {
            ......
            // If the window hasn't yet been added to the window manager,
            // and this guy didn't finish itself or start another activity,
            // then go ahead and add the window.
            ......
            // If the window has already been added, but during resume
            // we started another activity, then don't yet make the
            // window visible.
            ......
            // The window is now visible if it has been added, we are not
            // simply finishing, and we are not starting another activity.
            if (!r.activity.mFinished && willBeVisible
                    && r.activity.mDecor != null && !r.hideForNow) {
                ......
                if (r.activity.mVisibleFromClient) {
                    r.activity.makeVisible();
                }
            }
            ......
        } else {
            // If an exception was thrown when trying to resume, then
            // just end this activity.
            ......
        }
    }
Activity中makeVisible方法,把这个DecorView添加到wm中。。
    void makeVisible() {
        if (!mWindowAdded) {
            ViewManager wm = getWindowManager();
            wm.addView(mDecor, getWindow().getAttributes());
            mWindowAdded = true;
        }
        mDecor.setVisibility(View.VISIBLE);
    }
另一方面, wm.addView实际上调用的是WindowManagerGlobal中addView方法,此时创建了ViewRootImpl对象。。ViewRootImpl有木有很熟悉,在绘制View过程中,就是从ViewRootImpl的performTraversals方法开始的,然后依次经过测量,布局,绘制过程。。invalidate其实最后也是调用了ViewRootImpl的performTraversals方法
    public void addView(View view, ViewGroup.LayoutParams params, Display display, Window parentWindow) {
        ............
        ViewRootImpl root;
        View panelParentView = null;

		............
        root = new ViewRootImpl(view.getContext(), display);
        view.setLayoutParams(wparams);
        mViews.add(view);
        mRoots.add(root);
        mParams.add(wparams);
    }
总结一下:
1.创建一个DecorView的对象mDecor,该mDecor对象将作为整个应用窗口的根视图。
2.依据Feature等style theme创建不同的窗口修饰布局文件,并且通过findViewById获取Activity布局文件该存放的地方(窗口修饰布局文件中id为content的FrameLayout)。
3.将Activity的布局文件添加至id为content的FrameLayout内。


 3万+
3万+


 被折叠的 条评论
为什么被折叠?
被折叠的 条评论
为什么被折叠?
 到【灌水乐园】发言


