


XMLListView-Android
国外开源网站,下拉刷新,源码里面也有
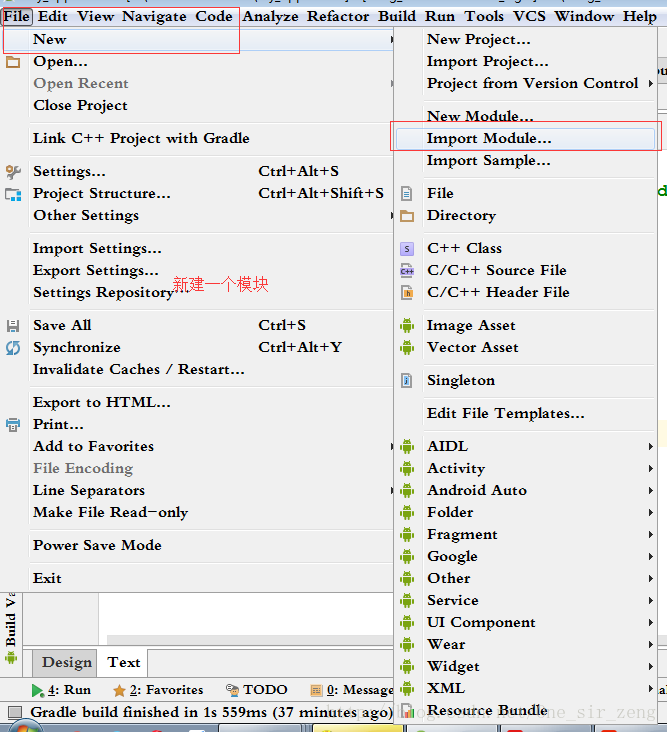
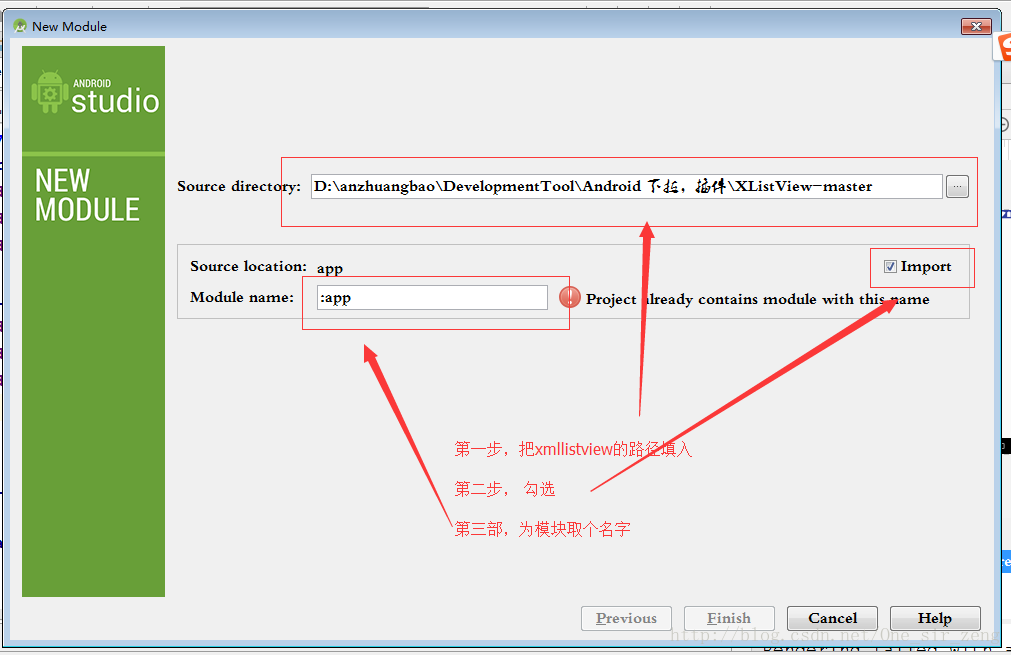
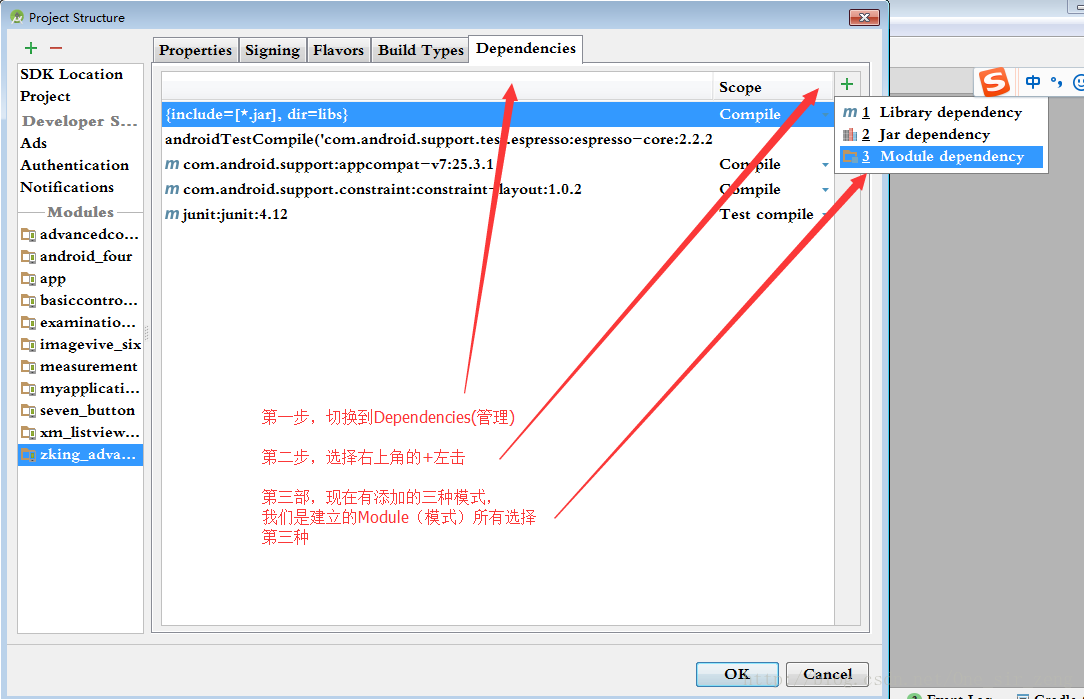
把XMLListView引入项目步骤
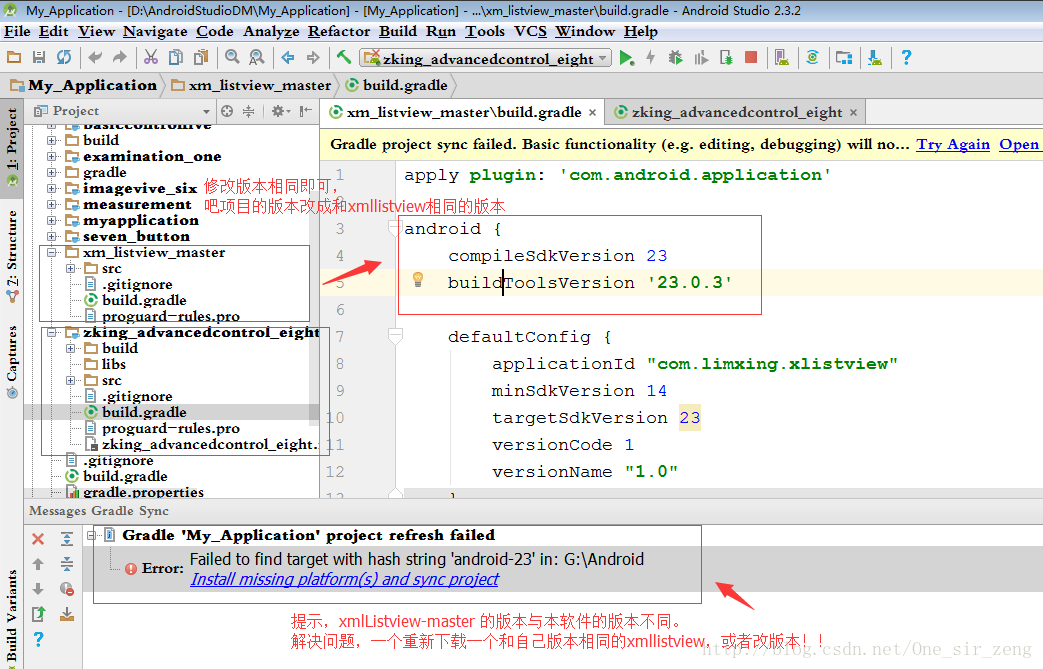
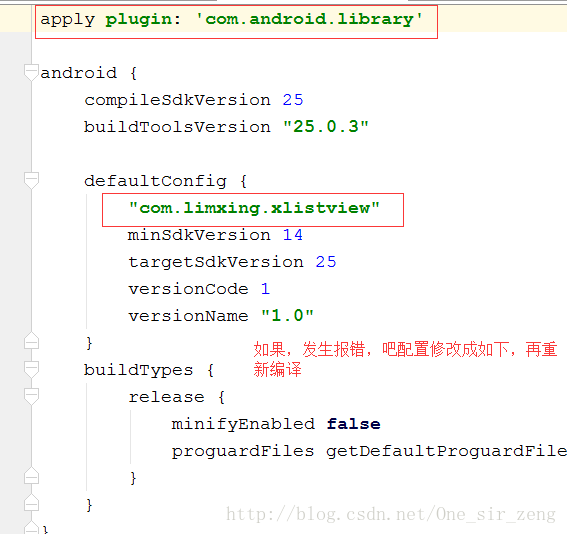
如果,导入报错,是版本问题的话,按此修改
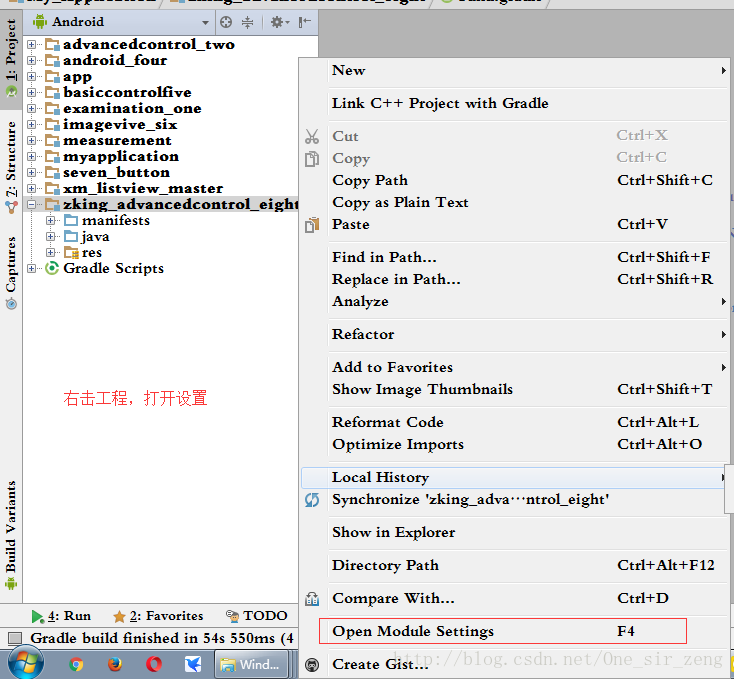
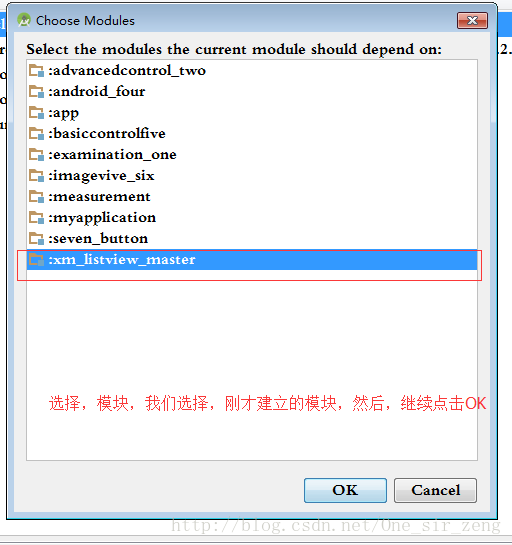
与项目建立关联
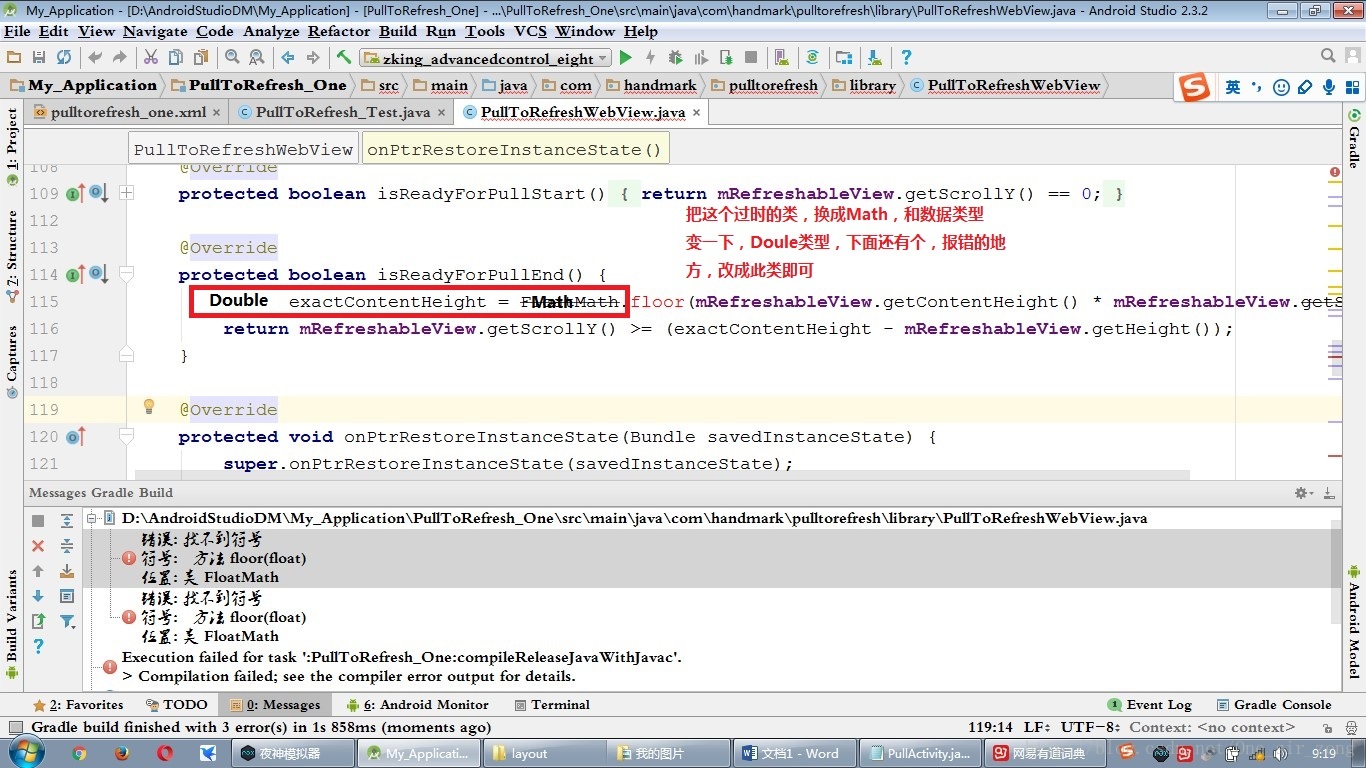
可能,出现报错,情况,照此修改试试
简单实践
xml文件,使用xmllistview
<?xml version="1.0" encoding="utf-8"?>
<LinearLayout xmlns:android="http://schemas.android.com/apk/res/android"
    android:orientation="vertical"
    android:layout_width="match_parent"
    android:layout_height="match_parent">

<com.limxing.xlistview.view.XListView
    android:layout_width="match_parent"
    android:layout_height="wrap_content"
    android:id="@+id/xlistview_refresh"

    >

</com.limxing.xlistview.view.XListView>

</LinearLayout>
JAVA代码
package com.example.zking_advancedcontrol_eight;

import android.app.TimePickerDialog;
import android.os.AsyncTask;
import android.os.Bundle;
import android.support.annotation.Nullable;
import android.support.v7.app.AppCompatActivity;
import android.view.View;
import android.widget.AdapterView;
import android.widget.ArrayAdapter;
import android.widget.Toast;

import com.limxing.xlistview.view.XListView;
import com.limxing.xlistview.view.XListView.IXListViewListener;

import java.util.LinkedList;
import java.util.List;

/**
 * Created by Administrator on 2017/6/15.
 */


public class Xlistview_Activity extends AppCompatActivity {

    private List<String> lis;
    private XListView xListView;
    private ArrayAdapter adapter;

    @Override
    protected void onCreate(@Nullable Bundle savedInstanceState) {
        super.onCreate(savedInstanceState);
        setContentView(R.layout.xmllistview_master);
        xListView = (XListView) findViewById(R.id.xlistview_refresh);
        lis = new LinkedList<String>();

        for (int i = 0; i <4 ; i++) {
            lis.add("测试"+i);
        }


        adapter = new ArrayAdapter(this,android.R.layout.simple_list_item_1,lis);
        xListView.setAdapter(adapter);


        xListView.setPullLoadEnable(true); //设置,上啦,允许,
        xListView.setPullRefreshEnable(true);   //设置,是否可以下拉  ,默认为true


        //监听
        xListView.setXListViewListener(new IXListViewListener() {
            @Override
            public void onRefresh() {
                xListView.stopLoadMore();//停止加载更多


               // xListView.setRefreshTime("十分钟之前");  可以设置提示更新时间
                new  MyasyncTas().execute();
            }
//在onRefresh()和onLoadMore()中实现页面刷新和加载更多就可以了,
// 记得刷新完毕后,自行调用stopRefresh()和stopLoadMore(),否则进度条会一直旋转无法消失。
            @Override
            public void onLoadMore() {  //下拉监听
                Toast.makeText(Xlistview_Activity.this, "拉动", Toast.LENGTH_SHORT).show();

            }


        });


    }

    //继承AsyncTask   异步任务类
    class MyasyncTas extends AsyncTask {

        @Override  //内部有现成机制,直接可以用
        protected Object doInBackground(Object[] params) {//在后台获取数据
            for (int i = 0; i <5 ; i++) {
                lis.add(0,"王"+i);
            }

            return null;
        }

        @Override   //更新
        protected void onPostExecute(Object o) {
            super.onPostExecute(o);
            //提示适配器,值已经发生改变
            adapter.notifyDataSetChanged();

            //告知Listview 已经更新完成,
            xListView.stopRefresh(true);
        }
    }


}
pulltorefresh建立模块和关联项目和xmllistview基本相同

测试使用
xml 页面
<?xml version="1.0" encoding="utf-8"?>
<LinearLayout xmlns:android="http://schemas.android.com/apk/res/android"
    android:orientation="vertical"
    android:layout_width="match_parent"
    android:layout_height="match_parent"
    >

    <com.handmark.pulltorefresh.library.PullToRefreshListView
        android:layout_width="match_parent"
        android:layout_height="wrap_content"
        android:id="@+id/pull_to_refresh_one_test"
        >

    </com.handmark.pulltorefresh.library.PullToRefreshListView>

</LinearLayout>
package com.example.zking_advancedcontrol_eight;
import android.os.AsyncTask;
import android.os.Bundle;
import android.support.annotation.Nullable;
import android.support.v7.app.AppCompatActivity;
import android.widget.ArrayAdapter;
import android.widget.ListView;
import android.widget.Toast;
import com.handmark.pulltorefresh.library.PullToRefreshBase;
import com.handmark.pulltorefresh.library.PullToRefreshListView;
import java.util.LinkedList;
import java.util.List;
/**
* Created by Administrator on 2017/6/15.
*/
public class PullToRefresh_Test extends AppCompatActivity {
private ArrayAdapter adapter;
private List<String> lis;
private PullToRefreshListView pullToRefreshListView;
@Override
protected void onCreate(@Nullable Bundle savedInstanceState) {
super.onCreate(savedInstanceState);
setContentView(R.layout.pulltorefresh_one);
lis = new LinkedList<String>();
for (int i = 0; i <10 ; i++) {
lis.add("one"+i);
}
pullToRefreshListView = (PullToRefreshListView) findViewById(R.id.pull_to_refresh_one_test);
adapter = new ArrayAdapter(PullToRefresh_Test.this,android.R.layout.simple_list_item_1, lis);
pullToRefreshListView.setAdapter(adapter);
//监听事件
pullToRefreshListView.setOnRefreshListener(new PullToRefreshBase.OnRefreshListener2<ListView>() {
@Override
public void onPullDownToRefresh(PullToRefreshBase<ListView> refreshView) {//下拉事件
Toast.makeText(PullToRefresh_Test.this, "下拉", Toast.LENGTH_SHORT).show();
new MyAsh().execute();
}
@Override
public void onPullUpToRefresh(PullToRefreshBase<ListView> refreshView) {//上啦事件
Toast.makeText(PullToRefresh_Test.this, "上啦", Toast.LENGTH_SHORT).show();
}
});
}
//建立一个内部类,异步任务
class MyAsh extends AsyncTask{
@Override //后台获取数据,内部有现成机制,故此可以直接写操作
protected Object doInBackground(Object[] params) {
for (int i = 0; i <3 ; i++) {
lis.add(0,"测试吗"+i);
}
return null;
}
@Override //更新UI
protected void onPostExecute(Object o) {
super.onPostExecute(o);
//通知,设配器,已经更新完数据
adapter.notifyDataSetChanged();
//关闭刷新,通PulltoRefresh 已经刷新完成
pullToRefreshListView.onRefreshComplete();
}
}
}
适配器
什么是适配器
它是数据与视图之间的桥梁,把数据装换成视图然后再显示,它可以吧,复杂的东西,按照人能接受的方式展示出来,我们常使用的Adapter有:ArrayAdapter、SimpleAdapter、SimpleCursorAdapter这三个,它们都是继承于BaseAdapter这个类。
SimpleAdapter、高级组件冲突解决方式
使用系统提供xml(模板)
xml
<?xml version="1.0" encoding="utf-8"?>
<LinearLayout
    xmlns:android="http://schemas.android.com/apk/res/android"
    xmlns:app="http://schemas.android.com/apk/res-auto"
    xmlns:tools="http://schemas.android.com/tools"
    android:layout_width="match_parent"
    android:layout_height="match_parent"
    tools:context="com.example.zking_advancedcontrol_eight.MainActivity">

    <ListView  <!--就一个简单的ListView-->
        android:layout_width="match_parent"
        android:layout_height="wrap_content"
        android:id="@+id/lv_main_lvone"
        >

    </ListView>


</LinearLayout>
package com.example.zking_advancedcontrol_eight;

import android.support.v7.app.AppCompatActivity;
import android.os.Bundle;
import android.view.View;
import android.widget.AdapterView;
import android.widget.ListView;
import android.widget.SimpleAdapter;
import android.widget.Toast;

import java.util.LinkedList;
import java.util.List;
import java.util.Map;
import java.util.TreeMap;

public class MainActivity extends AppCompatActivity {


    private String[] textview;

    @Override
    protected void onCreate(Bundle savedInstanceState) {
        super.onCreate(savedInstanceState);
        setContentView(R.layout.activity_main);

        //ListView组件  使用SimpleAdapter适配器,加系统的xml(模板)、自己编写的(模板)分别实现


        //模拟一组数据

        //图片数组
        int imgeview[]={R.drawable.bird,R.drawable.cat,R.drawable.chicken,R.drawable.cow,
                R.drawable.dog,R.drawable.dragon,R.drawable.duck,R.drawable.elephant,
                R.drawable.fish,R.drawable.fox};
        //子元素 组,与图片组长度对应
        textview = new String[]{"小鸟","黄猫","金鸡","灰牛","斑狗","绿龙","黄鸭","蓝象","淡粉鱼","淫狐"};

        //建立SimpleAdapter 的参数二List集合
        List<Map<String,Object>> list=new LinkedList<Map<String,Object>>() ;

        //生产Map 集合
        for (int i = 0; i< textview.length; i++) {  //遍历,子元素 数组
            Map<String, Object> map = new TreeMap<String,Object>();
            //产生,与Textview数组长度相同个map
            //每个map内放一个 键值,一个 值
            map.put("Image",imgeview[i]);
            map.put("Textview", textview[i]);
            list.add(map);
        }


        //取到ListView
        ListView listView= (ListView) findViewById(R.id.lv_main_lvone);


       //参数一 需要本类的上下文,MainActivity.this 或者 getApplicationContext()(应用程序的上下文)  都是,上下文
       //参数二 list集合,数据
        //参数三  xml  (数据模板)  android.R.layout.activity_list_item(系统提供的,一个图片,一个文本)  ,这里也可以用自己写的,但是也只能是一个图片,一个文本!!
        //参数四  放list集合中,每一个map的键值,
        //参数五  放入,组件的顺序,要和参数四对应,例如我这个,先是图片,再是 text 故此,xml顺序为(系统的),android.R.id.icon,android.R.id.text1
        SimpleAdapter simpleAdapter=new SimpleAdapter(getApplicationContext(),list,android.R.layout.activity_list_item,new String[]{"Image","Textview"},new int[]{android.R.id.icon,android.R.id.text1});
        listView.setAdapter(simpleAdapter);


        listView.setOnItemClickListener(new AdapterView.OnItemClickListener() {
            @Override
            public void onItemClick(AdapterView<?> parent, View view, int position, long id) {
                //position  为,该行所在下标
                Toast.makeText(MainActivity.this, "点击了"+ textview[position], Toast.LENGTH_SHORT).show();
            }
        });

    }


}
使用自定义的xml(模板)
主线显示xml文件不变了,
新增一个xml模板simpledapter.xml
xml
<?xml version="1.0" encoding="utf-8"?>
<LinearLayout
    xmlns:android="http://schemas.android.com/apk/res/android"
    android:orientation="horizontal"
    android:layout_width="match_parent"
    android:layout_height="wrap_content"

 //**设定区域组件可以存在多个,互补烦扰,解决控件冲突问题**
    android:descendantFocusability="blocksDescendants"
    >

    <ImageView
        android:layout_width="70dip"
        android:layout_height="70dip"
        android:src="@drawable/bird"
        android:id="@+id/iv_text_image"
        />

    <TextView
        android:layout_width="0dp"
        android:layout_height="wrap_content"
        android:text="鸟"
        android:layout_weight="1"
        android:id="@+id/tv_text_xieru"
        />

    <Button
        android:layout_width="wrap_content"
        android:layout_height="wrap_content"
        android:id="@+id/bt_text_low"

        android:text="下载"
        />


</LinearLayout>
JAVA
package com.example.zking_advancedcontrol_eight;

import android.support.v7.app.AppCompatActivity;
import android.os.Bundle;
import android.view.View;
import android.widget.AdapterView;
import android.widget.ListView;
import android.widget.SimpleAdapter;
import android.widget.Toast;

import java.util.LinkedList;
import java.util.List;
import java.util.Map;
import java.util.TreeMap;

public class MainActivity extends AppCompatActivity {


    private String[] textview;

    @Override
    protected void onCreate(Bundle savedInstanceState) {
        super.onCreate(savedInstanceState);
        setContentView(R.layout.activity_main);

        //ListView组件  使用SimpleAdapter适配器,加系统的xml(模板)、自己编写的(模板)分别实现


        //模拟一组数据

        //图片数组
        int imgeview[]={R.drawable.bird,R.drawable.cat,R.drawable.chicken,R.drawable.cow,
                R.drawable.dog,R.drawable.dragon,R.drawable.duck,R.drawable.elephant,
                R.drawable.fish,R.drawable.fox};
        //子元素 组,与图片组长度对应
        textview = new String[]{"小鸟","黄猫","金鸡","灰牛","斑狗","绿龙","黄鸭","蓝象","淡粉鱼","淫狐"};

        //建立SimpleAdapter 的参数二List集合
        List<Map<String,Object>> list=new LinkedList<Map<String,Object>>() ;

        //生产Map 集合
        for (int i = 0; i< textview.length; i++) {  //遍历,子元素 数组
            Map<String, Object> map = new TreeMap<String,Object>();
            //产生,与Textview数组长度相同个map
            //每个map内放一个 键值,一个 值
            map.put("Image",imgeview[i]);
            map.put("Textview", textview[i]);

            list.add(map);
        }


        //取到ListView
        ListView listView= (ListView) findViewById(R.id.lv_main_lvone);


       //参数一 需要本类的上下文,MainActivity.this 或者 getApplicationContext()(应用程序的上下文)  都是,上下文
       //参数二 list集合,数据
        //参数三  xml  (数据模板)  R.layout.simpledapter_text自己写的,但是也只能是一个图片,一个文本!!
        //参数四  放list集合中,每一个map的键值,
        //参数五  放入,组件的顺序,要和参数四对应,例如我这个,先是图片,再是 text 故此,xml顺序为(系统的),android.R.id.icon,android.R.id.text1
        SimpleAdapter simpleAdapter=new SimpleAdapter(getApplicationContext(),list,R.layout.simpledapter_text,new String[]{"Image","Textview"},new int[]{R.id.iv_text_image,R.id.tv_text_xieru});
        listView.setAdapter(simpleAdapter);


        listView.setOnItemClickListener(new AdapterView.OnItemClickListener() {
            @Override
            public void onItemClick(AdapterView<?> parent, View view, int position, long id) {
                //position  为,该行所在下标
                Toast.makeText(MainActivity.this, "点击了"+ textview[position], Toast.LENGTH_SHORT).show();
            }
        });

    }


}
Listview、重写BaseAdapter适配器实现优化
为何优化
如果,相同样式的数据出现多次,会对程序出现卡顿,甚至内存溢出,就是数据超出内存啦
优化步骤
- 第一步建立一个类继承BaseAdapter
- 重写方法
- 重写getview方法重点
- 重写方法的时候,建立一个辅助优化类,拥有属性为你需要优化哪些组件的属性。
主展示xml和模板xml还是刚才那二个
优化JAVA代码
package com.example.zking_advancedcontrol_eight;

import android.support.v7.app.AppCompatActivity;
import android.os.Bundle;
import android.view.LayoutInflater;
import android.view.View;
import android.view.ViewGroup;
import android.widget.AdapterView;
import android.widget.BaseAdapter;
import android.widget.Button;
import android.widget.ImageView;
import android.widget.ListView;
import android.widget.SimpleAdapter;
import android.widget.TextView;
import android.widget.Toast;

import java.util.LinkedList;
import java.util.List;
import java.util.Map;
import java.util.TreeMap;

public class MainActivity extends AppCompatActivity {


    private String[] textview;
    private List<Map<String, Object>> list;
    private int[] imgeview;

    @Override
    protected void onCreate(Bundle savedInstanceState) {
        super.onCreate(savedInstanceState);
        setContentView(R.layout.activity_main);

        //ListView组件  使用SimpleAdapter适配器,加系统的xml(模板)、自己编写的(模板)分别实现


        //模拟一组数据

        //图片数组
        imgeview = new int[]{R.drawable.bird,R.drawable.cat,R.drawable.chicken,R.drawable.cow,
                R.drawable.dog,R.drawable.dragon,R.drawable.duck,R.drawable.elephant,
                R.drawable.fish,R.drawable.fox};
        //子元素 组,与图片组长度对应
        textview = new String[]{"小鸟","黄猫","金鸡","灰牛","斑狗","绿龙","黄鸭","蓝象","淡粉鱼","淫狐"};

        //建立SimpleAdapter 的参数二List集合
        list = new LinkedList<Map<String,Object>>();

        //生产Map 集合
        for (int i = 0; i< textview.length; i++) {  //遍历,子元素 数组
            Map<String, Object> map = new TreeMap<String,Object>();
            //产生,与Textview数组长度相同个map
            //每个map内放一个 键值,一个 值
            map.put("Image", imgeview[i]);
            map.put("Textview", textview[i]);

            list.add(map);
        }


        //取到ListView
        ListView listView= (ListView) findViewById(R.id.lv_main_lvone);


        MyaAdapter myaAdapter=new MyaAdapter();  //新建自定义的适配器
        listView.setAdapter(myaAdapter); //把自定义的监听对象设置给Listview


        listView.setOnItemClickListener(new AdapterView.OnItemClickListener() {
            @Override
            public void onItemClick(AdapterView<?> parent, View view, int position, long id) {
                //position  为,该行所在下标
                Toast.makeText(MainActivity.this, "点击了"+ textview[position], Toast.LENGTH_SHORT).show();
            }
        });

    }


    //建立一个类继承BaseAdapter 重写它的方法

    class MyaAdapter extends BaseAdapter {

        @Override
        public int getCount() {  //一共需要处理的条数,就是显示在屏幕中的行的个数
            return list.size();
        }

        @Override
        public Object getItem(int position) {//position 本行所在下标,返回本下标的这行
            return list.get(position);
        }

        @Override
        public long getItemId(int position) {//取每一行的id  这个方法,数据有多少行就会调用多少次
            return position;
        }

        @Override
        public View getView(int position, View convertView, ViewGroup parent) {//得到行 ,数据有多少行就会调用多少次
            Optimize optimize=new Optimize();
            if(convertView==null){
                //为每一行数据,设定xml模板,
                // LayoutInflater.from(MainActivity.this)  为这个xml文件的数据设置模板
                // 参数一是,自定义的模板(xml),参数二是,取父布局xml,但是目前用不上

把xml模板转换成view                convertView=LayoutInflater.from(MainActivity.this).inflate(R.layout.simpledapter_text,null);
                //在这个simpledapter_text  模板内通过ID找到 iv_text_image  组件,然后放入化类的,图片属性中
                //其他几个属性,也是如此,取出
                optimize.imageView= (ImageView) convertView.findViewById(R.id.iv_text_image);
                //给每一行的图片组件设置 图片
                optimize.imageView.setImageResource(imgeview[position]);
                optimize.textView= (TextView) convertView.findViewById(R.id.tv_text_xieru);
                //给每一行的文本显示组件设置 文字
                optimize.textView.setText(textview[position]);

                optimize.button= (Button) convertView.findViewById(R.id.bt_text_low);

                convertView.setTag(optimize);//把优化对象,放入 convertView 内先存起来
            }else{//当之前已经存在的组件,故此我们不用新建,直接取出原来的既可以使用
                //取出,此前处于优化类里面的组件
                optimize= (Optimize) convertView.getTag();  //因为,我们知道,放入的是个对象,故此,把类型装换过来
                //给每一行的图片组件设置 图片
                optimize.imageView.setImageResource(imgeview[position]);
                //给每一行的文本显示组件设置 文字   ,
                // 自定义的适配器的数据,我没用传入数据,而是直接使用的全局变量,
                //传入的数据,取值方法 文本的取值 (CharSequence)getItem(position)

                optimize.textView.setText(textview[position]);
            }
            return convertView;
        }


    }


    //建立一个类,我就直接用的内部类
    class Optimize {
        public Optimize(){}
        //需要优化哪些组件,就建立哪些类型的组件属性
        public ImageView imageView;
        public TextView textView;
        public Button button;
    }


}


 6140
6140


 被折叠的 条评论
为什么被折叠?
被折叠的 条评论
为什么被折叠?
 到【灌水乐园】发言


