


先看一种效果
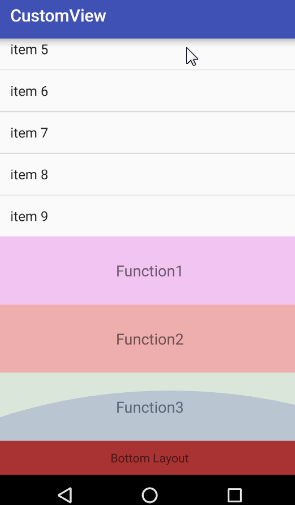
看上去这种布局效果,不需要嵌套ScrollView也可以实现,我知道的还有另外两种方式。
1:最外层一个LinearLayout布局,属性垂直,内含两个子View,一个是上面滑动的部分P1,一个是底部固定的部分P2。使用layout_weight分配高度权重,P2给一个固定高度,P1 ayout_weight指定为1占满剩余空间。然后P1是一个ListView,分别使用addHeadView和addFooterView添加头部和尾部的布局即可。
2:使用getItemViewType,如果不嫌麻烦。
3:使用ScrollView嵌套ListView
虽然这个案例使用方法1可以实现了,但是如果稍微麻烦一点,比如实现下面这种有两个ListView的效果。
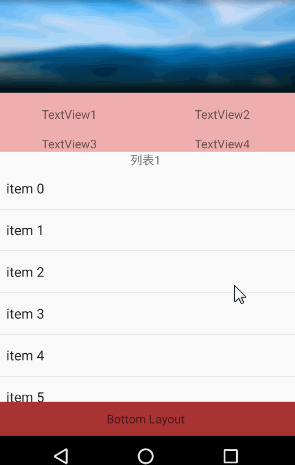
这里有两个ListView,你可能和我一样,会想到把其中一个ListView加到另一个ListView的HeaderView里面,按1里面说的那样。
如果这样做,个人感觉不是很舒服,我也没试过,最后使用方法3实现。
下面把代码贴出来,没什么技巧性,只是有几个需要注意的地方。
- Sample4Activity
public class Sample4Activity extends AppCompatActivity {

    private ListView mListView1, mListView2;

    @Override
    protected void onCreate(Bundle savedInstanceState) {
        super.onCreate(savedInstanceState);
        setContentView(R.layout.activity_sample4);

        mListView1 = (ListView) findViewById(R.id.list1);
        mListView1.setAdapter(new ArrayAdapter<>(this, android.R.layout.simple_list_item_1, getData()));

        mListView2 = (ListView) findViewById(R.id.list2);
        mListView2.setAdapter(new ArrayAdapter<>(this, android.R.layout.simple_list_item_1, getData()));
    }

    private String[] getData() {
        String[] data = new String[10];
        for (int i = 0; i < data.length; i++) {
            data[i] = "item " + i;
        }
        return data;
    }
}- R.layout.activity_sample4
<?xml version="1.0" encoding="utf-8"?>
<LinearLayout xmlns:android="http://schemas.android.com/apk/res/android"
    xmlns:tools="http://schemas.android.com/tools"
    android:layout_width="match_parent"
    android:layout_height="match_parent"
    android:orientation="vertical">

    <ScrollView
        android:layout_width="match_parent"
        android:layout_height="0dp"
        android:layout_weight="1">

        <LinearLayout
            android:layout_width="match_parent"
            android:layout_height="wrap_content"
            android:focusable="true"
            android:focusableInTouchMode="true"
            android:orientation="vertical"
            tools:context="com.lxq.customview.Sample4Activity">

            <ImageView
                android:layout_width="match_parent"
                android:layout_height="150dp"
                android:scaleType="fitXY"
                android:src="@drawable/banner" />

            <LinearLayout
                android:layout_width="match_parent"
                android:layout_height="wrap_content"
                android:background="#eeaa"
                android:orientation="vertical">

                <LinearLayout
                    android:layout_width="match_parent"
                    android:layout_height="50dp"
                    android:orientation="horizontal">

                    <TextView
                        android:layout_width="0dp"
                        android:layout_height="match_parent"
                        android:layout_weight="1"
                        android:gravity="center"
                        android:text="TextView1" />

                    <TextView
                        android:layout_width="0dp"
                        android:layout_height="match_parent"
                        android:layout_weight="1"
                        android:gravity="center"
                        android:text="TextView2" />
                </LinearLayout>

                <LinearLayout
                    android:layout_width="match_parent"
                    android:layout_height="50dp"
                    android:orientation="horizontal">

                    <TextView
                        android:layout_width="0dp"
                        android:layout_height="match_parent"
                        android:layout_weight="1"
                        android:gravity="center"
                        android:text="TextView3" />

                    <TextView
                        android:layout_width="0dp"
                        android:layout_height="match_parent"
                        android:layout_weight="1"
                        android:gravity="center"
                        android:text="TextView4" />

                </LinearLayout>
            </LinearLayout>

            <TextView
                android:layout_width="match_parent"
                android:layout_height="wrap_content"
                android:gravity="center"
                android:text="列表1" />

            <com.lxq.customview.sample4.MyListView
                android:id="@+id/list1"
                android:layout_width="match_parent"
                android:layout_height="wrap_content" />

            <TextView
                android:layout_width="match_parent"
                android:layout_height="wrap_content"
                android:gravity="center"
                android:text="列表2" />

            <com.lxq.customview.sample4.MyListView
                android:id="@+id/list2"
                android:layout_width="match_parent"
                android:layout_height="wrap_content" />

            <TextView
                android:layout_width="match_parent"
                android:layout_height="80dp"
                android:layout_weight="1"
                android:background="#aeae"
                android:gravity="center"
                android:text="Function1"
                android:textSize="18sp" />

            <TextView
                android:layout_width="match_parent"
                android:layout_height="80dp"
                android:layout_weight="1"
                android:background="#eeaa"
                android:gravity="center"
                android:text="Function2"
                android:textSize="18sp" />

            <TextView
                android:layout_width="match_parent"
                android:layout_height="80dp"
                android:layout_weight="1"
                android:background="#acdc"
                android:gravity="center"
                android:text="Function3"
                android:textSize="18sp" />

        </LinearLayout>
    </ScrollView>

    <TextView
        android:layout_width="match_parent"
        android:layout_height="40dp"
        android:background="#a33"
        android:gravity="center"
        android:text="Bottom Layout" />
</LinearLayout>- MyListView
public class MyListView extends ListView {

    public MyListView(Context context, AttributeSet attrs, int defStyle) {
        super(context, attrs, defStyle);
    }

    public MyListView(Context context, AttributeSet attrs) {
        super(context, attrs);
    }

    @Override
    protected void onMeasure(int widthMeasureSpec, int heightMeasureSpec) {
        int expandSpec = MeasureSpec.makeMeasureSpec(Integer.MAX_VALUE >> 2, MeasureSpec.AT_MOST);
        super.onMeasure(widthMeasureSpec, expandSpec);
    }
}
需要注意的地方:
MyListView
解决ListView嵌套ScrollView只显示一行,不能显示完整的问题。实现原理参考:http://blog.csdn.net/hanhailong726188/article/details/46136569android:focusable=”true” 和 android:focusableInTouchMode=”true”
在ScrollView第一个子控件LinearLayout的属性设置了以上两个属性,如果不设置,当进入该页面时,会自动滑到ListView的第一行,可以删除这两行代码看下效果。具体原因没深究。
另外在项目开发中还遇到一个关于ScrollView的属性 : android:fillViewport=”true”。
这个属性是何用途,下面举个例子。
<?xml version="1.0" encoding="utf-8"?>
<LinearLayout xmlns:android="http://schemas.android.com/apk/res/android"
    xmlns:tools="http://schemas.android.com/tools"
    android:layout_width="match_parent"
    android:layout_height="match_parent"
    android:orientation="vertical">

    <ScrollView
        android:layout_width="match_parent"
        android:layout_height="460dp"
        android:fillViewport="true">

        <TextView
            android:layout_width="match_parent"
            android:layout_height="match_parent"
            android:background="#bb3"
            android:text="占满ScrollView空间"
            android:textSize="16sp" />
    </ScrollView>

    <TextView
        android:layout_width="match_parent"
        android:layout_height="0dp"
        android:layout_weight="1"
        android:background="#a33"
        android:gravity="center"
        android:text="Bottom Layout" />
</LinearLayout>
TextView想占满ScrollView的整个空间,看上去代码是没问题的,但是效果确实这样:

现在在ScrollView标签中添加属性:android:fillViewport=”true” 再看效果:
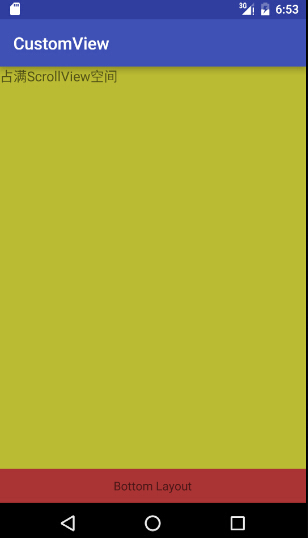
android:fillViewport=”true” 官方解释:
/**
 * When set to true, the scroll view measure its child to make it fill the currently
 * visible area.
 */
@ViewDebug.ExportedProperty(category = "layout")
private boolean mFillViewport;
当设置为真时,滚动视图测量它的子视图,使其填充当前可见的区域。


 665
665


 被折叠的 条评论
为什么被折叠?
被折叠的 条评论
为什么被折叠?
 到【灌水乐园】发言


