


Elasticsearch with Search-Guard定时删除旧索引
目录:
1、JAVA源码及pom文件:
2、具体测试:
说明:在ELK流程下,每一类日志每天产生一个索引,长期来看,索引数会越来越多。但是Elasticsearch使用了Search Guard插件,CURL的方式需要相应的证书转换为pem才能够进行连接。因此,本文通过TransportClient实现定期删除Elasticsearch中100天以前的旧索引。
1、JAVA源码及pom文件:
(1)IndexProcess.java:
package com.remoa;

import com.floragunn.searchguard.ssl.SearchGuardSSLPlugin;
import com.floragunn.searchguard.ssl.util.SSLConfigConstants;
import org.elasticsearch.action.admin.indices.delete.DeleteIndexRequest;
import org.elasticsearch.client.AdminClient;
import org.elasticsearch.client.transport.TransportClient;
import org.elasticsearch.common.settings.Settings;
import org.elasticsearch.common.transport.InetSocketTransportAddress;
import org.elasticsearch.transport.client.PreBuiltTransportClient;

import java.net.InetAddress;
import java.util.ArrayList;
import java.util.Calendar;
import java.util.Iterator;
import java.util.List;

/**
 * This class is used to delete old index more than 100 days in elasticsearch.
 * @author remoa
 * @since 2017.09.14
 */
public class IndexProcess {
    private TransportClient client;
    private AdminClient adminClient;
    public static final int DATE_NUMBER = -100;

    /**
     * 构造方法,提供连接Elasticsearch的相关参数并使用传输客户端TransportClient连接到Elasticsearch集群
     * @param keystorePath KeyStore签名证书位置
     * @param truststorePath Truststore签名证书位置
     * @param keypwd KeyStore签名证书密码
     * @param trustpwd Truststore签名证书密码
     * @param esHost Elasticsearch集群服务器
     * @param esClusterName Elasticsearch集群名称
     * @throws Throwable 异常不单独处理了,直接在方法中抛出
     */
    public IndexProcess(String keystorePath, String truststorePath, String keypwd, String trustpwd, String
            esHost, String esClusterName) throws Throwable{
        Settings settings = Settings.builder()
                //ES集群名称
                .put("cluster.name", esClusterName)
                .put("searchguard.ssl.transport.enabled", true)
                //私钥证书位置
                .put(SSLConfigConstants.SEARCHGUARD_SSL_TRANSPORT_KEYSTORE_FILEPATH, keystorePath)
                //公钥证书位置
                .put(SSLConfigConstants.SEARCHGUARD_SSL_TRANSPORT_TRUSTSTORE_FILEPATH, truststorePath)
                //keystore一般保存我们的私钥,用来加密解密或者为别人做签名。
                .put(SSLConfigConstants.SEARCHGUARD_SSL_TRANSPORT_KEYSTORE_PASSWORD, keypwd)
                //truststore里存放的是只包含公钥的数字证书。
                .put(SSLConfigConstants.SEARCHGUARD_SSL_TRANSPORT_TRUSTSTORE_PASSWORD, trustpwd)
                .put(SSLConfigConstants.SEARCHGUARD_SSL_TRANSPORT_ENFORCE_HOSTNAME_VERIFICATION, false)
                .put("path.home", ".")
                //使得客户端去嗅探整个集群的状态,把集群中其它机器的IP地址加到客户端中,设置为true则不用手动设置集群里所有机器的IP连接到客户端,它会自动帮助添加,并自动发现新加入集群的机器。
                .put("client.transport.sniff", true)
                .build();
        client = new PreBuiltTransportClient(settings, SearchGuardSSLPlugin.class)
                .addTransportAddress(new InetSocketTransportAddress(InetAddress.getByName(esHost), 9301))
                .addTransportAddress(new InetSocketTransportAddress(InetAddress.getByName(esHost), 9300));
        adminClient = client.admin();
    }

    /**
     * 根据索引名删除索引
     * @param index 索引名
     */
    public void deleteIndex(String index){
        adminClient.indices().
                delete(new DeleteIndexRequest(index)).
                actionGet();
    }

    /**
     * 得到全部索引
     * @return 返回List封装的全部索引的名字
     */
    public List<String> getIndex(){
        List<String> list = new ArrayList<String>();
        String [] indices = adminClient.indices()
                .prepareGetIndex()
                .setFeatures()
                .get()
                .getIndices();
        for(int i = 0; i < indices.length; i++){
            list.add(indices[i]);
        }
        return list;
    }

    /**
     * 得到过滤的关键字,即xxxx.xx.xx(年月日字符串),这里设置为100天
     * @return 过滤关键字
     */
    public String getKeyword(){
        Calendar calendar = Calendar.getInstance();
        calendar.add(Calendar.DATE, DATE_NUMBER);
        String year = String.valueOf(calendar.get(Calendar.YEAR));
        String month = String.valueOf(calendar.get(Calendar.MONTH) + 1);
        String day = String.valueOf(calendar.get(Calendar.DATE));
        if(month.length() == 1){
            month = "0" + month;
        }
        if(day.length() == 1){
            day = "0" + day;
        }
        String keyword = year + "." + month + "." + day;
        return keyword;
    }

    /**
     * 删除所有的超期的旧索引
     * @param list 索引列表
     * @param keyword 过滤关键字
     */
    public void deleteOldIndex(List<String> list, String keyword){
        int count = 0;
        for(Iterator<String> iter = list.iterator(); iter.hasNext(); ){
            String str = iter.next();
            //索引名称字段长度比10小的话就不作为删除对象了
            if(str.length() > 10){
                String dateStr = str.substring(str.length() - 10 ,str.length());//取出索引名称字段的结尾字段
                //索引名称字段最后不是以日期结尾的话也不作为删除对象
                String patternStr = "^[0-9]{4}\\.[0-9]{2}\\.[0-9]{2}$";
                if(dateStr.matches(patternStr)){
                    if(str.substring(str.length() - 10 ,str.length()).compareTo(keyword) < 0){
                        System.out.println("index: " + str + " is deleted");
                        this.deleteIndex(str);
                        count++;
                    }
                }
            }
        }
        System.out.println("The total delete index is: " + count);
    }

}
(2)Main.java:
package com.remoa;

import java.util.List;

/**
 * The main class is used to run deletion.
 * @author remoa
 * @since 2017.09.14
 */
public class Main {
    public static void main(String[] args) throws Throwable{
        //java -cp:和-classpath一样,是指定类运行所依赖其他类的路径,通常是类库,jar包之类,需要全路径到jar包
        if(args.length != 6) {
            //进行提示
            System.out.println("Usage: java -cp indexTest-1.0-SNAPSHOT-jar-with-dependencies.jar com.remoa.Main " +
                    "[keystorePath] [truststorePath] [keypassword]" +
                    " [trustpassword] [elasticsearch Host] [elasticsearch cluster name]");
        }else{
            IndexProcess indexProcess = new IndexProcess(args[0], args[1], args[2], args[3], args[4], args[5]);
            List<String> list = indexProcess.getIndex();
            String keyword = indexProcess.getKeyword();
            indexProcess.deleteOldIndex(list, keyword);
        }
    }

}
(3)pom文件:
<?xml version="1.0" encoding="UTF-8"?>
<project xmlns="http://maven.apache.org/POM/4.0.0"
         xmlns:xsi="http://www.w3.org/2001/XMLSchema-instance"
         xsi:schemaLocation="http://maven.apache.org/POM/4.0.0 http://maven.apache.org/xsd/maven-4.0.0.xsd">
    <modelVersion>4.0.0</modelVersion>
    <groupId>com.remoa</groupId>
    <artifactId>indexTest</artifactId>
    <version>1.0-SNAPSHOT</version>
    <build>
        <finalName>indexTest</finalName>
        <!-- 默认源代码和资源文件目录配置 -->
        <sourceDirectory>src/main/java </sourceDirectory>
        <testSourceDirectory>src/test/java</testSourceDirectory>
        <resources>
            <resource>
                <directory>src/main/resources</directory>
            </resource>
        </resources>
        <testResources>
            <testResource>
                <directory>src/test/resources</directory>
            </testResource>
        </testResources>
        <plugins>
            <!-- 编译插件,处理maven项目管理因为版本不一致导致编译不通过的问题 -->
            <plugin>
                <artifactId>maven-compiler-plugin</artifactId>
                <version>3.3</version>
                <configuration>
                    <!-- 源代码使用的开发版本 -->
                    <source>1.8</source>
                    <!-- 需要生成的目标class文件的编译版本 -->
                    <target>1.8</target>
                </configuration>
            </plugin>
            <plugin>
                <!-- 将依赖的某个jar包内部的类或者资源include/exclude掉-->
                <!-- 通过maven-shade-plugin插件生成一个uber-jar,它包含所有的依赖jar包-->
                <groupId>org.apache.maven.plugins</groupId>
                <artifactId>maven-shade-plugin</artifactId>
                <version>2.4.3</version>
                <executions>
                    <execution>
                        <phase>package</phase>
                        <goals>
                            <goal>shade</goal>
                        </goals>
                        <configuration>
                            <transformers>
                                <transformer implementation="org.apache.maven.plugins.shade.resource.AppendingTransformer">
                                    <resource>reference.conf</resource>
                                </transformer>
                            </transformers>
                            <filters>
                                <filter>
                                    <artifact>*:*</artifact>
                                    <excludes>
                                        <exclude>META-INF/*.SF</exclude>
                                        <exclude>META-INF/*.DSA</exclude>
                                        <exclude>META-INF/*.RSA</exclude>
                                    </excludes>
                                </filter>
                            </filters>
                            <shadedArtifactAttached>true</shadedArtifactAttached>
                            <shadedClassifierName>jar-with-dependencies</shadedClassifierName>
                        </configuration>
                    </execution>
                </executions>
            </plugin>
        </plugins>
    </build>
    <dependencies>
        <!-- https://mvnrepository.com/artifact/org.elasticsearch/elasticsearch -->
        <dependency>
            <groupId>org.elasticsearch</groupId>
            <artifactId>elasticsearch</artifactId>
            <version>5.2.2</version>
        </dependency>
        <!-- Transport是一个Elasticsearch JAVA客户端,Elastic获取java clientAPI,一定要与需要操作的集群的版本是一致的。-->
        <!-- https://mvnrepository.com/artifact/org.elasticsearch.client/transport -->
        <dependency>
            <groupId>org.elasticsearch.client</groupId>
            <artifactId>transport</artifactId>
            <version>5.2.2</version>
        </dependency>
        <!-- https://mvnrepository.com/artifact/com.floragunn/search-guard-5 -->
        <dependency>
            <groupId>com.floragunn</groupId>
            <artifactId>search-guard-5</artifactId>
            <version>5.2.2-15</version>
        </dependency>
        <!-- https://mvnrepository.com/artifact/com.floragunn/search-guard-ssl -->
        <dependency>
            <groupId>com.floragunn</groupId>
            <artifactId>search-guard-ssl</artifactId>
            <version>5.2.2-22</version>
        </dependency>
        <!-- https://mvnrepository.com/artifact/log4j/log4j -->
        <dependency>
            <groupId>log4j</groupId>
            <artifactId>log4j</artifactId>
            <version>1.2.16</version>
        </dependency>
        <dependency>
            <groupId>org.apache.logging.log4j</groupId>
            <artifactId>log4j-api</artifactId>
            <version>2.7</version>
        </dependency>
        <dependency>
            <groupId>org.apache.logging.log4j</groupId>
            <artifactId>log4j-core</artifactId>
            <version>2.7</version>
        </dependency>
    </dependencies>
</project>
(4)TransportClient的官网描述:
The TransportClient connects remotely to an Elasticsearch cluster using the transport module. It does not join the cluster, but simply gets one or more initial transport addresses and communicates with them in round robin fashion on each action (though most actions will probably be "two hop" operations).
翻译:传输客户端使用传输模块远程连接到Elasticsearch集群。它不加入集群,而是简单地获取一个或多个初始传输地址,并以循环方式与每个action进行通信(尽管大多数actions可能是“两跳”操作)。
2、具体测试:
(1)将Intellij的工程新建到gitlab仓库,然后从gitlab仓库中将工程传到服务器上。
具体操作:
①首先进入本地工程目录,使用git bash工具。
②git init
③git remote add origin http://git.datatub.com/remoa/indexTest.git
④git add .
⑤git commit
⑥git push -u origin master
⑦使用git bash通过ssh进入Linux主机,进入到要存放工程的目录
⑧git clone http://git.datatub.com/remoa/indexTest.git
⑨下载了工程后,使用mvn进行打包,mvn clean package -U
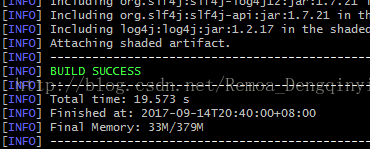
图2.1 截图1
(2)进入target目录:

图2.2 截图2
执行下列指令:
java -cp indexTest-1.0-SNAPSHOT-jar-with-dependencies.jar com.remoa.Main /root/xiangmin/keys/kdc1-keystore.jks /root/xiangmin/keys/truststore.jks [keypassword] [trustpassword] hdp1.example.com elk-example-cluster
出现报错:
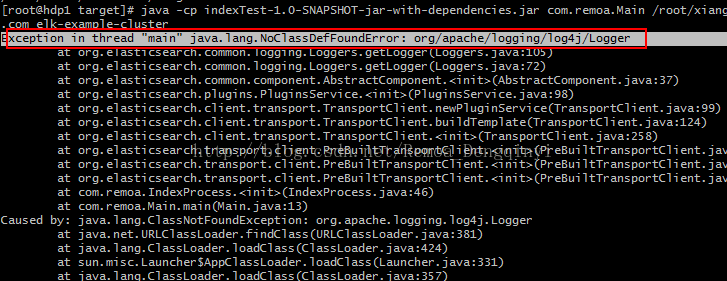
图2.3 截图3
解决方法:
①将maven的pom.xml文件中log4j配置修改为如下:
<!-- https://mvnrepository.com/artifact/log4j/log4j -->
        <dependency>
            <groupId>log4j</groupId>
            <artifactId>log4j</artifactId>
            <version>1.2.16</version>
        </dependency>

        <dependency>
            <groupId>org.apache.logging.log4j</groupId>
            <artifactId>log4j-api</artifactId>
            <version>2.7</version>
        </dependency>
        <dependency>
            <groupId>org.apache.logging.log4j</groupId>
            <artifactId>log4j-core</artifactId>
            <version>2.7</version>
        </dependency>
②将修改后的工程上传到git中
A)git add .将当前所有文件放入缓存区
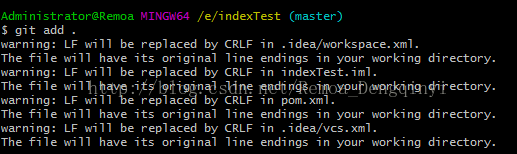
图2.4 截图4
B)git commit -m “update log4j configuration”进行提交
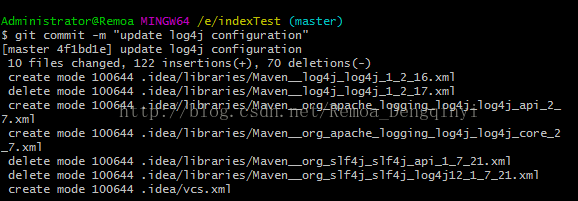
图2.5 截图5
C)git push提交本地文件:
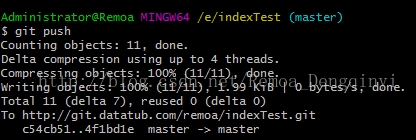
图2.6 截图6
D)在Linux服务器中使用命令git pull,从远程获取最新版本并merge到本地
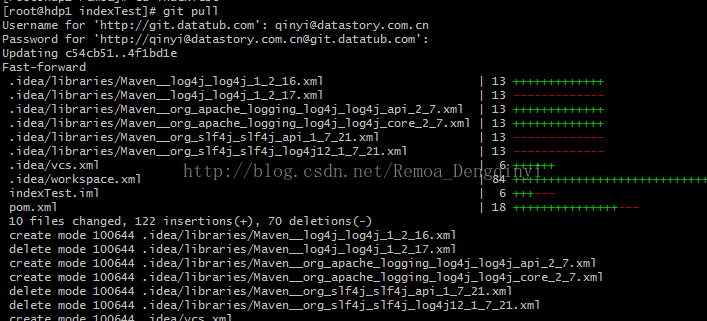
图2.7 截图7
E)下载好最新的项目后,使用mvn clean package -U,清理目标目录中的生成结果,并依据项目生成jar文件,在打包之前会进行编译、测试。
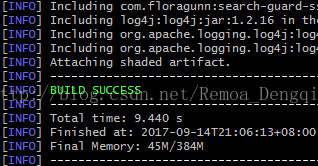
图2.8 截图8
(3)再重新运行jar包,运行成功:
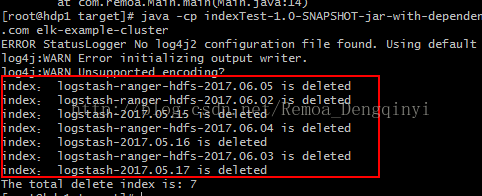
图2.9 截图9
(4)查看到Kibana中相应的100天前的索引都被删除了。
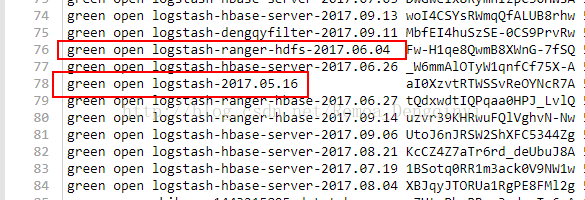
图2.10 截图10
(5)设置定时任务:
①编写脚本start_deleteindex.sh:
#!/bin/bash
source /etc/profile
source ~/.bash_profile
source /opt/package/logstash-5.2.2/reload_path.sh
java -cp /root/remoa/indexTest/target/indexTest-1.0-SNAPSHOT-jar-with-dependencies.jar com.remoa.Main /root/xiangmin/keys/kdc1-keystore.jks /root/xiangmin/keys/truststore.jks [密码1] [密码2] kdc1.example.com elk-example-cluster
②编写一个crontab.txt文本:
* * * * * source /root/remoa/indexTest/start_deleteindex.sh
③将文本加入定时任务:
crontab crontab.txt
④service crond restart重启服务:

图2.11 截图11
⑤ntsysv查看服务是否设为开机自启动:
查看到已设为开机自启。
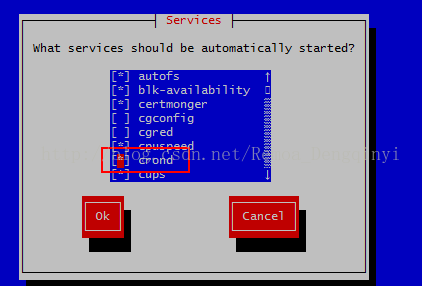
图2.12 截图12
(6)为了进行测试其自动运行,先对服务进行关闭

图2.13 截图13
(7)执行test.conf脚本,输入hello remoa进行测试
input{
        stdin{}
}

output{
        stdout{
                codec => rubydebug
        }
        elasticsearch{
                hosts => ["kdc1.example.com:9200","kdc2.example.com:9200"]
                user => logstash
                password => logstash
                action => "index"
                index => "logstash-remoa-2016.06.06"
                truststore => "/opt/package/logstash-5.2.2/config/keys/truststore.jks"
                truststore_password => whoami
                ssl => true
                ssl_certificate_verification => true
                codec => "json"
        }
}
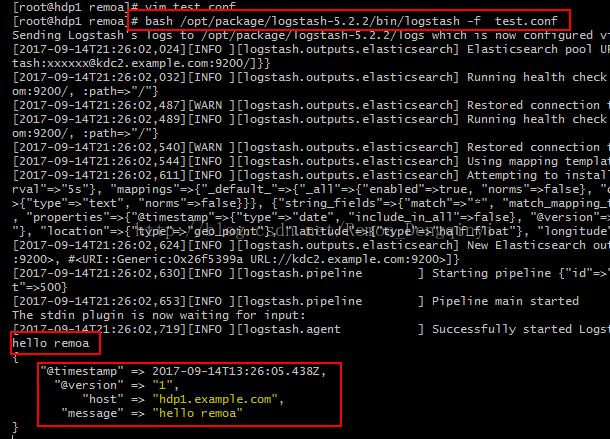
图2.14 截图14
(8)在Kibana中查看到相应索引。
GET _cat/indices

图2.15 截图15
(9)查看索引内容:
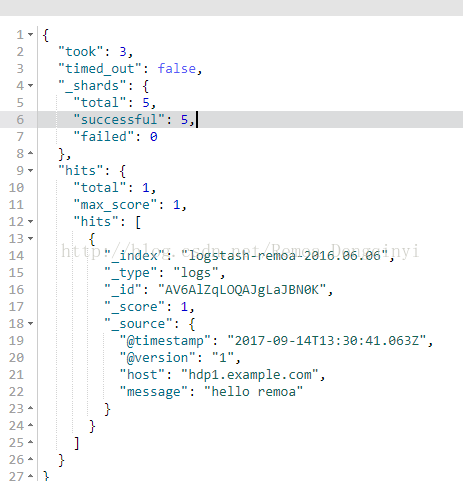
图2.16 截图16
(10)重新开启crond服务,定时任务为了测试方便,设置了每一分钟定时执行一次,因此静静等待一分钟:

图2.17 截图17
(11)一分钟后,在Kibana上发现该条索引已经被删除,测试完毕,定时删除Elasticsearch索引成功。
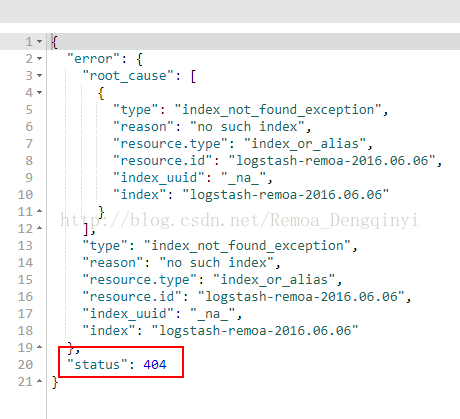
图2.18 截图18


 2033
2033


 被折叠的 条评论
为什么被折叠?
被折叠的 条评论
为什么被折叠?
 到【灌水乐园】发言


