


作者:Matthew Cochran December 12, 2005
原文地址:http://www.c-sharpcorner.com/UploadFile/rmcochran/MVC_intro12122005162329PM/MVC_intro.aspx?ArticleID=448db537-f236-497d-a16b-46c5d1141e3f
益处
在我们的开发项目中使用MVC(Model-View-Control)模式的益处是,可以完全降低业务层和应用表示层的相互影响。此外,我们会有完全独立的对象来操作表示层。MVC在我们项目中提供的这种对象和层之间的独立,将使我们的维护变得更简单使我们的代码重用变得很容易(下面你将看到)。
作为一般的习惯,我们知道我们希望保持最低的对象间的依赖,这样变化能够很容易的得到满足,而且我们可以重复使用我们辛辛苦苦写的代码。为了达到这个目的我们将遵循一般的原则“对接口编成,而不是对类”来使用MVC模式。
我们的使命,如果我们选择接受它...
我们被委任构建一个ACME 2000 Sports Car项目,我们的任务是做一个简单的Windows画面来显示汽车的方向和速度,使终端用户能够改变方向,加速或是减速。当然将会有范围的扩展。
在ACME已经有了传言,如果我们的项目成功,我们最终还要为ACME 2 Pickup Truck 和ACME 1 Tricycle开发一个相似的接口。作为开发人员,我们也知道ACME管理团队最终将问“这样是很棒的,我们能够在我们的intranet上看到它?”所有的这些浮现在脑海中,我们想交付一个产品,使它能够容易的升级以便能够保证将来我们能够有饭吃。
所以,同时我们决定“这是使用MVC的一个绝好情形”
我们的构架概要
好,现在我们知道我们要使用MVC,我们需要指出它的本质。通过我们的试验得出MVC的三个部分:Model,Control和View。在我们的系统中,Model就是我们的汽车,View就是我们的画面,Control将这两个部分联系起来。

为了改变Model(我们的ACME 2000 sports car),我们需要使用Control。我们的Control将会产生给Model(我们的ACME 2000 sports car)的请求,和更新View,View就是我们的画面(UI)。
这看起来很简单,但是这里产生了第一个要解决的问题:当终端用户想做一个对ACME 2000 sports car一个改变将会发生什么,比如说加速或是转向?他们将通过View(our windows form)用Control来提出一个变化的申请。

现在我们就剩下一个未解决问题了。如果View没有必要的信息来显示Model的状态怎么办?我们需要再在我们的图中加入一个箭头:View将能申请Model的状态以便得到它要显示的相关状态信息。

最后,我们的最终用户(司机)将会和我们的ACME Vehicle Control系统通过View来交互。如果他们想发出一个改变系统的申请,比如提高一点加速度,申请将会从View开始发出由Control处理。
Control将会向Model申请改变并将必要的变化反映在View上。比如,如果一个蛮横的司机对ACME 2000 Sports Car做了一个"floor it"申请,而现在行驶的太快不能转向,那么Control将会拒绝这个申请并在View中通知,这样就防止了在交通拥挤是发生悲惨的连环相撞。
Model (the ACME 2000 Sports Car) 将通知View 它的速度已经提高,而View也将做适当的更新。
综上,这就是我们将构建的概要:

开始:
作为总是想的远一点的开发人员,我们想让我们的系统有一个长久并且良好的生命周期。这就是说能够进可能的准备好满足ACME的很多变化。为了做到这一点,我们知道要遵循两条原则...“保证你的类低耦合”,要达到这个目标,还要“对接口编程”。
所以我们要做三个接口(正如你所猜测,一个Model接口,一个View接口,一个Control接口)。
经过很多调查研究,和与ACME人的费力咨询,我们得到了很多有关详细设计的信息。我们想确定我们可以设置的最大速度在前进,后退和转弯中。我们也需要能够加速,减速,左转和右转。我们的仪表盘必须显示当前的速度和方向。
实现所有这些需求是非常苛刻的,但是我们确信我们能够做到...
首先,我们考虑一下基本的项目。我们需要一些东西来表示方向和转动请求。我们做了两个枚举类型:AbsoluteDirection 和 RelativeDirection。
 public
enum AbsoluteDirection
public
enum AbsoluteDirection
 {
{ North=0, East, South, West
 }
public
enum RelativeDirection
{Right, Left, Back}
}
public
enum RelativeDirection
{Right, Left, Back}
下面来解决Control接口。我们知道Control需要将请求传递给Model,这些请求包括:Accelerate, Decelerate, 和 Turn。我们建立一个IVehicleControl接口,并加入适当的方法。
public
interface IVehicleControl
{void Accelerate(int paramAmount);void Decelerate(int paramAmount);void Turn(RelativeDirection paramDirection); }
现在我们来整理Model接口。我们需要知道汽车的名字,速度,最大速度,最大倒退速度,最大转弯速度和方向。我们也需要加速,减速,转弯的函数。
public
interface IVehicleModel
{ string Name{ get; set;}int Speed{ get; set;}int MaxSpeed{ get;}int MaxTurnSpeed{ get;}int MaxReverseSpeed { get;}AbsoluteDirection Direction{get; set;}void Turn(RelativeDirection paramDirection);void Accelerate(int paramAmount);void Decelerate(int paramAmount);}
最后,我们来整理View接口。我们知道View需要暴露出Control的一些机能,比如允许或禁止加速,减速和转弯申请。
public
interface IVehicleView
{void DisableAcceleration();void EnableAcceleration();void DisableDeceleration();void EnableDeceleration();void DisableTurning();void EnableTurning();}
现在我们需要做一些微调使我们的这些接口能够互相作用。首先,任何一个Control都需要知道它的View和Model,所以在我们的IvehicleControl接口中加入两个函数:"SetModel" 和"SetView":
public
interface IVehicleControl
{void RequestAccelerate(int paramAmount);void RequestDecelerate(int paramAmount);void RequestTurn(RelativeDirection paramDirection); void SetModel(IVehicleModel paramAuto);void SetView(IVehicleView paramView);}
下一个部分比较巧妙。我们希望View知道Model中的变化。为了达到这个目的,我们使用观察者模式。
为了实施观察者模式,我们需要将下面的函数加入到Model(被View观察):AddObserver, RemoveObserver, 和 NotifyObservers。
public
interface IVehicleModel
{string Name{ get; set;}int Speed{ get; set;}int MaxSpeed{ get;}int MaxTurnSpeed{ get;}int MaxReverseSpeed { get;}AbsoluteDirection Direction{get; set;}void Turn(RelativeDirection paramDirection);void Accelerate(int paramAmount);void Decelerate(int paramAmount);void AddObserver(IVehicleView paramView);void RemoveObserver(IVehicleView paramView);void NotifyObservers();}
...并且将下面的函数加入到View(被Model观察)中。这样做的目的是Model会有一个View的引用。当Model发生变化时,将会调用NotifyObservers()方法,传入一个对其自身的引用并调用Update()通知View这个变化。
public
class IVehicleView
{void DisableAcceleration();void EnableAcceleration();void DisableDeceleration();void EnableDeceleration();void DisableTurning();void EnableTurning();void Update(IVehicleModel paramModel);}
这样我们就将我们的接口联系起来了。在下面的代码中我们只需要引用我们这些接口,这样就保证了我们代码的低耦合。任何显示汽车状态的用户界面都需要实现IVehicleView,我们所有的ACME都需要实现IVehicleModel,并且我们需要为我们的ACME汽车制作Controls,这些Control将实现IVehicleControl接口。
下一步...在common中都需要什么
我们知道所有的汽车都做相同的动作,所以我们接下来做一个基于“骨架”的共有的代码来处理这些操作。这是一个抽象类,因为我们不希望任何人在“骨架”上开车(抽象类是不能被实例化的)。我们称其为Automobile。我们将用一个ArrayList (from System.Collections)来保持跟踪所有感兴趣的Views(记住观察者模式了吗?)。我们也可以用老式的数组来记录对IVehicleView的引用,但是现在我们已经很累了想快点结束这篇文章。如果你感兴趣,看一下在观察者模式中AddObserver, RemoveObserver, 和NotifyObservers,这些函数是怎样和IVehicleView互相作用的。任何时间当有速度或方向变化时,Automobile通知所有的IVehicleViews。
public
abstract
class Automobile: IVehicleModel
{#region "Declarations "private ArrayList aList = new ArrayList();private int mintSpeed = 0;private int mintMaxSpeed = 0;private int mintMaxTurnSpeed = 0;private int mintMaxReverseSpeed = 0;private AbsoluteDirection mDirection = AbsoluteDirection.North;private string mstrName = ""; #endregion#region "Constructor"public Automobile(int paramMaxSpeed, int paramMaxTurnSpeed, int paramMaxReverseSpeed, string paramName){this.mintMaxSpeed = paramMaxSpeed;this.mintMaxTurnSpeed = paramMaxTurnSpeed;this.mintMaxReverseSpeed = paramMaxReverseSpeed;this.mstrName = paramName;}#endregion#region "IVehicleModel Members"public void AddObserver(IVehicleView paramView){aList.Add(paramView);}public void RemoveObserver(IVehicleView paramView){aList.Remove(paramView);}public void NotifyObservers(){foreach(IVehicleView view in aList){view.Update(this);}}public string Name{get{return this.mstrName;}set{this.mstrName = value;}}public int Speed{get{return this.mintSpeed;}}public int MaxSpeed{get{return this.mintMaxSpeed;}}public int MaxTurnSpeed{get{return this.mintMaxTurnSpeed;}}public int MaxReverseSpeed{get{return this.mintMaxReverseSpeed;}}public AbsoluteDirection Direction{get{return this.mDirection;}}public void Turn(RelativeDirection paramDirection){AbsoluteDirection newDirection;switch(paramDirection){case RelativeDirection.Right:newDirection = (AbsoluteDirection)((int)(this.mDirection + 1) %4);break;case RelativeDirection.Left:newDirection = (AbsoluteDirection)((int)(this.mDirection + 3) %4);break;case RelativeDirection.Back:newDirection = (AbsoluteDirection)((int)(this.mDirection + 2) %4);break;default:newDirection = AbsoluteDirection.North;break;}this.mDirection = newDirection;this.NotifyObservers();}public void Accelerate(int paramAmount){this.mintSpeed += paramAmount;if(mintSpeed >= this.mintMaxSpeed) mintSpeed = mintMaxSpeed;this.NotifyObservers();}public void Decelerate(int paramAmount){this.mintSpeed -= paramAmount;if(mintSpeed <= this.mintMaxReverseSpeed) mintSpeed = mintMaxReverseSpeed;this.NotifyObservers();}#endregion}
最后但不是至少
现在我们的"ACME Framework"已经做好了,我们只需要设立有形的类和接口。首先让我们看看最后两个类:Control 和 Model...
这里我们有形的AutomobileControl实现IVehicleControl接口。我们的AutomobileControl也将设置View来依赖Model 的状态(当有向Model的申请时检测SetView方法)。
注意,我们只是有对IVehicleModel的引用(而不是抽象类Automobile )和对IVehicleView的引用(而不是具体的View),这样保证对象间的低耦合。
public
class AutomobileControl: IVehicleControl
{private IVehicleModel Model;private IVehicleView View;public AutomobileControl(IVehicleModel paramModel, IVehicleView paramView){this.Model = paramModel;this.View = paramView;}public AutomobileControl(){}#region IVehicleControl Memberspublic void SetModel(IVehicleModel paramModel){this.Model = paramModel;}public void SetView(IVehicleView paramView){this.View = paramView;}public void RequestAccelerate(int paramAmount){if(Model != null){Model.Accelerate(paramAmount);if(View != null) SetView();}}public void RequestDecelerate(int paramAmount){if(Model != null){Model.Decelerate(paramAmount);if(View != null) SetView();}}public void RequestTurn(RelativeDirection paramDirection){if(Model != null){Model.Turn(paramDirection);if(View != null) SetView();}}#endregionpublic void SetView(){if(Model.Speed >= Model.MaxSpeed){View.DisableAcceleration();View.EnableDeceleration();}else if(Model.Speed <= Model.MaxReverseSpeed){View.DisableDeceleration();View.EnableAcceleration();}else{View.EnableAcceleration();View.EnableDeceleration();}if(Model.Speed >= Model.MaxTurnSpeed){View.DisableTurning();}else{View.EnableTurning();}}}
这里是我们的ACME200SportsCar类(从抽象类Automobile继承,实现了IVehicleModel接口):
public
class ACME2000SportsCar:Automobile
{public ACME2000SportsCar(string paramName):base(250, 40, -20, paramName){}public ACME2000SportsCar(string paramName, int paramMaxSpeed, int paramMaxTurnSpeed, int paramMaxReverseSpeed):base(paramMaxSpeed, paramMaxTurnSpeed, paramMaxReverseSpeed, paramName){}}
现在轮到我们的View了...
现在终于开始建立我们MVC最后一个部分了...View!
我们要建立一个AutoView来实现IVehicleView接口。这个AutoView将会有对Control和Model接口的引用。
public
class AutoView : System.Windows.Forms.UserControl, IVehicleView
{ private IVehicleControl Control = new ACME.AutomobileControl(); private IVehicleModel Model = new ACME.ACME2000SportsCar("Speedy");}
我们也需要将所有的东西包装在UserControl的构造函数中。
public
AutoView()
{// This call is required by the Windows.Forms Form Designer.InitializeComponent();WireUp(Control, Model);}
public
void
WireUp(IVehicleControl paramControl, IVehicleModel paramModel)
{// If we're switching Models, don't keep watching// the old one! if(Model != null){Model.RemoveObserver(this);}Model = paramModel;Control = paramControl;Control.SetModel(Model);Control.SetView(this);Model.AddObserver(this);}
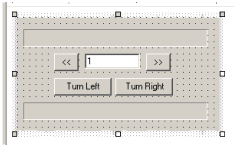
下面,加入我们的Button和一个label来显示ACME2000 Sports Car的状态还有状态条用来为所有的Buttons来显示编码。
private
void
btnAccelerate_Click(
object
sender, System.EventArgs e)
{Control.RequestAccelerate(int.Parse(this.txtAmount.Text));}
private
void
btnDecelerate_Click(
object
sender, System.EventArgs e)
{Control.RequestDecelerate(int.Parse(this.txtAmount.Text));}
private
void
btnLeft_Click(
object
sender, System.EventArgs e)
{Control.RequestTurn(RelativeDirection.Left);}
private
void
btnRight_Click(
object
sender, System.EventArgs e)
{Control.RequestTurn(RelativeDirection.Right);}
加入一个方法来更新接口...
public
void
UpdateInterface(IVehicleModel auto)
{this.label1.Text = auto.Name + " heading " + auto.Direction.ToString() + " at speed: " + auto.Speed.ToString();this.pBar.Value = (auto.Speed>0)? auto.Speed*100/auto.MaxSpeed : auto.Speed*100/auto.MaxReverseSpeed;}
最后我们实现IVehicleView接口的方法。
public
void
DisableAcceleration()
{this.btnAccelerate.Enabled = false;}
public
void
EnableAcceleration()
{this.btnAccelerate.Enabled = true;}
public
void
DisableDeceleration()
{this.btnDecelerate.Enabled = false;}
public
void
EnableDeceleration()
{this.btnDecelerate.Enabled = true;}
public
void
DisableTurning()
{this.btnRight.Enabled = this.btnLeft.Enabled = false;}
public
void
EnableTurning()
{this.btnRight.Enabled = this.btnLeft.Enabled = true;}
public
void
Update(IVehicleModel paramModel)
{this.UpdateInterface(paramModel);}
我们终于结束了!!!
现在我们可以来测试ACME2000 Sports Car了。一切按计划进行,然后我们找到ACME的主管人员,但他想要开一个载货卡车而不是运动车。
幸运的是我们用的是MVC!我们需要做的所有工作就是建立一个新的ACMETruck类,包装一下,完事!
public
class
ACME2000Truck: Automobile
{public ACME2000Truck(string paramName):base(80, 25, -12, paramName){}public ACME2000Truck(string paramName, int paramMaxSpeed, int paramMaxTurnSpeed, int paramMaxReverseSpeed):base(paramMaxSpeed, paramMaxTurnSpeed, paramMaxReverseSpeed, paramName){} }
在AutoView中,我们只需要建立卡车包装一下!
private
void
btnBuildNew_Click(
object
sender, System.EventArgs e)
{this.autoView1.WireUp(new ACME.AutomobileControl(), new ACME.ACME2000Truck(this.txtName.Text));}
如果我们想要一个新Control只允许我们来每次加速或减速最大5mph,小意思!做一个SlowPokeControl(和我们的AutoControl相同,但是在申请加速度中做了限制)。
public
void
RequestAccelerate(
int
paramAmount)
{if(Model != null){int amount = paramAmount;if(amount > 5) amount = 5;Model.Accelerate(amount);if(View != null) SetView();}}
public
void
RequestDecelerate(
int
paramAmount)
{if(Model != null){int amount = paramAmount;if(amount > 5) amount = 5;Model.Accelerate(amount);Model.Decelerate(amount);if(View != null) SetView();}}
如果我们想让我们的ACME2000 Truck变得迟钝,只需要在AutoView中包装。
private
void
btnBuildNew_Click(
object
sender, System.EventArgs e)
{this.autoView1.WireUp(new ACME.SlowPokeControl(), new ACME.ACME2000Truck(this.txtName.Text));}
最后,如果我们需要一个在web上的接口,我们要做的所有工作就是建立一个Web项目在UserControl中实现IVehicleView接口。
结论
正如你所看到的,使用MVC来构建代码控制接口耦合性很低,很容易适应需求的改变。它也能使变化的影响减小,而且你可以在任何地方重用你的虚函数和接口。有很多时候我们可以在我们的项目中实现伸缩性,特别是在那些需求变化的时候,但是这需要下次再说了。
于此同时,做下一个项目的时候记住MVC...你不会感到遗憾!
Happy Driving.


 1万+
1万+


 被折叠的 条评论
为什么被折叠?
被折叠的 条评论
为什么被折叠?
 到【灌水乐园】发言


