


最近刚学会使用ButterKnife,真是超级好用,忍不住要分享给大家了。
写在前面:该文档使用7.0版本,8.0版本方法名有所改动,建议看官方文档,整体业务逻辑和原理没什么变动。
在android编程过程中,我们会写大量的布局和点击事件,像初始view、设置view监听这样简单而重复的操作让人觉得麻烦类,所以可以采用注解的方式去实现,而ButterKnife则是注解中相对简单易懂的很不错的开源框架,而网上的文档和例子都过时了,7.0之后的版本改动很大,之前的注解都不能用了,所以借鉴官方文档总结了一下,接下来就介绍一下如何使用。基本参照官方文档,加上自己的心得。
ButterKnife 优势:
1.强大的View绑定和Click事件处理功能,简化代码,提升开发效率
2.方便的处理Adapter里的ViewHolder绑定问题
3.运行时不会影响APP效率,使用配置方便
4.代码清晰,可读性强
使用心得:
1.Activity ButterKnife.bind(this);必须在setContentView();之后,且父类bind绑定后,子类不需要再bind
2.Fragment ButterKnife.bind(this, mRootView);
3.属性布局不能用private or static 修饰,否则会报错
4.setContentView()不能通过注解实现。(其他的有些注解框架可以)
官网http://jakewharton.github.io/butterknife/
使用步骤:
一.导入ButterKnife jar包:
1)如果你是Eclipse,可以去官网下载jar包
2)如果你是AndroidStudio可以直接 File->Project Structure->Dependencies->Library dependency 搜索butterknife即可,第一个就是
3)当然也可以用maven和gradle配置
<span style="font-family:SimSun;font-size:14px;">MAVEN
    <dependency>
      <groupId>com.jakewharton</groupId>
      <artifactId>butterknife</artifactId>
      <version>(insert latest version)</version>
    </dependency>

GRADLE
compile 'com.jakewharton:butterknife:(insert latest version)'

Be sure to suppress this lint warning in your build.gradle.(关闭)
lintOptions {
  disable 'InvalidPackage'
}  </span>
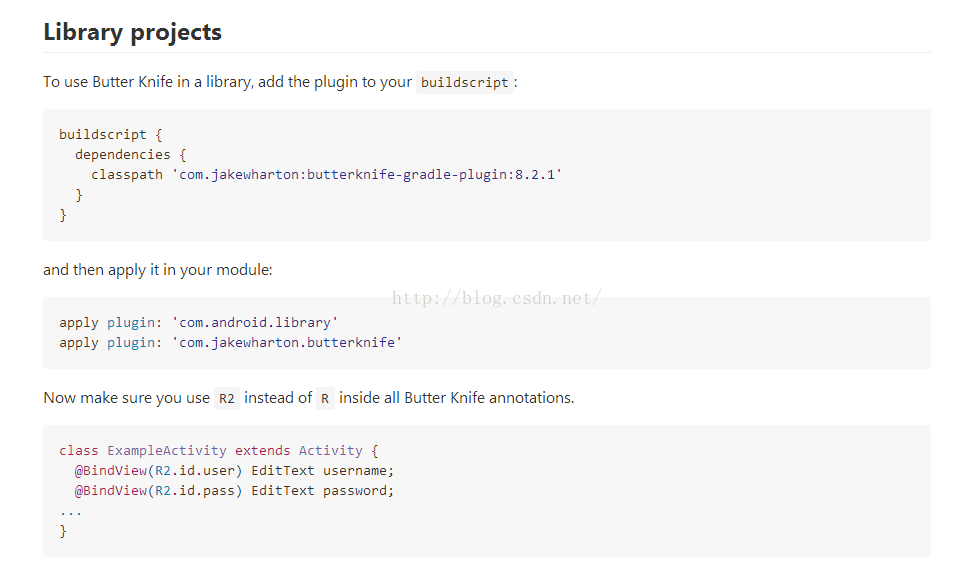
注意如果在Library 项目中使用要按如下步骤(github中有具体描述)否则无法找到view:
二.常见使用方法:
1)由于每次都要在Activity中的onCreate绑定Activity,所以个人建议写一个BaseActivity完成绑定,子类继承即可
注:ButterKnife.bind(this);绑定Activity 必须在setContentView之后:
实现如下(FragmentActivity 实现一样):
<span style="font-family:SimSun;font-size:14px;">public abstract class BaseActivity extends Activity {
    public abstract int getContentViewId();

    @Override
    protected void onCreate(Bundle savedInstanceState) {
        super.onCreate(savedInstanceState);
        setContentView(getContentViewId());
        ButterKnife.bind(this);
        initAllMembersView(savedInstanceState);
    }

    protected abstract void initAllMembersView(Bundle savedInstanceState);

    @Override
    protected void onDestroy() {
        super.onDestroy();
        ButterKnife.unbind(this);//解除绑定,官方文档只对fragment做了解绑
    }
}  </span>
2)绑定fragment
<span style="font-family:SimSun;font-size:14px;">public abstract class BaseFragment extends Fragment {
    public abstract int getContentViewId();
    protected Context context;
    protected View mRootView;

    @Nullable
    @Override
    public View onCreateView(LayoutInflater inflater, @Nullable ViewGroup container, @Nullable Bundle savedInstanceState) {
        mRootView =inflater.inflate(getContentViewId(),container,false);
        ButterKnife.bind(this,mRootView);//绑定framgent
        this.context = getActivity();
        initAllMembersView(savedInstanceState);
        return mRootView;
    }

    protected abstract void initAllMembersView(Bundle savedInstanceState);

    @Override
    public void onDestroyView() {
        super.onDestroyView();
        ButterKnife.unbind(this);//解绑
    }
}  </span>
3)绑定view
<span style="font-family:SimSun;font-size:14px;">@Bind(R.id.hello_world)
TextView mHelloWorldTextView;
@Bind(R.id.app_name)
TextView mAppNameTextView;//view</span>
4)绑定资源
<span style="font-family:SimSun;font-size:14px;">@BindString(R.string.app_name)
String appName;//sting
@BindColor(R.color.red)
int textColor;//颜色
@BindDrawable(R.mipmap.ic_launcher)
Drawable drawable;//drawble
@Bind(R.id.imageview)
ImageView mImageView;
@Bind(R.id.checkbox)
CheckBox mCheckBox;
@BindDrawable(R.drawable.selector_image)
Drawable selector; </span>
5)Adapter ViewHolder 绑定
<span style="font-family:SimSun;font-size:14px;">public class TestAdapter extends BaseAdapter {
    private List<String> list;
    private Context context;

    public TestAdapter(Context context, List<String> list) {
        this.list = list;
        this.context = context;
    }

    @Override
    public int getCount() {
        return list==null ? 0 : list.size();
    }

    @Override
    public Object getItem(int position) {
        return list.get(position);
    }

    @Override
    public long getItemId(int position) {
        return position;
    }

    @Override
    public View getView(int position, View convertView, ViewGroup parent) {
        ViewHolder holder;
        if (convertView == null) {
            convertView = LayoutInflater.from(context).inflate(R.layout.layout_list_item, null);
            holder = new ViewHolder(convertView);
            convertView.setTag(holder);
        } else {
            holder = (ViewHolder) convertView.getTag();
        }
        holder.textview.setText("item=====" + position);
        return convertView;
    }

    static class ViewHolder {
        @Bind(R.id.hello_world)
        TextView textview;

        public ViewHolder(View view) {
            ButterKnife.bind(this, view);
        }
    }
}  </span>
6)点击事件的绑定:不用声明view,不用setOnClickLisener()就可以绑定点击事件
a.直接绑定一个方法
<span style="font-family:SimSun;font-size:14px;">@OnClick(R.id.submit)
public void submit(View view) {
  // TODO submit data to server...
} </span>
b.所有监听方法的参数是可选的
<span style="font-family:SimSun;font-size:14px;">@OnClick(R.id.submit)
public void submit() {
  // TODO submit data to server...
}  </span>
c.定义一个特定类型,它将自动被转换
<span style="font-family:SimSun;font-size:14px;">@OnClick(R.id.submit)
public void sayHi(Button button) {
  button.setText("Hello!");
}</span>
d.多个view统一处理同一个点击事件,很方便,避免抽方法重复调用的麻烦
<span style="font-family:SimSun;font-size:14px;">@OnClick({ R.id.door1, R.id.door2, R.id.door3 })
public void pickDoor(DoorView door) {
  if (door.hasPrizeBehind()) {
    Toast.makeText(this, "You win!", LENGTH_SHORT).show();
  } else {
    Toast.makeText(this, "Try again", LENGTH_SHORT).show();
  }
} </span>
e.自定义view可以绑定自己的监听,不指定id
<span style="font-family:SimSun;font-size:14px;">public class FancyButton extends Button {
  @OnClick
  public void onClick() {
    // TODO do something!
  }
}  </span>
f.给EditText加addTextChangedListener(即添加多回调方法的监听的使用方法),利用指定回调,实现想回调的方法即可,哪个注解不会用点进去看下源码上的注释就会用了
<span style="font-family:SimSun;font-size:14px;">@OnTextChanged(value = R.id.mobileEditText, callback = OnTextChanged.Callback.BEFORE_TEXT_CHANGED)
void beforeTextChanged(CharSequence s, int start, int count, int after) {

}
@OnTextChanged(value = R.id.mobileEditText, callback = OnTextChanged.Callback.TEXT_CHANGED)
void onTextChanged(CharSequence s, int start, int before, int count) {

}
@OnTextChanged(value = R.id.mobileEditText, callback = OnTextChanged.Callback.AFTER_TEXT_CHANGED)
void afterTextChanged(Editable s) {

}  </span>
7)对一组View进行统一操作
a.装入一个list
<span style="font-family:SimSun;font-size:14px;">@Bind({ R.id.first_name, R.id.middle_name, R.id.last_name })
List<EditText> nameViews; </span>
b.设置统一处理
<span style="font-family:SimSun;">static final ButterKnife.Action<View> DISABLE = new ButterKnife.Action<View>() {
  @Override public void apply(View view, int index) {
    view.setEnabled(false);
  }
};
static final ButterKnife.Setter<View, Boolean> ENABLED = new ButterKnife.Setter<View, Boolean>() {
  @Override public void set(View view, Boolean value, int index) {
    view.setEnabled(value);
  }
};<span style="color: silver; line-height: normal; background-color: rgb(248, 248, 248);"> </span><a target=_blank href="http://blog.csdn.net/itjianghuxiaoxiong/article/details/50177549#" class="ViewSource" title="view plain" style="line-height: normal; color: rgb(160, 160, 160); text-decoration: none; border: none; padding: 1px; margin: 0px 10px 0px 0px; display: inline-block; width: 16px; height: 16px; text-indent: -2000px; background-image: url("images/default/ico_plain.gif"); background-attachment: initial; background-color: inherit; background-size: initial; background-origin: initial; background-clip: initial; background-position: 0% 0%; background-repeat: no-repeat;">view plain</a></span><span data-mod="popu_168" style="font-size: 9px; font-family: Verdana, Geneva, Arial, Helvetica, sans-serif; color: silver; line-height: normal;"> <a target=_blank href="http://blog.csdn.net/itjianghuxiaoxiong/article/details/50177549#" class="CopyToClipboard" title="copy" style="color: rgb(160, 160, 160); text-decoration: none; border: none; padding: 1px; margin: 0px 10px 0px 0px; font-size: 9px; display: inline-block; width: 16px; height: 16px; text-indent: -2000px; background-image: url("images/default/ico_copy.gif"); background-attachment: initial; background-color: inherit; background-size: initial; background-origin: initial; background-clip: initial; background-position: left top; background-repeat: no-repeat;">c</a></span>
c.统一操作处理,例如设置是否可点,属性等
<span style="font-family:SimSun;">ButterKnife.apply(nameViews, DISABLE);
ButterKnife.apply(nameViews, ENABLED, false);</span><span style="font-family:Arial;font-size: 14px;"> </span>
8)可选绑定:默认情况下,“绑定”和“监听”绑定都是必需的。如果不能找到目标视图,则将抛出异常。所以做空处理
<span style="font-family:SimSun;">@Nullable @Bind(R.id.might_not_be_there) TextView mightNotBeThere;

@Nullable @OnClick(R.id.maybe_missing) void onMaybeMissingClicked() {
  // TODO ...
}  </span>
三、代码混淆
<span style="font-family:SimSun;font-size:14px;">-keep class butterknife.** { *; }
-dontwarn butterknife.internal.**
-keep class **$$ViewBinder { *; }

-keepclasseswithmembernames class * {
    @butterknife.* <fields>;
}

-keepclasseswithmembernames class * {
    @butterknife.* <methods>;
}  </span>
四、Zelezny插件的使用
在AndroidStudio->File->Settings->Plugins->搜索Zelezny下载添加就行 ,可以快速生成对应组件的实例对象,不用手动写。使用时,在要导入注解的Activity 或 Fragment 或 ViewHolder的layout资源代码上,右键——>Generate——Generate ButterKnife Injections,然后就出现如图的选择框。(此动态图来自官网)
原文链接: 点击打开链接


 1001
1001


 被折叠的 条评论
为什么被折叠?
被折叠的 条评论
为什么被折叠?
 到【灌水乐园】发言


