


Snap是一个在Ubuntu系统上一个新的技术.如果大家对这个技术还不是很理解的话,可以参阅文章"安装snap应用到Ubuntu 16.4桌面系统".我们知道MySQL及Tomcat是在Java服务器端常用的技术.那么我们怎么来把它打包到我们的snap应用中去呢?很多人可能以为这个很简单.我们可以直接在snapcraft.yaml中使用stage-package来安装现有的debian包,不就可以了吗?其实,由于在snap系统的安全性限制,在一个snap应用被成功安装后,它自己所在的目录是只读的,不可以写入任何的数据.我们只有规定的部分目录才是可以写入的.我们以hello例程为例,我们有如下的目录可以使用:
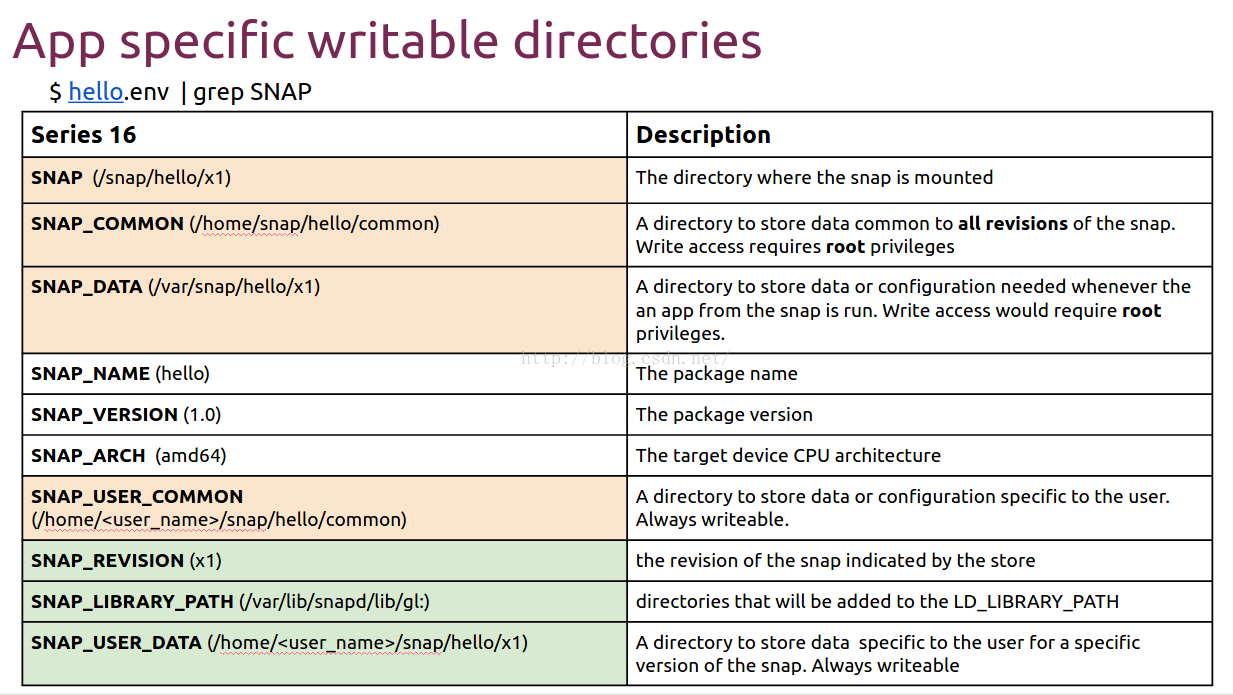
在上面,有两个最重要的目录:
- SNAP_DATA
- SNAP
在我们snap我们应用的时候,我们需要configure我们的应用尽量使用上面的两个目录,而不需要hard-code我们的目录.特别是由于我们的应用不能向自己的安装目录SNAP写入任何的数据(read-only),所以,我们必须把我们的数据库及需要写入数据的文件设置到SNAP_DATA目录中.另外必须注意的是,访问SNAP_DATA文件目录时需要
root权限.这对于一个daemon的应用来说,应该没有问题,但是对于一般的应用来说,我们需要使用
sudo来访问才可以访问到数据库.
1)snap Tomcat
在我们的snapcraft中有一个例程叫做"
tomcat-webapp-demo".它提供了一个很好的基础.
snapcraft.yaml
name: tomcat-webapp-demo
version: 1.0
architectures:
 - amd64
summary: Demo of Tomcat-hosted Webapp
description: This is a demo snap of a Tomcat-hosted webapp produced by snapcraft with maven.
confinement: strict

apps:
 tomcat:
   command: bin/wrapper
   daemon: simple
   plugs: [network-bind]

parts:
    webapp:
        plugin: maven
        source: https://github.com/lool/snappy-mvn-demo.git
        source-type: git
    tomcat:
        plugin: dump
        source: https://archive.apache.org/dist/tomcat/tomcat-8/v8.0.29/bin/apache-tomcat-8.0.29.tar.gz
    local-files:
        plugin: make
source: .wrapper
#!/bin/sh

set -e
set -x

# installation pathes are based of CATALINA_HOME
export CATALINA_HOME="$SNAP"
# writable pathes are based of CATALINA_BASE
export CATALINA_BASE="$SNAP_DATA"

# create runtime data
mkdir -p "$CATALINA_BASE/logs"
mkdir -p "$CATALINA_BASE/temp"

if ! [ -d $CATALINA_BASE/conf ]; then
	echo "conf directory does not exist"
    cp -rd $CATALINA_HOME/tomcat-conf $CATALINA_BASE/conf
fi

if ! [ -d $CATALINA_BASE/webapps ]; then
	echo "webapps directory  does not exist"
    cp -rd $CATALINA_HOME/webapps $CATALINA_BASE/
    cp $CATALINA_HOME/war/*.war $CATALINA_BASE/webapps/
fi

$CATALINA_HOME/bin/catalina.sh run
从上面的代码中,我们可以看出来我们已经把我们所需要的目录用SNAP及SNAP_DATA来代替了.
2)snap MySQL
我们可以先看一下文章"
Snapping Nextcloud: MySQL".从该文章中,我们可以看出来,直接通过stage-package的方式来snap MySQL是不可能的.我们可以直接编译MySQL源码的方式来snap MySQL.
snapcraft.yaml
    # Download the boost headers for MySQL. Note that the version used may need to
    # be updated if the version of MySQL changes.
    boost:
        plugin: copy
        source: http://sourceforge.net/projects/boost/files/boost/1.59.0/boost_1_59_0.tar.gz
        files:
          '*': boost/
        snap:
          - -*

    mysql:
        plugin: cmake
        source: https://github.com/kyrofa/mysql-server.git
        source-type: git
        source-branch: feature/support_no_setpriority
        after: [boost]
        configflags:
          - -DWITH_BOOST=$SNAPCRAFT_STAGE/boost
          - -DWITH_INNODB_PAGE_CLEANER_PRIORITY=OFF
          - -DCMAKE_INSTALL_PREFIX=/
          - -DBUILD_CONFIG=mysql_release
          - -DWITH_UNIT_TESTS=OFF
          - -DWITH_EMBEDDED_SERVER=OFF
          - -DWITH_EMBEDDED_SHARED_LIBRARY=OFF
          - -DWITH_ARCHIVE_STORAGE_ENGINE=OFF
          - -DWITH_BLACKHOLE_STORAGE_ENGINE=OFF
          - -DWITH_FEDERATED_STORAGE_ENGINE=OFF
          - -DWITH_PARTITION_STORAGE_ENGINE=OFF
          - -DINSTALL_MYSQLTESTDIR=
        build-packages:
          - wget
          - g++
          - cmake
          - bison
          - libncurses5-dev
          - libaio-dev
        stage:
         # Remove scripts that we'll be replacing with our own
          - -support-files/mysql.server
        snap:
         # Remove scripts that we'll be replacing with our own
         - -support-files/mysql.server

         # Remove unused binaries that waste space
         - -bin/innochecksum
         - -bin/lz4_decompress
         - -bin/myisam*
         - -bin/mysqladmin
         - -bin/mysqlbinlog
         - -bin/mysql_client_test
         - -bin/mysql_config*
         - -bin/mysqld_multi
         - -bin/mysqldump*
         - -bin/mysqlimport
         - -bin/mysql_install_db
         - -bin/mysql_plugin
         - -bin/mysqlpump
         - -bin/mysql_secure_installation
         - -bin/mysqlshow
         - -bin/mysqlslap
         - -bin/mysql_ssl_rsa_setup
         - -bin/mysqltest
         - -bin/mysql_tzinfo_to_sql
         - -bin/perror
         - -bin/replace
         - -bin/resolveip
         - -bin/resolve_stack_dump
         - -bin/zlib_decompress

    # Copy over our MySQL scripts
    mysql-customizations:
        plugin: copy
        files:
           # This one is what creates the initial database and account for ownCloud.
           src/mysql/start_mysql: bin/
           src/mysql/my.cnf: my.cnf
           src/mysql/mysql.server: support-files/
           sample.war: war/sample.war
           mysql-connector-java-6.0.3.jar: lib/mysql-connector-java-6.0.3.jar
由于编译MySQL时需要用到boost库,所以直接把boost库的源码下载下来,当然,在我们snap时,我们并不需要它,所以:
        snap:
- -*src/mysql/my.cnf
[mysqld]
user=root
max_allowed_packet=100M
secure-file-priv=NULL
port=3306
bind-address=0.0.0.0
[client]
protocol=tcp
在这里,我们配置了所需要的port号码及使用的协议TCP.这样我们的数据库可以位于任何一个单独的服务器中(我们可以修改这里的
bind-address).在我们的设计中,MySQL的数据库位于本机.这样当我们的MySQL服务器运行时,可以看到:
liuxg@liuxg:~$ netstat -lnp46 | grep -w 3306
(Not all processes could be identified, non-owned process info
 will not be shown, you would have to be root to see it all.)
tcp        0      0 0.0.0.0:3306            0.0.0.0:*               LISTEN      -
src/mysql/mysql.server
这个文件是我们在我们的下面的start_mysql的脚本中被使用的:$SNAP/support-files/mysql.server start该脚本的内容如下:
#!/bin/sh
# Copyright Abandoned 1996 TCX DataKonsult AB & Monty Program KB & Detron HB
# This file is public domain and comes with NO WARRANTY of any kind

# MySQL daemon start/stop script.

# Usually this is put in /etc/init.d (at least on machines SYSV R4 based
# systems) and linked to /etc/rc3.d/S99mysql and /etc/rc0.d/K01mysql.
# When this is done the mysql server will be started when the machine is
# started and shut down when the systems goes down.

# Comments to support chkconfig on RedHat Linux
# chkconfig: 2345 64 36
# description: A very fast and reliable SQL database engine.

# Comments to support LSB init script conventions
### BEGIN INIT INFO
# Provides: mysql
# Required-Start: $local_fs $network $remote_fs
# Should-Start: ypbind nscd ldap ntpd xntpd
# Required-Stop: $local_fs $network $remote_fs
# Default-Start:  2 3 4 5
# Default-Stop: 0 1 6
# Short-Description: start and stop MySQL
# Description: MySQL is a very fast and reliable SQL database engine.
### END INIT INFO

# If you install MySQL on some other places than /, then you
# have to do one of the following things for this script to work:
#
# - Run this script from within the MySQL installation directory
# - Create a /etc/my.cnf file with the following information:
#   [mysqld]
#   basedir=<path-to-mysql-installation-directory>
# - Add the above to any other configuration file (for example ~/.my.ini)
#   and copy my_print_defaults to /usr/bin
# - Add the path to the mysql-installation-directory to the basedir variable
#   below.
#
# If you want to affect other MySQL variables, you should make your changes
# in the /etc/my.cnf, ~/.my.cnf or other MySQL configuration files.

# If you change base dir, you must also change datadir. These may get
# overwritten by settings in the MySQL configuration files.

basedir=$SNAP
datadir=$SNAP_DATA/mysql

# Default value, in seconds, afterwhich the script should timeout waiting
# for server start.
# Value here is overriden by value in my.cnf.
# 0 means don't wait at all
# Negative numbers mean to wait indefinitely
service_startup_timeout=900

# Lock directory for RedHat / SuSE.
lockdir="$SNAP_DATA/mysql/lock"
lock_file_path="$lockdir/mysql"

# The following variables are only set for letting mysql.server find things.

# Set some defaults
mysqld_pid_file_path=
if test -z "$basedir"
then
  basedir=/
  bindir=//bin
  if test -z "$datadir"
  then
    datadir=//data
  fi
  sbindir=//bin
  libexecdir=//bin
else
  bindir="$basedir/bin"
  if test -z "$datadir"
  then
    datadir="$basedir/data"
  fi
  sbindir="$basedir/sbin"
  libexecdir="$basedir/libexec"
fi

# datadir_set is used to determine if datadir was set (and so should be
# *not* set inside of the --basedir= handler.)
datadir_set=

#
# Use LSB init script functions for printing messages, if possible
#
lsb_functions="/lib/lsb/init-functions"
if test -f $lsb_functions ; then
  . $lsb_functions
else
  log_success_msg()
  {
    echo " SUCCESS! $@"
  }
  log_failure_msg()
  {
    echo " ERROR! $@"
  }
fi

PATH="/sbin:/usr/sbin:/bin:/usr/bin:$basedir/bin"
export PATH

mode=$1    # start or stop

[ $# -ge 1 ] && shift


other_args="$*"   # uncommon, but needed when called from an RPM upgrade action
           # Expected: "--skip-networking --skip-grant-tables"
           # They are not checked here, intentionally, as it is the resposibility
           # of the "spec" file author to give correct arguments only.

case `echo "testing\c"`,`echo -n testing` in
    *c*,-n*) echo_n=   echo_c=     ;;
    *c*,*)   echo_n=-n echo_c=     ;;
    *)       echo_n=   echo_c='\c' ;;
esac

parse_server_arguments() {
  for arg do
    case "$arg" in
      --basedir=*)  basedir=`echo "$arg" | sed -e 's/^[^=]*=//'`
                    bindir="$basedir/bin"
		    if test -z "$datadir_set"; then
		      datadir="$basedir/data"
		    fi
		    sbindir="$basedir/sbin"
		    libexecdir="$basedir/libexec"
        ;;
      --datadir=*)  datadir=`echo "$arg" | sed -e 's/^[^=]*=//'`
		    datadir_set=1
	;;
      --pid-file=*) mysqld_pid_file_path=`echo "$arg" | sed -e 's/^[^=]*=//'` ;;
      --service-startup-timeout=*) service_startup_timeout=`echo "$arg" | sed -e 's/^[^=]*=//'` ;;
    esac
  done
}

wait_for_pid () {
  verb="$1"           # created | removed
  pid="$2"            # process ID of the program operating on the pid-file
  pid_file_path="$3" # path to the PID file.

  i=0
  avoid_race_condition="by checking again"

  while test $i -ne $service_startup_timeout ; do

    case "$verb" in
      'created')
        # wait for a PID-file to pop into existence.
        test -s "$pid_file_path" && i='' && break
        ;;
      'removed')
        # wait for this PID-file to disappear
        test ! -s "$pid_file_path" && i='' && break
        ;;
      *)
        echo "wait_for_pid () usage: wait_for_pid created|removed pid pid_file_path"
        exit 1
        ;;
    esac

    # if server isn't running, then pid-file will never be updated
    if test -n "$pid"; then
      if kill -0 "$pid" 2>/dev/null; then
        :  # the server still runs
      else
        # The server may have exited between the last pid-file check and now.
        if test -n "$avoid_race_condition"; then
          avoid_race_condition=""
          continue  # Check again.
        fi

        # there's nothing that will affect the file.
        log_failure_msg "The server quit without updating PID file ($pid_file_path)."
        return 1  # not waiting any more.
      fi
    fi

    echo $echo_n ".$echo_c"
    i=`expr $i + 1`
    sleep 1

  done

  if test -z "$i" ; then
    log_success_msg
    return 0
  else
    log_failure_msg
    return 1
  fi
}

# Get arguments from the my.cnf file,
# the only group, which is read from now on is [mysqld]
if test -x ./bin/my_print_defaults
then
  print_defaults="./bin/my_print_defaults"
elif test -x $bindir/my_print_defaults
then
  print_defaults="$bindir/my_print_defaults"
elif test -x $bindir/mysql_print_defaults
then
  print_defaults="$bindir/mysql_print_defaults"
else
  # Try to find basedir in /etc/my.cnf
  conf=/etc/my.cnf
  print_defaults=
  if test -r $conf
  then
    subpat='^[^=]*basedir[^=]*=\(.*\)$'
    dirs=`sed -e "/$subpat/!d" -e 's//\1/' $conf`
    for d in $dirs
    do
      d=`echo $d | sed -e 's/[ 	]//g'`
      if test -x "$d/bin/my_print_defaults"
      then
        print_defaults="$d/bin/my_print_defaults"
        break
      fi
      if test -x "$d/bin/mysql_print_defaults"
      then
        print_defaults="$d/bin/mysql_print_defaults"
        break
      fi
    done
  fi

  # Hope it's in the PATH ... but I doubt it
  test -z "$print_defaults" && print_defaults="my_print_defaults"
fi

#
# Read defaults file from 'basedir'.   If there is no defaults file there
# check if it's in the old (depricated) place (datadir) and read it from there
#

extra_args=""
if test -r "$basedir/my.cnf"
then
  extra_args="-e $basedir/my.cnf"
else
  if test -r "$datadir/my.cnf"
  then
    extra_args="-e $datadir/my.cnf"
  fi
fi

parse_server_arguments `$print_defaults $extra_args mysqld server mysql_server mysql.server`

#
# Set pid file if not given
#
if test -z "$mysqld_pid_file_path"
then
  mysqld_pid_file_path=$datadir/`hostname`.pid
else
  case "$mysqld_pid_file_path" in
    /* ) ;;
    * )  mysqld_pid_file_path="$datadir/$mysqld_pid_file_path" ;;
  esac
fi

case "$mode" in
  'start')
    # Start daemon

    # Safeguard (relative paths, core dumps..)
    cd $basedir

    echo $echo_n "Starting MySQL"
    if test -x $bindir/mysqld_safe
    then
      # Give extra arguments to mysqld with the my.cnf file. This script
      # may be overwritten at next upgrade.
      $bindir/mysqld_safe --datadir="$datadir" --pid-file="$mysqld_pid_file_path" --lc-messages-dir="$SNAP/share" $other_args >/dev/null 2>&1 &
      wait_for_pid created "$!" "$mysqld_pid_file_path"; return_value=$?

      # Make lock for RedHat / SuSE
      if test -w "$lockdir"
      then
        touch "$lock_file_path"
      fi

      exit $return_value
    else
      log_failure_msg "Couldn't find MySQL server ($bindir/mysqld_safe)"
    fi
    ;;

  'stop')
    # Stop daemon. We use a signal here to avoid having to know the
    # root password.

    if test -s "$mysqld_pid_file_path"
    then
      # signal mysqld_safe that it needs to stop
      touch "$mysqld_pid_file_path.shutdown"

      mysqld_pid=`cat "$mysqld_pid_file_path"`

      if (kill -0 $mysqld_pid 2>/dev/null)
      then
        echo $echo_n "Shutting down MySQL"
        kill $mysqld_pid
        # mysqld should remove the pid file when it exits, so wait for it.
        wait_for_pid removed "$mysqld_pid" "$mysqld_pid_file_path"; return_value=$?
      else
        log_failure_msg "MySQL server process #$mysqld_pid is not running!"
        rm "$mysqld_pid_file_path"
      fi

      # Delete lock for RedHat / SuSE
      if test -f "$lock_file_path"
      then
        rm -f "$lock_file_path"
      fi
      exit $return_value
    else
      log_failure_msg "MySQL server PID file could not be found!"
    fi
    ;;

  'restart')
    # Stop the service and regardless of whether it was
    # running or not, start it again.
    if $0 stop  $other_args; then
      $0 start $other_args
    else
      log_failure_msg "Failed to stop running server, so refusing to try to start."
      exit 1
    fi
    ;;

  'reload'|'force-reload')
    if test -s "$mysqld_pid_file_path" ; then
      read mysqld_pid <  "$mysqld_pid_file_path"
      kill -HUP $mysqld_pid && log_success_msg "Reloading service MySQL"
      touch "$mysqld_pid_file_path"
    else
      log_failure_msg "MySQL PID file could not be found!"
      exit 1
    fi
    ;;
  'status')
    # First, check to see if pid file exists
    if test -s "$mysqld_pid_file_path" ; then
      read mysqld_pid < "$mysqld_pid_file_path"
      if kill -0 $mysqld_pid 2>/dev/null ; then
        log_success_msg "MySQL running ($mysqld_pid)"
        exit 0
      else
        log_failure_msg "MySQL is not running, but PID file exists"
        exit 1
      fi
    else
      # Try to find appropriate mysqld process
      mysqld_pid=`pidof $libexecdir/mysqld`

      # test if multiple pids exist
      pid_count=`echo $mysqld_pid | wc -w`
      if test $pid_count -gt 1 ; then
        log_failure_msg "Multiple MySQL running but PID file could not be found ($mysqld_pid)"
        exit 5
      elif test -z $mysqld_pid ; then
        if test -f "$lock_file_path" ; then
          log_failure_msg "MySQL is not running, but lock file ($lock_file_path) exists"
          exit 2
        fi
        log_failure_msg "MySQL is not running"
        exit 3
      else
        log_failure_msg "MySQL is running but PID file could not be found"
        exit 4
      fi
    fi
    ;;
    *)
      # usage
      basename=`basename "$0"`
      echo "Usage: $basename  {start|stop|restart|reload|force-reload|status}  [ MySQL server options ]"
      exit 1
    ;;
esac

exit 0
这个脚本的内容其实和标准的从MySQL编译后的脚本没有什么大的差别.除了如下的地方发生改变:
basedir=$SNAP
datadir=$SNAP_DATA/mysqlsrc/mysql/start_mysql
这是一个我们需要的脚本来真正启动我们的MySQL服务器:
 mysql:
   command: start_mysql
   stop-command: support-files/mysql.server stop
   daemon: simple
plugs: [network, network-bind]#!/bin/sh
root_option_file="$SNAP_DATA/mysql/root.ini"
demouser_password_file="$SNAP_DATA/mysql/demouser_password"
mysqld_pid_file_path=$SNAP_DATA/mysql/`hostname`.pid
#mysql_socket_file_path=$SNAP_DATA/mysql/mysql.sock
new_install=false
# Make sure the database is initialized (this is safe to run if already
# initialized)
mysqld --initialize-insecure --basedir="$SNAP" --datadir="$SNAP_DATA/mysql" --lc-messages-dir="$SNAP/share"
# If the above command succeeded, it means this is a new installation.
if [ $? -eq 0 ]; then
echo "it is new install"
new_install=true
fi
# Start mysql
$SNAP/support-files/mysql.server start
# Initialize new installation if necessary.
if [ $new_install = true ]; then
# Generate a password for the root mysql user.
echo -n "Generating root mysql password... "
root_password="123"
echo "done."
# Generate a password for the owncloud mysql user.
echo -n "Generating owncloud mysql password... "
demouser_password="123"
echo "done."
# Save root user information
echo "writing client"
echo "[client]" >> $root_option_file
echo "writing user=root"
echo "user=root" >> $root_option_file
chmod 600 $root_option_file
echo "dump the root option file"
cat $root_option_file
# Now set everything up in one step:
# 1) Set the root user's password
# 2) Create the 'demouser' user
# 3) Create the 'demodb' database
# 4) Grant the 'demodb' user privileges on the 'demodb' database
echo -n "Setting up users and owncloud database... "
	mysql --defaults-file=$root_option_file <<SQL
ALTER USER 'root'@'localhost' IDENTIFIED BY '$root_password';
CREATE USER 'demouser'@'localhost' IDENTIFIED BY '$demouser_password';
CREATE DATABASE demodb;
GRANT ALL PRIVILEGES ON demodb.* TO 'demouser'@'localhost' IDENTIFIED BY '$demouser_password';
USE demodb;
create table Employees
    (
     id int not null,
     age int not null,
     first varchar (255),
     last varchar (255)
    );
INSERT INTO Employees VALUES (100, 18, 'Zara', 'Ali');
INSERT INTO Employees VALUES (101, 25, 'Mahnaz', 'Fatma');
INSERT INTO Employees VALUES (102, 30, 'Zaid', 'Khan');
INSERT INTO Employees VALUES (103, 28, 'Sumit', 'Mittal');
SQL
if [ $? -eq 0 ]; then
echo "done."
else
echo "Failed to initialize-- reverting..."
$SNAP/support-files/mysql.server stop
rm -rf $SNAP_DATA/mysql/*
fi
# Now the root mysql user has a password. Save that as well.
echo "writing root password"
echo "password=$root_password" >> $root_option_file
fi
# Wait here until mysql is running
echo "Waiting for server..."
#while [ ! -f "$mysqld_pid_file_path" -o ! -S "$mysql_socket_file_path" ]; do
while [ ! -f "$mysqld_pid_file_path" -o ]; do
sleep 1
done
# Check and upgrade mysql tables if necessary. This will return 0 if the upgrade
# succeeded, in which case we need to restart mysql.
echo "Checking/upgrading mysql tables if necessary..."
mysql_upgrade --defaults-file=$root_option_file
if [ $? -eq 0 ]; then
echo "Restarting mysql server after upgrade..."
$SNAP/support-files/mysql.server restart
echo "Waiting for server to come back after upgrade..."
# while [ ! -f "$mysqld_pid_file_path" -o ! -S "$mysql_socket_file_path" ]; do
while [ ! -f "$mysqld_pid_file_path" -o ]; do
sleep 1
done
fi
# If this was a new installation, wait until the server is all up and running
# before saving off the owncloud user's password. This way the presence of the
# file can be used as a signal that mysql is ready to be used.
if [ $new_install = true ]; then
echo "$demouser_password" > $demouser_password_file
fi
# Wait here until mysql exits (turn a forking service into simple). This is
# only needed for Ubuntu Core 15.04, as 16.04 supports forking services.
mysqld_pid=$(cat "$mysqld_pid_file_path")
while kill -0 $mysqld_pid 2>/dev/null; do
sleep 1
done
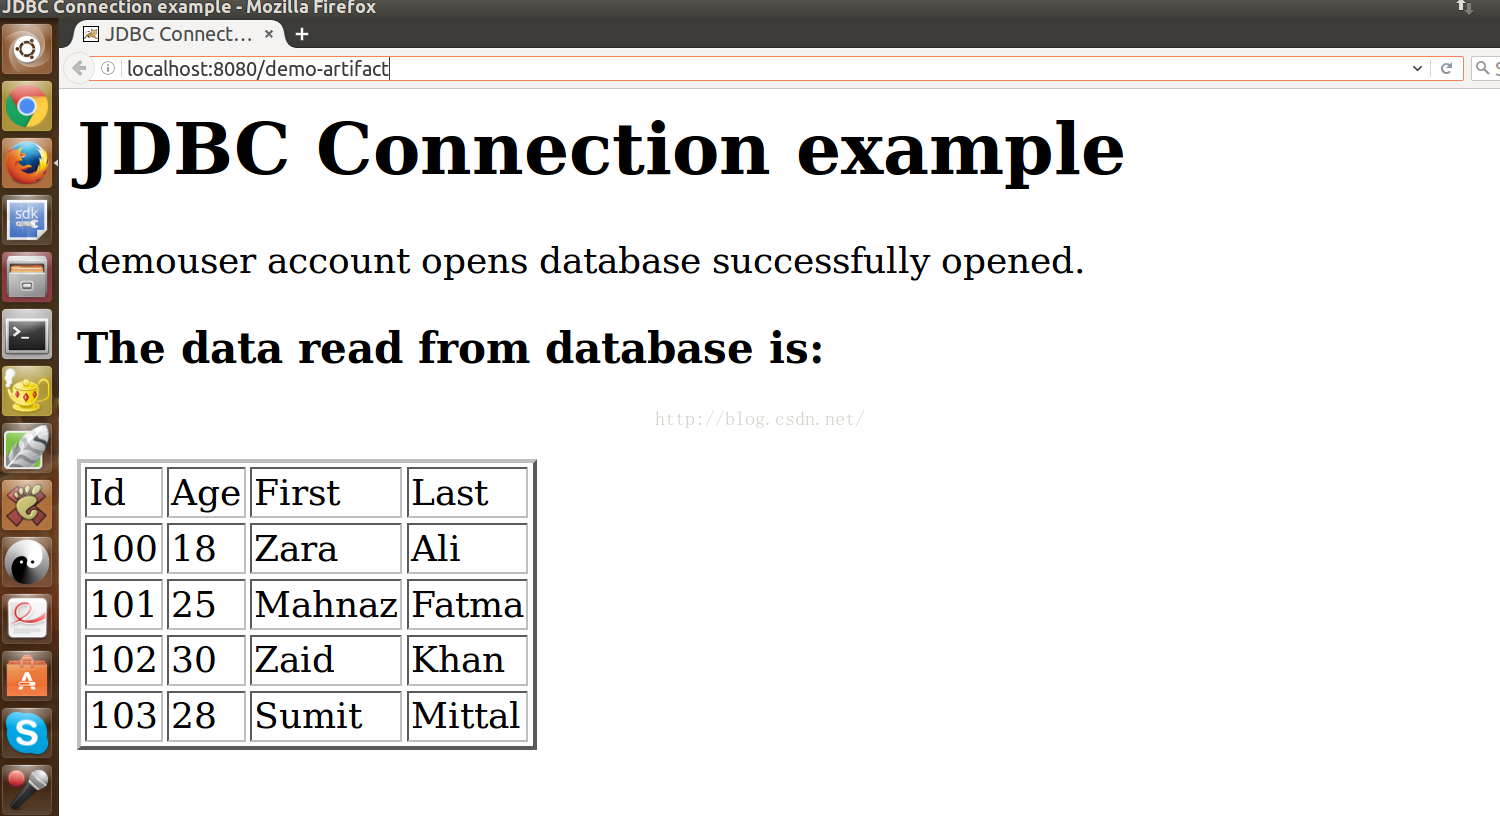
我们在table中也创建了几个记录.在这里也请大家注意,我hard-code了数据库的密码"123".这个密码在我们以后的数据库访问中需要用到.注意我们在这里已经创建了两个用户,一个叫做
root,另外一个叫做
demouser.
mysql --defaults-file=$root_option_file <<SQL
ALTER USER 'root'@'localhost' IDENTIFIED BY '$root_password';
CREATE USER 'demouser'@'localhost' IDENTIFIED BY '$demouser_password';
CREATE DATABASE demodb;
GRANT ALL PRIVILEGES ON demodb.* TO 'demouser'@'localhost' IDENTIFIED BY '$demouser_password';
USE demodb;
create table Employees
(
id int not null,
age int not null,
first varchar (255),
last varchar (255)
);
INSERT INTO Employees VALUES (100, 18, 'Zara', 'Ali');
INSERT INTO Employees VALUES (101, 25, 'Mahnaz', 'Fatma');
INSERT INTO Employees VALUES (102, 30, 'Zaid', 'Khan');
INSERT INTO Employees VALUES (103, 28, 'Sumit', 'Mittal');
SQL如何调用MySQL命令行
我们在snapcraft.yaml文档中,定义了如下的command:
 mysql-client:
   command: mysql --defaults-file=$SNAP_DATA/mysql/root.ini --protocol=TCP
   plugs: [network, network-bind]
由于在MySQL的命令行中需要访问到数据库,需要root权限.我们可以通过su命令进入到root用户:

我们可以通过运行我们定义的命令来启动MySQL客户端.通过这个命令,我们可以创建我们的数据等操作.
3)JSP 数据库访问
最后,我们需要一个JSP的程序来访问我们的数据库.我们的设计如下:
index.jsp
<%@ page import="java.sql.*"%>
<html>
<head>
<title>JDBC Connection example</title>
</head>

<body>
<h1>JDBC Connection example</h1>

<%
  String user = "demouser";
  String password = "123";

  try {
    java.sql.Connection con;
    Class.forName("com.mysql.jdbc.Driver");
    con = DriverManager.getConnection("jdbc:mysql://localhost:3306/demodb", user, password);
    out.println (user + " account opens database successfully opened.");

    String query="select * from Employees";
    Statement stmt=con.createStatement();
	ResultSet rs=stmt.executeQuery(query);
%>
    <br />
    <h3>The data read from database is:</h3>
    <br />

	<table border="2">
	<tr>
		<td>Id</td>
		<td>Age</td>
		<td>First</td>
		<td>Last</td>
	</tr>
<%
	while(rs.next())
	{
%>
	<tr>
		<td><%=rs.getInt("id")%></td>
		<td><%=rs.getInt("age")%></td>
		<td><%=rs.getString("first")%></td>
		<td><%=rs.getString("last")%></td>
	</tr>
<%
	}
%>
	</table>

<%
    // close the connection
    rs.close();
    stmt.close();
    con.close();
  }
  catch(SQLException e) {
    out.println("SQLException caught: " +e.getMessage());
  }
%>

</body>
</html>
最终打包我们的应用,并部署我们的应用.我们可以看到最终的结果为:
在实际的使用中,我们也可以把我们已经开发好的war包放入到我们的tomcat的目录中:
    mysql-customizations:
        plugin: copy
        files:
           # This one is what creates the initial database and account for ownCloud.
           src/mysql/start_mysql: bin/
           src/mysql/my.cnf: my.cnf
           src/mysql/mysql.server: support-files/
           sample.war: war/sample.war
           mysql-connector-java-6.0.3.jar: lib/mysql-connector-java-6.0.3.jar
更多关于snap的介绍,可以参阅文章"
安装snap应用到Ubuntu 16.4桌面系统"


 1372
1372


 被折叠的 条评论
为什么被折叠?
被折叠的 条评论
为什么被折叠?
 到【灌水乐园】发言


