


我们在AF小节里面讲了,AF会创建playbackThread线程,进行mixer操作。并且写入硬件。
我们这里以MixerThread为例进行分析。先看MixerThread构造函数
AudioFlinger::MixerThread::MixerThread()
{
...
    mAudioMixer = new AudioMixer(mNormalFrameCount, mSampleRate);
...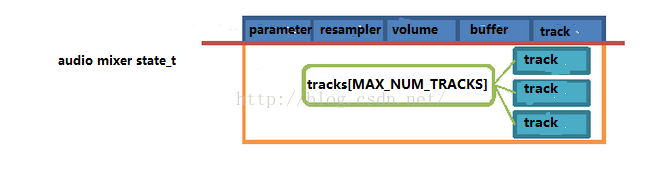
}class AudioMixer中比较重要的就是一些操作函数setResampler ,setParameter,setBufferProvider,getTrackName等,
以及下面这个结构体,其中track_t tracks[MAX_NUM_TRACKS]数组承载了AT小节里面讲到的,AT在AF里面创建对应的Track实例。最多可以创建32个。
即最多支持32路同时混音。
  struct state_t {
        uint32_t        enabledTracks;
        uint32_t        needsChanged;
        size_t          frameCount;
        void            (*hook)(state_t* state, int64_t pts);   // one of process__*, never NULL
        int32_t         *outputTemp;
        int32_t         *resampleTemp;
        NBLog::Writer*  mLog;
        int32_t         reserved[1];
        track_t         tracks[MAX_NUM_TRACKS]; __attribute__((aligned(32)));
};最终的mixer实际操作是在AudioMixer->process里面,
void AudioMixer::process(int64_t  pts)
{
    mState.hook(&mState,pts);
}在代码里,我们可以看到有以下几个钩子函数:
process__validate: 根据具体情况,负责为hook挂接具体实现
process__nop: hook的初始化值
process__OneTrack16BitsStereoNoResampling: 只有一路Track,16比特立体声,不重采样
process__genericNoResampling: 两路(包含)以上Track,不重采样,也是用的最多的场景
process__genericResampling: 两路(包含)以上Track,重采样
实际上整个hook的入口就是process__validate
void AudioMixer::process__validate(state_t* state, int64_t pts)
{
    uint32_t en = state->enabledTracks;
    while (en) {                      //遍历每个Track
        const int i = 31 - __builtin_clz(en);
        en &= ~(1<<i);
        countActiveTracks++;
        track_t& t = state->tracks[i];
        uint32_t n = 0;
        n |= NEEDS_CHANNEL_1 + t.channelCount - 1;
        n |= NEEDS_FORMAT_16;
        n |= t.doesResample() ? NEEDS_RESAMPLE_ENABLED : NEEDS_RESAMPLE_DISABLED;//根据之前设置的各项参数,来设置标志位
        if (t.auxLevel != 0 && t.auxBuffer != NULL) {
            n |= NEEDS_AUX_ENABLED;
        }
        if (t.volumeInc[0]|t.volumeInc[1]) {
            volumeRamp = true;
        } else if (!t.doesResample() && t.volumeRL == 0) {
            n |= NEEDS_MUTE_ENABLED;//根据之前设置的各项参数,来设置标志位
        }
        t.needs = n;         //根据之前设置的各项参数,来设置标志位
        if ((n & NEEDS_MUTE__MASK) == NEEDS_MUTE_ENABLED) {
            t.hook = track__nop;   //根据标志位来设置对应的t.hook 函数
        } else {
            if ((n & NEEDS_AUX__MASK) == NEEDS_AUX_ENABLED) {
                all16BitsStereoNoResample = false;
            }
            if ((n & NEEDS_RESAMPLE__MASK) == NEEDS_RESAMPLE_ENABLED) {
                all16BitsStereoNoResample = false;
                resampling = true;
                t.hook = track__genericResample;       //根据标志位来设置对应的t.hook 函数
            } else {
                if ((n & NEEDS_CHANNEL_COUNT__MASK) == NEEDS_CHANNEL_1){
                    t.hook = track__16BitsMono;        //根据标志位来设置对应的t.hook 函数
                    all16BitsStereoNoResample = false;
                }
                if ((n & NEEDS_CHANNEL_COUNT__MASK) >= NEEDS_CHANNEL_2){
                    t.hook = track__16BitsStereo;          //根据标志位来设置对应的t.hook 函数
                }
            }
        }
    }
    if (countActiveTracks) {
        if (resampling) {
            if (!state->outputTemp) {
                state->outputTemp = new int32_t[MAX_NUM_CHANNELS * state->frameCount];
            }
            if (!state->resampleTemp) {
                state->resampleTemp = new int32_t[MAX_NUM_CHANNELS * state->frameCount];
            }
            state->hook = process__genericResampling;    //根据标志位来设置对应的state->hook函数
        } else {
            if (state->outputTemp) {
                delete [] state->outputTemp;
                state->outputTemp = NULL;
            }
            if (state->resampleTemp) {
                delete [] state->resampleTemp;
                state->resampleTemp = NULL;
            }
            state->hook = process__genericNoResampling;//根据标志位来设置对应的state->hook函数
            if (all16BitsStereoNoResample && !volumeRamp) {
                if (countActiveTracks == 1) {
                    state->hook = process__OneTrack16BitsStereoNoResampling;//根据标志位来设置对应的state->hook函数
                }
            }
        }
    }
   state->hook(state, pts);//进行实际的mixer操作
}在process__validate中,先根据之前设置好的各项参数来决定有没有active的Track,是不是要resample等,然后挂接对应的state->hook函数,以及t.hook函数。
t.hook执行实际的mixer操作。具体就是process__validate调用state->hook函数,从而调用t.hook函数。
我们以state->hook函数process__genericNoResampling来继续往下分析。
void AudioMixer::process__genericNoResampling(state_t* state, int64_t pts)
{
    uint32_t enabledTracks = state->enabledTracks;
    uint32_t e0 = enabledTracks;
    while (e0) {
        const int i = 31 - __builtin_clz(e0);
        e0 &= ~(1<<i);
        track_t& t = state->tracks[i];
        t.buffer.frameCount = state->frameCount;
        t.bufferProvider->getNextBuffer(&t.buffer, pts);  //获取databuffer
        t.frameCount = t.buffer.frameCount;
        t.in = t.buffer.raw;
        if (t.in == NULL)
            enabledTracks &= ~(1<<i);
    }
e0 = enabledTracks;
    while (e0) {  //遍历每个track
        e0 &= ~(e1);
        int32_t *out = t1.mainBuffer;
        size_t numFrames = 0;
        do {
            memset(outTemp, 0, sizeof(outTemp));
            e2 = e1;
            while (e2) {
                while (outFrames) {
                    size_t inFrames = (t.frameCount > outFrames)?outFrames:t.frameCount;
                    if (inFrames) {
                        t.hook(&t, outTemp + (BLOCKSIZE-outFrames)*MAX_NUM_CHANNELS, inFrames,state->resampleTemp, aux);//执行实际的mix操作
                        t.frameCount -= inFrames;
                        outFrames -= inFrames;
                    }
                }
            }
            ditherAndClamp(out, outTemp, BLOCKSIZE);  //32bit转16bit
            out += BLOCKSIZE;
            numFrames += BLOCKSIZE;
        } while (numFrames < state->frameCount);
    }
    e0 = enabledTracks;
    while (e0) {
        const int i = 31 - __builtin_clz(e0);
        e0 &= ~(1<<i);
        track_t& t = state->tracks[i];
        t.bufferProvider->releaseBuffer(&t.buffer);  //释放data buffer
    }
}然后调用t.hook来执行实际的mixer动作。
最后调用releaseBuffer来释放data buffer。
t.hook就是在process__validate中挂接的钩子函数。主要有track__genericResample,track__16BitsMono,track__16BitsStereo
以track__16BitsStereo为例:
void AudioMixer::track__16BitsStereo(track_t* t, int32_t* out, size_t frameCount, int32_t* temp,
        int32_t* aux)
{
    const int16_t *in = static_cast<const int16_t *>(t->in);

            const uint32_t vrl = t->volumeRL;
            do {
                uint32_t rl = *reinterpret_cast<const uint32_t *>(in);
                in += 2;
                out[0] = mulAddRL(1, rl, vrl, out[0]);
                out[1] = mulAddRL(0, rl, vrl, out[1]);
                out += 2;
            } while (--frameCount);
}因为audio mixer的原理,就是把每个Track的PCM数据的简单叠加。但是叠加会造成溢出。
所以要先把16bit转成32bit来叠加。
计算完成后,还需要把32bit恢复成16bit。这就是ditherAndClamp函数干的事情了。
void ditherAndClamp(int32_t* out, const int32_t *sums, size_t c)
{
    size_t i;
    for (i=0 ; i<c ; i++) {
        int32_t l = *sums++;
        int32_t r = *sums++;
        int32_t nl = l >> 12;
        int32_t nr = r >> 12;
        l = clamp16(nl);
        r = clamp16(nr);
        *out++ = (r<<16) | (l & 0xFFFF);
    }
}下面看看clamp16到底做了什么:
static inline int16_t clamp16(int32_tsample)
{
   if ((sample>>15) ^ (sample>>31))
       sample = 0x7FFF ^ (sample>>31);
   return sample;
}那么,为什么Android要这么做呢?为什么不去优雅的保留信号的波形,而是选择让它直接消减掉呢?
可能就是因为
1. 混音的情况比较少见
2. 混音后溢出的情况也比较少见
3. 如果努力去保留信号的波形,势必要整体偏移16位,会造成声音细节的大量丢失,造成严重失真。
好了Audio Mixer大体就介绍这些


 2万+
2万+


 被折叠的 条评论
为什么被折叠?
被折叠的 条评论
为什么被折叠?
 到【灌水乐园】发言


