


参考的博客:http://www.cnblogs.com/fanyong/p/3424501.html
第一步:首先用如下命令查看是否安装了git
$ git –version
git version 2.7.4
如没有安装,则用如下命令进行安装:
sudo apt-get install git git-core 安装git
第二步:进行SSH认证
$ ssh -T git@github.com
packet_write_wait: Connection to 192.30.253.112 port 22:
Broken pipe**//解决办法见上篇博客**
$ ssh -T git@github.com
Permission denied (publickey).
$ ssh-keygen -C “your_email@example.com” -f ~/.ssh/github
参数含义:
-t 指定密钥类型,默认是 rsa非对称加密算法 ,可以省略。
-C 设置注释文字,比如邮箱。
-f 指定密钥文件存储文件名。
//引号中的是指自己Ubuntu的用户名和github的登录邮箱 例如:
ssh-keygen -t rsa -C “Wangxyid@163.com”
Generating public/private rsa key pair.
Enter passphrase (empty for no passphrase):
Enter same passphrase again:
The key fingerprint is:
SHA256:cof1Q0fc1QsEL7c73qR7VpkOZpzPi3NKWKM/RUX33Uc
The key’s randomart image is:
+—[RSA 2048]—-+
| .oo.oE|
| .o..O|
| …oo B|
| o oo..o.|
| . S . ++o o|
| o . +Bo+.|
| oo+*..|
| +o*B |
| BOo.|
+—-[SHA256]—–+
然后使用如下命令
$**cat ~/.ssh/github.pub**
将~/.ssh/github.pub公钥中的内容复制到剪贴板,公钥是一行长长的字符串,注意在粘贴时不要加入多余的空格、换行符等,否则在公钥认证过程当中因为服务端和客户端公钥不匹配而导致认证失败。最后将正确的公钥内容拷贝到GitHub的Key文本框中,并为这个ssh起个名字,保存即可。
设置成功后,用Terminal用ssh命令访问GitHub,会显示一条认证成功的消息并退出。
$ssh -T git@github.com
执行后提示:Hi github! You’ve successfully authenticated, but GitHub does not provide shell access.
$ ssh -T git@github.com
Warning: Permanently added the RSA host key for IP address ‘192.30.253.113’ to the list of known hosts.
Hi Wangxyang! You’ve successfully authenticated, but GitHub does not provide shell access.
二、提交代码至GitHub
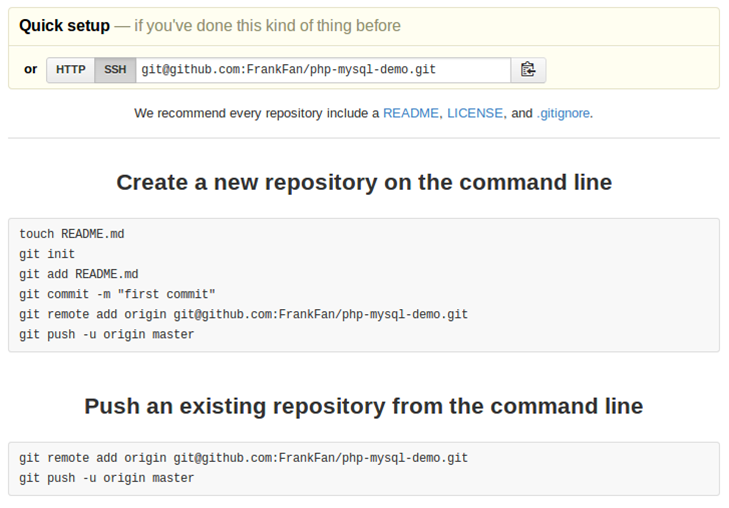
首先,在github.com上创建一个新的repo,根据情况加上适当的.gitignore,LICENSE等,然后提交本地代码至github
git pull 获取新版本
git status
git add .
git commit -m “add new files”
git remote add origin git@github.com:FranFan/php-demo
git push -u origin master
最后附上一张图,很有用。
创建仓库
$git init .
初始化空的 Git 仓库于 /home/wpython/PycharmProjects/superlists/.git/
下面的命令都是在/home/wpython/PycharmProjects/superlists/文件夹中输入的
第一次使用git时,使用如下命令进行
$ git config –global user.email “Wangxyid@163.com”
$ git config –global user.name “Wang”
添加想要提交的文件 ,显示仓库所有内容
$ ls
db.sqlite3 functional_tests.py manage.py superlists
db.sqlite3 是数据库文件,如果不想将其纳入版本控制,则用如下命令将其添加到一个特殊的文件夹 .gitignore中
$ echo “db.sqlite3” >> .gitignore
添加当前文件夹 (” . “)中的内容
$ git add .
$ ls
db.sqlite3 functional_tests.py geckodriver.log manage.py superlists
查看仓库状态
$ git status
位于分支 master
初始提交
要提交的变更:
(使用 “git rm –cached <文件>…” 以取消暂存)
新文件: .gitignore
新文件: functional_tests.py
新文件: geckodriver.log
新文件: manage.py
新文件: superlists/init.py
新文件: superlists/pycache/init.cpython-35.pyc
新文件: superlists/pycache/settings.cpython-35.pyc
新文件: superlists/pycache/urls.cpython-35.pyc
新文件: superlists/pycache/wsgi.cpython-35.pyc
新文件: superlists/settings.py
新文件: superlists/urls.py
新文件: superlists/wsgi.py
发现添加了很多没必要提交的.pyc文件,使用如下命令将其从git中删掉
$ git rm -r –cached superlists/_pycache_
rm ‘superlists/pycache/init.cpython-35.pyc’
rm ‘superlists/pycache/settings.cpython-35.pyc’
rm ‘superlists/pycache/urls.cpython-35.pyc’
rm ‘superlists/pycache/wsgi.cpython-35.pyc’
$ echo “_pycache_” >> .gitignore
$ echo “*.pyc” >> .gitignore
再次查看仓库状态
$ git status
位于分支 master
初始提交
要提交的变更:
(使用 “git rm –cached <文件>…” 以取消暂存)
新文件: .gitignore
新文件: functional_tests.py
新文件: geckodriver.log
新文件: manage.py
新文件: superlists/init.py
新文件: superlists/settings.py
新文件: superlists/urls.py
新文件: superlists/wsgi.py
尚未暂存以备提交的变更:
(使用 “git add <文件>…” 更新要提交的内容)
(使用 “git checkout – <文件>…” 丢弃工作区的改动)
修改: .gitignore
$ git commit
wang@ubuntu:/home/wpython/PycharmProjects/superlists/superlists**$ git status**
位于分支 master
初始提交
要提交的变更:
(使用 “git rm –cached <文件>…” 以取消暂存)
新文件: ../.gitignore
新文件: ../functional_tests.py
新文件: ../geckodriver.log
新文件: ../manage.py
新文件: init.py
新文件: settings.py
新文件: urls.py
新文件: wsgi.py
尚未暂存以备提交的变更:
(使用 “git add <文件>…” 更新要提交的内容)
(使用 “git checkout – <文件>…” 丢弃工作区的改动)
修改: ../.gitignore
wang@ubuntu:/home/wpython/PycharmProjects/superlists/superlists**$ git commit** 提示如下:
终止提交因为提交说明为空。
所以必须使得提交说明不为空才可以提交成功
$ git commit[master (根提交) 21fc5f2] ./gitignore
8 files changed, 184 insertions(+)
create mode 100644 .gitignore
create mode 100644 functional_tests.py
create mode 100644 geckodriver.log
create mode 100755 manage.py
create mode 100644 superlists/init.py
create mode 100644 superlists/settings.py
create mode 100644 superlists/urls.py
create mode 100644 superlists/wsgi.py
至此完成了第一个提交
问题:在github上看不到提交的代码
解决方法:
先在github网页上创建一个 test 的repository
然后在终端输入如下命令:
$ ls
db.sqlite3 functional_tests.py geckodriver.log manage.py superlists
$ git init
重新初始化现存的 Git 仓库于 /home/wpython/PycharmProjects/superlists/.git/
$ git commit -m “first commit”
位于分支 master
无文件要提交,干净的工作区
$ git add .
$ git status
位于分支 master
无文件要提交,干净的工作区
查看提交日志,撤销之前的提交,重新连接远程
$ git log
commit 3c58db195f8edabbfb350704ba2a52ec436e7ad2
Author: Wang Wangxyid@163.com
Date: Mon Dec 12 03:04:00 2016 +0800
./gitignore just try the first
commit 21fc5f28942844be5fce7bc7096bea3643b76b7b
Author: Wang Wangxyid@163.com
Date: Mon Dec 12 02:47:41 2016 +0800
./gitignore
撤销提交命令如下:
$ git reset –hard 21fc5f28942844be5fce7bc7096bea3643b76b7b
HEAD 现在位于 21fc5f2 ./gitignore
$ git remote add origin https://github.com/Wangxy1202/test.git
$ git push -u origin master
Username for ‘https://github.com‘: Wangxy1202
Password for ‘https://Wangxy1202@github.com‘:
对象计数中: 10, 完成.
Delta compression using up to 4 threads.
压缩对象中: 100% (8/8), 完成.
写入对象中: 100% (10/10), 2.83 KiB | 0 bytes/s, 完成.
Total 10 (delta 0), reused 0 (delta 0)
To https://github.com/Wangxy1202/test.git
* [new branch] master -> master
分支 master 设置为跟踪来自 origin 的远程分支 master。
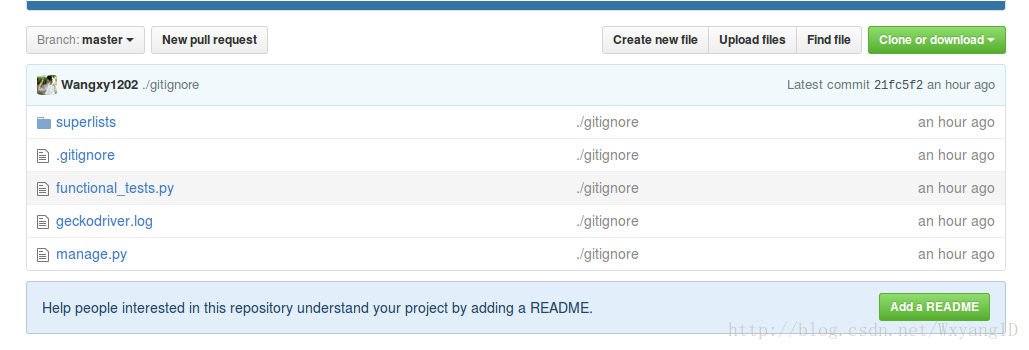
在github上可以查看 上传的代码


 1万+
1万+


 被折叠的 条评论
为什么被折叠?
被折叠的 条评论
为什么被折叠?
 到【灌水乐园】发言


