


OKhttp使用的步骤:
1.在build中加入okhttp,Gson的架包,还有修改build中的picasso:compile 'com.squareup.picasso:picasso:2.5.2',因为版本过低会出现问题
2.在修改仓库的地址,因为翻墙比较慢,即修改工程另一个build(可以不修改仓库,因为修改了运行不成功)
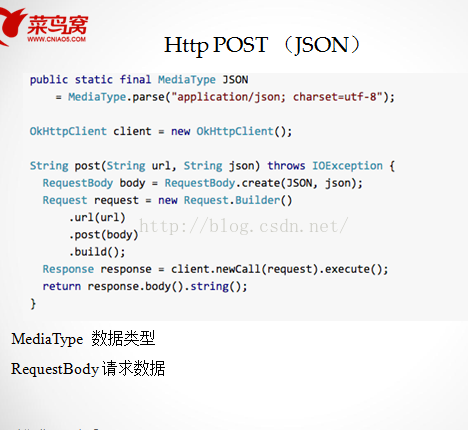
3.在类中编写okhttp代码,(获取的json数据,直接用string()来获得,或得到的数据还是json数据,需要使用Gson来解析),另外不能再主线程中编写网络请求
4.在bean文件夹中编写Banner类继承自BaseBean(是获取字段的javabean)
5.使用Gson 解析获取到的json数据
5.解析步骤:首先加入Gson的架包,右击项目dependence实现,然后看build中是否有引用
1.然后在获取网络数据的类中,新建Gson的对象 private Gson mGson = new Gson();
2.新建list对象来接收解析数据 private List<Banner> mBanner;
3.在okhttp中的get()方法中,实现解析,放入list
// Type type = new TypeToken<List<Banner>>(){}.getType();
// mBanner = mGson.fromJson(json,type);
4.然后就是遍历list中的数据,设置到你想要的地方
代码:
1.添加okhttp的dependence依赖:
compile 'com.squareup.okhttp:okhttp:2.5.0'

compile 'io.github.openfeign:feign-gson:9.3.1'
compile 'com.squareup.picasso:picasso:2.5.2'
allprojects {
    repositories {
        jcenter()
//        maven{ url 'http://maven.oschina.net/content/groups/public/'}
    }
}
3.编写okhttp的代码:
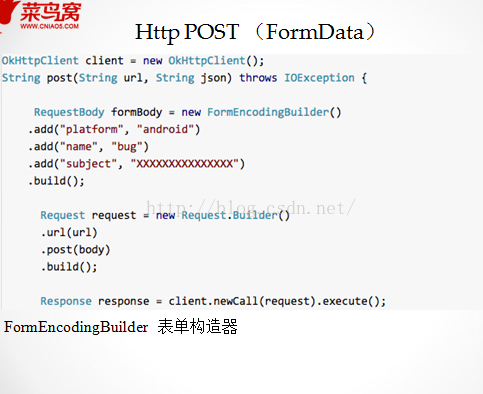
/**
 * 获取网络上的数据,用get方法,得到的json数据
 */
private void requestHttpImformation(){
    String url ="http://112.124.22.238:8081/course_api/banner/query";
    OkHttpClient okHttpClient=new OkHttpClient();
    RequestBody body = new FormEncodingBuilder().add("type","1").build();
    Request request=new Request.Builder().url(url).post(body).build();


     okHttpClient.newCall(request).enqueue(new Callback() {
            @Override
            public void onFailure(Request request, IOException e) {

            }

            @Override
            public void onResponse(Response response) throws IOException {

                if (response.isSuccessful()) {
                    String json = response.body().string();                   //json数据只需要用.string()获取就行
                    Type type=new TypeToken<List<Banner>>(){}.getType();      //使用Gson实现对json数据的解析
                    banners=gson.fromJson(json,type);                             //然后放在list中

                    Log.d(TAG, "获取的数据为" + json);
                }

            }
        });

}
4.从网络上获取的数据,按照包含什么样的数据,新建什么样的包,就要使用javabean,新建名字为banner:
package zuo.com.ui.bean;

/**用于存储网络上获取的json中的数据,用Gson解析的
 * Created by Administrator on 2016/10/10.
 */
public class Banner  {

    private  String name;
    private  String imgUrl;
    private  String description;

    public Banner(String name, String imgUrl, String description) {
        this.name = name;
        this.imgUrl = imgUrl;
        this.description = description;
    }

    public String getName() {
        return name;
    }

    public void setName(String name) {
        this.name = name;
    }

    public String getImgUrl() {
        return imgUrl;
    }

    public void setImgUrl(String imgUrl) {
        this.imgUrl = imgUrl;
    }

    public String getDescription() {
        return description;
    }

    public void setDescription(String description) {
        this.description = description;
    }
}
5.新建List<JavaBean> list对象,还有Gson对象,然后用Gson解析数据,将解析出的数据保存到list中
代码在3中,有详细的讲解
6.在sliderLayout中读取list中的数据,设置在textSliderView中,代码如下:
private void initSlider() {
    if(banners!=null) {
        for (Banner b:banners) {
            TextSliderView textSliderView = new TextSliderView(this.getActivity());
            textSliderView.description(b.getName()).image(b.getImgUrl());
            sliderLayout.addSlider(textSliderView);

        }

    }
        sliderLayout.setPresetIndicator(SliderLayout.PresetIndicators.Center_Bottom);    //这个为默认的indicator
//       sliderLayout.setCustomIndicator(pagerIndicator);     //设置下标的点,所在的位置在底部正中间
        sliderLayout.setCustomAnimation(new DescriptionAnimation());                       //动画效果
        sliderLayout.setPresetTransformer(SliderLayout.Transformer.RotateUp);              //设置转动模式,下面的文字说明自动出来
        sliderLayout.setDuration(3000);              //设置动画效果3秒自动转动
        //sliderLayout的监听事件,这个监听事件
        sliderLayout.addOnPageChangeListener(new ViewPagerEx.OnPageChangeListener() {
            @Override
            public void onPageScrolled(int position, float positionOffset, int positionOffsetPixels) {
        //    Log.d(TAG,"onPageScrolled");
            }

            @Override
            public void onPageSelected(int position) {
          //      Log.d(TAG,"onPageSelected");

            }

            @Override
            public void onPageScrollStateChanged(int state) {
            //    Log.d(TAG,"onPageScrollStateChanged");

            }
        });
效果图:


 3852
3852


 被折叠的 条评论
为什么被折叠?
被折叠的 条评论
为什么被折叠?
 到【灌水乐园】发言


