


皮肤更换的话,要做好还得配置一些theme什么的,感觉挺麻烦的,我这里就单纯的换一下背景并用SharedPreferences保存用户使用记录就行了
我的思路是:用户点击菜单项→弹出一个对话框→用户点击相应的Button→给gridView设置背景→用SharedPreferences保存设置
一、弹出对话框
相关代码
case R.id.item04:
AlertDialog dialog = new AlertDialog.Builder(this).create();
dialog.show();
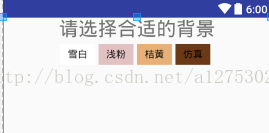
dialog.setContentView(R.layout.mydialog);mydialog.xml文件
很简单就是一个居中的线性布局嵌套了几个Button
<?xml version="1.0" encoding="utf-8"?>
<LinearLayout xmlns:android="http://schemas.android.com/apk/res/android"
    android:layout_width="match_parent"
    android:layout_height="match_parent"
    android:orientation="vertical"
   >
    <LinearLayout
        android:layout_width="match_parent"
        android:layout_height="match_parent"
        android:orientation="vertical"
        android:gravity="center">
    <TextView
        android:layout_width="wrap_content"
        android:layout_height="wrap_content"
        android:text="请选择合适的背景"
        android:textSize="28dp"/>
    <LinearLayout
        android:layout_width="match_parent"
        android:layout_height="match_parent"
        android:orientation="horizontal"
        android:layout_margin="5dp"
        android:gravity="center_horizontal">
    <Button
        android:id="@+id/shelfBg0"
        android:text="@string/bg_white"
        android:layout_width="50dp"
        android:layout_height="30dp"
        android:layout_marginRight="5dp"
        android:background="@color/shelf_background0"/>
     <Button
        android:id="@+id/shelfBg1"
        android:layout_width="50dp"
         android:text="@string/bg_pink"
        android:layout_height="30dp"
        android:layout_marginRight="5dp"
        android:background="@color/shelf_background1"/>
      <Button
        android:id="@+id/shelfBg2"
        android:layout_width="50dp"
          android:text="@string/bg_yellow"
        android:layout_height="30dp"
        android:layout_marginRight="5dp"
        android:background="@color/shelf_background2"/>
       <Button
        android:id="@+id/shelfBg3"
        android:layout_width="50dp"
           android:text="@string/bg_simulation"
        android:layout_marginRight="5dp"
        android:layout_height="30dp"
        android:background="@color/shelf_background3"/>
       </LinearLayout>
    </LinearLayout>
 </LinearLayout>
二、对话框监听事件及保存
dialog.findViewById(R.id.shelfBg0).setOnClickListener(new OnClickListener() {
				@Override
				public void onClick(View v) {
					// TODO Auto-generated method stub
					toolbarGrid.setBackground(mImages[0]);
					editor = sp.edit();
					editor.putInt("mSkins",mImages[0]);
					editor.commit();
					adapter.notifyDataSetChanged();
				}
});最后写一个方法在每次重新启动(onCreate)的时候调用就OK了
代码如下
//初始化皮肤
	public void iniSkin(){
		toolbarGrid.setBackground(sp.getInt("mSkins",mImages[0]));
	}
三、最终效果图
设置皮肤
下次进入

全文完!感谢阅读!


 9488
9488


 被折叠的 条评论
为什么被折叠?
被折叠的 条评论
为什么被折叠?
 到【灌水乐园】发言


