


博客核心内容:
- Python正则表达式(序)+分组筛选(有名和无名)
- Python常用模块:时间模块
- Python常用模块:random模块
- Python常用模块:os模块和sys模块
- Python常用模块:shutil模块
- Python常用模块:json模块
- Python常用模块:pickle模块
- Python常用模块:shelve模块
- Python常用模块:logging日志模块
- Python中的类与对象 (构造函数、this[self]关键字)
- Python常用模块:subprocess模块
| 1、 Python正则表达式(序) |
核心知识点:
部分代码示例:
#!/usr/bin/python
# -*- coding:utf-8 -*-
import re
str_info = "alex make love fenwei"
print(re.findall('alex.*wei',str_info))
print(re.search('e',str_info))
print(re.search('zhang',str_info))
print(re.search('e',str_info).group())
print(re.match('e',str_info))
print(re.search('^e',str_info))
#(a)和a的效果是一样的,单独自己就是整体的分组
print(re.search('(a)',str_info).group())
print(re.search('alex make',str_info).group())
print(re.search('alex\smake',str_info).group())
print(re.search('al(e)x\smak(e)',str_info).group())
print(re.search('al(e)x\smak(e)',str_info).group(0))
print(re.search('al(e)x\smak(e)',str_info).group(1))
print(re.search('al(e)x\smak(e)',str_info).group(2))
print(re.findall('alex\smake',str_info))
print(re.findall('al(e)x\smak(e)',str_info))
print(re.findall('al(?:e)x\smak(?:e)',str_info))
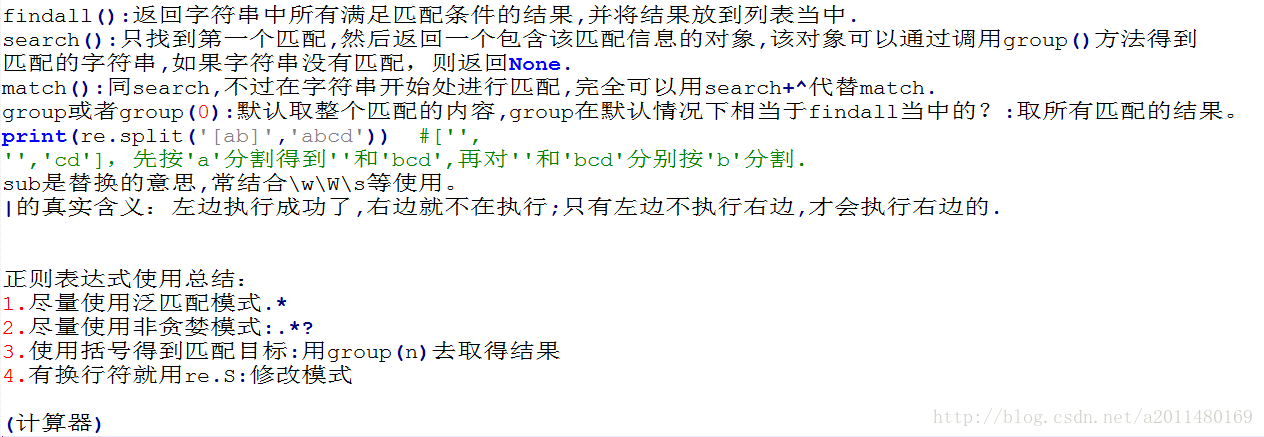
print(re.split('[ab]','abcd'))
print(re.sub('a','A',str_info))
print(re.sub('^a','A',str_info))
print(re.sub('^(\w+)(\s)(\w+)(\s)(\w+)$',r'\5\2\3\4\1','alex make love'))
print(re.sub('^(\w+)(\s)(\w+)(\s)(\w+)$',r'\5\2\3\4\1','alex make love fenwei'))
print(re.sub('^(\w+)(\s+)(\W)(\s+)(\w+)(\s+)(\W+)(\s+)(\w+)$',r'\9\2\3\4\5\6\7\8\1','alex | make \= love'))
print("下面的这种表示方式显得更加简单!")
print(re.sub('^(\w+)(\W+)(\w+)(\W+)(\w+)$',r'\5\2\3\4\1','alex | make \= love'))
print(re.sub('^(\w+)(\s+)(\w+)(\s+)(\w+)$',r'\5\2\3\4\1','alex make love'))
print(re.sub('^(\w+)(\s+)(\w+)(\s+)(\w+)$',r'\5\3\1','alex make love'))
print(re.sub('^(\w+)(\W+)(\w+)(\W+)(\w+)$',r'\5\2\3\4\1','alex " \ + = make --- / == love'))
print(re.search('company|companies','my company ,his companies').group())
print("如果匹配到右边,说明左边的肯定匹配失败")
print(re.search('companies|company','my company ,his companies').group())
print(re.findall('company|companies','my company ,his companies'))
运行结果:
['alex make love fenwei']
<_sre.SRE_Match object; span=(2, 3), match='e'>
None
e
None
None
a
alex make
alex make
alex make
alex make
e
e
['alex make']
[('e', 'e')]
['alex make']
['', '', 'cd']
Alex mAke love fenwei
Alex make love fenwei
love make alex
alex make love fenwei
love  | make  \=  alex
下面的这种表示方式显得更加简单!
love  | make  \=  alex
love     make    alex
lovemakealex
love  " \ + = make --- / ==   alex
company
如果匹配到右边,说明左边的肯定匹配失败
company
['company', 'companies']

Process finished with exit code 0
分组:
url(r’^search/(?P\w+)/$’, views.searchBook),
#!/usr/bin/python
# -*- coding:utf-8 -*-

import re

#无名分组
user_info1 = "dj173agfdsfldj123agdsf1236"
res1 = re.findall("dj(\d+)ag",user_info1)
print(res1)
res2 = re.findall("dj\d+ag",user_info1)
print(res2)

"""
上面的场景是我在爬虫的时候经常会用到的,因为如果不用分组的话,就无法从正则表达式中进一步
获取我想要的内容数据.
"""

#有名分组
res = re.search("dj(?P<name>\d+)ag",user_info1)
print(res)
print(res.group())
print(res.group("name"))

"""
分组的语法:'('')'
有名的语法:?P<标记符>
python中:无名分组通过findall实现,有名分组通过search实现(貌似findall不能有名,search不能有名)。
"""
运行结果:
['173', '123']
['dj173ag', 'dj123ag']
<_sre.SRE_Match object; span=(0, 7), match='dj173ag'>
dj173ag
173

Process finished with exit code 0| 2、 Python常用模块—时间模块 |
在Python中,通常有这几种方式来表示时间:
•时间戳(timestamp):通常来说,时间戳表示的是从1970年1月1日00:00:00开始按秒计算的偏移量。我们运行“type(time.time())”,返回的是float类型。
•格式化的时间字符串(Format String)
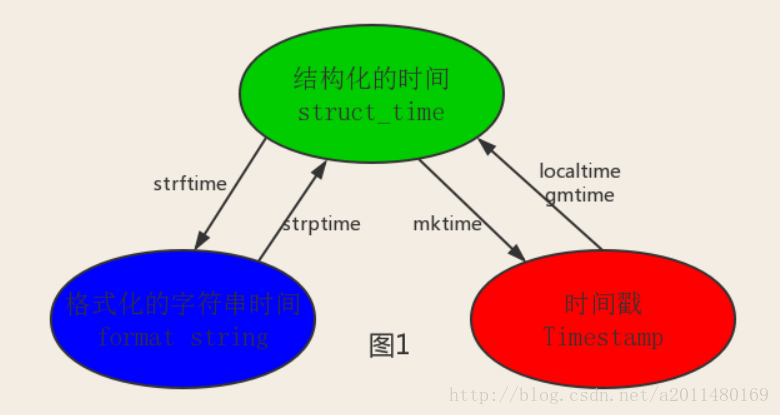
•结构化的时间(struct_time):struct_time元组共有9个元素共九个元素:(年,月,日,时,分,秒,一年中第几周,一年中第几天,夏令时)
其中计算机认识的时间只能是’时间戳’格式,而程序员可处理的或者说人类能看懂的时间有: ‘格式化的时间字符串’,’结构化的时间’ ,于是有了下图的转换关系。
关系转换图:
代码示例:
#!/usr/bin/python
# -*- coding:utf-8 -*-
import time
#时间戳
print(time.time())
#结构化的时间
print("下面的两个时间差了8个小时")
print(time.localtime())
print(time.gmtime())
#格式化的时间
print(time.strftime("%Y-%m-%d %H-%M-%S"))
print("%X代表的就是时分秒")
print(time.strftime("%Y-%m-%d-%X"))
#时间戳和结构化时间之间的转化
print(time.localtime(time.time()))
print(time.gmtime(time.time()))
print(time.mktime(time.localtime()))
print(time.mktime(time.gmtime()))
#结构化的时间和格式化的时间之间的相关转化
print(time.strftime("%Y-%m",time.localtime()))
print(time.strptime('2017-06-04 11:54:34','%Y-%m-%d %X'))
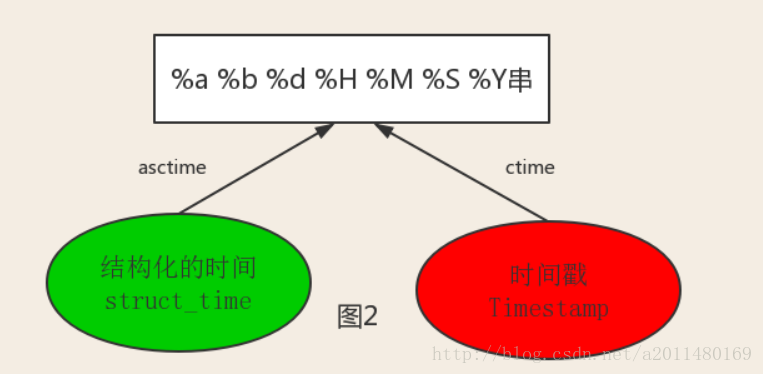
#结构化时间、时间戳和astime时间的转化
print(time.ctime(time.time()))
print(time.asctime(time.localtime()))
运行结果:
1496991122.0484
下面的两个时间差了8个小时
time.struct_time(tm_year=2017, tm_mon=6, tm_mday=9, tm_hour=14, tm_min=52, tm_sec=2, tm_wday=4, tm_yday=160, tm_isdst=0)
time.struct_time(tm_year=2017, tm_mon=6, tm_mday=9, tm_hour=6, tm_min=52, tm_sec=2, tm_wday=4, tm_yday=160, tm_isdst=0)
2017-06-09 14-52-02
%X代表的就是时分秒
2017-06-09-14:52:02
time.struct_time(tm_year=2017, tm_mon=6, tm_mday=9, tm_hour=14, tm_min=52, tm_sec=2, tm_wday=4, tm_yday=160, tm_isdst=0)
time.struct_time(tm_year=2017, tm_mon=6, tm_mday=9, tm_hour=6, tm_min=52, tm_sec=2, tm_wday=4, tm_yday=160, tm_isdst=0)
1496991122.0
1496962322.0
2017-06
time.struct_time(tm_year=2017, tm_mon=6, tm_mday=4, tm_hour=11, tm_min=54, tm_sec=34, tm_wday=6, tm_yday=155, tm_isdst=-1)
Fri Jun  9 14:52:02 2017
Fri Jun  9 14:52:02 2017

Process finished with exit code 0| 3、 random模块 |
代码示例1:
import random

print(random.random())#(0,1)----float    大于0且小于1之间的小数

print(random.randint(1,3))  #[1,3]    大于等于1且小于等于3之间的整数

print(random.randrange(1,3)) #[1,3)    大于等于1且小于3之间的整数

print(random.choice([1,'23',[4,5]]))#1或者23或者[4,5]

print(random.sample([1,'23',[4,5]],2))#列表元素任意2个组合

print(random.uniform(1,3))#大于1小于3的小数,如1.927109612082716


item=[1,3,5,7,9]
random.shuffle(item) #打乱item的顺序,相当于"洗牌"
print(item)
代码示例2:(生成验证码)
#!/usr/bin/python
# -*- coding:utf-8 -*-

import random

def v_code(n):
    res = ""
    for i in range(n):
        num = random.randint(0,9)
        s = chr(random.randint(65,90))
        add = random.choice([num,s])
        res += str(add)
    return res

print(v_code(7))
运行结果:
WFNW9N5

Process finished with exit code 0
| 4、 Python常用模块:os模块和sys模块 |
os模块是与操作系统交互的一个接口:
os.getcwd() 获取当前工作目录,即当前python脚本工作的目录路径
os.chdir("dirname")  改变当前脚本工作目录;相当于shell下cd
os.curdir  返回当前目录: ('.')
os.pardir  获取当前目录的父目录字符串名:('..')
os.makedirs('dirname1/dirname2')    可生成多层递归目录
os.removedirs('dirname1')    若目录为空,则删除,并递归到上一级目录,如若也为空,则删除,依此类推
os.mkdir('dirname')    生成单级目录;相当于shell中mkdir dirname
os.rmdir('dirname')    删除单级空目录,若目录不为空则无法删除,报错;相当于shell中rmdir dirname
os.listdir('dirname')    列出指定目录下的所有文件和子目录,包括隐藏文件,并以列表方式打印
os.remove()  删除一个文件
os.rename("oldname","newname")  重命名文件/目录
os.stat('path/filename')  获取文件/目录信息
os.sep    输出操作系统特定的路径分隔符,win下为"\\",Linux下为"/"
os.linesep    输出当前平台使用的行终止符,win下为"\t\n",Linux下为"\n"
os.pathsep    输出用于分割文件路径的字符串 win下为;,Linux下为:
os.name    输出字符串指示当前使用平台。win->'nt'; Linux->'posix'
os.system("bash command")  运行shell命令,直接显示
os.environ  获取系统环境变量
os.path.abspath(path)  返回path规范化的绝对路径
os.path.split(path)  将path分割成目录和文件名二元组返回
os.path.dirname(path)  返回path的目录。其实就是os.path.split(path)的第一个元素
os.path.basename(path)  返回path最后的文件名。如何path以/或\结尾,那么就会返回空值。即os.path.split(path)的第二个元素
os.path.exists(path)  如果path存在,返回True;如果path不存在,返回False
os.path.isabs(path)  如果path是绝对路径,返回True
os.path.isfile(path)  如果path是一个存在的文件,返回True。否则返回False
os.path.isdir(path)  如果path是一个存在的目录,则返回True。否则返回False
os.path.join(path1[, path2[, ...]])  将多个路径组合后返回,第一个绝对路径之前的参数将被忽略
os.path.getatime(path)  返回path所指向的文件或者目录的最后存取时间
os.path.getmtime(path)  返回path所指向的文件或者目录的最后修改时间
os.path.getsize(path) 返回path的大小
sys模块:
1 sys.argv           命令行参数List,第一个元素是程序本身路径
2 sys.exit(n)        退出程序,正常退出时exit(0)
3 sys.version        获取Python解释程序的版本信息
4 sys.maxint         最大的Int值
5 sys.path           返回模块的搜索路径,初始化时使用PYTHONPATH环境变量的值
6 sys.platform       返回操作系统平台名称
代码示例:
#!/usr/bin/python
# -*- coding:utf-8 -*-


import os

print(os.path.abspath(__file__))
print(os.path.dirname(os.path.abspath(__file__)))
print(os.path.dirname(os.path.dirname(os.path.abspath(__file__))))
运行结果:
D:\Python Work Location\Python 0507\day06\test1.py
D:\Python Work Location\Python 0507\day06
D:\Python Work Location\Python 0507

Process finished with exit code 0| 5、 Python常用模块:shutil模块 |
def copyfileobj(fsrc, fdst, length=16*1024):将文件内容拷贝到另一个文件中
def copyfile(src, dst, *, follow_symlinks=True):拷贝文件,并且目标文件无需存在
def copymode(src, dst, *, follow_symlinks=True):仅拷贝权限。内容、组、用户均不变,目标文件必须存在
def copy(src, dst, *, follow_symlinks=True):拷贝文件和权限
def copy2(src, dst, *, follow_symlinks=True):拷贝文件和状态信息
代码示例:
#!/usr/bin/python
# -*- coding:utf-8 -*-


import shutil

shutil.copyfileobj(open("test1.py","r"),open("test2.py","w"))
shutil.copyfile("test1.py","test3.py")
shutil.copymode("test1.py","test2.py")
shutil.copy("test1.py","test2.py")
shutil.copy2("test1.py","test2.py")| 6、 Python常用模块:json模块 |
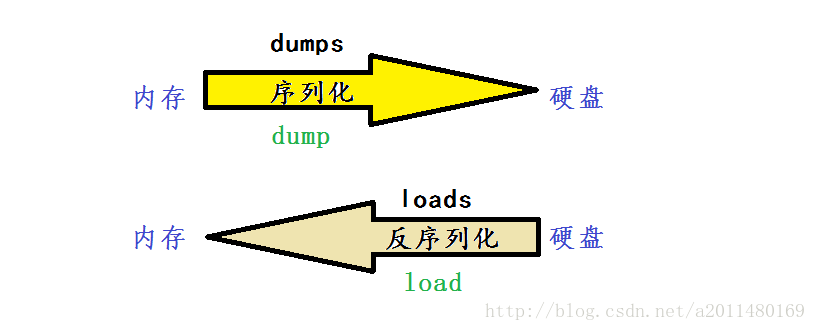
json和pickle(pickle只支持Python的数据类型)模块主要用于序列化和反序列化。
序列化:序列化需要先得到一个结果在写到文件里面去。内存—>硬盘
反序列化:读取文件得到一个结果,在写到内存里面去。 硬盘—>内存
如何将内存的数据共享给他人:将内存中的数据(字典等),将内存中的数据已json格式写到文件当中,然后在fr.read()在loads()即可。
序列化将数据写到文件当中(数据类型不变),反序列化将数据读到内存当中(数据类型不变)。
实例程序1:序列化与反序列的过程
#!/usr/bin/python
# -*- coding:utf-8 -*-


import json

#序列化的过程:dic ---> res=json.dumps(dic)--->f.write(res)
dic = {
    "name":"alex",
    "age":9000,
    "height":'150'
}

#通过json.dumps将一个字典转化成一个字符串,这个字符串是json可以识别的字符串
#此时res是json格式化后的字符串
res = json.dumps(dic)
print(res,type(res))

with open("a.json","w") as fw:
    fw.write(res)

#反序列的过程:res = fr.read() --> res = json.loads(res)--> dic = res
with open("a.json","r") as fr:
    dic = json.loads(fr.read())
    print(dic,type(dic))
    print(dic["name"])

#序列化与反序列的过程中保持数据类型不变
运行结果:
{"name": "alex", "age": 9000, "height": "150"} <class 'str'>
{'name': 'alex', 'age': 9000, 'height': '150'} <class 'dict'>
alex

Process finished with exit code 0
实例程序2:序列化与反序列的过程(简便程序)
#!/usr/bin/python
# -*- coding:utf-8 -*-


#序列化与反序列化的简单操作

import json

dic = {
    "name":"alex",
    "age":9000,
    "height":'150'
}

#序列化
json.dump(dic,open("b.json","w"))
#反序列化
res = json.load(open('b.json','r'))
print(res)
print(res["name"])
运行结果:
{'age': 9000, 'name': 'alex', 'height': '150'}
alex

Process finished with exit code 0
示例程序3:其余
#!/usr/bin/python
# -*- coding:utf-8 -*-


#eval序列化和反序列的过程
dict = {
    "name":"Alex",
    "age":"38",
    "height":"175"
}

#序列化
with open("word.txt","w") as fw:
    fw.write(str(dict))

#反序列化
with open("word.txt","r") as fr:
    res = eval(fr.read())
    print(res["name"])
    print(res,type(res))


#x = "[null,true,false,q]"#NameError: name 'null' is not defined
print("eval并不支持这种统一的格式")
x = "[None,True,False]"
res = eval(x)


a = "[null,true,false,1]"
import json
res2 = json.loads(a)
print(res2)


#x = "[null,true,false,1]"
# x2 = "[None,True,False]"
# import pickle
# print(pickle.loads(x2))
运行结果:
Alex
{'height': '175', 'age': '38', 'name': 'Alex'} <class 'dict'>
eval并不支持这种统一的格式
[None, True, False, 1]

Process finished with exit code 0
示例程序4:后期补充的
#!/usr/bin/python
# -*- coding:utf-8 -*-


import json
"""
1、当我们向文件当中写数据的时候,写入数据的类型必须是字符串,否则的话会报错
2、写入字符串的方式包含两种:__str__、str()、json.dump(dict,open("word.txt","a"))
"""
dict = {
    'name':'Alex',
    'age':'25'
}

print(type(dict))
print(type(str(dict)))

try:
    with open('word.txt',mode='a',encoding='utf-8') as fw:
        fw.write(dict)
except Exception as e:
    print('异常的信息是:%s'%e)

with open('word.txt',mode='a',encoding='utf-8') as fw:
    fw.write(dict.__str__())

with open('word.txt',mode='a',encoding='utf-8') as fw:
    fw.write(str(dict))

json.dump(dict,open("word.txt","a"))
运行结果:
{'age': '25', 'name': 'Alex'}{'age': '25', 'name': 'Alex'}{"age": "25", "name": "Alex"}5:后期补充的
#!/usr/bin/python
# -*- coding:utf-8 -*-


import json
"""
1、当我们向文件当中写数据的时候,写入数据的类型必须是字符串,否则的话会报错
2、写入字符串的方式包含两种:__str__、str()、json.dump(dict,open("word.txt","a"))
3、当我们直接从文件当中读取数据的时候:读取到的是字符串,而不是当初写入的类型
4、如果我们想在读取数据的时候仍能保持数据类型,此时需要用json模块
"""
# with open('word.txt',mode='r',encoding='utf-8') as fr:
#     content = fr.read()
#     print(content)
#     print(type(content))

with open("word.txt",mode="r",encoding="utf-8") as fr:
    res = json.loads(fr.read())
    print(type(res))
    print(res)


res = json.load(open('word.txt','r'))
print(res)
print(type(res))
文件word.txt中内容:
{"age": "25", "name": "Alex"}注意:word中的内容必须要用双引号,不然识别不了.
| 7、 Python常用模块:pickle |
转载网址:https://zhidao.baidu.com/question/1961914650144348460.html
pickle模块的使用:可以序列化Python任意的数据类型,其实准确的说,可以序列化Python
任意的对象,任意一个对象都可以序列化。
实例程序1:(稍微复杂一点的程序)
#!/usr/bin/python
# -*- coding:utf-8 -*-

import pickle

dic = {
    "name":"alex",
    "age":13,
}

#经过pickle转化之后是二进制的形式
print(pickle.dumps(dic))

#当我们打开文件的时候是bytes格式的形式
#序列化
with open("a.pkl","wb") as fw:
    fw.write(pickle.dumps(dic))

#反序列化
with open("a.pkl","rb") as fr:
    d = pickle.loads(fr.read())
    print(d,type(d))
运行结果:
b'\x80\x03}q\x00(X\x04\x00\x00\x00nameq\x01X\x04\x00\x00\x00alexq\x02X\x03\x00\x00\x00ageq\x03K\ru.'
{'name': 'alex', 'age': 13} <class 'dict'>

Process finished with exit code 0
示例程序2:(简单的程序)
#!/usr/bin/python
# -*- coding:utf-8 -*-


#通过pickle序列化与反序列的简单程序
import pickle

dic = {
    "name":"alex",
    "age":13
}

#序列化,但是当我们打开文件的时候是二进制的形式的显示
pickle.dump(dic,open("b.pkl","wb"))

res = pickle.load(open("b.pkl","rb"))
print(res,type(res))
print(res["name"])
运行结果:
{'name': 'alex', 'age': 13} <class 'dict'>
alex

Process finished with exit code 0
示例程序3:json不可以序列化函数
序列函数的实例:
1、json不可以序列化函数
#!/usr/bin/python
# -*- coding:utf-8 -*-

import json

def func():
    print("from func")

json.dumps(func)

运行结果:json不支持Python的函数类型
TypeError: <function func at 0x000000000251CBF8> is not JSON serializable
示例程序4:
2、pickle可以序列化任意的Python对象,但是有一些对象有一些自己的独特性质,函数名(内存地址)必须
要找到以前的值。
#!/usr/bin/python
# -*- coding:utf-8 -*-

import json
import pickle

def func():
    print("from func")

data = pickle.dumps(func)
print(data)

#序列化
pickle.dump(func,open("c.pkl","wb"))
#反序列化,(如果单独反序列化函数名,是错误的,因为函数体已经释放,单纯的函数名字是错误的)。
res = pickle.load(open("c.pkl","rb"))
print(res)
res()

运行结果:
b'\x80\x03c__main__\nfunc\nq\x00.'
<function func at 0x000000000217CBF8>
from func

Process finished with exit code 0

普通的数据类型:序列化的就是类型本身,函数序列化仅仅序列化一个内存地址。| 8、 Python常用模块: shelve |
shelve和pickle的效果是一样的,可以序列化所有的Python类型,只是换了一种形式进行序列化。
没有json模块使用普遍,用的普遍是json。(略)
| 9、 Python常用模块:logging日志模块 |
一:如果不指定filename,则默认打印到终端
二:指定日志级别:
指定方式:
1:level=10
2:level=logging.ERROR
日志级别种类:
    CRITICAL = 50
    FATAL = CRITICAL
    ERROR = 40
    WARNING = 30
    WARN = WARNING
    INFO = 20
    DEBUG = 10
    NOTSET = 0
代码示例:
#!/usr/bin/python
# -*- coding:utf-8 -*-


import logging


#1.导入一个logging模块,并做一些基本的配置
#filename日志文件的名字,如果不指定名字,则日志将会打印到终端。
#日志级别是由下向上打印。
#module:哪个模块在执行打印日志的功能,即当前执行文件
logging.basicConfig(filename="access.log",
                    format='%(asctime)s - %(name)s - %(levelname)s -%(module)s:  %(message)s',
                    datefmt='%Y-%m-%d %H:%M:%S %p',
                    level=40)

logging.debug("debug")
logging.info("info")
logging.warning("warning")
logging.error("error")
logging.critical("critical")
运行结果:
2017-06-10 01:25:04 AM - root - ERROR -test1:  error
2017-06-10 01:25:04 AM - root - CRITICAL -test1:  critical
2017-06-10 01:25:33 AM - root - ERROR -test1:  error
2017-06-10 01:25:33 AM - root - CRITICAL -test1: critical| 10、 Python中的类与对象 |
1> 把一类事物的静态属性和动态可以执行的操作组合在一起所得到的这个概念就是类
2>类的一个个体就是对象,对象是具体的,实实在在的事物
初始化构造函数:所谓初始化构造函数就是在构造对象的同时被对象自动调用,完成对事物的初始化,一个类只要生成一个类对象,它一定会调用构造函数,并且它永远只会调用一个.
self可以理解为this关键字
示例程序1:
#!/usr/bin/python
# -*- coding:utf-8 -*-


class  Chinese:
    langage = "Chinese"
    #self可以理解为对象本身:self指针变量指向当前时刻正在创建的对象
    def __init__(self,name,age,sex):
        self.name = name
        self.age = age
        self.sex = sex
    def talk(self):
        print("%s"%self.name)

if __name__ == '__main__':
    people1 = Chinese("tingting",25,"shaonv")
    print(people1.name)
    print(people1.age)
    print(people1.sex)
    people1.talk()

    people2 = Chinese("Alex",25,"man")
    print(people2.name)
    print(people2.age)
    print(people2.sex)
    people2.talk()
运行结果:
tingting
25
shaonv
tingting
Alex
25
man
Alex

Process finished with exit code 0
示例程序2:
#!/usr/bin/python
# -*- coding:utf-8 -*-


class Chinese:
    country_name = "China"
    def __init__(self,name,age,sex):
        self.name = name
        self.age = age
        self.sex = sex
    def talk(self):
        print("%s"%self)


if __name__ == '__main__':
    #增加一个属性
    Chinese.x = 1
    print(Chinese.x)
运行结果:
1

Process finished with exit code 0
实例程序3:下面的程序有一个问题????。
面向对象:(上帝似的的思维方式,所有存在的东西都是对象,一切都是对象)
可扩展性(和用户相关的,程序经常会发生变化)
def __init__(self):初始化构造函数
在Python当中,对象本身只有数据属性,但是类本身既有数据属性,也有函数属性。
在Python3当中,类型与类是同一个概念。
凡是在类内部定义的函数,没有加任何装饰器修饰的情况下,都是绑定方法(构造器吗?)。
#!/usr/bin/python
# -*- coding:utf-8 -*-


#序列化与反序列化的简单操作

class Student:
    langage = "chinese"
    def __init__(self,name,age,sex):
        self.name = name
        self.age = age
        self.sex = sex
    def fun(self):
        print(self.name+"\t"+str(self.age))

if __name__ == '__main__':
    student1 = Student("zhang",35,"man")
    student2 = Student("zhang", 35, "man")
    #说明属性和方法属于类本身的
    print(student1.langage,id(student1.langage))
    print(student2.langage, id(student2.langage))
    #地址为什么不一样呢?应该是指向同一块代码区域啊?结果是一个对象绑定一个方法
    print(student1.fun)
    print(student2.fun)
运行结果:
chinese 39431392
chinese 39431392
<bound method Student.fun of <__main__.Student object at 0x000000000261D208>>
<bound method Student.fun of <__main__.Student object at 0x000000000261D240>>

Process finished with exit code 0| 11、 Python常用模块:subprocess模块 |
(1)suprocess模块的作用:可以执行命令,并将命令的结果保存下来,并将结果往任意位置发送。
subprocess.Popen(‘dir’,shell=True,stdout=subprocess.PIPE)含义:执行dir这个命令,并将dir这个命令的
执行结果扔到管道里面去,(否则直接交给默认执行的终端)
过滤出avi结尾的文件:
subprocess.Popen(r’dir D:\Hadoop1.0全部软件\day06 | findstr avi*’,shell=True)
(2)将结果抛到管道里面,只能取一次内荣,取完一次之后管道里面就空了。
即管道里面的内容取一次之后就空了。
(3)以当前系统平台为准:windows:gbk linux:utf-8
示例程序1:
#!/usr/bin/python
# -*- coding:utf-8 -*-

import subprocess

"""
dir命令的作用:列出当前路径的文件以及文件夹
"""

#将dir命令的执行结果抛到stdout管道里面去
res = subprocess.Popen(r'dir',shell=True,stdout=subprocess.PIPE)
print(res)
#从stdout管道里面将命令的执行结果给拿出来
print(res.stdout.read().decode('gbk'))
运行结果:
<subprocess.Popen object at 0x0000000001E1CF60>
 驱动器 D 中的卷是 NewDisk
 卷的序列号是 B823-EC5F

 D:\Python Work Location\Python 0507\day08\directory1 的目录

2017/06/23  01:44    <DIR>          .
2017/06/23  01:44    <DIR>          ..
2017/06/23  01:44             1,600 Test1.py
2017/06/22  15:25               531 客户端.py
2017/06/22  15:22               398 服务端.py
               3 个文件          2,529 字节
               2 个目录 387,610,337,280 可用字节


Process finished with exit code 0
示例程序2:
#!/usr/bin/python
# -*- coding:utf-8 -*-

import subprocess

"""
dir命令的作用:列出当前路径的文件以及文件夹
"""

#若一个命令不存在,则将这个'命令'错误的执行结果抛到stderr管道里面去
res = subprocess.Popen('dirzhfds',shell=True,
                       stdout=subprocess.PIPE,
                       stderr=subprocess.PIPE)

print("====>",res.stdout.read().decode('gbk'))
print("====>",res.stderr.read().decode('gbk'))
运行结果:
====>
====> 'dirzhfds' 不是内部或外部命令,也不是可运行的程序
或批处理文件。


Process finished with exit code 0
示例程序3:
#!/usr/bin/python
# -*- coding:utf-8 -*-

import subprocess

"""
dir命令的作用:列出当前路径的文件以及文件夹
"""

#从D:\Hadoop1.0全部软件\day06过滤出txt文件
res = subprocess.Popen(r'dir D:\Hadoop1.0全部软件\day06 |findstr txt*',shell=True,
                 stderr=subprocess.PIPE,
                 stdout=subprocess.PIPE)

print(res.stdout.read().decode('gbk'))
运行结果:
2017/06/23  01:58                 0 aa.txt


Process finished with exit code 0
示例程序4:
#!/usr/bin/python
# -*- coding:utf-8 -*-

import subprocess

"""
dir命令的作用:列出当前路径的文件以及文件夹
"""


#广义用法:将上一个命令的执行结果作为下一个命令的输入
res1 = subprocess.Popen(r'dir D:\Hadoop1.0全部软件\day06',shell=True,
                        stdout=subprocess.PIPE)
print(res1)

#将res1的输出作为res2的输入
res2 = subprocess.Popen(r'findstr txt*',shell=True,
                        stdin=res1.stdout,
                        stdout=subprocess.PIPE,
                        stderr=subprocess.PIPE)
print(res2.stdout.read().decode('gbk'))
#管道里面的内容拿出来之后就没有了
print("====>",res2.stdout.read().decode('gbk'))
运行结果:
<subprocess.Popen object at 0x00000000021CC908>
2017/06/23  01:58                 0 aa.txt

====>

Process finished with exit code 0


 2万+
2万+


 被折叠的 条评论
为什么被折叠?
被折叠的 条评论
为什么被折叠?
 到【灌水乐园】发言


