


博客核心内容:
深入理解Python中的引用
相关实例程序
对于字典查找和列表查找,当涉及的频繁操作的时候,我们就应该用字典查找代替列表查找。
示例程序1:
#!/usr/bin/python
# -*- coding:utf-8 -*-

users_info = [
    {'id':1,'name':'alex','pwd':'123'},
    {'id':2,'name':'egon','pwd':'456'},
    {'id':3,'name':'eric','pwd':'789'},
]

users_dict = {}
for item in users_info:
    users_dict[item['id']] = item

"""
运行的相关结果:
(1, {'id':1,'name':'alex','pwd':'123'})
(2, {'id':2,'name':'egon','pwd':'456'})
(3, {'id':3,'name':'eric','pwd':'789'})
"""
示例程序2:在上面的程序中,value值实际上只占用了一块内存空间
#!/usr/bin/python
# -*- coding:utf-8 -*-

users_info = [
    {'id':1,'name':'alex','pwd':'123'},
    {'id':2,'name':'egon','pwd':'456'},
    {'id':3,'name':'eric','pwd':'789'},
]

users_dict = {}
for item in users_info:
    users_dict[item['id']] = item

"""
运行的相关结果:
(1, {'id':1,'name':'alex','pwd':'123'})
(2, {'id':2,'name':'egon','pwd':'456'})
(3, {'id':3,'name':'eric','pwd':'789'})
"""

# 我们通过字典去改变列表中的数值
users_dict[1]['pwd']=345

# 查看因字典改变而受到影响的列表
for item in users_info:
    print(item)

"""
{'id': 1, 'pwd': 345, 'name': 'alex'}
{'id': 2, 'pwd': '456', 'name': 'egon'}
{'id': 3, 'pwd': '789', 'name': 'eric'}
"""
示例3:嵌套的递归应用
#!/usr/bin/python
# -*- coding:utf-8 -*-

"""
目的:根据comment_list生成我们最终想要的结果
"""

comment_list = [
        {'id':1,'news_id':1,'user_id':10,'content':'写的什么玩意啊','parent_id':None},
        {'id':2,'news_id':1,'user_id':11,'content':'还真不是什么玩意','parent_id':1},
        {'id':3,'news_id':1,'user_id':12,'content':'写的真好','parent_id':1},
        {'id':4,'news_id':1,'user_id':11,'content':'我总算看明白了,原来是因为我智商低','parent_id':3},
        {'id':5,'news_id':1,'user_id':19,'content':'还可以吧','parent_id':None},
    ]

#步骤1:将列表格式转化为字典格式进行存储,同时增加child相关信息
comment_dict = {}
for row in comment_list:
        row['child'] = []
        comment_dict[row['id']] = row

for k,v in comment_dict.items():
        print(k,v)

"""
第一步骤得到我们想要的结果:
1  {'news_id': 1, 'content': '写的什么玩意啊', 'id': 1, 'child': [], 'parent_id': None, 'user_id': 10}
2  {'news_id': 1, 'content': '还真不是什么玩意', 'id': 2, 'child': [], 'parent_id': 1, 'user_id': 11}
3  {'news_id': 1, 'content': '写的真好', 'id': 3, 'child': [], 'parent_id': 1, 'user_id': 12}
4  {'news_id': 1, 'content': '我总算看明白了,原来是因为我智商低', 'id': 4, 'child': [], 'parent_id': 3, 'user_id': 11}
5  {'news_id': 1, 'content': '还可以吧', 'id': 5, 'child': [], 'parent_id': None, 'user_id': 19}
"""

#步骤二:如果某个评论拥有父亲评论,则我们将其添加到父列表当中,下面一步也是最终要的一步
print('*'*100)
for row in comment_list:
        if row['parent_id']:
                parent_id = row['parent_id']
                comment_dict[parent_id]['child'].append(row)
        else:
                pass

for key,value in comment_dict.items():
        print(key,value)

"""
1  {'news_id': 1, 'content': '写的什么玩意啊', 'parent_id': None, 'user_id': 10, 'id': 1,
    'child': [{'news_id': 1, 'content': '还真不是什么玩意', 'parent_id': 1, 'user_id': 11, 'id': 2, 'child': []},
              {'news_id': 1, 'content': '写的真好', 'parent_id': 1, 'user_id': 12, 'id': 3,
               'child':
                      [{'news_id': 1, 'content': '我总算看明白了,原来是因为我智商低', 'parent_id': 3, 'user_id': 11, 'id': 4, 'child': []}]}]
    }
2  {'news_id': 1, 'content': '还真不是什么玩意', 'parent_id': 1, 'user_id': 11, 'id': 2, 'child': []}
3  {'news_id': 1, 'content': '写的真好', 'parent_id': 1, 'user_id': 12, 'id': 3,
    'child':
           [{'news_id': 1, 'content': '我总算看明白了,原来是因为我智商低', 'parent_id': 3, 'user_id': 11, 'id': 4, 'child': []}]
   }
4  {'news_id': 1, 'content': '我总算看明白了,原来是因为我智商低', 'parent_id': 3, 'user_id': 11, 'id': 4, 'child': []}
5  {'news_id': 1, 'content': '还可以吧', 'parent_id': None, 'user_id': 19, 'id': 5, 'child': []}
"""

# 步骤3:清洗数据,获得我们期望的最终结果
print('*'*100)
comment_result = {}
for k,v in comment_dict.items():
        if v['parent_id'] == None:
                comment_result[k] = v

print(comment_result.__len__())
for k,v in comment_result.items():
        print(k,v)

"""
1 {'user_id': 10, 'child': [{'user_id': 11, 'child': [], 'content': '还真不是什么玩意', 'news_id': 1, 'parent_id': 1, 'id': 2}, {'user_id': 12, 'child': [{'user_id': 11, 'child': [], 'content': '我总算看明白了,原来是因为我智商低', 'news_id': 1, 'parent_id': 3, 'id': 4}], 'content': '写的真好', 'news_id': 1, 'parent_id': 1, 'id': 3}], 'content': '写的什么玩意啊', 'news_id': 1, 'parent_id': None, 'id': 1}
5 {'user_id': 19, 'child': [], 'content': '还可以吧', 'news_id': 1, 'parent_id': None, 'id': 5}
"""
多级评论的相关实例
多级评论的前端页面展示
我们通过利用css样式设计的技巧,达到多级评论的效果.
实例程序1:
<!DOCTYPE html>
<html lang="en">
<head>
    <meta charset="UTF-8">
    <title>Title</title>
    <style>
        .comment > .content {
            margin-left: 30px;
            color: red;
            font-weight: 700;
        }
    </style>
</head>
<body>
<h3>今天上海渡劫的视频真给力啊?</h3>
<div class="comment">
    <div class="content">
        <div class="item">我擦,是真的吗?</div>
        <div class="comment">
            <div class="content">
                <div class="item">你个傻x,这你也信!</div>
            </div>
        </div>
        <div class="item">不应该吧!</div>
        <div class="comment">
            <div class="content">
                <div class="item">肯定是假的啊!</div>
                <div class="item">应该是假的!</div>
            </div>
        </div>
        <div class="item">肯定是假的!</div>
    </div>
</div>
</body>
</html>
效果展示:

实例程序2:将后台的html页面传入到前台页面进行显示
后台代码:
def comment(request):
    comment_content = """
    <div class="comment">
    <div class="content">
        <div class="item">我擦,是真的吗?</div>
        <div class="comment">
            <div class="content">
                <div class="item">你个傻x,这你也信!</div>
            </div>
        </div>
        <div class="item">不应该吧!</div>
        <div class="comment">
            <div class="content">
                <div class="item">肯定是假的啊!</div>
                <div class="item">应该是假的!</div>
            </div>
        </div>
        <div class="item">肯定是假的!</div>
    </div>
</div>
    """
    return render(request,'comment.html',{'comment_content':comment_content})
前端显示:
<!DOCTYPE html>
<html lang="en">
<head>
    <meta charset="UTF-8">
    <title>Title</title>
    <style>
        .comment > .content {
            margin-left: 30px;
            color: red;
            font-weight: 700;
        }
    </style>
</head>
<body>
<h3>今天上海渡劫的视频真给力啊?</h3>
{{ comment_content|safe }}
</body>
</html>
渲染出的效果和上面是一样的.
利用递归的方法形成多级评论(核心)
根据前端页面的展示情况在后台进行相应的操作
数据库当中的内容:

后台代码:
def create_child_node(child_list):
    pre_str = """
       <div class="comment">
           <div class="content">
    """
    for item in child_list:
        tpl = '<div class="item">%s: %s</div>'
        content = tpl % (item['user__username'], item['content'])
        pre_str = pre_str + content
        if item['child']:
            # 在这里面用到了递归
            child_str = create_child_node(item['child'])
            pre_str = pre_str + child_str
    end_str = """
           </div>
       </div>
    """

    return pre_str+end_str


def create_html(comment_result):
    pre_str = """
       <div class="comment">
           <div class="content">
    """
    for key,value in comment_result.items():
        tpl = '<div class="item">%s: %s</div>'
        content = tpl%(value['user__username'],value['content'])
        pre_str = pre_str + content
        # 如果该评论含有相应的子评论
        if value['child']:
            child_str = create_child_node(value['child'])
            pre_str = pre_str + child_str
    end_str = """
           </div>
       </div>
    """

    print(pre_str+end_str)
    return pre_str+end_str


def comment(request):
    # 到底获取什么内容,是由我们用户进行自定义的
    comment_list = models.Comment.objects.filter(news_id=1).values('id','news_id','user_id','content','parent_id','user__username')
    """
    {'user_id': 10, 'id': 1, 'news_id': 1, 'content': '写的什么玩意啊?', 'parent_id': None, 'user__username': 'Klay'}
    {'user_id': 11, 'id': 2, 'news_id': 1, 'content': '还auth_group不是什么玩意?', 'parent_id': 1, 'user__username': 'Jenson'}
    {'user_id': 12, 'id': 3, 'news_id': 1, 'content': '写的真好!', 'parent_id': 1, 'user__username': 'Darcie'}
    {'user_id': 11, 'id': 4, 'news_id': 1, 'content': '我总算看明白了,原来是因为我智商低.', 'parent_id': 3, 'user__username': 'Jenson'}
    {'user_id': 19, 'id': 5, 'news_id': 1, 'content': '还可以吧!', 'parent_id': None, 'user__username': 'ashley'}
    {'user_id': 20, 'id': 6, 'news_id': 1, 'content': '有点意思!', 'parent_id': 3, 'user__username': 'baby'}
    """

    # 步骤1:
    comment_dict = {}
    for row in comment_list:
        # 先给每一条评论增加上一个字段child
        row['child'] = []
        comment_dict[row['id']] = row

    # 步骤二:最重要的一步
    for row in comment_list:
        if row['parent_id']:
            # 如果该评论拥有父评论,则添加到父亲的child列表当中
            parent_id = row['parent_id']
            # 因为append,所以是同一块内存空间
            comment_dict[parent_id]['child'].append(row)
        else:
            pass

    # 步骤三:清洗数据,获取最终的结果
    comment_result = {}
    for k, v in comment_dict.items():
        if v['parent_id'] == None:
            comment_result[k] = v
    print(comment_result.__len__())
    """
    (1, {'parent_id': None, 'child': [{'parent_id': 1, 'child': [], 'content': '还不是什么玩意?', 'news_id': 1, 'user_id': 11, 'id': 2}, {'parent_id': 1, 'child': [{'parent_id': 3, 'child': [], 'content': '我总算看明
    白了,原来是因为我智商低.', 'news_id': 1, 'user_id': 11, 'id': 4}, {'parent_id': 3, 'child': [], 'content': '有点意思!', 'news_id': 1, 'user_id': 20, 'id': 6}], 'content': '写的真好!', 'news_id': 1, 'user_id': 12
    , 'id': 3}], 'content': '写的什么玩意啊?', 'news_id': 1, 'user_id': 10, 'id': 1})
    (5, {'parent_id': None, 'child': [], 'content': '还可以吧!', 'news_id': 1, 'user_id': 19, 'id': 5})
    """

    # 到现在为止我们已经获取了我们的结构化数据comment_result = {},接下来进行处理,返回到前端页面

    comment_str = create_html(comment_result)
    return render(request,'comment.html',{'comment_str':comment_str})
前端页面代码:
<!DOCTYPE html>
<html lang="en">
<head>
    <meta charset="UTF-8">
    <title>Title</title>
    <style>
        .comment > .content {
            margin-left: 30px;
            color: red;
            font-weight: 700;
        }
    </style>
</head>
<body>
<h3>今天上海渡劫的视频真给力啊?</h3>
{{ comment_str|safe }}
</body>
</html>
运行效果:
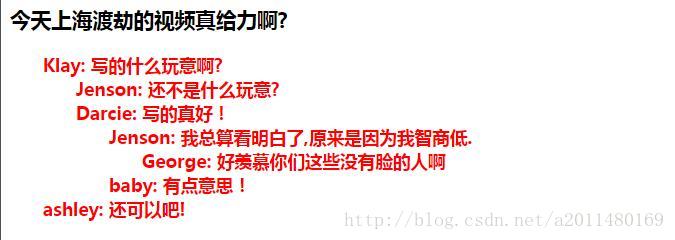
生成的相应的html代码:
<div class="comment">
    <div class="content">
        <div class="item">Klay: 写的什么玩意啊?</div>
        <div class="comment">
            <div class="content">
                <div class="item">Jenson: 还不是什么玩意?</div>
                <div class="item">Darcie: 写的真好!</div>
                <div class="comment">
                    <div class="content">
                        <div class="item">Jenson: 我总算看明白了,原来是因为我智商低.</div>
                        <div class="comment">
                            <div class="content">
                                <div class="item">George: 好羡慕你们这些没有脸的人啊</div>
                            </div>
                        </div>
                        <div class="item">baby: 有点意思!</div>
                    </div>
                </div>
            </div>
        </div>
        <div class="item">ashley: 还可以吧!</div>
    </div>
</div>
动态展示效果图以及相应代码
{% load staticfiles %}
<!DOCTYPE html>
<html lang="en">
<head>
    <meta charset="UTF-8">
    <title>Title</title>
    <style>
        .comment > .content {
            margin-left: 30px;
            font-family: 楷体;
            font-weight: 700;
        }

        .hide {
            display: none;
        }
    </style>
</head>
<body>
<p>
<div style="font-weight: 700;font-family: 楷体;color: red">今天上海渡劫的视频真给力啊?</div>
</p>
{{ comment_str|safe }}


<script src="{% static  "js/jquery-1.11.3.min.js" %}"></script>
<script>
    $(function () {
        {# 给title标题添加相应的事件 #}
        $('.item').click(function () {
            if ($(this).next().hasClass('comment')) {
                if ($(this).next().hasClass('hide')) {
                    $(this).next().removeClass('hide')
                } else {
                    $(this).next().addClass('hide')
                }
            }
        })
    })
</script>
</body>
</html>
效果展示:

管理菜单
简单的动态管理菜单静态图
准则:一个静态标题对应一个item系列.
下面我们实现一个简单的动态管理菜单
[参考链接]http://blog.csdn.net/a2011480169/article/details/78145160)
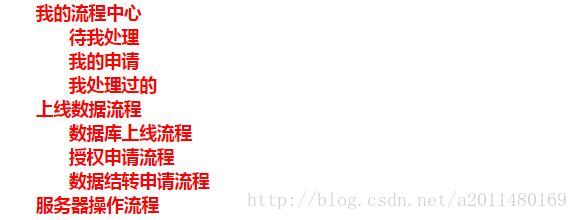
当然我们希望是下面这样的(下面的这个还没有实现动态的效果)
<div class="comment">
    <div class="content">
        <div class="item">我的流程中心</div>
        <div class="comment">
            <div class="content">
                <div class="item">待我处理</div>
                <div class="item">我的申请</div>
                <div class="item">我处理过的</div>
            </div>
        </div>
        <div class="item">上线数据流程</div>
        <div class="comment">
            <div class="content">
                <div class="item">数据库上线流程</div>
                <div class="item">授权申请流程</div>
                <div class="item">数据结转申请流程</div>
            </div>
        </div>
        <div class="item">服务器操作流程</div>
    </div>
</div>
效果:
但是到现在为止,我们还没有实现动态折叠的效果呢!
简单的动态管理菜单动态图
代码示例:
前端代码:
{% load staticfiles %}
<!DOCTYPE html>
<html lang="en">
<head>
<meta charset="UTF-8">
<title>Title</title>
<style>
.body a {
display: block;
}
.item .body {
margin-left: 30px;
}
.item .hide {
display: none;
}
</style>
</head>
<body>
{#接下来我们要实现菜单的功能#}
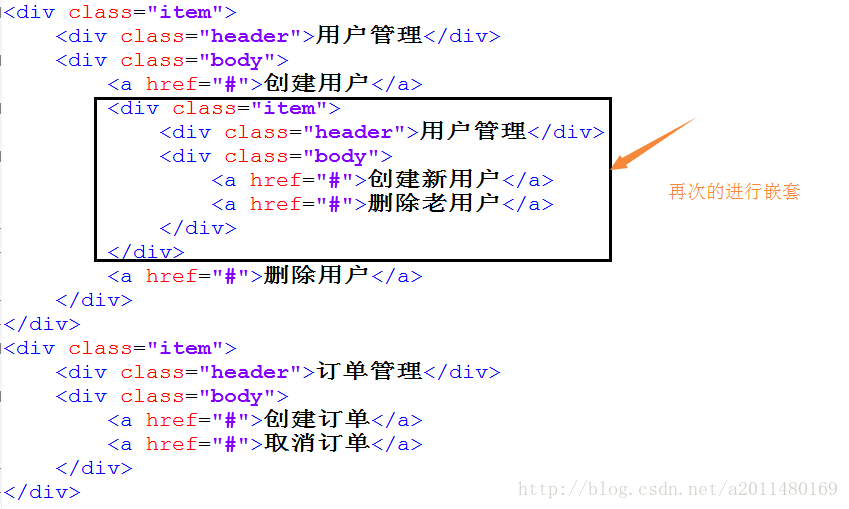
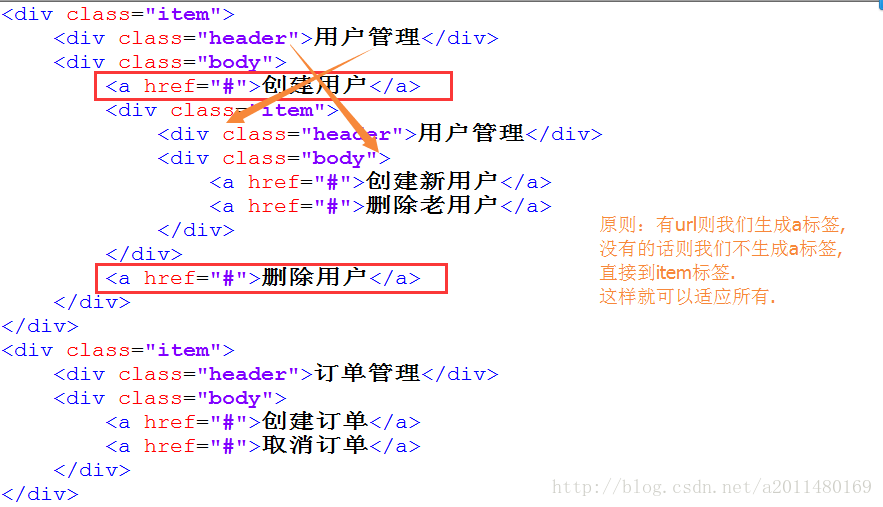
<div class="item">
<div class="title">用户管理</div>
<div class="body hide">
<a href="#">创建用户</a>
<div class="item">
<div class="title">用户管理</div>
<div class="body hide">
<a href="#">创建用户</a>
<a href="#">用户列表</a>
</div>
</div>
<a href="#">用户列表</a>
</div>
</div>
<div class="item">
<div class="title">订单管理</div>
<div class="body hide">
<a href="#">创建订单</a>
<a href="#">取消订单</a>
</div>
</div>
<script src="{% static "js/jquery-1.11.3.min.js" %}"></script>
<script>
{# 一旦加载页面,就执行里面的函数 #}
$(function () {
{# 给title标题添加相应的事件 #}
$('.title').click(function () {
if ($(this).next().hasClass('hide')) {
$(this).next().removeClass('hide')
} else {
$(this).next().addClass('hide')
}
})
})
</script>
</body>
</html>效果展示:

代码块总结:
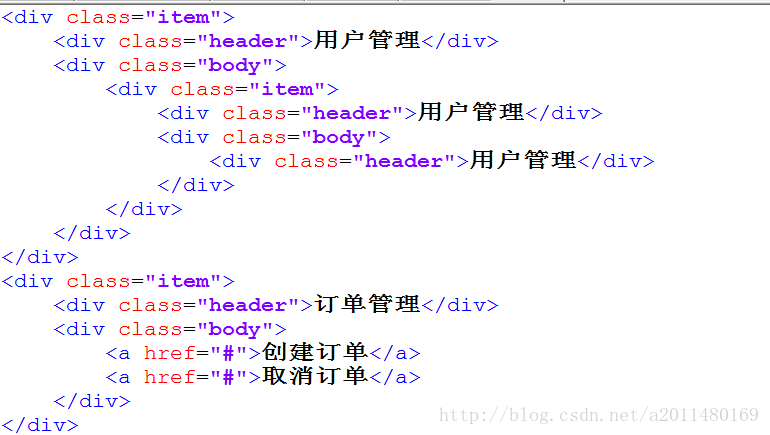
如果没有url我们就可以用下面的模板:
<div class="item">
    <div class="header">用户管理</div>
    <div class="body">
        <div class="item">
            <div class="header">用户管理</div>
            <div class="body">
                <div class="item">
                    <div class="header">用户管理</div>
                </div>
            </div>
        </div>
    </div>
</div>
<div class="item">
    <div class="header">用户管理</div>
</div>简单的动态管理菜单动态图引发出的多级评论(利用模板改造而来)没有标签
下满我们就用上面这种方法去写动态的多级评论,并且这次涉及到的递归算法和上面是类似的。
示例程序:
def create_child_node(child_list):
    pre_str = """
    <div class="child">
         <div class="item">
    """
    for item in child_list:
        tpl = '<div class="header">%s: %s</div>'
        content = tpl % (item['user__username'], item['content'])
        pre_str = pre_str + content
        # 在这一层用到了递归
        if item['child']:
            # 在这里面用到了递归
            child_str = create_child_node(item['child'])
            pre_str = pre_str + child_str

    end_str = """
         </div>
    </div>
    """

    return pre_str+end_str


def build_comment_tree(comment_result):
    """
    function:通过递归形成相应的html
    (1, {'parent_id': None, 'child': [{'parent_id': 1, 'child': [], 'content': '还不是什么玩意?', 'news_id': 1, 'user_id': 11, 'id': 2}, {'parent_id': 1, 'child': [{'parent_id': 3, 'child': [], 'content': '我总算看明
    白了,原来是因为我智商低.', 'news_id': 1, 'user_id': 11, 'id': 4}, {'parent_id': 3, 'child': [], 'content': '有点意思!', 'news_id': 1, 'user_id': 20, 'id': 6}], 'content': '写的真好!', 'news_id': 1, 'user_id': 12
    , 'id': 3}], 'content': '写的什么玩意啊?', 'news_id': 1, 'user_id': 10, 'id': 1})
    (5, {'parent_id': None, 'child': [], 'content': '还可以吧!', 'news_id': 1, 'user_id': 19, 'id': 5})
    有url生成a标签,没有的话则生成div标签
    """
    # 步骤1:我们先形成最外面的评论
    pre_str = """
         <div class="item">
    """
    end_str = """
         </div>
    """

    comment_str = ""
    for key,value in comment_result.items():
        tpl = '<div class="header">%s: %s</div>'
        content = tpl%(value['user__username'],value['content'])
        if value['child']:
            child_str = create_child_node(value['child'])
            comment_str +=  pre_str+content+child_str+end_str
        else:
            comment_str += pre_str + content + end_str

    return comment_str


def comment(request):
    # 到底获取什么内容,是由我们用户进行自定义的
    comment_list = models.Comment.objects.filter(news_id=1).values('id','news_id','user_id','content','parent_id','user__username')
    """
    {'user_id': 10, 'id': 1, 'news_id': 1, 'content': '写的什么玩意啊?', 'parent_id': None, 'user__username': 'Klay'}
    {'user_id': 11, 'id': 2, 'news_id': 1, 'content': '还auth_group不是什么玩意?', 'parent_id': 1, 'user__username': 'Jenson'}
    {'user_id': 12, 'id': 3, 'news_id': 1, 'content': '写的真好!', 'parent_id': 1, 'user__username': 'Darcie'}
    {'user_id': 11, 'id': 4, 'news_id': 1, 'content': '我总算看明白了,原来是因为我智商低.', 'parent_id': 3, 'user__username': 'Jenson'}
    {'user_id': 19, 'id': 5, 'news_id': 1, 'content': '还可以吧!', 'parent_id': None, 'user__username': 'ashley'}
    {'user_id': 20, 'id': 6, 'news_id': 1, 'content': '有点意思!', 'parent_id': 3, 'user__username': 'baby'}
    """

    # 步骤1:
    comment_dict = {}
    for row in comment_list:
        # 先给每一条评论增加上一个字段child
        row['child'] = []
        comment_dict[row['id']] = row

    # 步骤二:最重要的一步
    for row in comment_list:
        if row['parent_id']:
            # 如果该评论拥有父评论,则添加到父亲的child列表当中
            parent_id = row['parent_id']
            # 因为append,所以是同一块内存空间
            comment_dict[parent_id]['child'].append(row)
        else:
            pass

    # 步骤三:清洗数据,获取最终的结果
    comment_result = {}
    for k, v in comment_dict.items():
        if v['parent_id'] == None:
            comment_result[k] = v
    print(comment_result.__len__())
    """
    (1, {'parent_id': None, 'child': [{'parent_id': 1, 'child': [], 'content': '还不是什么玩意?', 'news_id': 1, 'user_id': 11, 'id': 2}, {'parent_id': 1, 'child': [{'parent_id': 3, 'child': [], 'content': '我总算看明
    白了,原来是因为我智商低.', 'news_id': 1, 'user_id': 11, 'id': 4}, {'parent_id': 3, 'child': [], 'content': '有点意思!', 'news_id': 1, 'user_id': 20, 'id': 6}], 'content': '写的真好!', 'news_id': 1, 'user_id': 12
    , 'id': 3}], 'content': '写的什么玩意啊?', 'news_id': 1, 'user_id': 10, 'id': 1})
    (5, {'parent_id': None, 'child': [], 'content': '还可以吧!', 'news_id': 1, 'user_id': 19, 'id': 5})
    """

    # 到现在为止我们已经获取了我们的结构化数据comment_result = {},接下来进行处理,返回到前端页面
    # 通过build_comment_tree将我们的结构化数据形成相应的html


    comment_str = build_comment_tree(comment_result)
    return render(request,'comment.html',{'comment_str':comment_str})
前端代码:
{% load staticfiles %}
<!DOCTYPE html>
<html lang="en">
<head>
    <meta charset="UTF-8">
    <title>Title</title>
    <style>
        .item {
            font-family: 楷体;
            font-weight: 700;
        }

        .child {
            margin-left: 30px;
            font-family: 楷体;
            font-weight: 700;
        }

        .hide {
            display: none;
        }
    </style>
</head>
<body>
<p>
<div style="font-weight: 700;font-family: 楷体;color: red">今天上海渡劫的视频真给力啊?</div>
</p>
{#接下来我们用另外一种方式实现菜单的动态效果图#}
{{ comment_str|safe }}
<script src="{% static  "js/jquery-1.11.3.min.js" %}"></script>
<script>
    $(function () {
        {# 给title标题添加相应的事件 #}
        $('.header').click(function () {
            if ($(this).next().hasClass('child')) {
                if ($(this).next().hasClass('hide')) {
                    $(this).next().removeClass('hide')
                } else {
                    $(this).next().addClass('hide')
                }
            }
        })
    })
</script>
</body>
</html>
效果图:

动态菜单示例(模板,含有相应的rul)
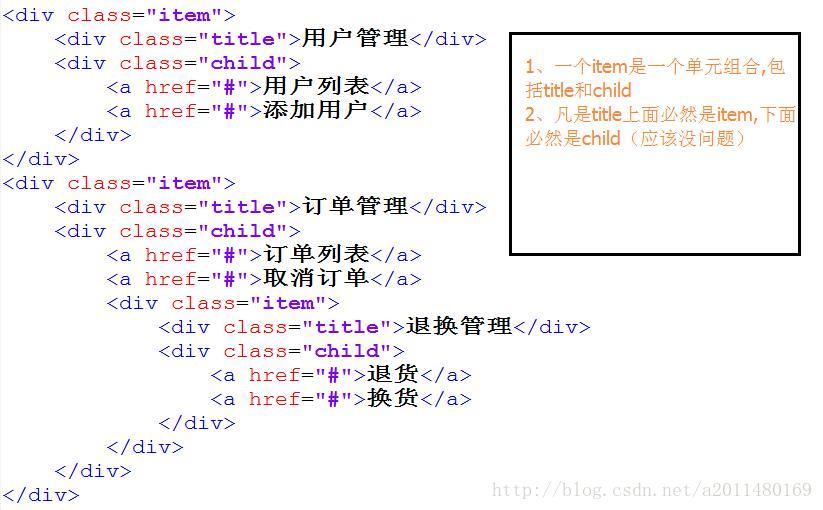
<div class="item">
    <div class="title">用户管理</div>
    <div class="child">
        <a href="#">用户列表</a>
        <a href="#">添加用户</a>
    </div>
</div>
<div class="item">
    <div class="title">订单管理</div>
    <div class="child">
        <a href="#">订单列表</a>
        <a href="#">取消订单</a>
        <div class="item">
            <div class="title">退换管理</div>
            <div class="child">
                <a href="#">退货</a>
                <a href="#">换货</a>
            </div>
        </div>
    </div>
</div>
代码示例:
后台代码:
from django.shortcuts import render, HttpResponse
from app01 import models


# Create your views here.
def create_child_node(child_list):
    """
    :param child_list:
    [{'url': '/users.html', 'child': [], 'id': 3, 'parent_id': 1, 'caption': '用户列表'},
    {'url': '/add_user.html', 'child': [], 'id': 4, 'parent_id': 1, 'caption': '添加用户'}]
    {'url': 'None', 'child': [], 'id': 4, 'parent_id': 1, 'caption': '添加用户'}]
    无论怎么样,一样要将递归停留在这个函数内部,这样就方便多了.
    """


    pre_str = """
        <div class="child">
    """
    end_str = """
        </div>
    """

    for item in child_list:
        if item['url']:
            tpl = '<a href="%s">%s</a>'
            content = tpl%(item['url'],item['caption'])
            pre_str = pre_str + content
        else:
            head_str = '<div class="item">'
            tail_str = '</div>'
            tpl = '<div class="title">%s</div>'
            content = tpl % (item['caption'])
            if item['child']:
                child_str = create_child_node(item['child'])
                pre_str = pre_str = pre_str +  head_str + content + child_str + tail_str
            else:
                pre_str = pre_str = pre_str + head_str + content + tail_str

    return pre_str + end_str


def build_menu_tree(menu_result):
    """
    :param menu_result:
    1 {'url': None, 'child': [{'url': '/users.html', 'child': [], 'id': 3, 'parent_id': 1, 'caption': '用户列表'},
                              {'url': '/add_user.html', 'child': [], 'id': 4, 'parent_id': 1, 'caption': '添加用户'}],
       'id': 1, 'parent_id': None, 'caption': '用户管理'}
    2 {'url': None, 'child': [{'url': '/orders.html', 'child': [], 'id': 5, 'parent_id': 2, 'caption': '订单列表'},
                              {'url': '/xxxxx.html', 'child': [], 'id': 6, 'parent_id': 2, 'caption': '取消订单'},
                              {'url': None, 'child': [{'url': '/aaa.html', 'child': [], 'id': 8, 'parent_id': 7, 'caption': '退货'},
                                                      {'url': '/bbb.html', 'child': [], 'id': 9, 'parent_id': 7, 'caption': '换货'}],
                               'id': 7, 'parent_id': 2, 'caption': '退换管理'}],
       'id': 2, 'parent_id': None, 'caption': '订单管理'}
    """
    pre_str = """
        <div class="item">
    """
    end_str = """
        </div>
    """
    menu_str = ""

    for key,value in menu_result.items():
        tpl = '<div class="title">%s</div>'
        content = tpl%(value['caption'])
        if value['child']:
            child_str = create_child_node(value['child'])
            menu_str += pre_str + content + child_str + end_str
        else:
            menu_str += pre_str + content + end_str

    print(menu_str)
    return menu_str


def index(request):
    menu_list = models.Menu.objects.values('id', 'caption', 'url', 'parent_id')
    """
    {'url': None, 'caption': '用户管理', 'id': 1, 'parent_id': None}
    {'url': None, 'caption': '订单管理', 'id': 2, 'parent_id': None}
    {'url': '/users.html', 'caption': '用户列表', 'id': 3, 'parent_id': 1}
    {'url': '/add_user.html', 'caption': '添加用户', 'id': 4, 'parent_id': 1}
    {'url': '/orders.html', 'caption': '订单列表', 'id': 5, 'parent_id': 2}
    {'url': '/xxxxx.html', 'caption': '取消订单', 'id': 6, 'parent_id': 2}
    {'url': None, 'caption': '退换管理', 'id': 7, 'parent_id': 2}
    {'url': '/aaa.html', 'caption': '退货', 'id': 8, 'parent_id': 7}
    {'url': '/bbb.html', 'caption': '换货', 'id': 9, 'parent_id': 7}
    凡是None点击之后都会出现折叠菜单.
    """

    # 步骤1:将列表结构转化为字典结构,并给每一个添加上一个child字段
    menu_dict = {}
    for row in menu_list:
        # 先加上child字段
        row['child'] = []
        menu_dict[row['id']] = row

    """
    1  {'caption': '用户管理', 'parent_id': None, 'id': 1, 'url': None, 'child': []}
    2  {'caption': '订单管理', 'parent_id': None, 'id': 2, 'url': None, 'child': []}
    3  {'caption': '用户列表', 'parent_id': 1, 'id': 3, 'url': '/users.html', 'child': []}
    4  {'caption': '添加用户', 'parent_id': 1, 'id': 4, 'url': '/add_user.html', 'child': []}
    5  {'caption': '订单列表', 'parent_id': 2, 'id': 5, 'url': '/orders.html', 'child': []}
    6  {'caption': '取消订单', 'parent_id': 2, 'id': 6, 'url': '/xxxxx.html', 'child': []}
    7  {'caption': '退换管理', 'parent_id': 2, 'id': 7, 'url': None, 'child': []}
    8  {'caption': '退货', 'parent_id': 7, 'id': 8, 'url': '/aaa.html', 'child': []}
    9  {'caption': '换货', 'parent_id': 7, 'id': 9, 'url': '/bbb.html', 'child': []}
    """

    # 步骤二:最重要的一步,将子菜单添加到父child当中
    for row in menu_list:
        if row['parent_id']:
            # 如果该菜单拥有父菜单,则添加到父亲的child列表当中
            parent_id = row['parent_id']
            menu_dict[parent_id]['child'].append(row)
        else:
            pass
    """
    1 {'parent_id': None, 'child': [{'parent_id': 1, 'child': [], 'caption': '用户列表', 'id': 3, 'url': '/users.html'},
                                    {'parent_id': 1, 'child': [], 'caption': '添加用户', 'id': 4, 'url': '/add_user.html'}],
       'caption': '用户管理', 'id': 1, 'url': None}
    2 {'parent_id': None, 'child': [{'parent_id': 2, 'child': [], 'caption': '订单列表', 'id': 5, 'url': '/orders.html'}, {'parent_id': 2, 'child': [], 'caption': '取消订单', 'id': 6, 'url': '/xxxxx.html'},
                                    {'parent_id': 2, 'child': [{'parent_id': 7, 'child': [], 'caption': '退货', 'id': 8, 'url': '/aaa.html'},
                                                               {'parent_id': 7, 'child': [], 'caption': '换货', 'id': 9, 'url': '/bbb.html'}],
                                     'caption': '退换管理', 'id': 7, 'url' : None}],
       'caption': '订单管理', 'id': 2, 'url': None}
    3 {'parent_id': 1, 'child': [], 'caption': '用户列表', 'id': 3, 'url': '/users.html'}
    4 {'parent_id': 1, 'child': [], 'caption': '添加用户', 'id': 4, 'url': '/add_user.html'}
    5 {'parent_id': 2, 'child': [], 'caption': '订单列表', 'id': 5, 'url': '/orders.html'}
    6 {'parent_id': 2, 'child': [], 'caption': '取消订单', 'id': 6, 'url': '/xxxxx.html'}
    7 {'parent_id': 2, 'child': [{'parent_id': 7, 'child': [], 'caption': '退货', 'id': 8, 'url': '/aaa.html'},
                                 {'parent_id': 7, 'child': [], 'caption': '换货', 'id': 9, 'url': '/bbb.html'}],
       'caption': '退换管理', 'id': 7, 'url': None}
    8 {'parent_id': 7, 'child': [], 'caption': '退货', 'id': 8, 'url': '/aaa.html'}
    9 {'parent_id': 7, 'child': [], 'caption': '换货', 'id': 9, 'url': '/bbb.html'}
    """

    # 步骤三:清洗数据,获取最终的结果,menu_result
    menu_result = {}
    for k, v in menu_dict.items():
        if v['parent_id'] == None:
            menu_result[k] = v

    """
    1 {'url': None, 'child': [{'url': '/users.html', 'child': [], 'id': 3, 'parent_id': 1, 'caption': '用户列表'},
                              {'url': '/add_user.html', 'child': [], 'id': 4, 'parent_id': 1, 'caption': '添加用户'}],
       'id': 1, 'parent_id': None, 'caption': '用户管理'}
    2 {'url': None, 'child': [{'url': '/orders.html', 'child': [], 'id': 5, 'parent_id': 2, 'caption': '订单列表'},
                              {'url': '/xxxxx.html', 'child': [], 'id': 6, 'parent_id': 2, 'caption': '取消订单'},
                              {'url': None, 'child': [{'url': '/aaa.html', 'child': [], 'id': 8, 'parent_id': 7, 'caption': '退货'},
                                                      {'url': '/bbb.html', 'child': [], 'id': 9, 'parent_id': 7, 'caption': '换货'}],
                               'id': 7, 'parent_id': 2, 'caption': '退换管理'}],
       'id': 2, 'parent_id': None, 'caption': '订单管理'}
    """

    # 步骤五:通过build_comment_tree函数在后台形成递归的html页面


    menu_str = build_menu_tree(menu_result)

    return render(request, 'index.html', {'menu_str': menu_str})
前端代码:
{% load staticfiles %}
<!DOCTYPE html>
<html lang="en">
<head>
    <meta charset="UTF-8">
    <title>Title</title>
    <style>
        .child > a {
            display: block;
        }

        .item .child {
            margin-left: 30px;
        }

        .hide {
            display: none;
        }
        .item{
            font-family: 楷体;
            font-weight: 700;
            font-size: large;
        }
    </style>
</head>
<body>
{{ menu_str|safe }}
<script src="{% static  "js/jquery-1.11.3.min.js" %}"></script>
<script>
    {# 一旦加载页面,就执行里面的函数 #}
    $(function () {
        {# 给title标题添加相应的事件 #}
        $('.title').click(function () {
            if ($(this).next().hasClass('hide')) {
                $(this).next().removeClass('hide')
            } else {
                $(this).next().addClass('hide')
            }
        })
    })
</script>
</body>
</html>
效果展示:

操作步骤总结:
步骤一:将列表结构转化为字典结构,并给每一个添加上一个child字段
步骤二:最重要的一步,将子菜单添加到父child当中
步骤三:清洗数据,获取最终的结果,menu_result
步骤四:模拟前端菜单,接下来我们要实现菜单的功能
步骤五:通过build_comment_tree函数在后台形成递归的html页面
步骤六:递归终止
递归算法使用总结
1、先假设第二层不存在,只完成第一层的功能;
2、在假设第二层不存在,只完成第三层的功能;
3、依次递归,知道找到递归规律.
多级评论的展示
代码示例:
<!DOCTYPE html>
<html lang="en">
<head>
    <meta charset="UTF-8">
    <title>Title</title>
    <style>
        .body a{
            display: block;
        }
        .body{
            margin-left: 30px;
        }
        .hide{
            display: none;
        }
    </style>
</head>
<body>
    <h1>分类列表</h1>
    <ul>
        {% if current_new_type_id %}
            <li><a href="/">全部</a></li>
        {% else %}
            <li><a style="color:green" href="/">全部</a></li>
        {% endif %}

        {% for row in new_type_list %}
            {% if row.id == current_new_type_id %}
                <li><a style="color:green" href="/all/{{ row.id }}/">{{ row.caption }}</a></li>
            {% else %}
                <li><a href="/all/{{ row.id }}/">{{ row.caption }}</a></li>
            {% endif %}
        {% endfor %}
    </ul>
    <h2>新闻列表</h2>
    <div>
        {% for row in new_list %}
            <div>
                <div>{{ row.title }}</div>
                <div>
                    {{ row.user.username }}
                     <div class="new-comment" style="display: inline-block;"  new-id="{{ row.id }}">
                         评论:{{ row.comment_count }}
                     </div>
                    <div style="display: inline-block;position: relative;">
                        赞:<a class="new-like" new-id="{{ row.id }}">{{ row.like_count }}</a>
                    </div>
                </div>
                <div class="comment-area"></div>
            </div>
            <div>
                <div>{{ row.title }}</div>
                <div>{{ row.user.username }}  评论:{{ row.comment_count }}  赞:<a class="new-like" new-id="{{ row.id }}">{{ row.like_count }}</a></div>
            </div>
            <div>
                <div>{{ row.title }}</div>
                <div>{{ row.user.username }}  评论:{{ row.comment_count }}  赞:<a class="new-like" new-id="{{ row.id }}">{{ row.like_count }}</a></div>
            </div>
        {% endfor %}
    </div>

    <script src="/static/jquery-3.2.1.js"></script>
    <script>
        $(function () {
            bindLikeEvent();
            bindCommentEvent();
        });
        function bindCommentEvent() {
            $('.new-comment').click(function () {
                var newId = $(this).attr('new-id');
                var $this = $(this);
                $.ajax({
                    url: '/fetch_comment.html',
                    type: "GET",
                    data: {'newId': newId},
                    success:function (arg) {
                        console.log(arg);

                        $this.parent().next().html(arg);
                    }
                })


            })
        }

        function bindLikeEvent() {
            $('.new-like').click(function () {
                // 获取当前新闻ID
                var newId = $(this).attr('new-id');
                var $this = $(this);
                $.ajax({
                    url: '/do_like.html',
                    type: "POST",
                    data: {'newId': newId},
                    dataType: 'JSON',
                    success:function (arg) {
                        if(arg.status){
                            var origin = $this.text();
                            var count = parseInt(origin);
                            if(arg.code == 666){
                                $this.text(count - 1 );
                                showLikeCount($this,'-1');

                            }else if(arg.code == 999){
                                $this.text(count + 1 );
                                showLikeCount($this,'+1');

                            }
                        }else{
                            alert(arg.msg);
                        }
                    }

                })
            })
        }

        function showLikeCount($this,text) {
            var fontSize = 5;
            var top = 0;
            var right = 0;
            var opacity = 1;

            var tag = document.createElement('span');
            // var tag = document.getElementById()
            tag.innerText = text;
            tag.style.position = "absolute";
            // 默认大小
            tag.style.fontSize = fontSize + "px";
            tag.style.top = top + 'px';
            tag.style.right = right + 'px';
            tag.style.opacity = opacity;
            $this.after(tag);

            // 定时器,没0.5s执行一次
            var obj = setInterval(function () {
                fontSize += 5;
                top -= 5;
                right -= 5;
                opacity -= 0.1;

                tag.style.fontSize = fontSize + "px";
                tag.style.top = top + 'px';
                tag.style.right = right + 'px';
                tag.style.opacity = opacity;
                if(opacity <= 0){
                    clearInterval(obj);
                    tag.remove();
                }
            },100);

        }
    </script>
</body>
</html>


 648
648


 被折叠的 条评论
为什么被折叠?
被折叠的 条评论
为什么被折叠?
 到【灌水乐园】发言


