


为什么需要线程池,我个人认为,线程池的存在是为了能让程序快速有效的去执行各种工作(或命令)。当去执行一项阻塞的操作(如IO操作)时,首先我们想到的是,启动一个线程去执行这项操作,然后让它在后台运行,执行完之后以回调函数的方式通知主线程(或者其他信号量等方式)。已经有高人验证,当我们需要执行一项任务再去新建一个线程,然后让其销毁,这种方式对系统的开销很大,不适合用于绝大多数环境,如果我们能提前建立若干个线程,在没有工作的情况下让其休眠,当有任务来时,唤醒其中一个线程去执行这项任务,完后再让其休眠,这种方式无疑比频繁的新建和销毁线程高效许多,下面讲讲我个人在windows下实现的一个线程池。
先来看一个图
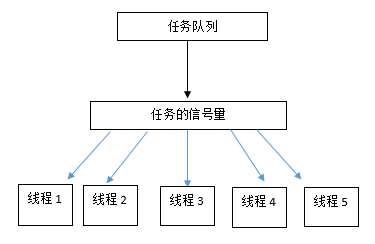
每个线程都在等待一个信号量来唤醒自己,当一个线程获取到一个信号量时,它从任务队列中取出一个任务来进行执行,执行完后再查看还有无信号量,如果没有,就继续休眠。
可以建立如下结构体
typedef void(*threadfunc_t)(void*);

struct ThreadJob
{
    threadfunc_t fun;//函数指针
    void* arg;//参数
    ThreadJob()
    {
        memset(this, 0, sizeof(ThreadJob));
    }
    ThreadJob(threadfunc_t f, void* a)
    {
        fun = f;
        arg = a;
    }
    void Run()
    {
        if (fun)
        {
            fun(arg);
        }
    }
};
这个是一个线程所要执行的一项工作,存在线程池的任务列表中。
struct ThreadItem
{
    uintptr_t thread;
    ThreadPool* pool;
    bool run;
    ThreadItem()
    {
        pool = NULL;
        run = false;
    }
};
这个是一个线程的描述信息,包括了线程的句柄,是否在执行任务中,以及自己所属的线程池对象指针,这些信息不是必要的,仅仅是方便以后扩展功能所用,这些信息将以线程的参数传递给工作线程,工作线程一般都是一个死循环的工作线程。
以下是线程池的类
class ThreadPool
{
    public:
        ThreadPool();
        ThreadPool(int num);
        ~ThreadPool();
    public:
        bool CreatePool(int num);
        int Active();   //正在激活的线程
        int Pending();  //当前准备可以调度的线程
        int JobNum();   //当前任务数
        bool Schedule(threadfunc_t fun, void* arg); //执行一个工作
        bool Destory(); //摧毁
        static void JobThread(void* arg);
    private:
        Mutex listlock;//任务队列锁
        vector<ThreadItem>  m_thread;//线程数组
        list<ThreadJob> joblist;//任务队列
        HANDLE _EventComplete;//所有线程已经退出的事件
        HANDLE _SemaphoreCall;//有任务的信号
        HANDLE _SemaphoreDel;//线程退出的信号
        long runnum;//当前有任务的线程数量
        long threadnum;//总线程数量
};
大家看注释应该能看明白,
这里的摧毁线程池的做法是,首先先每个线程发送一个SemaphoreDel的信号,当线程收到这个信号的时候就让runnum减一,当runnum为0时,就发出一个EventComplete事件,这样主线程就知道了所以线程已经全部退出。
以下是全部代码
//threadpool.h
#ifndef _THREADPOOL_H_
#define _THREADPOOL_H_

#include <vector>
#include <list>
#include "mutex.h"

using std::vector;
using std::list;

class ThreadPool;

typedef void(*threadfunc_t)(void*);

struct ThreadJob
{
    threadfunc_t fun;
    void* arg;
    ThreadJob()
    {
        memset(this, 0, sizeof(ThreadJob));
    }
    ThreadJob(threadfunc_t f, void* a)
    {
        fun = f;
        arg = a;
    }
    void Run()
    {
        if (fun)
        {
            fun(arg);
        }
    }
};


struct ThreadItem
{
    uintptr_t thread;
    ThreadPool* pool;
    bool run;
    ThreadItem()
    {
        pool = NULL;
        run = false;
    }
};

class ThreadPool
{
    public:
        ThreadPool();
        ThreadPool(int num);
        ~ThreadPool();
    public:
        bool CreatePool(int num);
        int Active();   //正在激活的线程
        int Pending();  //当前准备可以调度的线程
        int JobNum();   //当前任务数
        bool Schedule(threadfunc_t fun, void* arg); //执行一个工作
        bool Destory(); //摧毁
        static void JobThread(void* arg);
    private:
        Mutex listlock;
        vector<ThreadItem>  m_thread;
        list<ThreadJob> joblist;
        HANDLE EventComplete;
        HANDLE SemaphoreCall;
        HANDLE SemaphoreDel;
        long runnum;
        long threadnum;

};

#endif
//threadpool.cpp
#include "threadpool.h"
#include <errno.h>
#include <process.h>
ThreadPool::ThreadPool()
{
threadnum = runnum = 0;
}
ThreadPool::ThreadPool(int num)
{
threadnum = runnum = 0;
CreatePool(num);
}
ThreadPool::~ThreadPool()
{
Destory();
CloseHandle(SemaphoreCall);
CloseHandle(SemaphoreDel);
CloseHandle(EventComplete);
}
bool ThreadPool::CreatePool(int num)
{
m_thread.reserve(num);
SemaphoreCall = CreateSemaphore(0, 0, 10000, NULL);
SemaphoreDel = CreateSemaphore(0, 0, 10000, NULL);
EventComplete = CreateEvent(0, false, false, NULL);
for (int i = 0; i < num; i++)
{
m_thread.push_back(ThreadItem());
m_thread[i].pool = this;
m_thread[i].thread = _beginthread(JobThread, 0, &m_thread[i]);
}
threadnum = num;
return true;
}
int ThreadPool::Active() //正在激活的线程
{
return runnum;
}
int ThreadPool::Pending() //当前准备可以调度的线程
{
return threadnum - runnum;
}
int ThreadPool::JobNum()
{
return joblist.size();
}
bool ThreadPool::Schedule(threadfunc_t fun, void* arg) //执行一个工作
{
listlock.Lock();
joblist.push_back(ThreadJob(fun,arg));
ReleaseSemaphore(SemaphoreCall, 1, NULL);
listlock.Unlock();
return true;
}
bool ThreadPool::Destory() //摧毁
{
if (threadnum)
{
ReleaseSemaphore(SemaphoreDel, threadnum, NULL);
return !!WaitForSingleObject(EventComplete, INFINITE);
}
return true;
}
void ThreadPool::JobThread(void* arg)
{
ThreadItem *threaditem = (ThreadItem*)arg;
ThreadPool *pool = threaditem->pool;
HANDLE hWaitHandle[2];
hWaitHandle[0] = pool->SemaphoreCall;
hWaitHandle[1] = pool->SemaphoreDel;
while (1)
{
DWORD wr = WaitForMultipleObjects(2, hWaitHandle, false, INFINITE);
if (wr == WAIT_OBJECT_0 + 1)
break;
pool->listlock.Lock();
if (!pool->joblist.empty())
{
ThreadJob job = pool->joblist.front();
pool->joblist.pop_front();
pool->listlock.Unlock();
InterlockedIncrement(&pool->runnum);
threaditem->run = true;
job.Run();
threaditem->run = false;
InterlockedDecrement(&pool->runnum);
}
else
pool->listlock.Unlock();
}
InterlockedDecrement(&pool->threadnum);
if (!pool->threadnum)
{
SetEvent(pool->EventComplete);
}
}另外mutex.h头文件和源文件如下
//mutex.h
#ifndef _MUTEX_H_
#define _MUTEX_H_
#include <windows.h>

class Mutex
{
    public:
        Mutex();
        Mutex(const Mutex& m);
        ~Mutex();
    public:
        HANDLE handle;
        CRITICAL_SECTION c_lock;
        void Lock();
        void Unlock();
    public:
        Mutex& operator=(const Mutex& m);
};
#endif
//mutex.cpp
#include "mutex.h"

Mutex::Mutex()
{
    InitializeCriticalSection(&c_lock);
}

Mutex::Mutex(const Mutex& m)
{
    InitializeCriticalSection(&c_lock);
}

Mutex::~Mutex()
{

    DeleteCriticalSection(&c_lock);
}

void Mutex::Lock()
{
    EnterCriticalSection(&c_lock); //进入锁临界区
}

void Mutex::Unlock()
{
    LeaveCriticalSection(&c_lock); //进入锁临界区
}

Mutex& Mutex::operator=(const Mutex& m)
{
    //不进行复制
    return *this;
}
把这4个文件加入工程中一起编译应该没有什么错误,至此本人设计的线程池介绍完毕,当然网上也有很多大牛的其他更高效的线程池设计,也有类似本人所敲的代码,如果有人觉得我存在抄袭的现象,可以跟我说,因为本人也是参考了网上几份源码,加上自己的思考而写出这些代码,重在大家技术交流,谢谢大家。


 247
247


 被折叠的 条评论
为什么被折叠?
被折叠的 条评论
为什么被折叠?
 到【灌水乐园】发言


