


首页设计与实现
首先,这章节讲的是首页内容的设计与实现,不包括主界面的设计,因为一开始入手,我希望能立马获取到数据并能展示出来,后面再来搭木积似的一步一步把整体框架做起来。
设计
(图丑,莫见怪~)
主界面的设计如下

首页的设计如下
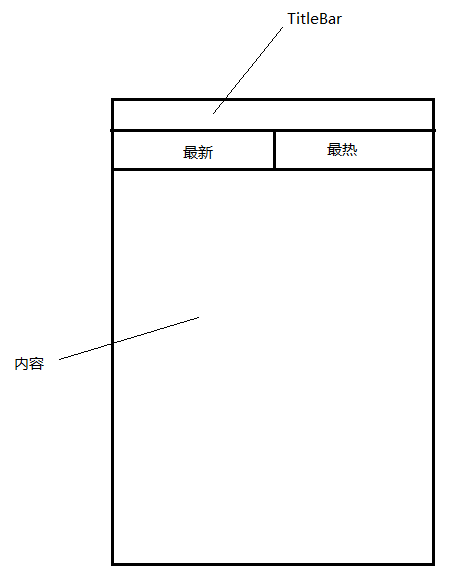
有人可能会觉得,为什么不把TitleBar抽出来放在主界面,而要单独放在每个页面里。因为,这个跟你把Navigator(页面导航器)放在什么地方有关系,现在先不说为什么,就这么认为吧,不是每个页面都需要TitleBar的,放在各自页面,就可以很好的控制是否需要标题栏,需要时候再添加。
实现
这章节先实现首页部分。可以看到,最新和最热的内容上结构是一致的,所以,先定义一个组件来显示即可。
先来看下项目的目录结构:
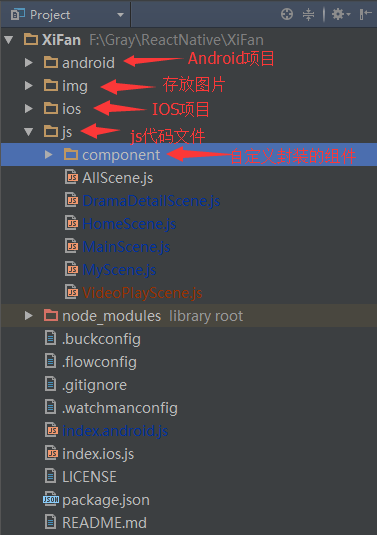
现在用的IDE是WebStorm(之前都是用sublime text 3 敲的代码,那个苦啊/(ㄒoㄒ)/~~)。
自定义组件
新建好js/component 文件夹之后,在component文件夹下创建DramaComponent.js文件
初始代码如下:
import React,{Component} from 'react';
import {
    View,
    Text,
} from 'react-native';

class DramaComponent extends Component{
    constructor(props){
        super(props);
    }

    render(){
        return(
            <View>
                <Text>
                    我是列表内容
                </Text>
            </View>
        );
    }
}
然后,我们这个组件是要作为公共组件的,要给别的组件引用,因此,我们需要将它‘暴露’出去,需要做如下处理:
export default class DramaComponent extends Component {
    ...
}就是在定义class前加上export default
接着,我们在index.android.js使用import引用它:
import React, { Component} from 'react';
import {
  AppRegistry,
  View,
} from 'react-native';

import DramaComponent from './js/component/DramaComponent';

class XiFan extends Component {

  render(){
    return(
        <DramaComponent />
    );
  }
}

AppRegistry.registerComponent('XiFan', () => XiFan);
看下有没有正常被引用,使用命令行cd到项目根目录下,执行命令(如果已经启动并运行过了,模拟器下双击键盘R键,重新加载即可)
react-native run-android
可以看到组件可以被正常使用并显示了。(默认你已经配置好调试环境,已经连接模拟器并设置好IP)
组件UI编写
可以正常被调用之后,我们就开始编写具体的UI层。
这是一个列表,我们优先想到的是用ListView这个控件
export default class DramaComponent extends Component {
    constructor(props) {
        super(props);
        this.state = {
            movies:new ListView.DataSource({
                rowHasChanged:(r1,r2) => r1!=r2,
            }),
        }
    }
    //渲染ListView item view
    _renderMovieView(movie){

    }
    //ListView 拉到底部时调用
    _onEndReached(){

    }

    render() {
        return (
            <ListView
                dataSource = {this.state.movies}
                renderRow = {this._renderMovieView.bind(this)}
                style = {styles.listview}
                initialListSize = {10}
                pageSize = {10}
                onEndReachedThreshold = {5}
                onEndReached = {this._onEndReached.bind(this)}
                enableEmptySections = {true}
                contentContainerStyle = {styles.grid}
            />
        );
    }
}
ListView的几个属性:
dataSource:数据源
renderRow:ListView渲染的每一item view
initialListSize:初始渲染item的个数
pageSize:每次事件循环(每帧)渲染的行数
onEndReachedThreshold:调用onEndReached之前的临界值,单位是像素
onEndReached:当所有的数据都已经渲染过,并且列表被滚动到距离最底部不足onEndReachedThreshold个像素的距离时调用
更多属性介绍可以看下文档介绍
dataSource是一个动态数据,会变化,所以使用state来绑定数据。
每一部剧包含:影片名称、标题、主要演员、图片,还有点击item跳转时的详情链接,所以数据结构设计如下:
var dramaItem ={
    name:'',//影片名称
    title:'',//标题
    actor:'',//演员
    pic:'',//图片地址
    url:'',//详情链接
};
接着,我们要将item view绘制出来,_renderMovieView函数实现如下:
    //渲染ListView item view
    _renderMovieView(movie){
        return(
            <View style={styles.row} key={movie.url}>
                <TouchableOpacity onPress={this._onItemPress.bind(this,movie)} activeOpacity={0.8} >
                    <View>
                        <Image source={{uri:movie.pic}} style={styles.thumbnail}>
                            <Text style={styles.title}>{movie.title}</Text>
                        </Image>
                        <Text numberOfLines={1} style={styles.name}>{movie.name}</Text>
                        <Text numberOfLines={1} style={styles.actor}>{movie.actor}</Text>
                    </View>
                </TouchableOpacity>
            </View>

        );
    }

    //item 点击事件
    _onItemPress(movie){
        console.log(movie);
    }
这里关于UI如何布局就不详细说了,看着UI效果大家应该都知道怎么写了。这里需要注意的是TouchableOpacity 的onPress方法需要在点击的时候将movie对象传递下去,所以这里会有个组件的函数怎么传参的问题。
这里有两种方法:
第一种
如上面代码所示,在函数后面调用bind,第一个参数是上下文对象,后面就是参数对象数组
onPress={this._onItemPress.bind(this,movie)}- 第二种
onPress={()=>this._onItemPress(movie)}一般使用第一种方法,因为很多时候在定义的方法_onItemPress内,会调用this.xxxx,这时候如果你没有使用_onItemPress.bind(this),将上下文对象传递下去,那么会报错,提示找不到xxxx方法或对象。
最后,我们在组件生命周期componentDidMount方法内,进行模拟数据:
componentDidMount(){
        var dramaItem ={
            name:'原来是美男啊',//影片名称
            title:'第16集中字',//标题
            actor:'张根硕',//演员
            pic:'http://img.y3600.com/d/file/p/2016/08/24/b216e94526fbf2d49f40dc5aaa1897a4.jpg',//图片地址
            url:'http://www.y3600.com/hanju/2016/907.html',//详情链接
        };
        var datas = [];
        datas.push(dramaItem);
        this.setState({
            movies:this.state.movies.cloneWithRows(datas),
        });
    }
这里关键是通过setState进行状态更新,进而刷新页面,要注意的是调用cloneWithRows进行数据填充,datas是个数据集合。关键代码:
this.setState({
    movies:this.state.movies.cloneWithRows(datas),
});
然后重新刷新(双击RR)
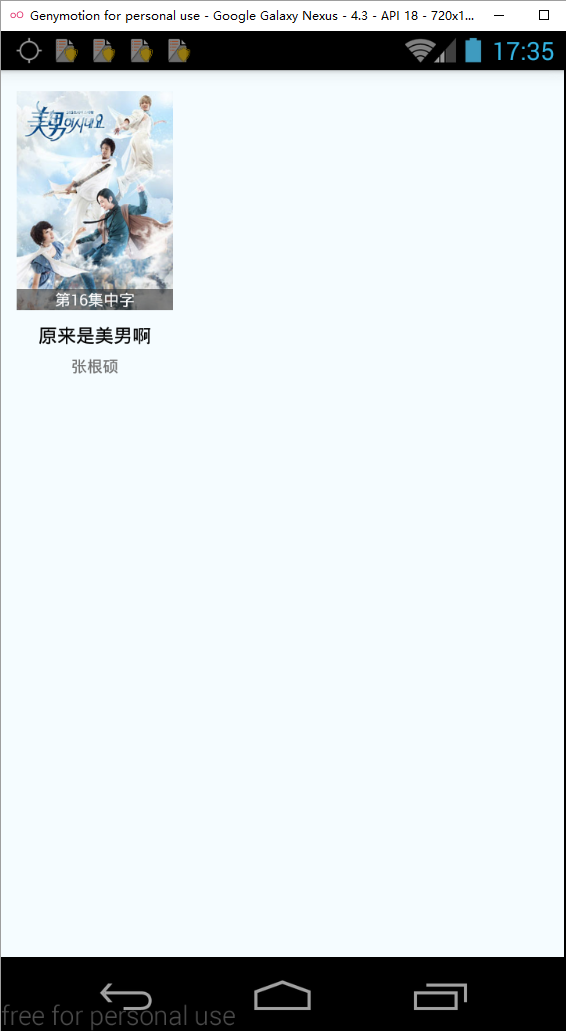
这里只模拟了一条数据(多条数据多次调用datas.push即可),可以看到已经可以正常显示了,点击item也有log输出了(通过android studio查看logcat)
至此,我们已经实现了列表数据UI的编写,如果你运行上面的代码,你会发现少了些样式style,那下面贴下这节的全部代码:
import React, {Component} from 'react';
import {
    View,
    Text,
    ListView,
    StyleSheet,
    TouchableOpacity,
    Dimensions,
    Image
} from 'react-native';

export default class DramaComponent extends Component {
    constructor(props) {
        super(props);
        this.state = {
            movies:new ListView.DataSource({
                rowHasChanged:(r1,r2) => r1!=r2,
            }),
        }
    }

    componentDidMount(){
        var dramaItem ={
            name:'原来是美男啊',//影片名称
            title:'第16集中字',//标题
            actor:'张根硕',//演员
            pic:'http://img.y3600.com/d/file/p/2016/08/24/b216e94526fbf2d49f40dc5aaa1897a4.jpg',//图片地址
            url:'http://www.y3600.com/hanju/2016/907.html',//详情链接
        };
        var datas = [];
        datas.push(dramaItem);
        this.setState({
            movies:this.state.movies.cloneWithRows(datas),
        });
    }

    //渲染ListView item view
    _renderMovieView(movie){
        return(
            <View style={styles.row} key={movie.url}>
                <TouchableOpacity onPress={this._onItemPress.bind(this,movie)} activeOpacity={0.8} >
                    <View>
                        <Image source={{uri:movie.pic}} style={styles.thumbnail}>
                            <Text style={styles.title}>{movie.title}</Text>
                        </Image>
                        <Text numberOfLines={1} style={styles.name}>{movie.name}</Text>
                        <Text numberOfLines={1} style={styles.actor}>{movie.actor}</Text>
                    </View>
                </TouchableOpacity>
            </View>

        );
    }

    _onItemPress(movie){
        console.log(movie);
    }

    //ListView 拉到底部时调用
    _onEndReached(){
        console.log('加载下一页');
    }

    render() {
        return (
            <ListView
                dataSource = {this.state.movies}
                renderRow = {this._renderMovieView.bind(this)}
                style = {styles.listview}
                initialListSize = {10}
                pageSize = {10}
                onEndReachedThreshold = {5}
                onEndReached = {this._onEndReached.bind(this)}
                enableEmptySections = {true}
                contentContainerStyle = {styles.grid}
            />
        );
    }
}
const WIN_WIDTH = Dimensions.get('window').width;
var width = WIN_WIDTH/3;
var styles = StyleSheet.create({
    grid:{
        justifyContent: 'flex-start',
        flexDirection: 'row',
        flexWrap: 'wrap'
    },
    row:{
        height:200,
        width:width,
        flexDirection:'column',
        justifyContent:'center',
        alignItems:'center',
        paddingTop:10,
        paddingBottom:10,
        marginTop:5,
        marginBottom:5,
    },
    thumbnail:{
        flex:1,
        width:width-20,
        height:140,
        justifyContent:'flex-end',
        resizeMode: Image.resizeMode.strech,
    },
    title:{
        fontSize:10,
        textAlign:'center',
        color:'white',
        backgroundColor:'#27272790',
    },
    name:{
        fontSize:12,
        width:width-20,
        color:'black',
        marginTop:8,
        marginBottom:5,
        textAlign:'center',
    },
    actor:{
        fontSize:10,
        color:'#707070',
        width:width-20,
        textAlign:'center',
    },
    listview:{
        backgroundColor:'#f5fcff',
    },
});
这里可能要提一下,我们使用的是ListView,但是最后效果好像是一个Android中GridView的效果,或者你可能会有疑问react native中如何实现GridView的效果。其实在react native中使用ListView在配合好style就可以实现GridView的效果了,主要样式如下:
    grid:{
        justifyContent: 'flex-start',
        flexDirection: 'row',
        flexWrap: 'wrap'
    },
    row:{
        height:200,
        width:width,
        flexDirection:'column',
        justifyContent:'center',
        alignItems:'center',
        paddingTop:10,
        paddingBottom:10,
        marginTop:5,
        marginBottom:5,
    },
grid是ListView的contentContainerStyle,justifyContent: ‘flex-start’使每个item靠左,flexDirection: ‘row’让item是水平从左往右排列,flexWrap: ‘wrap’是当一行item排列不下时自动换行。row是每个item的style,需要设置好height和width。
总结
本节讲了应用的的整体设计,并实现了列表UI,只是数据还是模拟阶段,主要技术点在于ListView的使用,熟悉dataSource、renderRow、ListView.DataSource、cloneWithRows以及函数的传参问题。下一节,我们在实现真实数据的获取和解析,使用到cheerio这个html解析库,如果你还不知道这是用来干嘛的,你可以先去了解下。


 1842
1842


 被折叠的 条评论
为什么被折叠?
被折叠的 条评论
为什么被折叠?
 到【灌水乐园】发言


