Quartz入门实例14-让Quartz的Job使用Spring注入的Bean

	<!-- 由spring生成scheduler -->
	<bean id="scheduler" class="org.springframework.scheduling.quartz.SchedulerFactoryBean">
		<!--<property name="jobFactory">
			<bean class="cn.zto.job.JobBeanJobFactory"/>
		</property>-->
		<property name="schedulerName" value="scheduler"/>
		<property name="configLocation" value="classpath:cn/zto/quartz/quartz.properties" />
	</bean>


由于将Scheduler交给Spring生成, SchedulerFactoryBean有个jobFactory属性 而且jobFactory是实现SchedulerContextAware的类还要继承AdaptableJobFactory

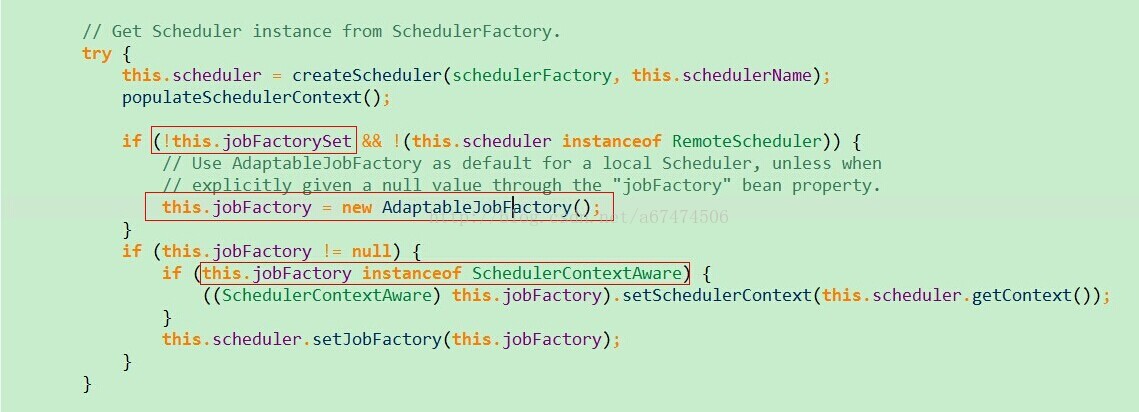
jobFactorySet是个默认为false的boolean类型的

在Spirng-context-support  jar包下org.springframework.scheduling.quartz包中有个SpringBeanJobFactory的类继承了AdaptableJobFactory实现AdaptableJobFactory

spring会默认使用这个给jobFactory

我们可以继承SpringBeanJobFactory重写他的createJobInstance方法

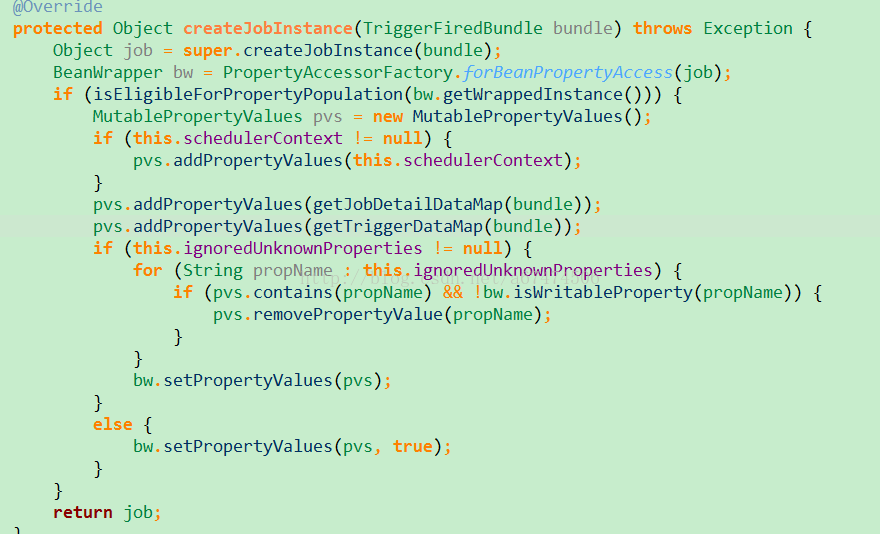
当Spring在加载配置文件时,如果配置文件中有Bean实现了ApplicationContextAware接口时

Spring会自动调用setApplicationContext方法

我们可以通过这个获取Spring上下文然后在创建Job时让Job自动注入到Spring容器中


JobBeanJobFactory.class

package cn.zto.job;

import org.quartz.spi.TriggerFiredBundle;
import org.springframework.beans.BeansException;
import org.springframework.context.ApplicationContext;
import org.springframework.context.ApplicationContextAware;
import org.springframework.scheduling.quartz.SpringBeanJobFactory;

public class JobBeanJobFactory extends SpringBeanJobFactory implements ApplicationContextAware {
    
	private ApplicationContext applicationContext;

    public void setApplicationContext(ApplicationContext applicationContext) throws BeansException {
        this.applicationContext = applicationContext;
    }

    @Override
    protected Object createJobInstance(TriggerFiredBundle bundle) throws Exception {
        Object jobInstance = super.createJobInstance(bundle);
        //把Job交给Spring来管理,这样Job就能使用由Spring产生的Bean了
        applicationContext.getAutowireCapableBeanFactory().autowireBean(jobInstance);
        return jobInstance;
    }


}


xml配置


	<!-- 由spring生成scheduler -->
	<bean id="scheduler" class="org.springframework.scheduling.quartz.SchedulerFactoryBean">
		<property name="jobFactory">
			<bean class="cn.zto.job.JobBeanJobFactory"/>
		</property>
		<property name="schedulerName" value="scheduler"/>
		<property name="configLocation" value="classpath:cn/zto/quartz/quartz.properties" />
	</bean>


还可以使用Spring的AOP机制 

详情的话可以查看这个地址

http://sulong.me/2011/09/05/inject_dependency_to_domain_by_spring


  • 3
    点赞
  • 6
    收藏
    觉得还不错? 一键收藏
  • 1
    评论
当在 Job 类中注入 Spring Bean 时,需要使用 Spring 提供的 JobFactory 来创建 Job 实例,这样 Job 类中的 Bean 才能被正确注入。具体实现步骤如下: 1. 创建一个实现了 SpringJobFactory 接口的类,用于创建 Job 实例。 ```java import org.quartz.Job; import org.quartz.Scheduler; import org.quartz.SchedulerContext; import org.quartz.spi.JobFactory; import org.springframework.beans.factory.annotation.Autowired; import org.springframework.context.ApplicationContext; import org.springframework.stereotype.Component; @Component public class AutowiringSpringBeanJobFactory implements JobFactory { @Autowired private ApplicationContext context; /** * {@inheritDoc} */ @Override public Job newJob(TriggerFiredBundle bundle, Scheduler scheduler) throws SchedulerException { final Job job = (Job) context.getBean(bundle.getJobDetail().getJobClass()); final SchedulerContext schedulerContext = scheduler.getContext(); schedulerContext.put("applicationContext", context); return job; } } ``` 2. 在 Quartz 配置中注册 JobFactory,如下所示: ```java import javax.sql.DataSource; import org.quartz.JobDetail; import org.quartz.Scheduler; import org.quartz.Trigger; import org.quartz.impl.StdSchedulerFactory; import org.quartz.impl.jdbcjobstore.JobStoreTX; import org.quartz.impl.jdbcjobstore.PostgreSQLDelegate; import org.quartz.impl.jdbcjobstore.StdJDBCDelegate; import org.quartz.impl.jdbcjobstore.StdJDBCJobStore; import org.quartz.impl.jdbcjobstore.oracle.OracleDelegate; import org.quartz.spi.JobFactory; import org.springframework.beans.factory.annotation.Autowired; import org.springframework.beans.factory.annotation.Qualifier; import org.springframework.context.ApplicationContext; import org.springframework.context.annotation.Bean; import org.springframework.context.annotation.Configuration; import org.springframework.core.env.Environment; @Configuration public class QuartzConfig { @Autowired private Environment env; @Bean public JobFactory jobFactory(ApplicationContext applicationContext) { AutowiringSpringBeanJobFactory jobFactory = new AutowiringSpringBeanJobFactory(); jobFactory.setApplicationContext(applicationContext); return jobFactory; } @Bean public Scheduler scheduler(Trigger[] triggers, @Qualifier("quartzDataSource") DataSource dataSource) throws SchedulerException { StdSchedulerFactory factory = new StdSchedulerFactory(); factory.initialize(quartzProperties()); Scheduler scheduler = factory.getScheduler(); scheduler.setJobFactory(jobFactory); scheduler.setDataSource(dataSource); scheduler.setQuartzProperties(quartzProperties()); scheduler.start(); for (Trigger trigger : triggers) { scheduler.scheduleJob(trigger.getJobDetail(), trigger); } return scheduler; } @Bean public JobDetail jobDetail() { return JobBuilder.newJob().ofType(MyJob.class) .storeDurably().withIdentity("MyJob").withDescription("Invoke My Job service...").build(); } @Bean public Trigger trigger(JobDetail job) { return TriggerBuilder.newTrigger().forJob(job) .withIdentity("MyJobTrigger").withDescription("My Job trigger").withSchedule(CronScheduleBuilder.cronSchedule(env.getProperty("myjob.cron.expression"))).build(); } @Bean public Properties quartzProperties() { Properties properties = new Properties(); properties.setProperty(StdSchedulerFactory.PROP_SCHED_INSTANCE_NAME, env.getProperty("scheduler.instance.name")); properties.setProperty(StdSchedulerFactory.PROP_SCHED_INSTANCE_ID, env.getProperty("scheduler.instance.id")); properties.setProperty(StdSchedulerFactory.PROP_THREAD_POOL_CLASS, env.getProperty("scheduler.threadPool.class")); properties.setProperty(StdSchedulerFactory.PROP_THREAD_POOL_THREAD_COUNT, env.getProperty("scheduler.threadPool.threadCount")); properties.setProperty(StdSchedulerFactory.PROP_JOB_STORE_CLASS, env.getProperty("scheduler.jobStore.class")); properties.setProperty(StdSchedulerFactory.PROP_JOB_STORE_DRIVER_DELEGATE_CLASS, env.getProperty("scheduler.jobStore.driverDelegateClass")); properties.setProperty(StdSchedulerFactory.PROP_JOB_STORE_USE_PROPERTIES, env.getProperty("scheduler.jobStore.useProperties")); properties.setProperty(StdSchedulerFactory.PROP_JOB_STORE_DATASOURCE, env.getProperty("scheduler.jobStore.dataSource")); properties.setProperty(StdSchedulerFactory.PROP_JOB_STORE_TABLE_PREFIX, env.getProperty("scheduler.jobStore.tablePrefix")); properties.setProperty(StdSchedulerFactory.PROP_JOB_STORE_IS_CLUSTERED, env.getProperty("scheduler.jobStore.isClustered")); properties.setProperty(StdSchedulerFactory.PROP_JOB_STORE_CLUSTER_CHECKIN_INTERVAL, env.getProperty("scheduler.jobStore.clusterCheckinInterval")); properties.setProperty(StdSchedulerFactory.PROP_JOB_STORE_MAX_MISFIRES_TO_HANDLE_AT_A_TIME, env.getProperty("scheduler.jobStore.maxMisfiresToHandleAtATime")); properties.setProperty(StdSchedulerFactory.PROP_JOB_STORE_MISFIRE_THRESHOLD, env.getProperty("scheduler.jobStore.misfireThreshold")); return properties; } } ``` 3. 在 Job 类中注入 Bean,如下所示: ```java import org.quartz.Job; import org.quartz.JobExecutionContext; import org.quartz.JobExecutionException; import org.springframework.beans.factory.annotation.Autowired; import org.springframework.context.ApplicationContext; import org.springframework.stereotype.Component; @Component public class MyJob implements Job { @Autowired private MyService myService; /** * {@inheritDoc} */ @Override public void execute(JobExecutionContext context) throws JobExecutionException { ApplicationContext applicationContext = (ApplicationContext) context.getScheduler().getContext().get("applicationContext"); applicationContext.getAutowireCapableBeanFactory().autowireBean(this); myService.doSomething(); } } ``` 通过这种方式,就可以在 QuartzJob 类中注入 Spring Bean。

“相关推荐”对你有帮助么?

  • 非常没帮助
  • 没帮助
  • 一般
  • 有帮助
  • 非常有帮助
提交
评论 1
添加红包

请填写红包祝福语或标题

红包个数最小为10个

红包金额最低5元

当前余额3.43前往充值 >
需支付:10.00
成就一亿技术人!
领取后你会自动成为博主和红包主的粉丝 规则
hope_wisdom
发出的红包
实付
使用余额支付
点击重新获取
扫码支付
钱包余额 0

抵扣说明:

1.余额是钱包充值的虚拟货币,按照1:1的比例进行支付金额的抵扣。
2.余额无法直接购买下载,可以购买VIP、付费专栏及课程。

余额充值