


转载请注明出处:http://blog.csdn.net/a740169405/article/details/69668957
##简述:
写这篇文章的缘由是最近项目中查内存泄漏时,发现最终原因是由于异步线程调用View的的post方法导致的。
为何我会使用异步线程调用View的post方法,是因为项目中需要用到很多复杂的自定义布局,需要提前解析进入内存,防止在主线程解析导致卡顿,具体的实现方法是在Application启动的时候,使用异步线程解析这些布局,等需要使用的时候直接从内存中拿来用。
造成内存泄漏的原因,需要先分析View的post方法执行流程,也就是文章前半部分的内容
##文章内容:
- View#post方法作用以及实现源码
- View#post与Handler#post的区别
- 分析View#post方法导致的内存泄漏
post方法分析
看看View的post方法注释:
Causes the Runnable to be added to the message queue. The runnable will be run on the user interface thread
意思是将runnable加入到消息队列中,该runnable将会在用户界面线程中执行,也就是UI线程。这解释,和Handler的作用差不多,然而事实并非如此。
再看看post方法的源码:
public boolean post(Runnable action) {
    final AttachInfo attachInfo = mAttachInfo;
    if (attachInfo != null) {
	    // 如果当前View加入到了window中,直接调用UI线程的Handler发送消息
        return attachInfo.mHandler.post(action);
    }
    // Assume that post will succeed later
    // View未加入到window,放入ViewRootImpl的RunQueue中
    ViewRootImpl.getRunQueue().post(action);
    return true;
}
分两种情况,当View已经attach到window,直接调用UI线程的Handler发送runnable。如果View还未attach到window,将runnable放入ViewRootImpl的RunQueue中。
那么post到RunQueue里的runnable什么时候执行呢,又是为何当View还没attach到window的时候,需要post到RunQueue中。
View#post与Handler#post的区别
其实,当View已经attach到了window,两者是没有区别的,都是调用UI线程的Handler发送runnable到MessageQueue,最后都是由handler进行消息的分发处理。
但是如果View尚未attach到window的话,runnable被放到了ViewRootImpl#RunQueue中,最终也会被处理,但不是通过MessageQueue。
ViewRootImpl#RunQueue源码注释如下:
/**
 * The run queue is used to enqueue pending work from Views when no Handler is
 * attached.  The work is executed during the next call to performTraversals on
 * the thread.
 * @hide
 */
大概意思是当视图树尚未attach到window的时候,整个视图树是没有Handler的(其实自己可以new,这里指的handler是AttachInfo里的),这时候用RunQueue来实现延迟执行runnable任务,并且runnable最终不会被加入到MessageQueue里,也不会被Looper执行,而是等到ViewRootImpl的下一个performTraversals时候,把RunQueue里的所有runnable都拿出来并执行,接着清空RunQueue。
由此可见RunQueue的作用类似于MessageQueue,只不过,这里面的所有
runnable最后的执行时机,是在下一个performTraversals到来的时候,MessageQueue里的消息处理的则是下一次loop到来的时候。RunQueue源码:
static final class RunQueue {
	// 存放所有runnable,HandlerAction是对runnable的包装对象
    private final ArrayList<HandlerAction> mActions = new ArrayList<HandlerAction>();

	// view没有attach到window的时候,View#post最终调用到这
    void post(Runnable action) {
        postDelayed(action, 0);
    }

	// view没有attach到window的时候,View#postDelay最终调用到这
    void postDelayed(Runnable action, long delayMillis) {
        HandlerAction handlerAction = new HandlerAction();
        handlerAction.action = action;
        handlerAction.delay = delayMillis;

        synchronized (mActions) {
            mActions.add(handlerAction);
        }
    }

	// 移除一个runnable任务,
	// view没有attach到window的时候,View#removeCallbacks最终调用到这
    void removeCallbacks(Runnable action) {
        final HandlerAction handlerAction = new HandlerAction();
        handlerAction.action = action;

        synchronized (mActions) {
            final ArrayList<HandlerAction> actions = mActions;

            while (actions.remove(handlerAction)) {
                // Keep going
            }
        }
    }

	// 取出所有的runnable并执行,接着清空RunQueue集合
    void executeActions(Handler handler) {
        synchronized (mActions) {
            final ArrayList<HandlerAction> actions = mActions;
            final int count = actions.size();

            for (int i = 0; i < count; i++) {
                final HandlerAction handlerAction = actions.get(i);
                handler.postDelayed(handlerAction.action, handlerAction.delay);
            }

            actions.clear();
        }
    }

	// 对runnable的封装类,记录runnable以及delay时间
    private static class HandlerAction {
        Runnable action;
        long delay;

        @Override
        public boolean equals(Object o) {
            if (this == o) return true;
            if (o == null || getClass() != o.getClass()) return false;

            HandlerAction that = (HandlerAction) o;
            return !(action != null ? !action.equals(that.action) : that.action != null);

        }

        @Override
        public int hashCode() {
            int result = action != null ? action.hashCode() : 0;
            result = 31 * result + (int) (delay ^ (delay >>> 32));
            return result;
        }
    }
}
再看看RunQueue里的消息处理位置,ViewRootImpl#performTraversals:
private void performTraversals() {

	// ....

    // Execute enqueued actions on every traversal in case a detached view enqueued an action
    getRunQueue().executeActions(mAttachInfo.mHandler);

	// ....
}
也就是说,当View没有被attach到window的时候,最后runnable的处理不是通过MessageQueue,而是ViewRootImpl自己在下一个performTraversals到来的时候执行。
为了验证RunQueue里的runnable是在下一个performTraversals到来的时候执行的,做一个测试(在Activity的onCreate方法中):
// Activity的跟布局
ViewGroup viewGroup = (ViewGroup) getWindow().getDecorView();
// 自己new的一个View,等待attach到window中
final View view = new View(getApplicationContext()) {
    @Override
    protected void onLayout(boolean changed, int left, int top, int right, int bottom) {
        super.onLayout(changed, left, top, right, bottom);
        // view执行了layout
        Log.e(TAG, "view layout");
    }
};

// 在View未attach到window上之前,
// 使用Handler#post发送一个runnable(最终到了MessageQueue中)
mHandler.post(new Runnable() {
    @Override
    public void run() {
        // 获取View的宽高,查看View是否已经layout
        Log.e(TAG, "MessageQueue runnable, view width = " + view.getWidth() + "  height = " + view.getHeight());
    }
});

// 在View未attach到window上之前,
// 使用View#post发送一个runnable(最终到了ViewRootImpl#RunQueue中)
view.post(new Runnable() {
    @Override
    public void run() {
        // 获取View的宽高,查看View是否已经layout
        Log.e(TAG, "RunQueue runnable, view width = " + view.getWidth() + "  height = " + view.getHeight());
    }
});

// 将view添加到window中
viewGroup.addView(view);
Log:

打印出来的日志说明:
- 使用handler#post的runnable最先执行,此时View还未layout,无法获取view的宽高。
- 接着view的onLayout方法执行,表示view完成了位置的布置,此时可以获取宽高。
- view#post的runnable最后执行,也就是说view已经layout完成才执行,此时能够获取View的宽高。
这里提一下,下一次performTraversals到来的时候,View可能attach到了window上,也可能未attach到window上,也就是代码最后不执行addView动作,使用view#post的runnable仍然无法获取View的宽高,修改如下:
// viewGroup.addView(view);
Log:

我们经常碰到一个问题,就是new一个View之后,通过addView添加到视图树或者是在Activity的onCreate方法里调用setContentView方法。紧接着,我们想获取View的宽高,但是因为view的measure和layout都还未执行,所以是获取不到宽高的。
view#post的一个作用是,在下一个performTraversals到来的时候,也就是view完成layout之后的第一时间获取宽高。
View#post方法导致的内存泄漏
分析泄漏之前需要查看ViewRootImpl里的RunQueue成员变量定义以及创建过程:
// 用ThreadLocal对象来保存ViewRootImpl的RunQueue实例
static final ThreadLocal<RunQueue> sRunQueues = new ThreadLocal<RunQueue>();

static RunQueue getRunQueue() {
    RunQueue rq = sRunQueues.get();
    if (rq != null) {
        return rq;
    }
    // 如果当前线程没有创建RunQueue实例,创建并保存在sRunQueues中
    rq = new RunQueue();
    sRunQueues.set(rq);
    return rq;
}
首先这里的ThreadLocal内部持有的实例是线程单利的,也就是不同的线程调用sRunQueues.get()得到的不是同一个对象。
ViewRootImpl使用ThreadLocal来保存RunQueue实例,一般来说,ViewRootImpl#getRunQueue都是在UI线程使用,所以RunQueue实例只有一个。UI线程的对象引用关系:
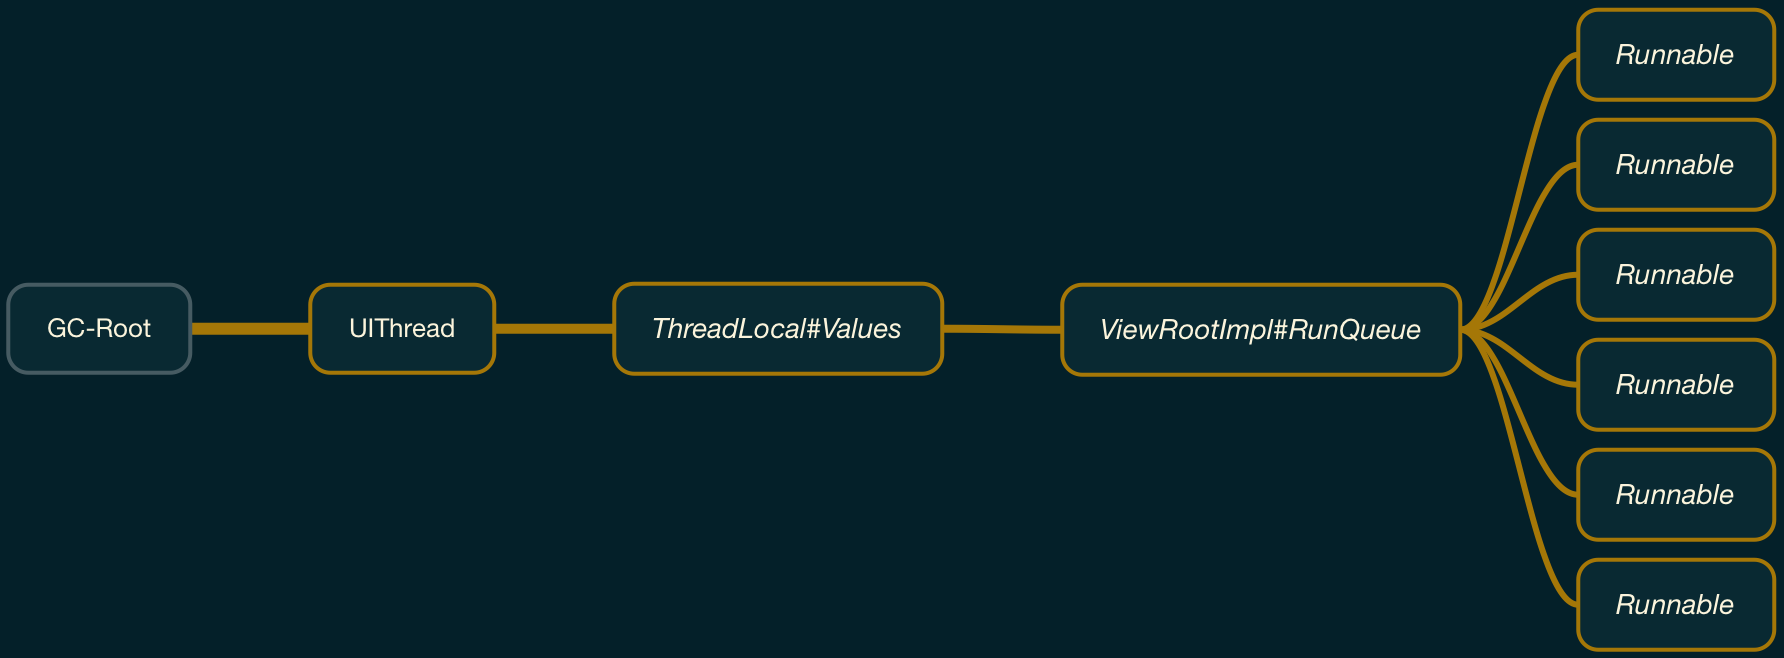
UIThread是应用程序启动的时候,新建的一个线程,生命周期与应用程序一致,也就是说UI线程对应的RunQueue实例是无法被回收的,但是无所谓,因为每次ViewRootImpl#performTraversals方法被调用时都会把RunQueue里的所有Runnable对象执行并清除。
接着,如果是异步线程调用了View#post方法:
new Thread(new Runnable() {
    @Override
    public void run() {
        new View(getApplicationContext()).post(new Runnable() {
            @Override
            public void run() {
            }
        });
    }
}).start();
这里的的对象引用关系:
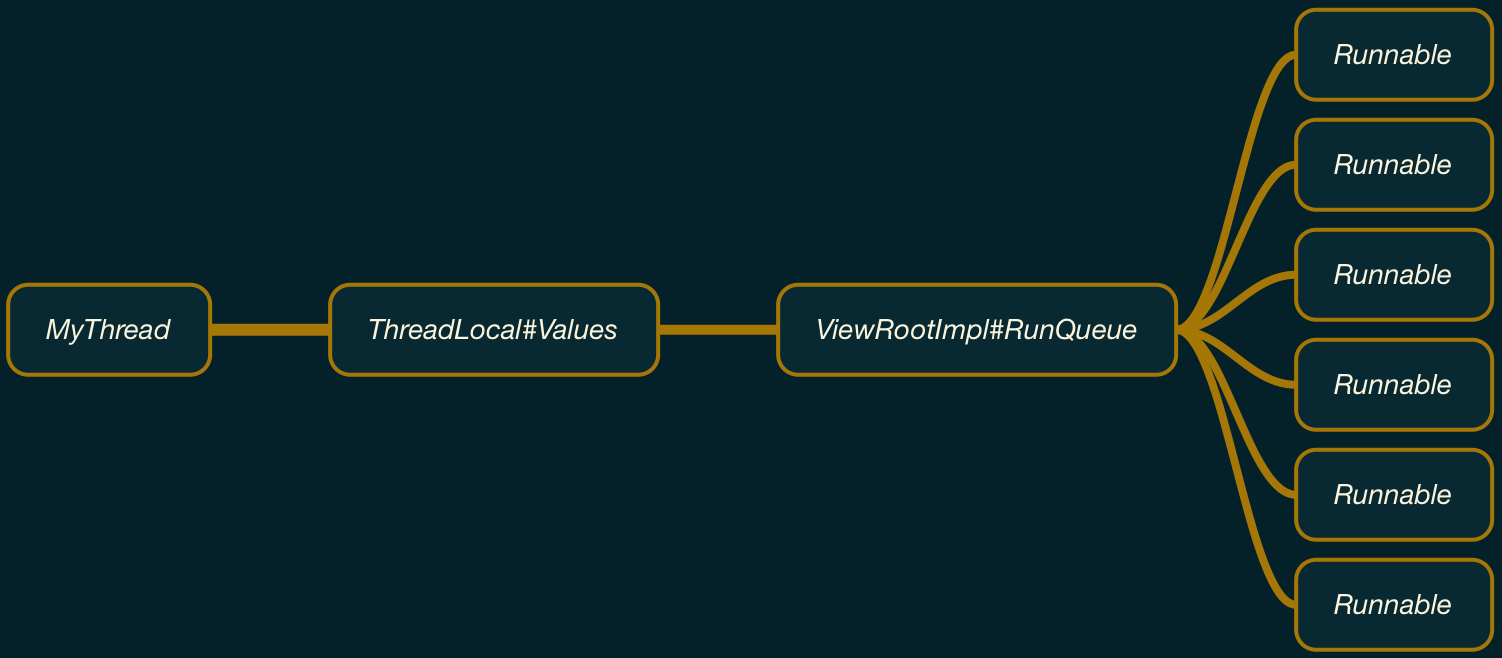
这里定义的Thread只是一个临时对象,并没有被GC-Root持有,是可以被垃圾回收器回收的,那么我们post出去的Runnable只是不会被执行而已,最后还是会被回收,并不会造成内存泄漏。
但是如果,这个Thread是一个静态变量的话,那么我们使用异步线程post出去的Runnable也就泄漏了,如果这些runnable又引用了View对象或者是Activity对象,就会造成更大范围的泄漏。
虽然,Thread被定义成静态变量的情况很少出现。但是线程池被定义成静态变量却常常出现,例如我们应用程序中,经常会定义一些静态线程池对象用来实现线程的复用,比如下面的这个线程池管理类GlobalThreadPool:
public class GlobalThreadPool {

    private static final int SIZE = 3;
    private static ScheduledExecutorService mPool;

    public static ScheduledExecutorService getGlobalThreadPoolInstance() {
        if (mPool == null) {
            synchronized (GlobalThreadPool.class) {
                if (mPool == null) {
                    mPool = Executors.newScheduledThreadPool(SIZE);
                }
            }
        }
        return mPool;
    }

    /**
     * run a thead ,== new thread
     */
    public static void startRunInThread(Runnable doSthRunnable) {
        getGlobalThreadPoolInstance().execute(doSthRunnable);
    }
}
接着再把异步处理调用View#post的代码改改:
GlobalThreadPool.startRunInThread(new Runnable() {
    @Override
    public void run() {
        new View(MainActivity.this).post(new Runnable() {
            @Override
            public void run() {
            }
        });
    }
});
这样的话,对象引用关系就变成了:
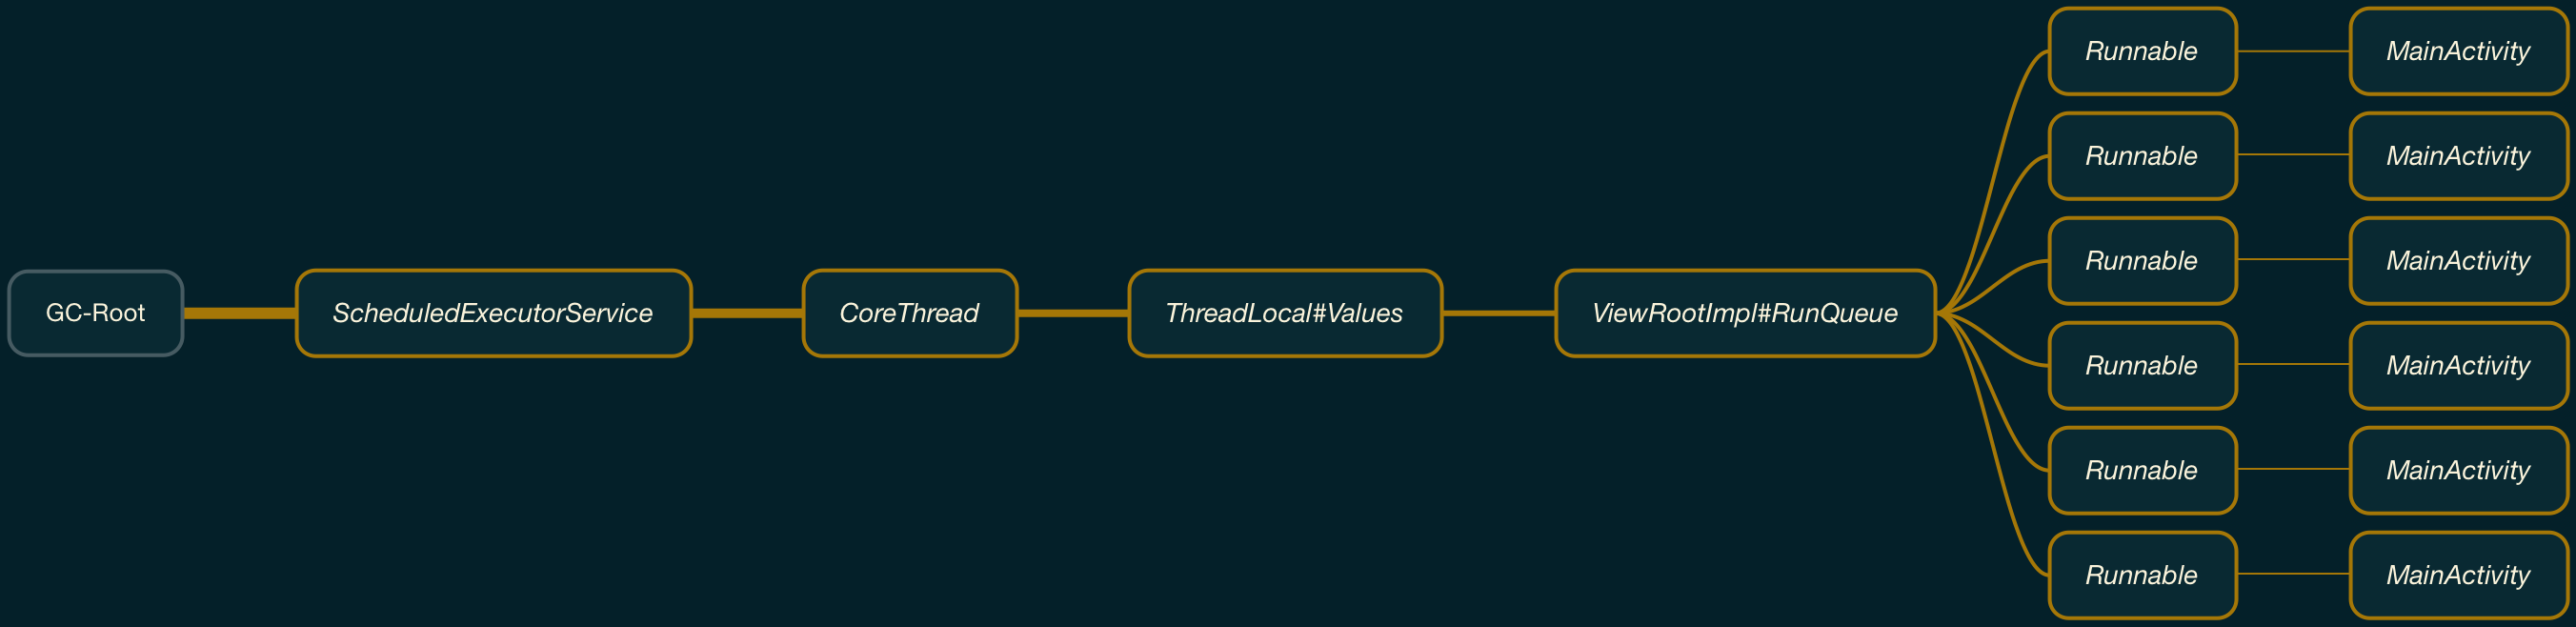
导出的heap文件hprof查看对象引用关系:

最后,回到文章开头简述中说的,项目中使用异步线程解析布局文件,当解析的布局文件的时候,如果布局文件中包含TextView,这时候,android系统4.4-5.2的机器,就会出现内存泄漏,具体为什么往下看。
- TextView的构造方法调用用了setText方法。
- setText方法又调用了notifyViewAccessibilityStateChangedIfNeeded方法。
- notifyViewAccessibilityStateChangedIfNeeded方法又创建了一个SendViewStateChangedAccessibilityEvent对象,紧接着又调用了SendViewStateChangedAccessibilityEvent对象的runOrPost方法。
- runOrPost方法最终又调用了View的post方法。
上面这一大串流程,导致的结果就是异步线程调用了View的post方法,如果这里的线程是核心线程,也就是一直会存在于线程池中的线程,并且线程池又是静态的,就导致使用异步线程创建多个TextView相当于是往异步线程的RunQueue中加入多个Runnable,而Runable又引用了View,导致View的泄漏。
泄漏的对象引用关系和上面主动调用View的post方法类似。
至于为什么4.4-5.2的机器才会泄漏,是因为4.4-5.2的系统,View中notifyViewAccessibilityStateChangedIfNeeded方法并没有判断View是否attach到了window,直到google发布的android_6.0系统才修复该问题,该问题可以说是google的问题,因为google官方在Support_v4包中就提供了异步线程加载布局文件的框架,具体参阅:android.support.v4.view.AsyncLayoutInflater

传送门:https://developer.android.com/reference/android/support/v4/view/AsyncLayoutInflater.html
##总结:
- 当View已经attach到window,不管什么线程, 调用View#post 和 调用Handler#post效果一致
- 当View尚未attach到window,主线程调用View#post发送的runnable将在下一次performTraversals到来时执行,而非主线程调用View#post发送的runnable将无法被执行。
- 可以通过在主线程调用View#post发送runnable来获取下一次performTraversals时视图树中View的布局信息,如宽高。
- 如果调用View#post方法的线程对象被GC-Root引用,则发送的runnable将会造成内存泄漏。
更新(2019年09月17日)
如果需要解决该问题,可以通过反射来置空的方式解决,但是置空代码需要创建View的子线程执行,这里需要特别注意。
/**
 * 切记此方法需要在创建View的子线程中调用
 */
private void resolveLeak() {
    if (Looper.getMainLooper().getThread() == Thread.currentThread()) {
        // 主线程不需要处理
        return;
    }
    try {
        Class<?> viewRootImpl = Class.forName("android.view.ViewRootImpl");
        Field sRunQueuesField = viewRootImpl.getDeclaredField("sRunQueues");
        if (sRunQueuesField != null) {
            sRunQueuesField.setAccessible(true);
            ThreadLocal threadLocal = (ThreadLocal) sRunQueuesField.get(viewRootImpl);
            if (threadLocal != null) {
                threadLocal.set(null);
            }
        }
    } catch (NoSuchFieldException e) {
        e.printStackTrace();
    } catch (IllegalAccessException e) {
        e.printStackTrace();
    } catch (ClassNotFoundException e) {
        e.printStackTrace();
    }
}


 被折叠的 条评论
为什么被折叠?
被折叠的 条评论
为什么被折叠?
 到【灌水乐园】发言


