


DTL模板语言生来只是为了方便的展示信息,所以与编程语言相比显得有点薄弱,有时候不能满足我们的需求。因此django提供了一个接口,让开发者能自定义标签和过滤器。
一些内置标签请参照官方网站的filter过滤器的讲解—–官方网站标签和过滤器详解
一、过滤器注意事项
自定义过滤器必须处在已经安装了的app中的一个名叫”templatetags”的包(文件夹)中。因此可以有两种选择:
1、一种是放在其他已经安装了的app中。这种方式简单,但不方便管理。
2、单独创建一个app,用来存放所有的自己定义的过滤器。
注意事项:
1、创建完templatetags模块后,你需要重启服务器。
2、在模板中加载的是过滤器所在的文件名,而不是app的名称。
二、过滤器分类以及实例
1、自定义过滤器分类
(1)自定义过滤器

(2)简单过滤器(simple_tag)

(3)内涵过滤器(inclusion_tag)

(4)分配过滤器(assignment_tag)
2、实例演示
在介绍以之前先创建项目还有今天所要用到的代码文件。运行环境依然是ubuntu,python2.7,创建的所有过滤器都单独放在一个app中。
(1)实例前准备工作
django-admin.py startproject myfilter  #创建myfilter工程

cd myfilter  #进入目录

python manage.py startapp books  #创建books app

mkdir -p books/templates   #创建books app下存放html的目录

python manage.py startapp common  #创建存放通用过滤器的app common

mkdir -p common/templatetags  #创建common app下存放过滤器的目录

tree   #查看创建的工程的目录结构
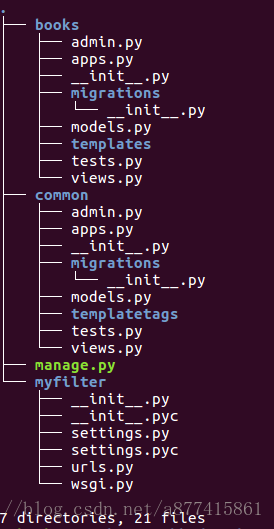
step1 myfilter/settings.py
vim myfilter/settings.py   #首先修改settings.py

INSTALLED_APPS = [
    'django.contrib.admin',
    'django.contrib.auth',
    'django.contrib.contenttypes',
    'django.contrib.sessions',
    'django.contrib.messages',
    'django.contrib.staticfiles',
    'books', #添加books app
    'common',#添加common app
]
step2 myfilter/urls.py
vim myfilter/urls.py #修改urls.py

from django.conf.urls import url
from django.contrib import admin

from books import views
urlpatterns = [
    url(r'^admin/', admin.site.urls),
    url(r'^books/([\S\s]*)/$',views.hello_books) #这里使用了正则在上一次中有讲过,如果还不懂可以看一下django学习03
]
step3 books/views.py
vim  books/views.py #修改views.py

# -*- coding: utf-8 -*-
from __future__ import unicode_literals

from django.shortcuts import render

# Create your views here.
from django.shortcuts import render
def hello_books(request, bn):
    return render(request,'hello_books.html',{'books_name':bn})
step4 创建和编辑hello_books.html
mkdir -p books/templates/hello_books.html #创建html

vim books/templates/hello_books.html  #编辑hello_books.html
<!DOCTYPE html>
<html>
<body>
<h3>{{books_name}}</h3>
</body>
</html>(2) 实例
1、自定义filter
  自定义过滤其中有三种方式,来注册定义过滤器
  - 通过函数注册
  - 通过装饰器注册
  - 默认重命名注册
step1 创建编写过滤器文件
vim common/templatetags/custom_filter.py #创建编写过滤器文件
common/templatetags/custom_filter.py内容如下
#coding=utf-8
from django import template #引入template模板

register = template.Library()

#1 通过函数注册
#第一个参数是给过滤器命名,第二个参数过滤器使用的函数
def mycut(value,args): #此过滤器的效果是将value中的args替换成""
    return value.replace(args,"")
register.filter("mycut",mycut)   #注册步骤


#2 装饰器注册
#name的值决定过滤器名字,默认使用函数的名字当作过滤器名d
@register.filter   #注册步骤
def mycut1(value,args):
    return value.replace(args,"")

#3 最后一种
@register.filter(name="Exists") #注册步骤  此过滤器名字以这里注册的为准 Exists
def exists(src,dst):  #此过滤器的效果是判断dst是否包含于src中,存在则显示True,否则False
    return True if dst in src  else False
step2 编写hello_books.html文件
vim books/templates/hello_books.html
hello_books.html
{% load custom_filter %} <!--引入custom_filter过滤器文件-->
<!DOCTYPE html>
<html>
<body>
<h3>{{books_name}}</h3>
<!--这是内置标签cut作用和我们一样-->
<h3>cut: {{books_name|cut:"_"}}</h3>
<!--我们定义的第一个过滤器mycut-->
<h3>mycut: {{books_name|mycut:"_"}}</h3>
<!--我们定义的第二个过滤器mycut1-->
<h3>mycut1: {{books_name|mycut1:"_"}}</h3>
<!--这我们定义的第三个过滤器Exists-->
<h3>exists: {{books_name|Exists:"python"}}</h3>
</body>
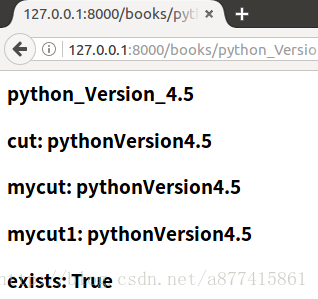
</html>step3 运行程序
python manage.py runserver运行效果如下图:
2、简单标签(simple_tag)
step1 创建编写views.py文件
vim books/views.py #创建编写过滤器文件# -*- coding: utf-8 -*-
from __future__ import unicode_literals
from django.shortcuts import render
# Create your views here.
from django.shortcuts import render
def hello_books(request, bn):
return render(request,'hello_books.html',{'books_name':bn,'timezone':'%Z'}) #这里多传递了一个timezonestep2 创建编写过滤器文件
vim common/templatetags/custom_tag.py #创建编写过滤器文件
common/templatetags/custom_tag.py内容如下
#coding=utf-8
from django import template #引入template模板
import time #导入时间模块

register = template.Library()

#简单过滤器  takes_context表示是否取views.py传递过来的参数.如果等于True,则取,否则则不取。
@register.simple_tag(takes_context=True)

def current_time(context, format_string): #此方法是格式化显示当前时间,具体介绍请百度参照python的time模块。

    timezone = context['timezone'] #此为展示context=True时的作用,此获得数据timezone="%Z"

    return time.strftime(format_string,time.localtime())#格式化当前时间
step3 编写hello_books.html文件
vim books/templates/hello_books.html
hello_books.html内容如下
{% load custom_tag %}  <!--引入custom_tag 过滤器文件-->
<!DOCTYPE html>
<html>
  <body>
    <h3>{%current_time timezone|add:"%c" %}</h3>  <!--显示时区和当时时间 -->
    <h3>{{timezone}}</h3>  <!--显示后台传的timezone值 -->
    <h3>{%current_time "%c" %}</h3> <!-- 显示当时时间 -->
  </body>
</html>
step4 运行程序
python manage.py runserver
3、内涵标签(inclusion_tag)
step1 创建编写过滤器文件
vim common/templatetags/custom.py #创建编写过滤器文件
common/templatetags/custom.py内容如下
#coding=utf-8

from django import template

register = template.Library()

@register.inclusion_tag('result.html') #引入模板html
def show():
    l = [u'python',u'java',u'C#'] #list l
    return {'choices':l} #返回字典
step2 编写result.html文件
vim books/templates/result.html
result.html内容如下
<ul>
{% for choice in choices %} #遍历choices
  <li> {{choice}} </li>
{% endfor %}
<ul>
step3 编写hello_books.html文件
vim books/templates/hello_books.html
hello_books.html内容如下
<!DOCTYPE html>
{% load custom %}  <!--引入custom 过滤器文件-->
<html>
  <body>
    {% show %} <!-- 调用show标签-->
  </body>
</html>
step4 运行程序
python manage.py runserver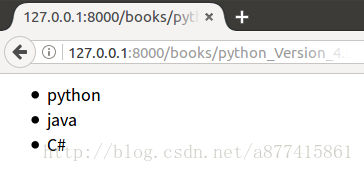
4、分配标签(assignment_tag)
step1 创建编写views.py文件
vim books/views.py #创建编写过滤器文件# -*- coding: utf-8 -*-
from __future__ import unicode_literals
from django.shortcuts import render
# Create your views here.
from django.shortcuts import render
def hello_books(request, bn):
return render(request,'hello_books.html',{'books_name':bn,'timezone':'%Z'}) #这里多传递了一个timezonestep2 创建编写过滤器文件
vim common/templatetags/custom_ass.py #创建编写过滤器文件
common/templatetags/custom_ass.py内容如下
#coding=utf-8
from django import template #引入template模板
import time #导入时间模块

register = template.Library()

#简单过滤器  takes_context表示是否取views.py传递过来的参数.如果等于True,则取,否则则不取。
@register.assignment_tag(takes_context=True)

def current_time(context, format_string): #此方法是格式化显示当前时间,具体介绍请百度参照python的time模块。

    timezone = context['timezone'] #此为展示context=True时的作用,此获得数据timezone="%Z"

    return time.strftime(format_string,time.localtime())#格式化当前时间
step3 编写hello_books.html文件
vim books/templates/hello_books.html
hello_books.html内容如下
{% load custom_ass%}  <!--引入custom_tag 过滤器文件-->
<!DOCTYPE html>
<html>
  <body>
    <h3>{%current_time "%c" as ct%}</h3>  <!--将值赋予给ct -->
    <h3>现在的时间是 {{ct}}</h3>  <!--后如果需要上的时间时只需调用ct即可 -->
  </body>
</html>
step4 运行程序
python manage.py runserver


 3428
3428


 被折叠的 条评论
为什么被折叠?
被折叠的 条评论
为什么被折叠?
 到【灌水乐园】发言


