项目介绍
在android开发早期,不像现在这样有各种第三方的网路框架,而网络请求又是app必须的功能,所以不同的公司都会采用自己封装框架的方式,其实主要目的就是可以实现http请求,然后得到想要的结果(json等等),然后还会加入一些扩展的功能:如支持上传下载进度回调、支持对错误的统一处理、支持对数据做内存缓存和文件缓存以及缓存的刷新机制等等。
后来,慢慢的有的知名公司就会选择把自家公司的http框架开源出来,其他公司就可以在自己的项目中采用。Volley也是这么来的,这是google的开源框架,目前已经集成到了android中了。
Volley 是 Google 推出的 Android 异步网络请求框架和图片加载框架。
特点
- 扩展性强。Volley 中大多是基于接口的设计,可配置性强。
- 一定程度符合 Http 规范,包括返回 ResponseCode(2xx、3xx、4xx、5xx)的处理,请求头的处理,缓存机制的支持等。并支持重试及优先级定义。
- 默认 Android2.3 及以上基于 HttpURLConnection,2.3 以下基于 HttpClient 实现,这两者的区别及优劣在4.2.1 Volley中具体介绍。
- 提供简便的图片加载工具。
- 特别适合数据量小,通信频繁的网络操作。
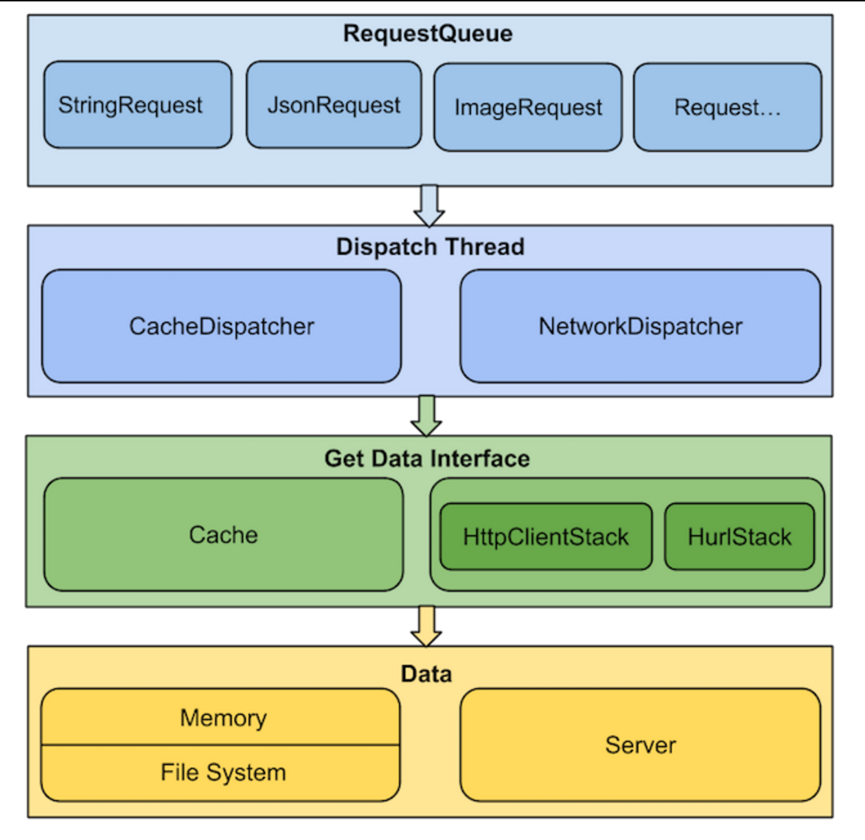
总体设计
从这个图上大致可以分析出这个流程:这里提供了各种格式的请求,支持string、json、image等等,请求会进入一个请求的队列中,网络请求的线程会不断去队列中取请求,然后根据内存和文件是否命中来决定是否去做网络请求,请求结果会缓存到本地和内存中。
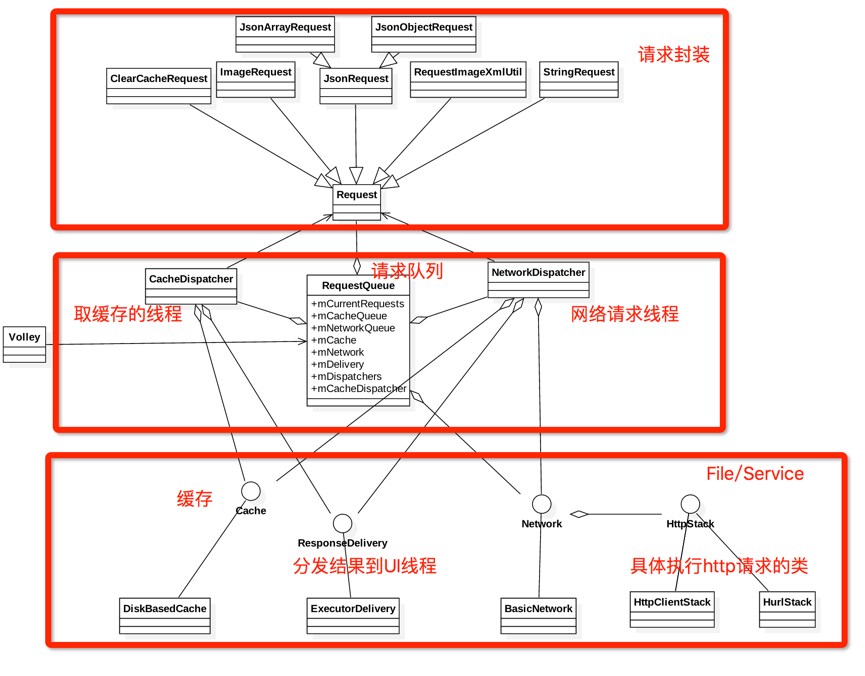
类图
流程分析:栈帧+时序图
时序图就不画了,比较简单
核心模块分述
大致流程是这样的:
Volley类
首先调用Volley的newRequestQueue(Context context)方法,会调用到newRequestQueue(Context context, HttpStack stack)方法,在这个方法中如果stack=空的话,会根据android的版本来选择到底是使用HttpClient(封装在HttpClientStack中)还是使用HttpUrlConnection(封装在HurlStack中)。同时会初始化一个RequestQueue来,并调用RequestQueue的start方法。
我们看一下RequestQueue的start方法:
public void start() {
        stop();  // Make sure any currently running dispatchers are stopped.
        // Create the cache dispatcher and start it.
        mCacheDispatcher = new CacheDispatcher(mCacheQueue, mNetworkQueue, mCache, mDelivery);
        mCacheDispatcher.start();

        // Create network dispatchers (and corresponding threads) up to the pool size.
        for (int i = 0; i < mDispatchers.length; i++) {
            NetworkDispatcher networkDispatcher = new NetworkDispatcher(mNetworkQueue, mNetwork,
                    mCache, mDelivery);
            mDispatchers[i] = networkDispatcher;
            networkDispatcher.start();
        }
    }
它首先调用stop方法来停止自己启动的线程,同时会初始化CacheDispatcher线程,并启动它。同时会启动若干个NetworkDispatcher线程。
RequestQueue类
一般在此之后我们会调用RequestQueue的add(Request request)方法,就把一个请求加入到了请求队列中了,具体来看一下add方法的源码:
 public <T> Request<T> add(Request<T> request) {
        // Tag the request as belonging to this queue and add it to the set of current requests.
        request.setRequestQueue(this);
        synchronized (mCurrentRequests) {
            mCurrentRequests.add(request);
        }

        // Process requests in the order they are added.
        request.setSequence(getSequenceNumber());
        request.addMarker("add-to-queue");

        // If the request is uncacheable, skip the cache queue and go straight to the network.
        if (!request.shouldCache()) {
            mNetworkQueue.add(request);
            return request;
        }

        // Insert request into stage if there's already a request with the same cache key in flight.
        synchronized (mWaitingRequests) {
            String cacheKey = request.getCacheKey();
            if (mWaitingRequests.containsKey(cacheKey)) {
                // There is already a request in flight. Queue up.
                Queue<Request<?>> stagedRequests = mWaitingRequests.get(cacheKey);
                if (stagedRequests == null) {
                    stagedRequests = new LinkedList<Request<?>>();
                }
                stagedRequests.add(request);
                mWaitingRequests.put(cacheKey, stagedRequests);
                if (VolleyLog.DEBUG) {
                    VolleyLog.v("Request for cacheKey=%s is in flight, putting on hold.", cacheKey);
                }
            } else {
                // Insert 'null' queue for this cacheKey, indicating there is now a request in
                // flight.
                mWaitingRequests.put(cacheKey, null);
                mCacheQueue.add(request);
            }
            return request;
        }
    }
首先我们看到request会被加入到mCurrentRequests中。然后会给request设置一个序列号(作为排序标志),还会加一个Marker(主要是为了方便debug)。然后会判断request是否需要缓存,如果不需要缓存,会将请求加入到mNetworkQueue中,就会直接返回。需要缓存就会向下走,就到了mWaitingRequests这里,mWaitingRequests中会存放的数据类型为:key为request的url,value为一个集合(url为同一个url的多个request)。
这里你可能不很理解,为何对于相同的url的request要都保存到一个队列中呢?这里解释一下:
网络请求结束之后会调用RequestQueue的finish(Request request)方法:
看源码:
   void finish(Request<?> request) {
        // Remove from the set of requests currently being processed.
        synchronized (mCurrentRequests) {
            mCurrentRequests.remove(request);
        }

        if (request.shouldCache()) {
            synchronized (mWaitingRequests) {
                String cacheKey = request.getCacheKey();
                Queue<Request<?>> waitingRequests = mWaitingRequests.remove(cacheKey);
                if (waitingRequests != null) {
                    if (VolleyLog.DEBUG) {
                        VolleyLog.v("Releasing %d waiting requests for cacheKey=%s.",
                                waitingRequests.size(), cacheKey);
                    }
                    // Process all queued up requests. They won't be considered as in flight, but
                    // that's not a problem as the cache has been primed by 'request'.
                    mCacheQueue.addAll(waitingRequests);
                }
            }
        }
    }
这里可以看到,如果request需要缓存,会从mWaitingRequests中先移除key为这个url的请求集合,而这个请求的集合会被加入到mCacheQueue,即如果一个url的request请求成功了,那么与这个request一样url的其他request不会走网络请求,而是直接从本地缓存中取数据。
CacheDispatcher
CacheDispatcher是一个Runnable。我们看一下它的run方法:
    public void run() {
        if (DEBUG) VolleyLog.v("start new dispatcher");
        Process.setThreadPriority(Process.THREAD_PRIORITY_BACKGROUND);

        // Make a blocking call to initialize the cache.
        mCache.initialize();

        while (true) {
            try {
                // Get a request from the cache triage queue, blocking until
                // at least one is available.
                final Request<?> request = mCacheQueue.take();
                request.addMarker("cache-queue-take");

                // If the request has been canceled, don't bother dispatching it.
                if (request.isCanceled()) {
                    request.finish("cache-discard-canceled");
                    continue;
                }

                // Attempt to retrieve this item from cache.
                Cache.Entry entry = mCache.get(request.getCacheKey());
                if (entry == null) {
                    request.addMarker("cache-miss");
                    // Cache miss; send off to the network dispatcher.
                    mNetworkQueue.put(request);
                    continue;
                }

                // If it is completely expired, just send it to the network.
                if (entry.isExpired()) {
                    request.addMarker("cache-hit-expired");
                    request.setCacheEntry(entry);
                    mNetworkQueue.put(request);
                    continue;
                }

                // We have a cache hit; parse its data for delivery back to the request.
                request.addMarker("cache-hit");
                Response<?> response = request.parseNetworkResponse(
                        new NetworkResponse(entry.data, entry.responseHeaders));
                request.addMarker("cache-hit-parsed");

                if (!entry.refreshNeeded()) {
                    // Completely unexpired cache hit. Just deliver the response.
                    mDelivery.postResponse(request, response);
                } else {
                    // Soft-expired cache hit. We can deliver the cached response,
                    // but we need to also send the request to the network for
                    // refreshing.
                    request.addMarker("cache-hit-refresh-needed");
                    request.setCacheEntry(entry);

                    // Mark the response as intermediate.
                    response.intermediate = true;

                    // Post the intermediate response back to the user and have
                    // the delivery then forward the request along to the network.
                    mDelivery.postResponse(request, response, new Runnable() {
                        @Override
                        public void run() {
                            try {
                                mNetworkQueue.put(request);
                            } catch (InterruptedException e) {
                                // Not much we can do about this.
                            }
                        }
                    });
                }

            } catch (InterruptedException e) {
                // We may have been interrupted because it was time to quit.
                if (mQuit) {
                    return;
                }
                continue;
            }
        }
    }
先去初始化DiskBasedCache。然后是一个死循环。在这个循环中做的事情是:先从mCacheQueue中取出来一个请求,如果这个请求取消了,就结束这个循环。否者就去缓存中根据request的url去取,如果没取出来,就把这个请求加入到mNetworkQueue中去,结束本次循环。如果取出来的缓存过去了的话,也会就把这个请求加入到mNetworkQueue中去,结束本次循环。剩下的情况就是取出来了缓存,并且缓存没有过期,这个时候就把缓存的结果回调给这个请求,除此之外还会判断缓存结果是否新鲜,如果新鲜,则直接传输响应结果,否则传输响应结果,并将request加入到mNetworkQueue做新鲜度验证。
NetworkDispatcher
NetworkDispatcher是一个Runnable。具体看一下它的的run方法:
    @Override
    public void run() {
        Process.setThreadPriority(Process.THREAD_PRIORITY_BACKGROUND);
        while (true) {
            long startTimeMs = SystemClock.elapsedRealtime();
            Request<?> request;
            try {
                // Take a request from the queue.
                request = mQueue.take();
            } catch (InterruptedException e) {
                // We may have been interrupted because it was time to quit.
                if (mQuit) {
                    return;
                }
                continue;
            }

            try {
                request.addMarker("network-queue-take");

                // If the request was cancelled already, do not perform the
                // network request.
                if (request.isCanceled()) {
                    request.finish("network-discard-cancelled");
                    continue;
                }

                addTrafficStatsTag(request);

                // Perform the network request.
                NetworkResponse networkResponse = mNetwork.performRequest(request);
                request.addMarker("network-http-complete");

                // If the server returned 304 AND we delivered a response already,
                // we're done -- don't deliver a second identical response.
                if (networkResponse.notModified && request.hasHadResponseDelivered()) {
                    request.finish("not-modified");
                    continue;
                }

                // Parse the response here on the worker thread.
                Response<?> response = request.parseNetworkResponse(networkResponse);
                request.addMarker("network-parse-complete");

                // Write to cache if applicable.
                // TODO: Only update cache metadata instead of entire record for 304s.
                if (request.shouldCache() && response.cacheEntry != null) {
                    mCache.put(request.getCacheKey(), response.cacheEntry);
                    request.addMarker("network-cache-written");
                }

                // Post the response back.
                request.markDelivered();
                //TODO::add sqlite

                mDelivery.postResponse(request, response);
            } catch (VolleyError volleyError) {
                volleyError.setNetworkTimeMs(SystemClock.elapsedRealtime() - startTimeMs);
                parseAndDeliverNetworkError(request, volleyError);
            } catch (Exception e) {
                VolleyLog.e(e, "Unhandled exception %s", e.toString());
                VolleyError volleyError = new VolleyError(e);
                volleyError.setNetworkTimeMs(SystemClock.elapsedRealtime() - startTimeMs);
                mDelivery.postError(request, volleyError);
            }
        }
    }
这也是一个死循环。会从mNetworkQueue中取出一个request,这个request如果取消了,就直接结束这次循环,否则就走Network的performRequest方法来做http请求,请求结果为NetworkResponse,request会调用parseNetworkResponse方法来解析这个结果,并且如果这个request需要缓存,就会把这个请求的结果缓存到本地,主要是通过DiskBasedCache这个类实现的,具体做法是用url作为key。最后把结果分发到UI线程中去。
DiskBasedCache
缓存的文件命名,传入url,经过加入生成缓存文件名
    private String getFilenameForKey(String key) {
        int firstHalfLength = key.length() / 2;
        String localFilename = String.valueOf(key.substring(0, firstHalfLength).hashCode());
        localFilename += String.valueOf(key.substring(firstHalfLength).hashCode());
        return localFilename;
    }
会把实体类直接序列化到本地去
ExecutorDelivery
new ExecutorDelivery(new Handler(Looper.getMainLooper()))
可看到这里的handler使用的是主线程的handler。
图片请求相关
我们知道volley是支持图片请求的,并且有一套自己的解码方案。具体在ImageRequest中。
@Override
    protected Response<Bitmap> parseNetworkResponse(NetworkResponse response) {
        // Serialize all decode on a global lock to reduce concurrent heap usage.
        synchronized (sDecodeLock) {
            try {
                return doParse(response);
            } catch (OutOfMemoryError e) {
                VolleyLog.e("Caught OOM for %d byte image, url=%s", response.data.length, getUrl());
                return Response.error(new ParseError(e));
            }
        }
    }
private Response<Bitmap> doParse(NetworkResponse response) {
byte[] data = response.data;
BitmapFactory.Options decodeOptions = new BitmapFactory.Options();
Bitmap bitmap = null;
if (mMaxWidth == 0 && mMaxHeight == 0) {
decodeOptions.inPreferredConfig = mDecodeConfig;
bitmap = BitmapFactory.decodeByteArray(data, 0, data.length, decodeOptions);
} else {
// If we have to resize this image, first get the natural bounds.
decodeOptions.inJustDecodeBounds = true;
BitmapFactory.decodeByteArray(data, 0, data.length, decodeOptions);
int actualWidth = decodeOptions.outWidth;
int actualHeight = decodeOptions.outHeight;
// Then compute the dimensions we would ideally like to decode to.
int desiredWidth = getResizedDimension(mMaxWidth, mMaxHeight,
actualWidth, actualHeight, mScaleType);
int desiredHeight = getResizedDimension(mMaxHeight, mMaxWidth,
actualHeight, actualWidth, mScaleType);
// Decode to the nearest power of two scaling factor.
decodeOptions.inJustDecodeBounds = false;
// TODO(ficus): Do we need this or is it okay since API 8 doesn't support it?
// decodeOptions.inPreferQualityOverSpeed = PREFER_QUALITY_OVER_SPEED;
decodeOptions.inSampleSize =
findBestSampleSize(actualWidth, actualHeight, desiredWidth, desiredHeight);
Bitmap tempBitmap =
BitmapFactory.decodeByteArray(data, 0, data.length, decodeOptions);
// If necessary, scale down to the maximal acceptable size.
if (tempBitmap != null && (tempBitmap.getWidth() > desiredWidth ||
tempBitmap.getHeight() > desiredHeight)) {
bitmap = Bitmap.createScaledBitmap(tempBitmap,
desiredWidth, desiredHeight, true);
tempBitmap.recycle();
} else {
bitmap = tempBitmap;
}
}
if (bitmap == null) {
return Response.error(new ParseError(response));
} else {
return Response.success(bitmap, HttpHeaderParser.parseCacheHeaders(response));
}
}阅读体会&优缺点 提出改进意见 你能否提出改进意见
进一步思考:
这么多个queue,到底如何区分呢?mWaitingRequests、mCurrentRequests、mCacheQueue、mNetworkQueue?
缓存的过期和新鲜度如何判断,具体如何理解?
BlockingQueue作为线程容器,可以保障线程同步。
主要方法有两个:add(Object)、take()。
add(Object):把Object加到BlockingQueue里,即如果BlockingQueue可以容纳,则返回true,否则异常
take():取走BlockingQueue里排在首位的对象,若BlockingQueue为空,阻断进入等待状态直到Blocking有新的对象被加入为止如何判断是哪个线程更加优先?
PriorityBlockingQueue里面存储的对象必须是实现Comparable接口。队列通过这个接口的compare方法确定对象的priority。取消请求:
Activity里面启动了网络请求,而在这个网络请求还没返回结果的时候,Activity被结束了,此时如果继续使用其中的Context等,除了无辜的浪费CPU,电池,网络等资源,有可能还会导致程序crash,所以,我们需要处理这种一场情况。
Volley可以在Activity停止的时候,同时取消所有或部分未完成的网络请求。
Volley里所有的请求结果会返回给主进程,如果在主进程里取消了某些请求,则这些请求将不会被返回给主线程。Volley支持多种request取消方式。
onStop()中调用
request.cancel();取消某个请求
mRequestQueue.cancelAll(this);取消队列中所有请求
mRequestQueue.cancelAll( new RequestFilter() {});根据RequestFilter或者Tag来终止某些请求


 185
185

 被折叠的 条评论
为什么被折叠?


