Nginx中使用htpasswd配置Http认证

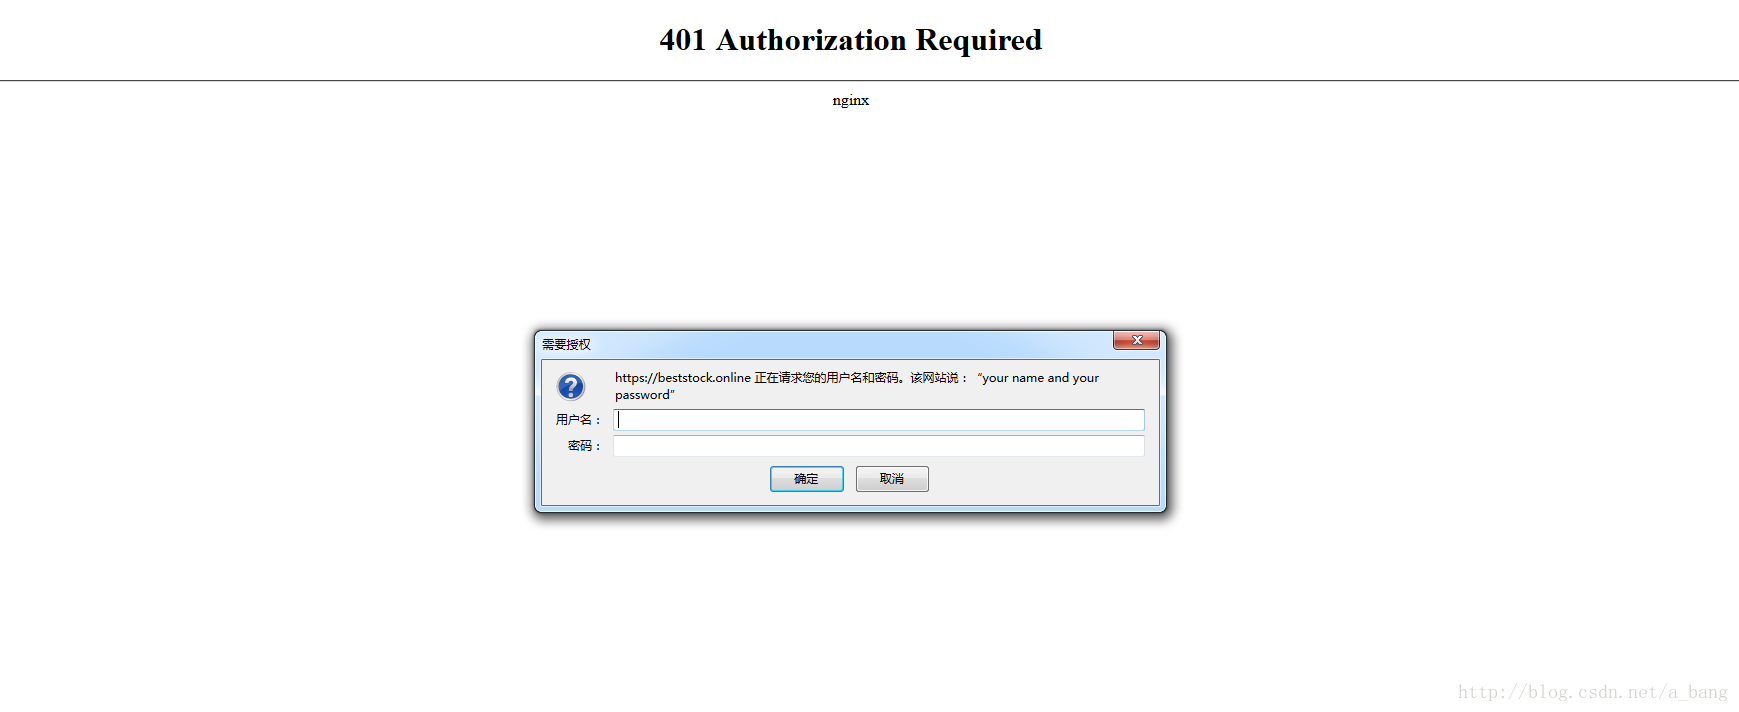
为了增强网站的安全性,可以通过设置HTTP认证的方式实现,而nginx的ngx_http_auth_basic_module模块为我们提供了方便。访问者在浏览默写模块或者网页的时候,只有通过认证才能正常显示,否则会报401 Authorization Required,认证错误时会报403。如下图:

这里写图片描述

下面来说一下实现方式:

安装httpd
yum -y install httpd 
创建认证数据文件
[root@ZhOu nginx]# htpasswd -c /usr/opt/nginx/passwd.db root
New password: 
Re-type new password: 
Adding password for user root
[root@ZhOu nginx]# cat passwd.db 
root:14W4BSbnMrVEg
[root@ZhOu nginx]# 

执行上面语句,如上下图所示,密码经过加密后保存在passwd.db文件中。

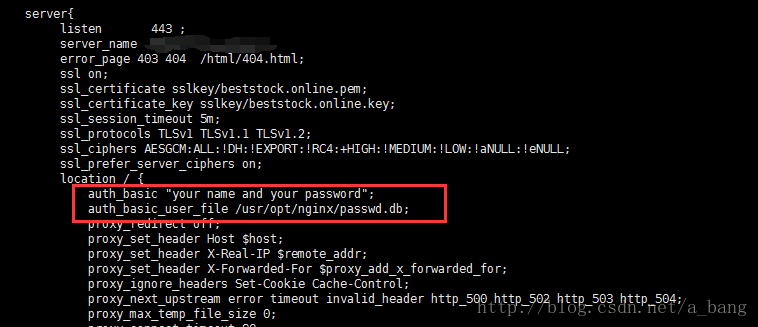
nginx中配置auth_basic 和auth_basic_user_file

这里写图片描述

重启nginx
[root@ZhOu nginx]# nginx -t  //检查配置是否正常
nginx: the configuration file /usr/opt/nginx/nginx.conf syntax is ok
nginx: configuration file /usr/opt/nginx/nginx.conf test is successful
[root@ZhOu nginx]# nginx -s reload   //平滑重启

打开网页,就会看到最开始的效果图。
  

nginx basic auth

主要包含两个值:auth_basic 和auth_basic_user_file

  • auth_basic
    语法: auth_basic string | off;
    默认值: auth_basic off;
    配置段: http, server, location, limit_except
    默认表示不开启认证,后面如果跟上字符,这些字符会在弹窗中显示。
      
  • auth_basic_user_file
    语法: auth_basic_user_file file;
    默认值: —
    配置段: http, server, location, limit_except
htpasswd

基本格式:   

  • htpasswd [-cmdpsD] passwordfile username
  • htpasswd -b[cmdpsD] passwordfile username password
  • htpasswd -n[mdps] username
  • htpasswd -nb[mdps] username password

参数说明:

  • b
    使用批处理方式,从命令行中获得密码,而不显示提示要求输入。 此选项的使用应该极为谨慎,因为命令行中的密码是清晰可见的。
      
  • c
    建立passwdfile文件。如果passwdfile已经存在,则它被重写并截断。 此选项不能与-n选项同时使用。
      
  • n
    在标准输出设备上显示结果,而不更新文件。 用于生成可以为Apache非文本输出存储格式所接受的密码记录。 此选项在命令行中的语法有所改变,因为passwdfile参数(通常是第一个)被省略了。 此选项不能与-c选项同时使用。

  • m
    使用MD5加密密码。在Windows, Netware 和TPF上,这是默认的。
      

  • d
    使用crypt()加密密码。在除了Windows, Netware和TPF的平台上(比如linux),这是默认的。 虽然它在所有平台上可以为htpasswd所支持, 但是在Windows, Netware和TPF上不能为httpd服务器所支持。

  • s
    使用SHA加密密码。 它是为了方便转入或移植到使用LDAP Directory Interchange Format (ldif)的Netscape而设计的。
      

  • p
    使用纯文本的密码。虽然在所有平台上htpasswd都可以建立这样的密码, 但是httpd后台只在Windows, Netware和TPF上支持纯文本的密码。
      
  • passwdfile
    包含用户名和密码的文件的名称。 如果使用了-c,而此文件不存在则建立,如果已经存在,则重写并截断此文件。
      
  • username
    需要在passwdfile中建立或更新的用户名。 如果此文件中username不存在,则增加一项,如果已经存在,则改变其密码。
      
  • password
    将被加密并存储到文件中的纯文本的密码。仅用于和-b选项同时使用。

注:htpasswd所管理的文件可以包含两种类型的密码,有些用户的密码使用MD5加密的,而同一个文件中的其他用户是用crypt()加密的。

1. 在服务器上安装nginxhtpasswd 2. 创建一个新的htpasswd文件并添加用户和密码 ```bash sudo htpasswd -c /etc/nginx/.htpasswd username ``` 3. 配置nginx服务器以使用htpasswd文件进行身份验证 ```nginx server { listen 80; server_name example.com; root /var/www/html; location / { auth_basic "Restricted Content"; auth_basic_user_file /etc/nginx/.htpasswd; index index.html; } } ``` 4. 下载并安装nginx-auth-ldap模块 ```bash sudo apt-get install libldap2-dev sudo apt-get install nginx-extras ``` 5. 编辑nginx配置文件以启用nginx-auth-ldap模块 ```nginx ldap_server ldapserver { url ldap://ldap.example.com/ou=people,dc=example,dc=com?uid?sub?(objectClass=posixAccount); binddn "cn=admin,dc=example,dc=com"; binddn_passwd "password"; group_attribute memberUid; group_attribute_is_dn on; require valid_user; } server { listen 80; server_name example.com; root /var/www/html; location / { auth_ldap "Restricted Content"; auth_ldap_servers ldapserver; index index.html; } } ``` 6. 自定义htpasswd认证页面 ```nginx server { listen 80; server_name example.com; root /var/www/html; location / { auth_basic "Restricted Content"; auth_basic_user_file /etc/nginx/.htpasswd; error_page 401 /401.html; index index.html; } location = /401.html { internal; root /var/www/html; } } ``` 7. 创建自定义htpasswd认证页面 ```html <!DOCTYPE html> <html> <head> <title>Authentication Required</title> <style> body { font-family: Arial, Helvetica, sans-serif; margin: 0; padding: 0; background-color: #f1f1f1; } .container { padding: 20px; background-color: #fff; border-radius: 5px; margin-top: 50px; margin-left: auto; margin-right: auto; width: 300px; } h1 { text-align: center; } form { text-align: center; } input[type=password] { padding: 12px 20px; margin: 8px 0; box-sizing: border-box; border: none; background-color: #f1f1f1; } button[type=submit] { background-color: #4CAF50; color: white; padding: 12px 20px; margin: 8px 0; border: none; border-radius: 4px; cursor: pointer; width: 100%; } button[type=submit]:hover { background-color: #45a049; } </style> </head> <body> <div class="container"> <h1>Authentication Required</h1> <form> <label for="username">Username:</label><br> <input type="text" id="username" name="username"><br> <label for="password">Password:</label><br> <input type="password" id="password" name="password"><br><br> <button type="submit">Login</button> </form> </div> </body> </html> ``` 8. 重新加载nginx配置 ```bash sudo service nginx reload ``` 9. 访问受保护的页面并查看美化后的htpasswd认证页面。
评论 2
添加红包

请填写红包祝福语或标题

红包个数最小为10个

红包金额最低5元

当前余额3.43前往充值 >
需支付:10.00
成就一亿技术人!
领取后你会自动成为博主和红包主的粉丝 规则
hope_wisdom
发出的红包
实付
使用余额支付
点击重新获取
扫码支付
钱包余额 0

抵扣说明:

1.余额是钱包充值的虚拟货币,按照1:1的比例进行支付金额的抵扣。
2.余额无法直接购买下载,可以购买VIP、付费专栏及课程。

余额充值