今年三月份Google在自己推出的Material design库中增加了BottomNavigationBar导航栏控制器。以前想要实现这个效果可谓是方法众多,五花八门像TabHost,RadioButton,textView等等,现在推出了这个就可以完美取代其它各式各样的导航栏。
借鉴了这两篇博客,写了这个带Fragment状态保存的BottomNavigationBar。
转载请注明出处:http://www.open-open.com/lib/view/open1465996383855.html
转载请注明出处:http://blog.csdn.net/guolin_blog/article/details/13171191
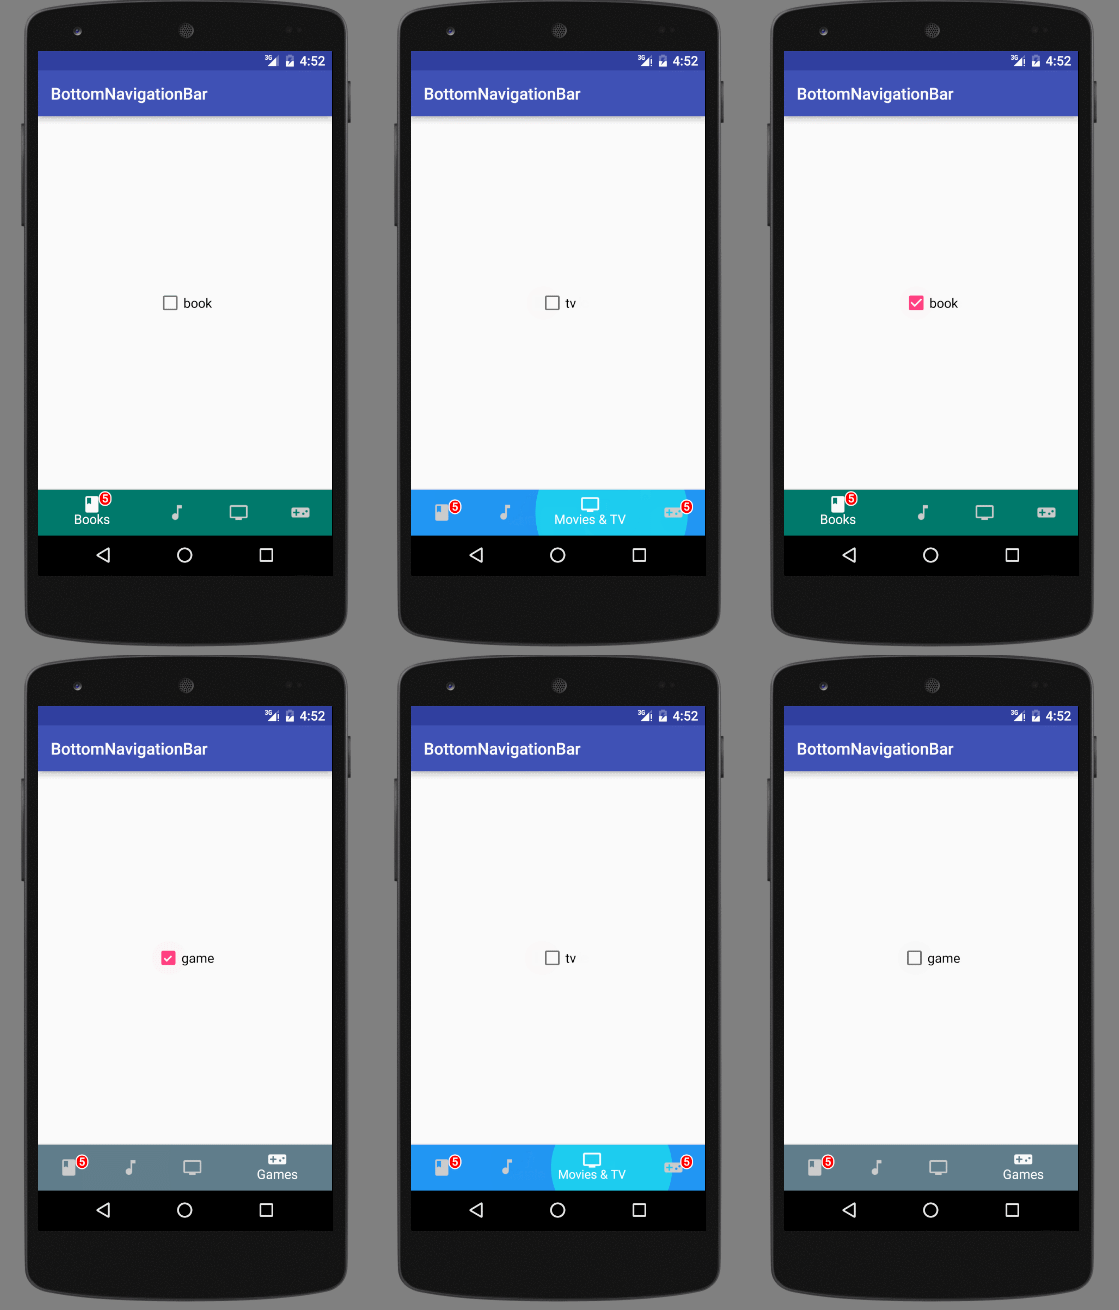
国际惯例先放上效果图
MODE_FIXED+BACKGROUND_STYLE_STATIC效果

MODE_SHIFTING+BACKGROUND_STYLE_STATIC效果

MODE_FIXED+BACKGROUND_STYLE_RIPPLE效果

MODE_SHIFTING+BACKGROUND_STYLE_RIPPLE效果

先看下build.gradle
compile 'com.ashokvarma.android:bottom-navigation-bar:1.2.0'布局内容
<?xml version="1.0" encoding="utf-8"?>
<LinearLayout xmlns:android="http://schemas.android.com/apk/res/android"
    xmlns:tools="http://schemas.android.com/tools"
    android:layout_width="match_parent"
    android:layout_height="match_parent"
    android:orientation="vertical"
    tools:context="com.example.wangchang.testbottomnavigationbar.MainActivity">

    <FrameLayout
        android:id="@+id/layFrame"
        android:layout_width="match_parent"
        android:layout_height="0dp"
        android:layout_weight="1" />

    <com.ashokvarma.bottomnavigation.BottomNavigationBar
        android:id="@+id/bottom_navigation_bar"
        android:layout_width="match_parent"
        android:layout_height="wrap_content"
        android:layout_gravity="bottom" />
</LinearLayout>- 首先需要设置导航栏的模式和背景样式
bottomNavigationBar.setMode(BottomNavigationBar.MODE_SHIFTING);
bottomNavigationBar.setBackgroundStyle(BottomNavigationBar.BACKGROUND_STYLE_RIPPLE);- 初始化导航栏标签页
        /**
         *添加标签的消息数量
         */
        BadgeItem numberBadgeItem = new BadgeItem()
                .setBorderWidth(4)
                .setBackgroundColor(Color.RED)
                .setText("5")
                .setHideOnSelect(true);
        /**
         *添加tab标签页
         */
        bottomNavigationBar
                .addItem(new BottomNavigationItem(R.mipmap.ic_book_white_24dp, "Books").setActiveColorResource(R.color.teal).setBadgeItem(numberBadgeItem))
                .addItem(new BottomNavigationItem(R.mipmap.ic_music_note_white_24dp, "Music").setActiveColorResource(R.color.blue))
                .addItem(new BottomNavigationItem(R.mipmap.ic_tv_white_24dp, "Movies & TV").setActiveColorResource(R.color.brown))
                .addItem(new BottomNavigationItem(R.mipmap.ic_videogame_asset_white_24dp, "Games").setActiveColorResource(R.color.grey).setBadgeItem(numberBadgeItem))
                .initialise();
        /**
         *首次进入不会主动回调选中页面的监听
         *所以这里自己调用一遍,初始化第一个页面
         */
        onTabSelected(0);
        bottomNavigationBar.setTabSelectedListener(this);
接下来就是重要的部分了,对Fragment状态进行保存。
 @Override
    public void onTabSelected(int position) {
        FragmentManager fm = getSupportFragmentManager();
        FragmentTransaction transaction = fm.beginTransaction();
      /**
        *每次添加之前隐藏所有正在显示的Fragment
        *然后如果是第一次添加的话使用transaction.add();
        *但第二次显示的时候,使用transaction.show();
        *这样子我们就可以保存Fragment的状态了
        */
        hideFragment(transaction);
        switch (position) {
            case 0:
                if (bookFragment == null) {
                    bookFragment = new BookFragment();
                    transaction.add(R.id.layFrame, bookFragment);
                    list.add(bookFragment);
                } else {
                    transaction.show(bookFragment);
                }
                break;
            case 1:
                if (musicFragment == null) {
                    musicFragment = new MusicFragment();
                    transaction.add(R.id.layFrame, musicFragment);
                    list.add(musicFragment);
                } else {
                    transaction.show(musicFragment);
                }
                break;
            case 2:
                if (tvFragment == null) {
                    tvFragment = new TvFragment();
                    transaction.add(R.id.layFrame, tvFragment);
                    list.add(tvFragment);
                } else {
                    transaction.show(tvFragment);
                }
                break;
            case 3:
                if (gameFragment == null) {
                    gameFragment = new GameFragment();
                    transaction.add(R.id.layFrame, gameFragment);
                    list.add(gameFragment);
                } else {
                    transaction.show(gameFragment);
                }
                break;
        }
        transaction.commit();
    }
隐藏Fragment
    /**
     * @param transaction
     */
    public void hideFragment(FragmentTransaction transaction) {
        for (Fragment fragment : list) {
            transaction.hide(fragment);
        }
    }
碎片的布局就很简单了
<?xml version="1.0" encoding="utf-8"?>
<LinearLayout xmlns:android="http://schemas.android.com/apk/res/android"
    android:layout_width="match_parent"
    android:layout_height="match_parent"
    android:gravity="center"
    android:orientation="vertical">

    <CheckBox
        android:layout_width="wrap_content"
        android:layout_height="wrap_content"
        android:text="book" />
</LinearLayout>


 本文介绍如何使用Google Material Design库中的BottomNavigationBar组件实现底部导航,并通过示例展示了如何为该组件配置不同模式与背景样式,同时实现了Fragment状态保存以提高用户体验。


 2333
2333


