本系列文章由@浅墨_毛星云 出品,转载请注明出处。
文章链接:
http://blog.csdn.net/poem_qianmo/article/details/50095705
作者:毛星云(浅墨) 微博:http://weibo.com/u/1723155442
本文工程使用的Unity3D版本:
5.2.1
概要:续接上文,本文进一步讲解与分析了上文未讲完的Unity5中Standard Shader正向基础渲染通道源码的片段着色实现部分,以及对屏幕像素化后期特效进行了实现。
同样需要声明的是。本文中对Stardard Shader源码的一些分析,全是浅墨自己通过对Unity Shader内建源码的理解,以及Google之后理解与分析而来。如有解释不妥当之处,还请各位及时指出。
依然是附上一组本文配套工程的运行截图之后,便开始我们的正文。
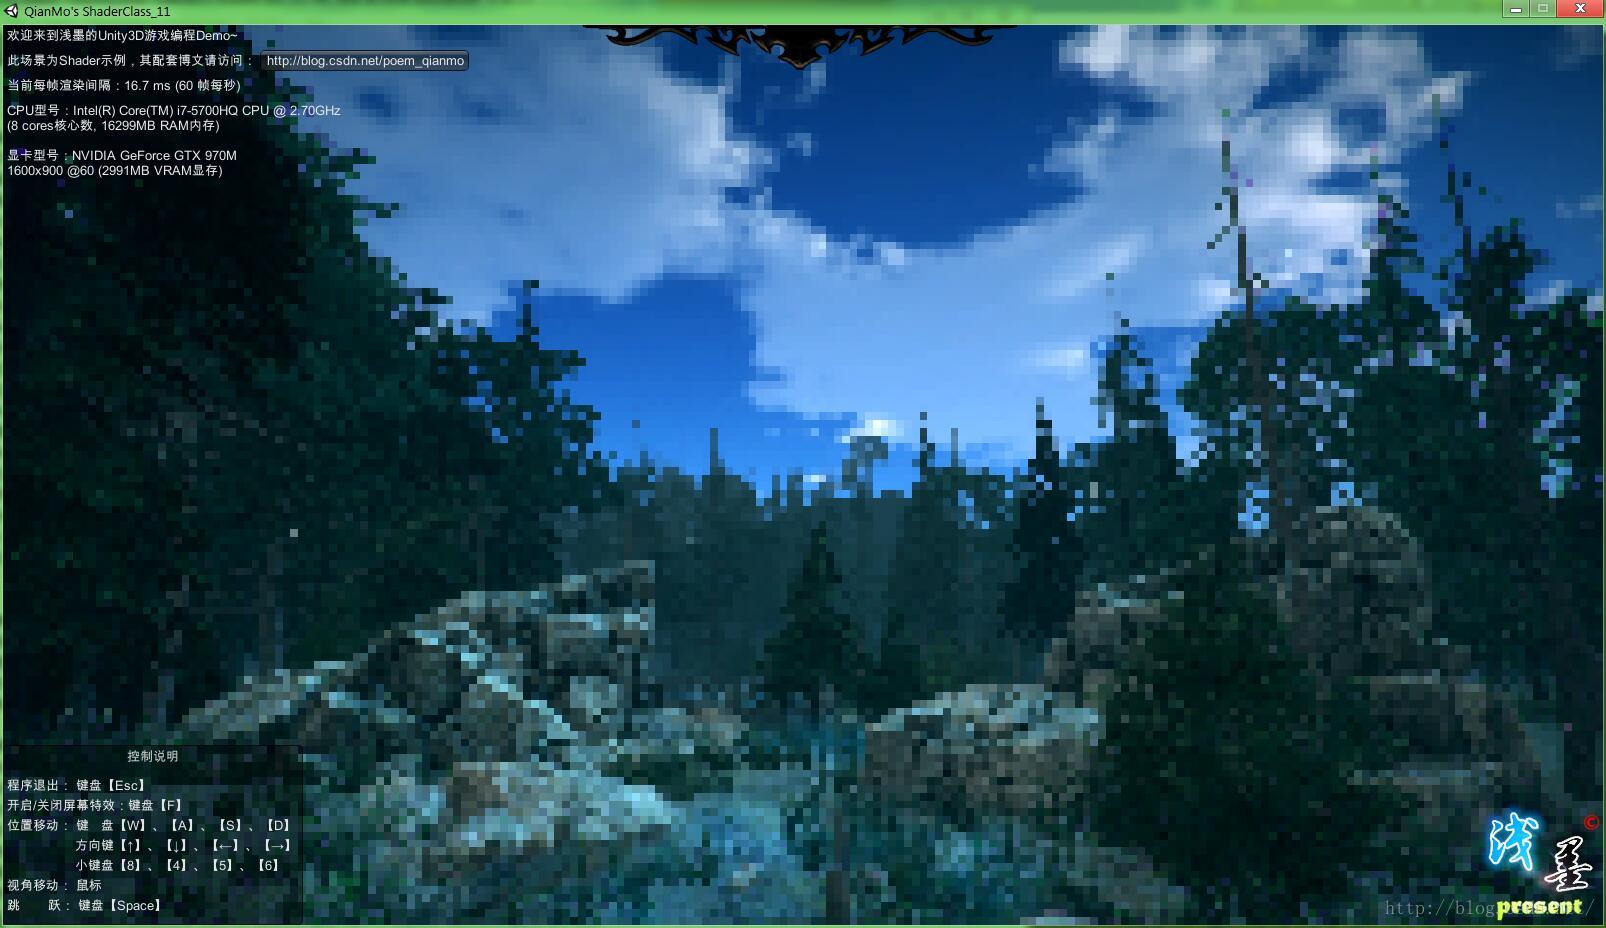
傍晚的野外(with 屏幕像素化特效):
傍晚的野外(原始场景):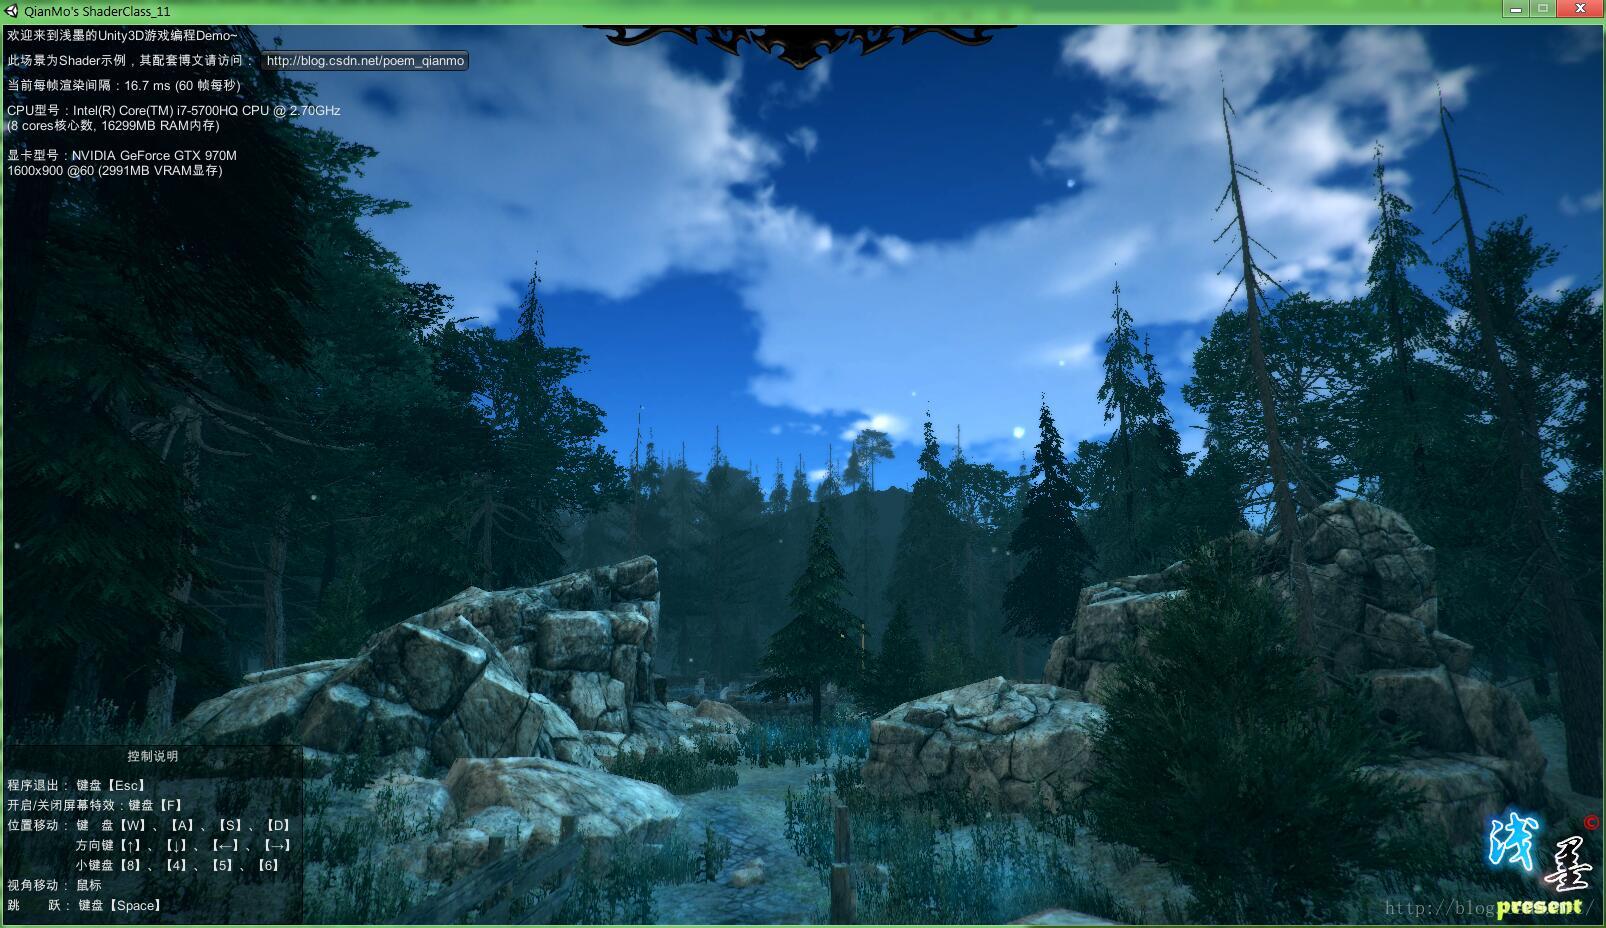
图依然是贴这两张。文章末尾有更多的运行截图,并提供了源工程的下载。先放出可运行的exe下载,如下:
【可运行的本文配套exe游戏场景请点击这里下载】
提示:在此游戏场景中按F键可以开关屏幕特效。
一、关于BRDF(双向反射分布函数)
本次源码剖析有涉及BRDF的相关内容,这边简单提一下。
双向反射分布函数(Bidirectional ReflectanceDistribution Function,BRDF)用来定义给定入射方向上的辐射照度(irradiance)如何影响给定出射方向上的辐射率(radiance)。更笼统地说,它描述了入射光线经过某个表面反射后如何在各个出射方向上分布——这可以是从理想镜面反射到漫反射、各向同性(isotropic)或者各向异性(anisotropic)的各种反射。
BRDF作为图形学中比较常见的一个知识点,这边暂时不多讲,因为随便拿一本图形学相关的书都可以看到他的身影。这边给出一些参考的链接,大家有需要可以深入了解:
1. 如何正确理解 BRDF (双向反射分布函数)? - 计算机 - 知乎
2.图形学理论知识:BRDF 双向反射分布函数
3. An Introduction to BRDF-based Lighting –Nvidia
二、续Standard Shader中正向基础渲染通道源码分析
此部分接上文《【浅墨Unity3D Shader编程】之十 深入理解Unity5中的Standard Shader(二)&屏幕油画特效的实现》的第二部分“Standard Shader中正向基础渲染通道源码分析“。
上文中分析了Standard Shader中正向基础渲染通道的源码,刚好分析完了顶点着色函数vertForwardBase,本文中将对片段着色函数fragForwardBase 进行说明。分析完之后,也就结束了这一系列长得稍微有些离谱的Standard Shader正向基础渲染通道的源码分析。
OK,开始吧,先上注释好的片段着色函数fragForwardBase的代码,位于UnityStandardCore.cginc中:
-
-
-
-
-
- half4 fragForwardBase (VertexOutputForwardBase i) : SV_Target
- {
-
- FRAGMENT_SETUP(s)
-
- #if UNITY_OPTIMIZE_TEXCUBELOD
- s.reflUVW = i.reflUVW;
- #endif
-
-
- UnityLight mainLight = MainLight (s.normalWorld);
-
-
- half atten = SHADOW_ATTENUATION(i);
-
-
- half occlusion = Occlusion(i.tex.xy);
- UnityGI gi = FragmentGI (s, occlusion, i.ambientOrLightmapUV, atten, mainLight);
-
-
- half4 c = UNITY_BRDF_PBS (s.diffColor, s.specColor, s.oneMinusReflectivity, s.oneMinusRoughness, s.normalWorld, -s.eyeVec, gi.light, gi.indirect);
-
- c.rgb += UNITY_BRDF_GI (s.diffColor, s.specColor, s.oneMinusReflectivity, s.oneMinusRoughness, s.normalWorld, -s.eyeVec, occlusion, gi);
-
- c.rgb += Emission(i.tex.xy);
-
-
- UNITY_APPLY_FOG(i.fogCoord, c.rgb);
-
-
- return OutputForward (c, s.alpha);
- }
依然是老规矩,把上面代码中新接触到的相关内容进行下分条讲解。
1. FRAGMENT_SETUP(x)宏
FRAGMENT_SETUP(x)宏定义于UnityStandardCore.cginc头文件中,其作用其实就是用FragmentSetup函数初始化括号中的x变量。
- #define FRAGMENT_SETUP(x) FragmentCommonData x = \
- FragmentSetup(i.tex, i.eyeVec, IN_VIEWDIR4PARALLAX(i), i.tangentToWorldAndParallax, IN_WORLDPOS(i));
调用此宏,也就是表示写了如下的代码,定义了一个x变量:
- FragmentCommonData x =FragmentSetup(i.tex, i.eyeVec, IN_VIEWDIR4PARALLAX(i), i.tangentToWorldAndParallax, IN_WORLDPOS(i));
其中FragmentSetup函数也定义于UnityStandardCore.cginc头文件中,用于填充一个FragmentCommonData结构体并于返回值中返回,也就是进行片段函数相关参数的初始化,相关代码如下:
-
- inline FragmentCommonData FragmentSetup (float4 i_tex, half3 i_eyeVec, half3 i_viewDirForParallax, half4 tangentToWorld[3], half3 i_posWorld)
- {
- i_tex = Parallax(i_tex, i_viewDirForParallax);
-
- half alpha = Alpha(i_tex.xy);
- #if defined(_ALPHATEST_ON)
- clip (alpha - _Cutoff);
- #endif
-
- FragmentCommonData o = UNITY_SETUP_BRDF_INPUT (i_tex);
- o.normalWorld = PerPixelWorldNormal(i_tex, tangentToWorld);
- o.eyeVec = NormalizePerPixelNormal(i_eyeVec);
- o.posWorld = i_posWorld;
-
-
- o.diffColor = PreMultiplyAlpha (o.diffColor, alpha, o.oneMinusReflectivity, o.alpha);
- return o;
- }
其中的FragmentCommonData结构体也是定义于UnityStandardCore.cginc头文件中:
-
- struct FragmentCommonData
- {
- half3 diffColor, specColor;
-
-
- half oneMinusReflectivity, oneMinusRoughness;
- half3 normalWorld, eyeVec, posWorld;
- half alpha;
-
- #if UNITY_OPTIMIZE_TEXCUBELOD || UNITY_STANDARD_SIMPLE
- half3 reflUVW;
- #endif
-
- #if UNITY_STANDARD_SIMPLE
- half3 tangentSpaceNormal;
- #endif
- };
2. MainLight函数
MainLight函数定义于UnityStandardCore.cginc头文件中,用途是实例化一个UnityLight结构体对象,并进行相应的填充,其返回值作为主光源。相关代码如下:
-
-
-
-
-
-
-
-
-
-
-
-
-
-
-
-
- UnityLight MainLight (half3 normalWorld)
- {
-
- UnityLight l;
-
-
-
- #ifdef LIGHTMAP_OFF
-
- l.color = _LightColor0.rgb;
-
- l.dir = _WorldSpaceLightPos0.xyz;
-
- l.ndotl = LambertTerm (normalWorld, l.dir);
-
-
- #else
- l.color = half3(0.f, 0.f, 0.f);
- l.ndotl = 0.f;
- l.dir = half3(0.f, 0.f, 0.f);
- #endif
-
-
- return l;
- }
3. SHADOW_ATTENUATION宏
SHADOW_ATTENUATION宏相关的代码位于AutoLight.cginc头文件中,用于实现阴影渲染相关的辅助工作,代码如下:
-
-
-
-
-
- #if defined (SHADOWS_SCREEN)
- ……
- #define SHADOW_ATTENUATION(a) unitySampleShadow(a._ShadowCoord)
- #endif
-
-
-
- #if defined (SHADOWS_DEPTH) && defined (SPOT)
- #define SHADOW_COORDS(idx1) unityShadowCoord4 _ShadowCoord : TEXCOORD##idx1;
- #define TRANSFER_SHADOW(a) a._ShadowCoord = mul (unity_World2Shadow[0], mul(_Object2World,v.vertex));
- #define SHADOW_ATTENUATION(a) UnitySampleShadowmap(a._ShadowCoord)
- #endif
-
-
-
- #if defined (SHADOWS_CUBE)
- #define SHADOW_COORDS(idx1) unityShadowCoord3 _ShadowCoord : TEXCOORD##idx1;
- #define TRANSFER_SHADOW(a) a._ShadowCoord = mul(_Object2World, v.vertex).xyz - _LightPositionRange.xyz;
- #define SHADOW_ATTENUATION(a) UnitySampleShadowmap(a._ShadowCoord)
- #endif
-
-
- #if !defined (SHADOWS_SCREEN) && !defined (SHADOWS_DEPTH) && !defined (SHADOWS_CUBE)
- #define SHADOW_COORDS(idx1)
- #define TRANSFER_SHADOW(a)
- #define SHADOW_ATTENUATION(a) 1.0
- #endif
可以发现,SHADOW_ATTENUATION(a)宏除了在关闭阴影的状态是等于1以外,其他几种情况都是等价于UnitySampleShadowmap(a._ShadowCoord)函数的调用。而这里的UnitySampleShadowmap函数,定于于UnityShadowLibrary.cginc函数中。实现代码如下。
-
-
-
-
-
- inline half UnitySampleShadowmap (float3 vec)
- {
- float mydist = length(vec) * _LightPositionRange.w;
- mydist *= 0.97;
-
- #if defined (SHADOWS_SOFT)
- float z = 1.0/128.0;
- float4 shadowVals;
- shadowVals.x = SampleCubeDistance (vec+float3( z, z, z));
- shadowVals.y = SampleCubeDistance (vec+float3(-z,-z, z));
- shadowVals.z = SampleCubeDistance (vec+float3(-z, z,-z));
- shadowVals.w = SampleCubeDistance (vec+float3( z,-z,-z));
- half4 shadows = (shadowVals < mydist.xxxx) ? _LightShadowData.rrrr : 1.0f;
- return dot(shadows,0.25);
- #else
- float dist = SampleCubeDistance (vec);
- return dist < mydist ? _LightShadowData.r : 1.0;
- #endif
- }
4. Occlusion函数
Occlusion函数用于进行全局光照的第一步。其输入参数为一个float2型的纹理坐标,而其half型的返回值将作为FragmentGI函数的一个输入参数。Occlusion函数的原型如下:
- half Occlusion(float2 uv)
- {
- #if (SHADER_TARGET < 30)
-
-
- return tex2D(_OcclusionMap, uv).g;
- #else
- half occ = tex2D(_OcclusionMap, uv).g;
- return LerpOneTo (occ, _OcclusionStrength);
- #endif
- }
其中的LerpOneTo函数很简单,用于线性插值,输入两个值b和t,返回1+(b-1)*t,具体定义如下:
- half LerpOneTo(half b, half t)
- {
- half oneMinusT = 1 - t;
- return oneMinusT + b * t;
- }
5. UnityGI结构体
UnityGI结构体是Unity中存放全局光照光源信息的结构体,定义于UnityLightingCommon.cginc头文件中,如下。
-
- struct UnityGI
- {
- UnityLight light;
-
- #ifdef DIRLIGHTMAP_SEPARATE
-
- #ifdef LIGHTMAP_ON
- UnityLight light2;
- #endif
-
- #ifdef DYNAMICLIGHTMAP_ON
- UnityLight light3;
- #endif
- #endif
- UnityIndirect indirect;
- };
其中包含了UnityLight结构体和UnityIndirect结构体,其中UnityLight结构体是Unity Shader中最基本的光照结构体,而UnityIndirect是Unity中存放间接光源信息的结构体。它们两者也定义于UnityLightingCommon.cginc头文件中,代码如下。
-
- struct UnityLight
- {
- half3 color;
- half3 dir;
- half ndotl;
- };
-
-
- struct UnityIndirect
- {
- half3 diffuse;
- half3 specular;
- };
6. FragmentGI函数
FragmentGI函数是片段着色部分全局光照的处理函数,定义于UnityStandardCore.cginc头文件中。相关代码如下:
-
- inline UnityGI FragmentGI (FragmentCommonData s, half occlusion, half4 i_ambientOrLightmapUV, half atten, UnityLight light, bool reflections)
- {
-
- UnityGIInput d;
-
- d.light = light;
- d.worldPos = s.posWorld;
- d.worldViewDir = -s.eyeVec;
- d.atten = atten;
- #if defined(LIGHTMAP_ON) || defined(DYNAMICLIGHTMAP_ON)
- d.ambient = 0;
- d.lightmapUV = i_ambientOrLightmapUV;
- #else
- d.ambient = i_ambientOrLightmapUV.rgb;
- d.lightmapUV = 0;
- #endif
- d.boxMax[0] = unity_SpecCube0_BoxMax;
- d.boxMin[0] = unity_SpecCube0_BoxMin;
- d.probePosition[0] = unity_SpecCube0_ProbePosition;
- d.probeHDR[0] = unity_SpecCube0_HDR;
-
- d.boxMax[1] = unity_SpecCube1_BoxMax;
- d.boxMin[1] = unity_SpecCube1_BoxMin;
- d.probePosition[1] = unity_SpecCube1_ProbePosition;
- d.probeHDR[1] = unity_SpecCube1_HDR;
-
-
- if(reflections)
- {
- Unity_GlossyEnvironmentData g;
- g.roughness = 1 - s.oneMinusRoughness;
- #if UNITY_OPTIMIZE_TEXCUBELOD || UNITY_STANDARD_SIMPLE
- g.reflUVW = s.reflUVW;
- #else
- g.reflUVW = reflect(s.eyeVec, s.normalWorld);
- #endif
-
- return UnityGlobalIllumination (d, occlusion, s.normalWorld, g);
- }
- else
- {
- return UnityGlobalIllumination (d, occlusion, s.normalWorld);
- }
- }
-
- inline UnityGI FragmentGI (FragmentCommonData s, half occlusion, half4 i_ambientOrLightmapUV, half atten, UnityLight light)
- {
- return FragmentGI(s, occlusion, i_ambientOrLightmapUV, atten, light, true);
- }
其中的UnityGIInput结构体定义了全局光照所需要的一些函数,定义为如下:
-
- struct UnityGIInput
- {
- UnityLight light;
-
- float3 worldPos;
- half3 worldViewDir;
- half atten;
- half3 ambient;
- half4 lightmapUV;
-
- float4 boxMax[2];
- float4 boxMin[2];
- float4 probePosition[2];
- float4 probeHDR[2];
- };
UnityGIInput 中还包含了UnityLight结构体,其定义和代码实现上文刚刚已经有提到过。
FragmentGI函数最终利用了UnityGlobalIllumination函数,其定义于UnityGlobalIllumination.cginc头文件中,实现如下。
- inline UnityGI UnityGlobalIllumination (UnityGIInput data, half occlusion, half3 normalWorld)
- {
- return UnityGI_Base(data, occlusion, normalWorld);
- }
此
FragmentGI
函数就是嵌套了一层UnityGI_Base函数,那我们继续溯源,找到UnityGI_Base函数的定义,也是位于UnityGlobalIllumination.cginc头文件中:
-
- inline UnityGI UnityGI_Base(UnityGIInput data, half occlusion, half3 normalWorld)
- {
-
- UnityGI o_gi;
-
- ResetUnityGI(o_gi);
-
-
- #if !defined(LIGHTMAP_ON)
- o_gi.light = data.light;
- o_gi.light.color *= data.atten;
- #endif
-
-
- #if UNITY_SHOULD_SAMPLE_SH
- #if UNITY_SAMPLE_FULL_SH_PER_PIXEL
- half3 sh = ShadeSH9(half4(normalWorld, 1.0));
- #elif (SHADER_TARGET >= 30) && !UNITY_STANDARD_SIMPLE
- half3 sh = data.ambient + ShadeSH12Order(half4(normalWorld, 1.0));
- #else
- half3 sh = data.ambient;
- #endif
-
- o_gi.indirect.diffuse = sh;
- #endif
-
-
- #if defined(LIGHTMAP_ON)
-
- fixed4 bakedColorTex = UNITY_SAMPLE_TEX2D(unity_Lightmap, data.lightmapUV.xy);
- half3 bakedColor = DecodeLightmap(bakedColorTex);
-
- #ifdef DIRLIGHTMAP_OFF
- o_gi.indirect.diffuse = bakedColor;
-
- #ifdef SHADOWS_SCREEN
- o_gi.indirect.diffuse = MixLightmapWithRealtimeAttenuation (o_gi.indirect.diffuse, data.atten, bakedColorTex);
- #endif // SHADOWS_SCREEN
-
- #elif DIRLIGHTMAP_COMBINED
- fixed4 bakedDirTex = UNITY_SAMPLE_TEX2D_SAMPLER (unity_LightmapInd, unity_Lightmap, data.lightmapUV.xy);
- o_gi.indirect.diffuse = DecodeDirectionalLightmap (bakedColor, bakedDirTex, normalWorld);
-
- #ifdef SHADOWS_SCREEN
- o_gi.indirect.diffuse = MixLightmapWithRealtimeAttenuation (o_gi.indirect.diffuse, data.atten, bakedColorTex);
- #endif // SHADOWS_SCREEN
-
- #elif DIRLIGHTMAP_SEPARATE
-
-
-
- fixed4 bakedDirTex = UNITY_SAMPLE_TEX2D_SAMPLER(unity_LightmapInd, unity_Lightmap, data.lightmapUV.xy);
- o_gi.indirect.diffuse = DecodeDirectionalSpecularLightmap (bakedColor, bakedDirTex, normalWorld, false, 0, o_gi.light);
-
-
- half2 uvIndirect = data.lightmapUV.xy + half2(0.5, 0);
- bakedColor = DecodeLightmap(UNITY_SAMPLE_TEX2D(unity_Lightmap, uvIndirect));
- bakedDirTex = UNITY_SAMPLE_TEX2D_SAMPLER(unity_LightmapInd, unity_Lightmap, uvIndirect);
- o_gi.indirect.diffuse += DecodeDirectionalSpecularLightmap (bakedColor, bakedDirTex, normalWorld, false, 0, o_gi.light2);
- #endif
- #endif
-
- #ifdef DYNAMICLIGHTMAP_ON
-
- fixed4 realtimeColorTex = UNITY_SAMPLE_TEX2D(unity_DynamicLightmap, data.lightmapUV.zw);
- half3 realtimeColor = DecodeRealtimeLightmap (realtimeColorTex);
-
- #ifdef DIRLIGHTMAP_OFF
- o_gi.indirect.diffuse += realtimeColor;
-
- #elif DIRLIGHTMAP_COMBINED
- half4 realtimeDirTex = UNITY_SAMPLE_TEX2D_SAMPLER(unity_DynamicDirectionality, unity_DynamicLightmap, data.lightmapUV.zw);
- o_gi.indirect.diffuse += DecodeDirectionalLightmap (realtimeColor, realtimeDirTex, normalWorld);
-
- #elif DIRLIGHTMAP_SEPARATE
- half4 realtimeDirTex = UNITY_SAMPLE_TEX2D_SAMPLER(unity_DynamicDirectionality, unity_DynamicLightmap, data.lightmapUV.zw);
- half4 realtimeNormalTex = UNITY_SAMPLE_TEX2D_SAMPLER(unity_DynamicNormal, unity_DynamicLightmap, data.lightmapUV.zw);
- o_gi.indirect.diffuse += DecodeDirectionalSpecularLightmap (realtimeColor, realtimeDirTex, normalWorld, true, realtimeNormalTex, o_gi.light3);
- #endif
- #endif
-
- o_gi.indirect.diffuse *= occlusion;
-
-
- return o_gi;
- }
不难发现,此FragmentGI函数的实现,也就是实例化一个UnityGIInput结构体对象,然后依次填充了此结构体对象的每个各个参数,最后调用一下基于UnityGI_Base函数的UnityGlobalIllumination函数而已。
7. UNITY_BRDF_PBS宏
首先,这边有一段宏,定义于UnityPBSLighting.cginc头文件中,根据不同的情况,将UNITY_BRDF_PBS宏定义为不同版本的UNITY_BRDF_PBS宏——是BRDF3_Unity_PBS、BRDF2_Unity_PBS还是BRDF1_Unity_PBS。
-
-
- #if !defined (UNITY_BRDF_PBS) // 允许显式地在自定义着色器中重写BRDF的实现细节 || allow to explicitly override BRDF in custom shader
-
- #if (SHADER_TARGET < 30) || defined(SHADER_API_PSP2)
-
- #define UNITY_BRDF_PBS BRDF3_Unity_PBS
- #elif defined(SHADER_API_MOBILE)
-
- #define UNITY_BRDF_PBS BRDF2_Unity_PBS
- #else
-
- #define UNITY_BRDF_PBS BRDF1_Unity_PBS
- #endif
- #endif
三种情况下,BRDF3_Unity_PBS、BRDF2_Unity_PBS、 BRDF1_Unity_PBS三个函数的参数和返回值都一样,区别仅仅是内部的实现。在这边,以BRDF1_Unity_PBS为例,讲一下参数值的含义。
half4 BRDF1_Unity_PBS (half3 diffColor,half3 specColor, half oneMinusReflectivity, half oneMinusRoughness,half3 normal,half3 viewDir,UnityLight light, UnityIndirect gi)
第一个参数,half3型的diffColor,表示漫反射颜色的值。
第二个参数,half3型的specColor,表示镜面反射颜色值。
第三个参数,half型的oneMinusReflectivity,表示1减去反射率的值。
第四个参数,half型的oneMinusRoughness,表示1减去粗糙度的值。
第五次参数,half3型的normal,表示法线的方向。
第六个参数,half3型的viewDir,表示视线的方向。
第七个参数,UnityLight型的light,表示Unity中光源参数的结构体,包含half3型的光源颜色color,half3型的光源方向dir,half型的入射光方向和当前表面法线方向的点乘的积ndotl。上文有贴出过其实现代码,都几次提到了,这边就再贴一下。
- struct UnityLight
- {
- half3 color;
- half3 dir;
- half ndotl;
- };
第八个参数,UnityIndirect类型的gi ,一个包含了half3型的漫反射颜色diffuse和half3型的镜面反射颜色specular的光线反射结构体,
表示间接光照信息
。
- struct UnityIndirect
- {
- half3 diffuse;
- half3 specular;
- };
下面将三种版本的函数分别贴出来,它们都定义于UnityStandardBRDF.cginc头文件中。
7.1 BRDF1_Unity_PBS
-
-
-
-
-
-
-
-
-
-
-
-
-
-
-
-
-
-
-
- half4 BRDF1_Unity_PBS (half3 diffColor, half3 specColor, half oneMinusReflectivity, half oneMinusRoughness,
- half3 normal, half3 viewDir,
- UnityLight light, UnityIndirect gi)
- {
- half roughness = 1-oneMinusRoughness;
- half3 halfDir = Unity_SafeNormalize (light.dir + viewDir);
-
- half nl = light.ndotl;
- half nh = BlinnTerm (normal, halfDir);
- half nv = DotClamped (normal, viewDir);
- half lv = DotClamped (light.dir, viewDir);
- half lh = DotClamped (light.dir, halfDir);
-
- #if UNITY_BRDF_GGX
- half V = SmithGGXVisibilityTerm (nl, nv, roughness);
- half D = GGXTerm (nh, roughness);
- #else
- half V = SmithBeckmannVisibilityTerm (nl, nv, roughness);
- half D = NDFBlinnPhongNormalizedTerm (nh, RoughnessToSpecPower (roughness));
- #endif
-
- half nlPow5 = Pow5 (1-nl);
- half nvPow5 = Pow5 (1-nv);
- half Fd90 = 0.5 + 2 * lh * lh * roughness;
- half disneyDiffuse = (1 + (Fd90-1) * nlPow5) * (1 + (Fd90-1) * nvPow5);
-
-
-
-
-
-
- half specularTerm = max(0, (V * D * nl) * unity_LightGammaCorrectionConsts_PIDiv4);
- half diffuseTerm = disneyDiffuse * nl;
-
- half grazingTerm = saturate(oneMinusRoughness + (1-oneMinusReflectivity));
- half3 color = diffColor * (gi.diffuse + light.color * diffuseTerm)
- + specularTerm * light.color * FresnelTerm (specColor, lh)
- + gi.specular * FresnelLerp (specColor, grazingTerm, nv);
-
- return half4(color, 1);
- }
7.2 BRDF2_Unity_PBS
12
-
-
-
-
-
-
-
- half4 BRDF2_Unity_PBS (half3 diffColor, half3 specColor, half oneMinusReflectivity, half oneMinusRoughness,
- half3 normal, half3 viewDir,
- UnityLight light, UnityIndirect gi)
- {
- half3 halfDir = Unity_SafeNormalize (light.dir + viewDir);
-
- half nl = light.ndotl;
- half nh = BlinnTerm (normal, halfDir);
- half nv = DotClamped (normal, viewDir);
- half lh = DotClamped (light.dir, halfDir);
-
- half roughness = 1-oneMinusRoughness;
- half specularPower = RoughnessToSpecPower (roughness);
-
-
-
-
-
-
-
-
-
- half invV = lh * lh * oneMinusRoughness + roughness * roughness;
- half invF = lh;
- half specular = ((specularPower + 1) * pow (nh, specularPower)) / (unity_LightGammaCorrectionConsts_8 * invV * invF + 1e-4h);
-
-
- #if SHADER_API_GLES || SHADER_API_GLES3
- specular = clamp(specular, 0.0, 100.0);
- #endif
-
- half grazingTerm = saturate(oneMinusRoughness + (1-oneMinusReflectivity));
- half3 color = (diffColor + specular * specColor) * light.color * nl
- + gi.diffuse * diffColor
- + gi.specular * FresnelLerpFast (specColor, grazingTerm, nv);
-
- return half4(color, 1);
- }
7.3 BRDF3_Unity_PBS
-
-
-
-
-
-
-
-
-
- half4 BRDF3_Unity_PBS (half3 diffColor, half3 specColor, half oneMinusReflectivity, half oneMinusRoughness,
- half3 normal, half3 viewDir,
- UnityLight light, UnityIndirect gi)
- {
- half3 reflDir = reflect (viewDir, normal);
-
- half nl = light.ndotl;
- half nv = DotClamped (normal, viewDir);
-
-
- half2 rlPow4AndFresnelTerm = Pow4 (half2(dot(reflDir, light.dir), 1-nv));
- half rlPow4 = rlPow4AndFresnelTerm.x;
- half fresnelTerm = rlPow4AndFresnelTerm.y;
-
- half grazingTerm = saturate(oneMinusRoughness + (1-oneMinusReflectivity));
-
- half3 color = BRDF3_Direct(diffColor, specColor, rlPow4, oneMinusRoughness);
- color *= light.color * nl;
- color += BRDF3_Indirect(diffColor, specColor, gi, grazingTerm, fresnelTerm);
-
- return half4(color, 1);
- }
BRDF1_Unity_PBS函数的实现部分用到了最多的变量,最终表现效果最好,主要用于Shader Model 3.0、PC平台或者游戏主机平台。BRDF2_Unity_PBS简化了一部分计算,主要用于移动平台,而BRDF3_Unity_PBS是为Shader Model 小于3.0的着色模型提供基本版的BRDF,实现细节最为简陋。
8. UNITY_BRDF_GI宏
UNITY_BRDF_GI宏位于UnityPBSLighting.cginc头文件中,相关代码如下。
-
-
-
-
-
-
-
- #if !defined(UNITY_BRDF_PBS_LIGHTMAP_INDIRECT)
-
- #define UNITY_BRDF_PBS_LIGHTMAP_INDIRECT BRDF2_Unity_PBS
- #endif
-
- #if !defined (UNITY_BRDF_GI)
-
- #define UNITY_BRDF_GI BRDF_Unity_Indirect
- #endif
上面这段代码中关于UNITY_BRDF_GI宏的地方,就是说若没有定义UNITY_BRDF_GI宏,就定义一个UNITY_BRDF_GI宏等价于BRDF_Unity_Indirect。这边的BRDF_Unity_Indirect是一个函数名,就紧紧跟在上面这段宏代码的后面:
-
- inline half3 BRDF_Unity_Indirect (half3 baseColor, half3 specColor, half oneMinusReflectivity, half oneMinusRoughness, half3 normal, half3 viewDir, half occlusion, UnityGI gi)
- {
- half3 c = 0;
- #if defined(DIRLIGHTMAP_SEPARATE)
- gi.indirect.diffuse = 0;
- gi.indirect.specular = 0;
-
- #ifdef LIGHTMAP_ON
- c += UNITY_BRDF_PBS_LIGHTMAP_INDIRECT (baseColor, specColor, oneMinusReflectivity, oneMinusRoughness, normal, viewDir, gi.light2, gi.indirect).rgb * occlusion;
- #endif
- #ifdef DYNAMICLIGHTMAP_ON
- c += UNITY_BRDF_PBS_LIGHTMAP_INDIRECT (baseColor, specColor, oneMinusReflectivity, oneMinusRoughness, normal, viewDir, gi.light3, gi.indirect).rgb * occlusion;
- #endif
- #endif
- return c;
- }
关于此段代码,BRDF_Unity_Indirect 函数的核心部分其实就是在调用UNITY_BRDF_PBS_LIGHTMAP_INDIRECT,而上文的宏有交代过,UNITY_BRDF_PBS_LIGHTMAP_INDIRECT宏等价于 BRDF2_Unity_PBS。而BRDF2_Unity_PBS函数,其定义于UnityStandardBRDF.cginc中,是为移动平台简化的BRDF版本,这个上文刚刚提到过,这边就不多交代。
9.Emission函数
Emission函数定于于UnityStandardInput.cginc头文件中,根据指定的自发光光照贴图,利用tex2D函数,对输入的纹理进行光照贴图的采样,相关代码如下:
-
-
-
-
-
- half3 Emission(float2 uv)
- {
- #ifndef _EMISSION
- return 0;
- #else
- return tex2D(_EmissionMap, uv).rgb * _EmissionColor.rgb;
- #endif
- }
其中用于采样的自发光贴图对应的函数定义于UnityStandardInput.cginc头文件的一开始部分。
这边这句代码其实是相当于在CGPROGRAM中的顶点和片段着色函数之前,对这个变量进行声明,以便于CG语言块中使用的时候,能识别到他的含义。
因为在Standard.shader源码的一开始,Properties块也就是属性值声明部分,对其进行了属性的声明:
-
- _EmissionMap("Emission", 2D) = "white" {}
10.UNITY_APPLY_FOG宏
UNITY_APPLY_FOG宏相关的一些代码用于雾效的启用与否的辅助工作,定义于UnityCG.cginc头文件中,这边贴出注释好的代码即可。
-
- #define UNITY_FOG_LERP_COLOR(col,fogCol,fogFac) col.rgb = lerp((fogCol).rgb, (col).rgb, saturate(fogFac))
-
-
- #if defined(FOG_LINEAR) || defined(FOG_EXP) || defined(FOG_EXP2)
-
- #if (SHADER_TARGET < 30) || defined(SHADER_API_MOBILE)
-
-
- #define UNITY_APPLY_FOG_COLOR(coord,col,fogCol) UNITY_FOG_LERP_COLOR(col,fogCol,coord)
-
-
- #else
-
- #define UNITY_APPLY_FOG_COLOR(coord,col,fogCol) UNITY_CALC_FOG_FACTOR(coord); UNITY_FOG_LERP_COLOR(col,fogCol,unityFogFactor)
- #endif
-
- #else
- #define UNITY_APPLY_FOG_COLOR(coord,col,fogCol)
- #endif
-
- #ifdef UNITY_PASS_FORWARDADD
-
- #define UNITY_APPLY_FOG(coord,col) UNITY_APPLY_FOG_COLOR(coord,col,fixed4(0,0,0,0))
-
- #else
- #define UNITY_APPLY_FOG(coord,col) UNITY_APPLY_FOG_COLOR(coord,col,unity_FogColor)
- #endif
11.OutputForward函数
OutputForward函数定义于UnityStandardCore.cginc头文件中,其为正向渲染通道的输出函数。
-
-
-
-
-
- half4 OutputForward (half4 output, half alphaFromSurface)
- {
- #if defined(_ALPHABLEND_ON) || defined(_ALPHAPREMULTIPLY_ON)
- output.a = alphaFromSurface;
- #else
- UNITY_OPAQUE_ALPHA(output.a);
- #endif
- return output;
- }
其中UNITY_OPAQUE_ALPHA宏的定义为:
- #define UNITY_OPAQUE_ALPHA(outputAlpha) outputAlpha = 1.0
三、屏幕像素化特效的实现
我们都知道,Unity中的屏幕特效通常分为两部分来实现:
下面依旧是从这两个方面对本次的特效进行实现。
3.1 Shader实现部分
国际惯例,上注释好的Shader代码。
- Shader "浅墨Shader编程/Volume11/PixelEffect"
- {
-
- Properties
- {
-
- _MainTex("Texture", 2D) = "white" {}
-
- _Params("PixelNumPerRow (X) Ratio (Y)", Vector) = (80, 1, 1, 1.5)
- }
-
-
- SubShader
- {
-
- Cull Off
-
- ZWrite Off
-
- ZTest Always
-
-
- Pass
- {
-
- CGPROGRAM
-
-
- #pragma vertex vert
- #pragma fragment frag
-
-
- #include "UnityCG.cginc"
-
-
- struct vertexInput
- {
- float4 vertex : POSITION;
- float2 uv : TEXCOORD0;
- };
-
-
- struct vertexOutput
- {
- float4 vertex : SV_POSITION;
- float2 uv : TEXCOORD0;
- };
-
-
-
-
-
-
- vertexOutput vert(vertexInput v)
- {
-
- vertexOutput o;
-
-
- o.vertex = mul(UNITY_MATRIX_MVP, v.vertex);
-
- o.uv = v.uv;
-
-
- return o;
- }
-
-
- sampler2D _MainTex;
- half4 _Params;
-
-
- half4 PixelateOperation(sampler2D tex, half2 uv, half scale, half ratio)
- {
-
- half PixelSize = 1.0 / scale;
-
- half coordX=PixelSize * ceil(uv.x / PixelSize);
- half coordY = (ratio * PixelSize)* ceil(uv.y / PixelSize / ratio);
-
- half2 coord = half2(coordX,coordY);
-
- return half4(tex2D(tex, coord).xyzw);
- }
-
-
-
-
-
- fixed4 frag(vertexOutput Input) : COLOR
- {
-
- return PixelateOperation(_MainTex, Input.uv, _Params.x, _Params.y);
- }
-
-
- ENDCG
- }
- }
- }
如Shader代码中所展示的,本次的屏幕像素化特效主要用一个自定义函数来实现,实现代码如下:
-
- half4 PixelateOperation(sampler2D tex, half2 uv, half scale, half ratio)
- {
-
- half PixelSize = 1.0 / scale;
-
- half coordX=PixelSize * ceil(uv.x / PixelSize);
- half coordY=( ratio * PixelSize ) * ceil(uv.y / PixelSize / ratio);
-
- half2 coord = half2(coordX,coordY);
-
- return half4(tex2D(tex, coord).xyzw);
- }
首先需要了解到的是,此自定义函数中用到了CG标准函数库中的一个库函数——ceil。ceil(x)的作用是对输入参数向上取整。例如:ceil(float(1.3)) ,返回值就为2.0。
PixelateOperation函数的首先先计算出每个像素块的尺寸,然后根据这里的向上取整函数ceil,分别表示出像素块的坐标值。X坐标值为PixelSize * ceil(uv.x / PixelSize)。而Y轴这边还引入了一个系数ratio,先在式子一开头乘以此系数,然后在ceil函数之中的分母部分除以一个ratio,以达到用此参数实现自定义像素长宽比的调整操作。
然后在片段着色器中调用此自定义的PixelateOperation函数,其返回值就作为片段函数frag的返回值即可:
- fixed4 frag(vertexOutput Input) : COLOR
- {
-
- return PixelateOperation(_MainTex, Input.uv, _Params.x, _Params.y);
- }
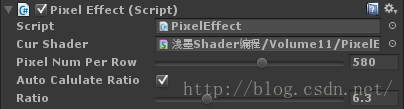
3.2 C#脚本实现部分
C#脚本文件的代码依然是几乎从之前的几个特效中重用,只用稍微改一点细节就可以。贴出详细注释的实现此特效的C#脚本:
- using UnityEngine;
- using System.Collections;
-
-
- [ExecuteInEditMode]
-
- [AddComponentMenu("浅墨Shader编程/Volume11/PixelEffect")]
- public class PixelEffect : MonoBehaviour
- {
-
- #region Variables
-
-
- public Shader CurShader;
- private Material CurMaterial;
-
-
- [Range(1f, 1024f), Tooltip("屏幕每行将被均分为多少个像素块")]
- public float PixelNumPerRow = 580.0f;
-
- [Tooltip("自动计算平方像素所需的长宽比与否")]
- public bool AutoCalulateRatio = true;
-
- [Range(0f, 24f), Tooltip("此参数用于自定义长宽比")]
- public float Ratio = 1.0f;
-
- #endregion
-
-
-
- #region MaterialGetAndSet
- Material material
- {
- get
- {
- if(CurMaterial == null)
- {
- CurMaterial = new Material(CurShader);
- CurMaterial.hideFlags = HideFlags.HideAndDontSave;
- }
- return CurMaterial;
- }
- }
- #endregion
-
-
-
-
- void Start ()
- {
-
- CurShader = Shader.Find("浅墨Shader编程/Volume11/PixelEffect");
-
-
- if(!SystemInfo.supportsImageEffects)
- {
- enabled = false;
- return;
- }
- }
-
-
-
-
- void OnRenderImage (RenderTexture sourceTexture, RenderTexture destTexture)
- {
-
- if(CurShader != null)
- {
- float pixelNumPerRow = PixelNumPerRow;
-
- material.SetVector("_Params", new Vector2(pixelNumPerRow,
- AutoCalulateRatio ? ((float)sourceTexture.width / (float)sourceTexture.height) : Ratio ));
-
- Graphics.Blit(sourceTexture, destTexture, material);
- }
-
-
- else
- {
-
- Graphics.Blit(sourceTexture, destTexture);
- }
- }
-
-
-
-
- void Update()
- {
-
- if (Application.isPlaying)
- {
- #if UNITY_EDITOR
- if (Application.isPlaying != true)
- {
- CurShader = Shader.Find("浅墨Shader编程/Volume11/PixelEffect");
- }
- #endif
- }
- }
-
-
-
- void OnDisable ()
- {
- if(CurMaterial)
- {
-
- DestroyImmediate(CurMaterial);
- }
- }
- }
根据我们C#脚本中参数的设定,可以有每行每列的像素个数PixelNumPerRow参数、是否自动计算正方形像素所需的长宽比与否AutoCalulateRatio参数、自定义长宽比的Ratio参数可以调节。而需要注意,若AutoCalulateRatio参数被勾选,我们的Shader将自动计算正方形像素所需的长宽比,这样第三个参数Ratio也就失效了。反正,若AutoCalulateRatio参数没有被勾选,就可以用Ratio参数自己定制像素的长宽比。
 下面依然是一起看一下运行效果的对比。
四、最终的效果展示
还是那句话,贴几张场景的效果图和使用了屏幕特效后的效果图。在试玩场景时,除了类似CS/CF的FPS游戏控制系统以外,还可以使用键盘上的按键【F】,开启或者屏幕特效。
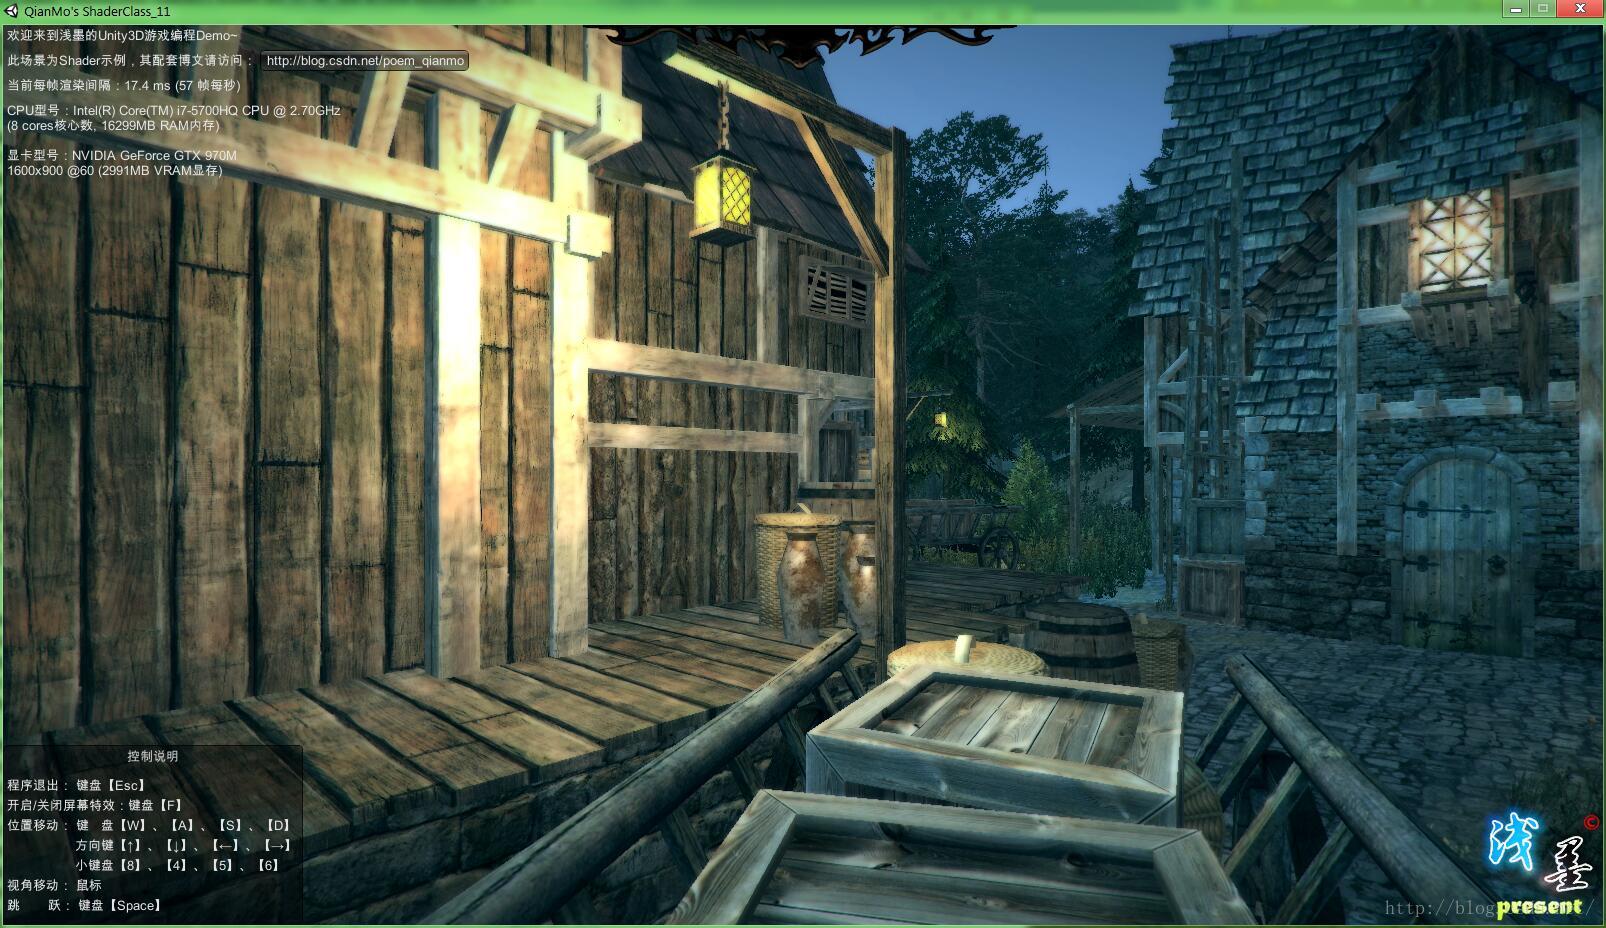
推车与货物(with 屏幕像素化特效):
推车与货物(原始场景):
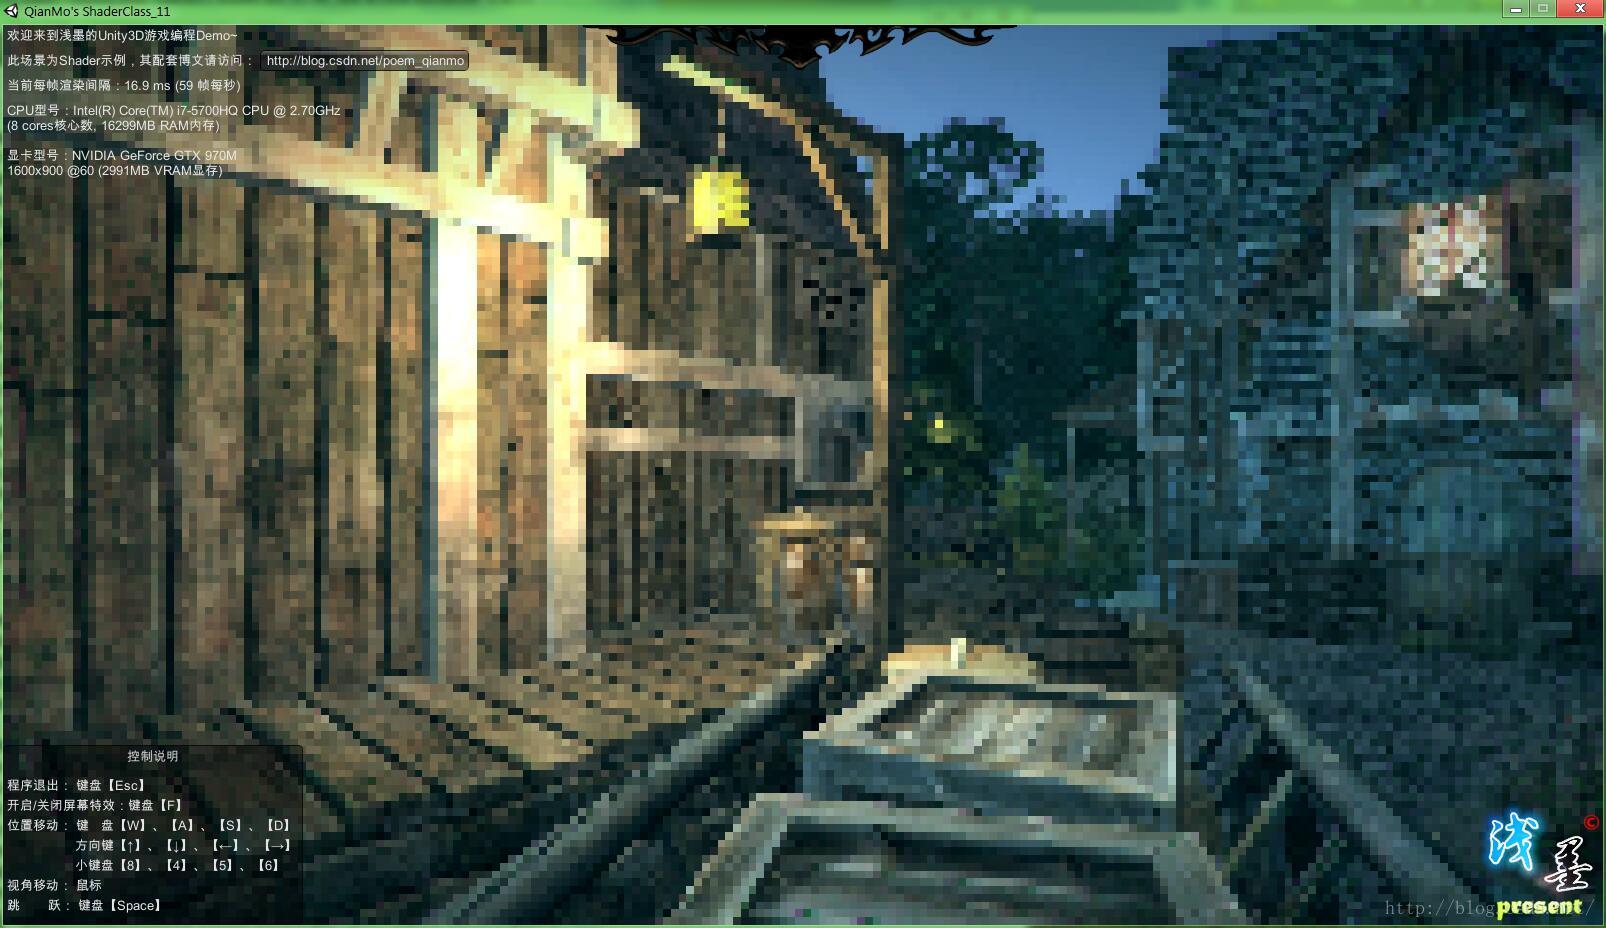
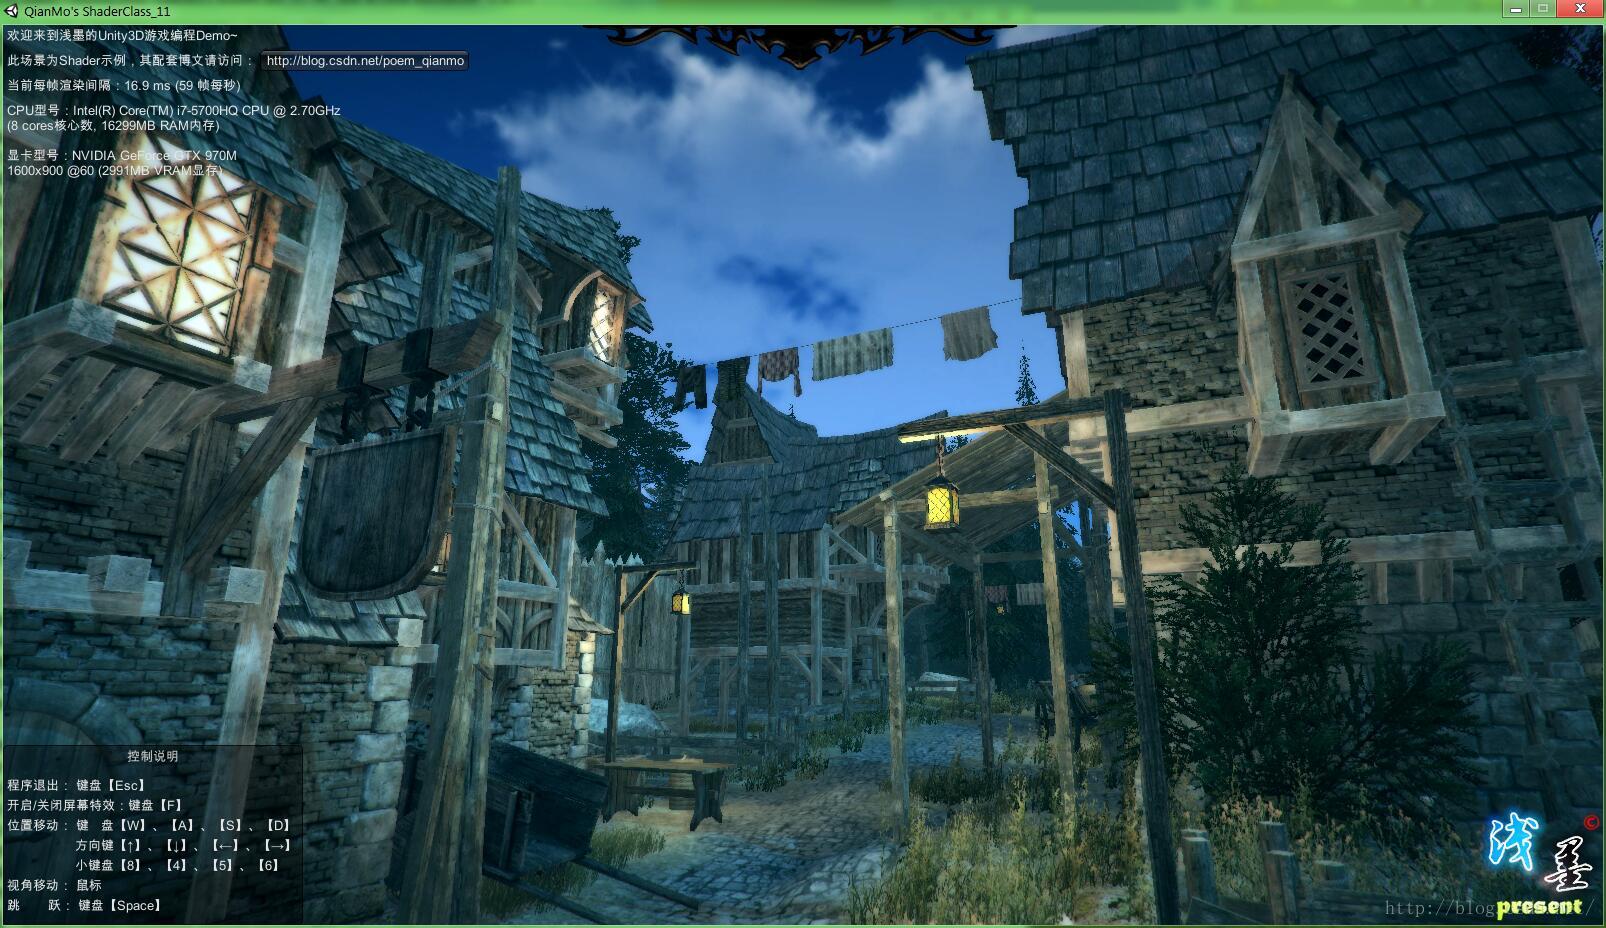
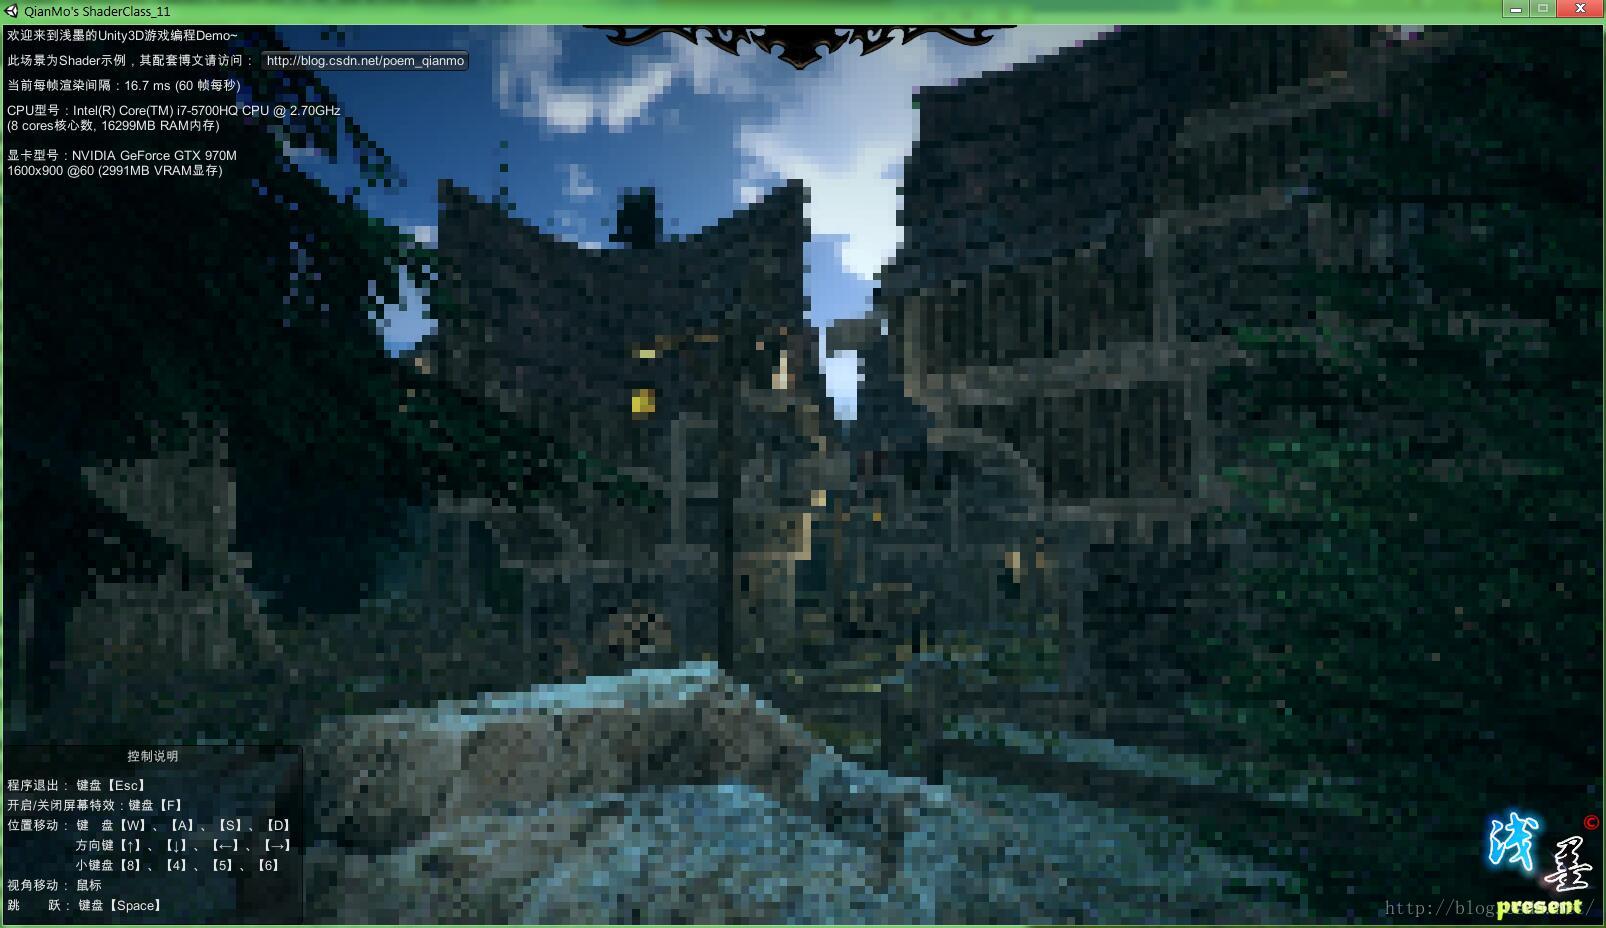
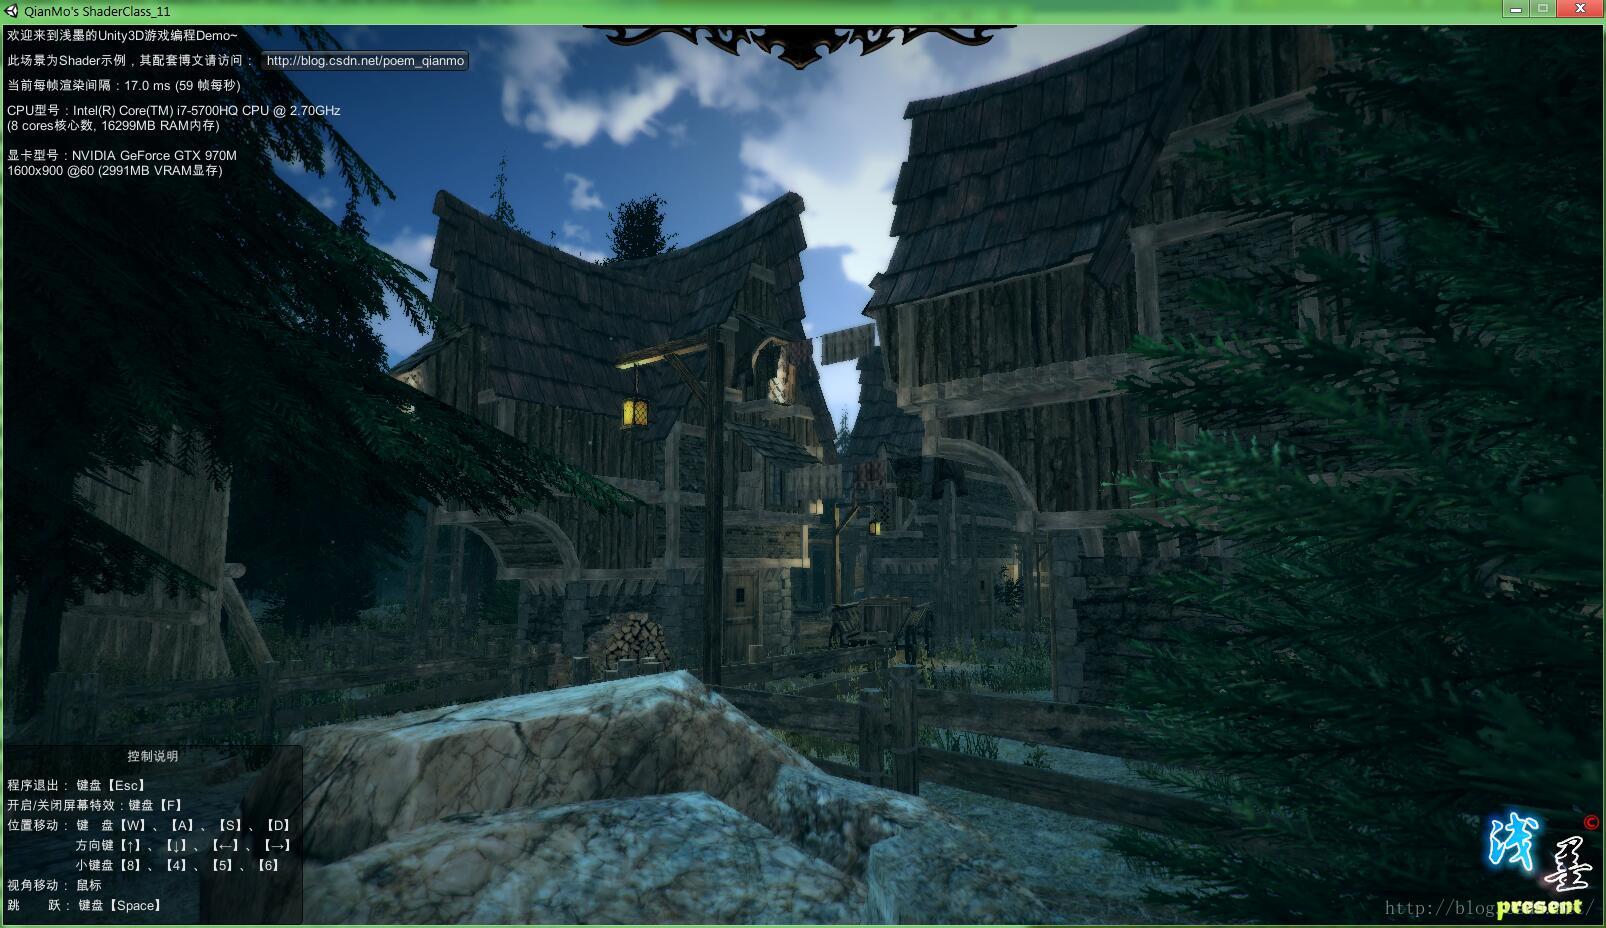
城镇中(with 屏幕像素化特效):
 城镇中(原始
场景
):
城镇中(原始
场景
):
 悠长小径(with 屏幕像素化特效):
 悠长小径(原始
场景
):
悠长小径(原始
场景
):
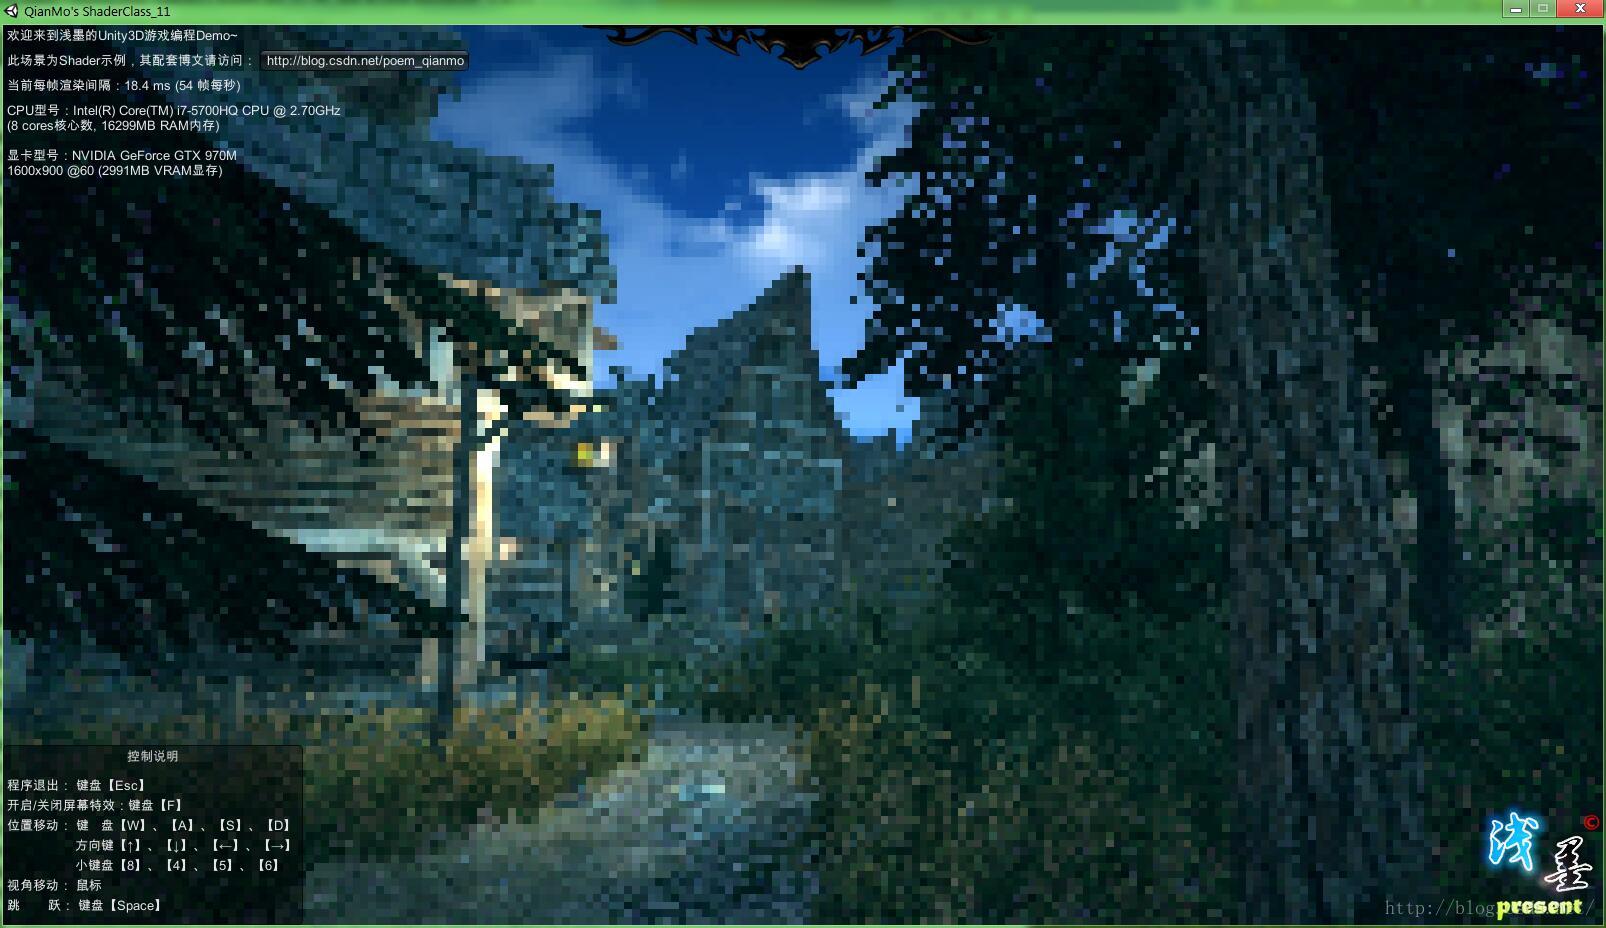
 山丘(with 屏幕像素化特效):
山丘(原始场景):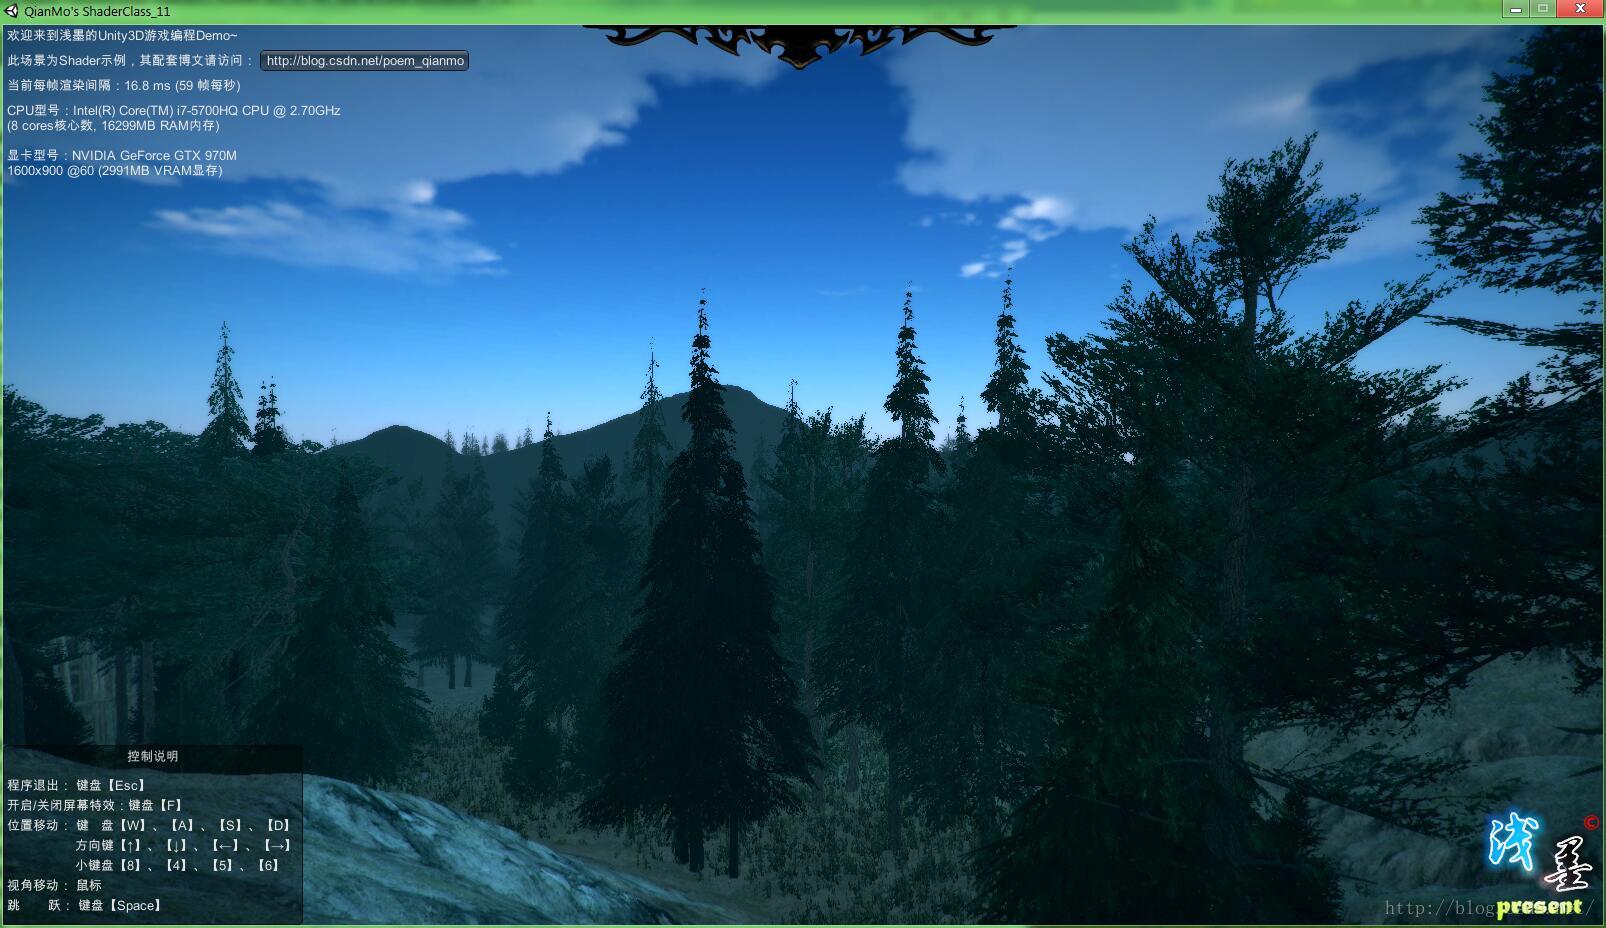
天色渐暗(with 屏幕像素化特效):
 天色渐暗(原始
场景
):
天色渐暗(原始
场景
):
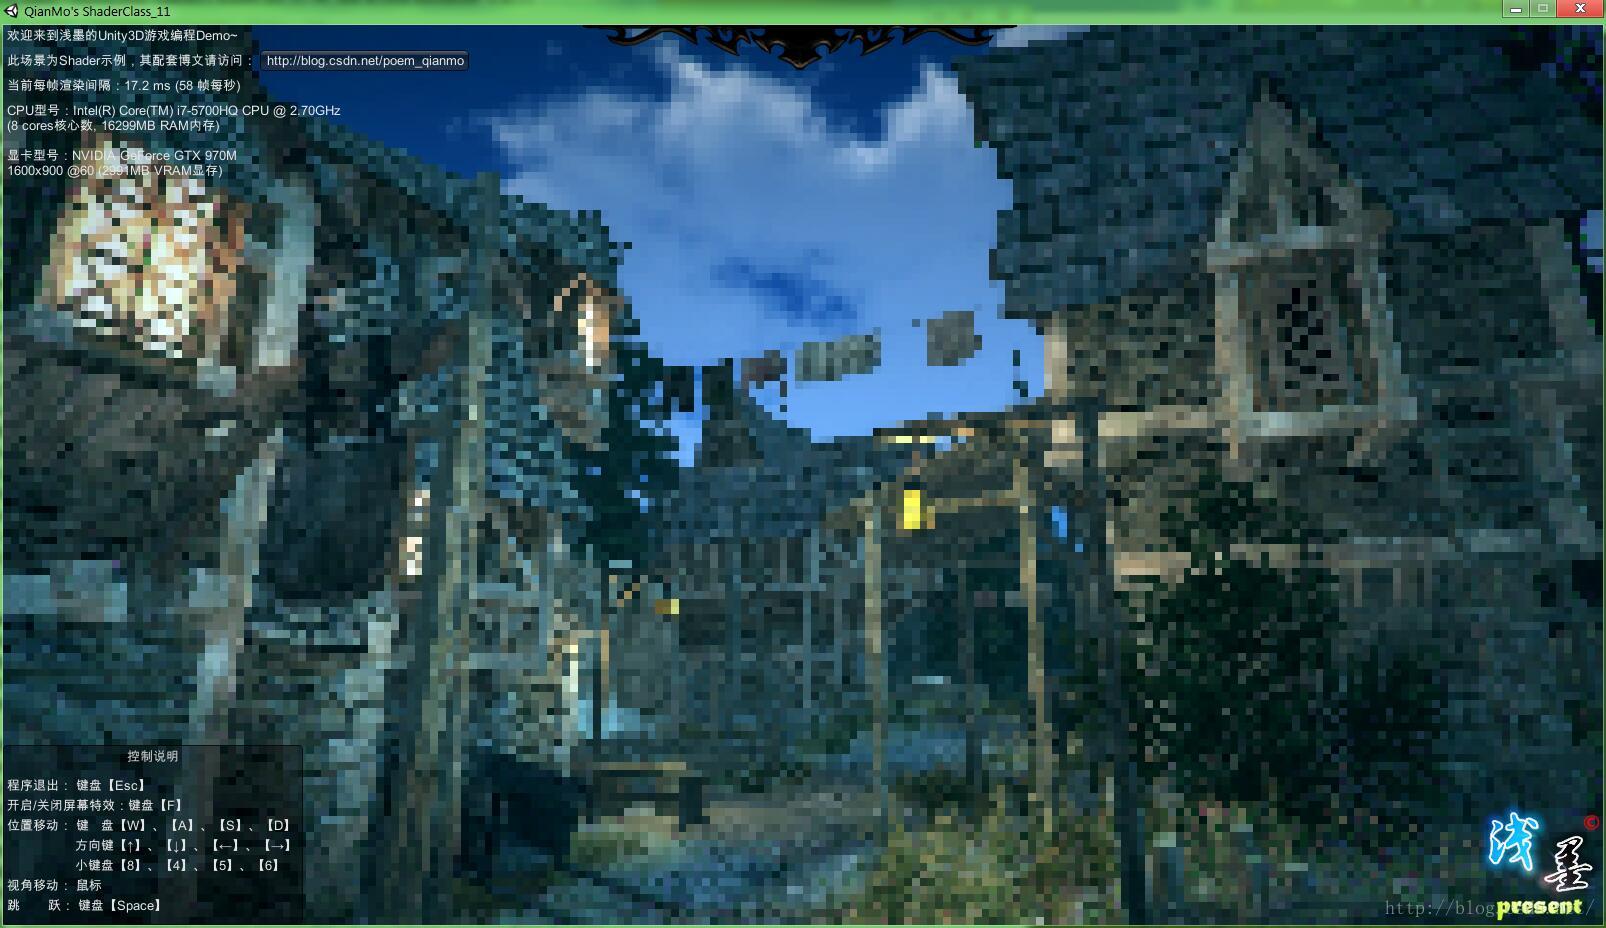
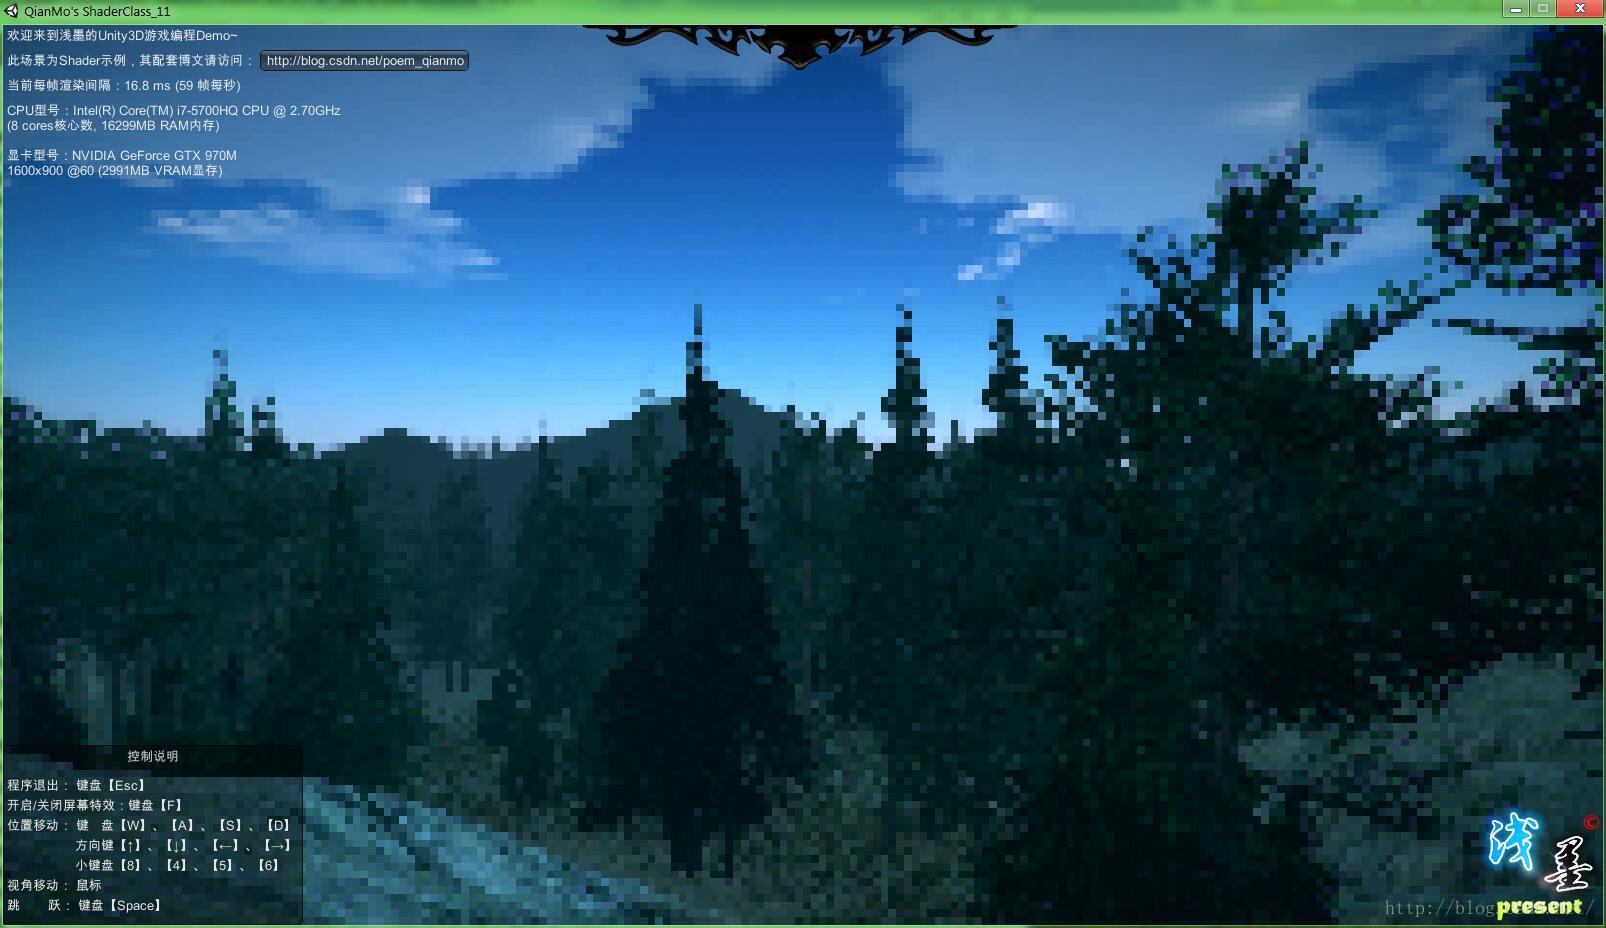
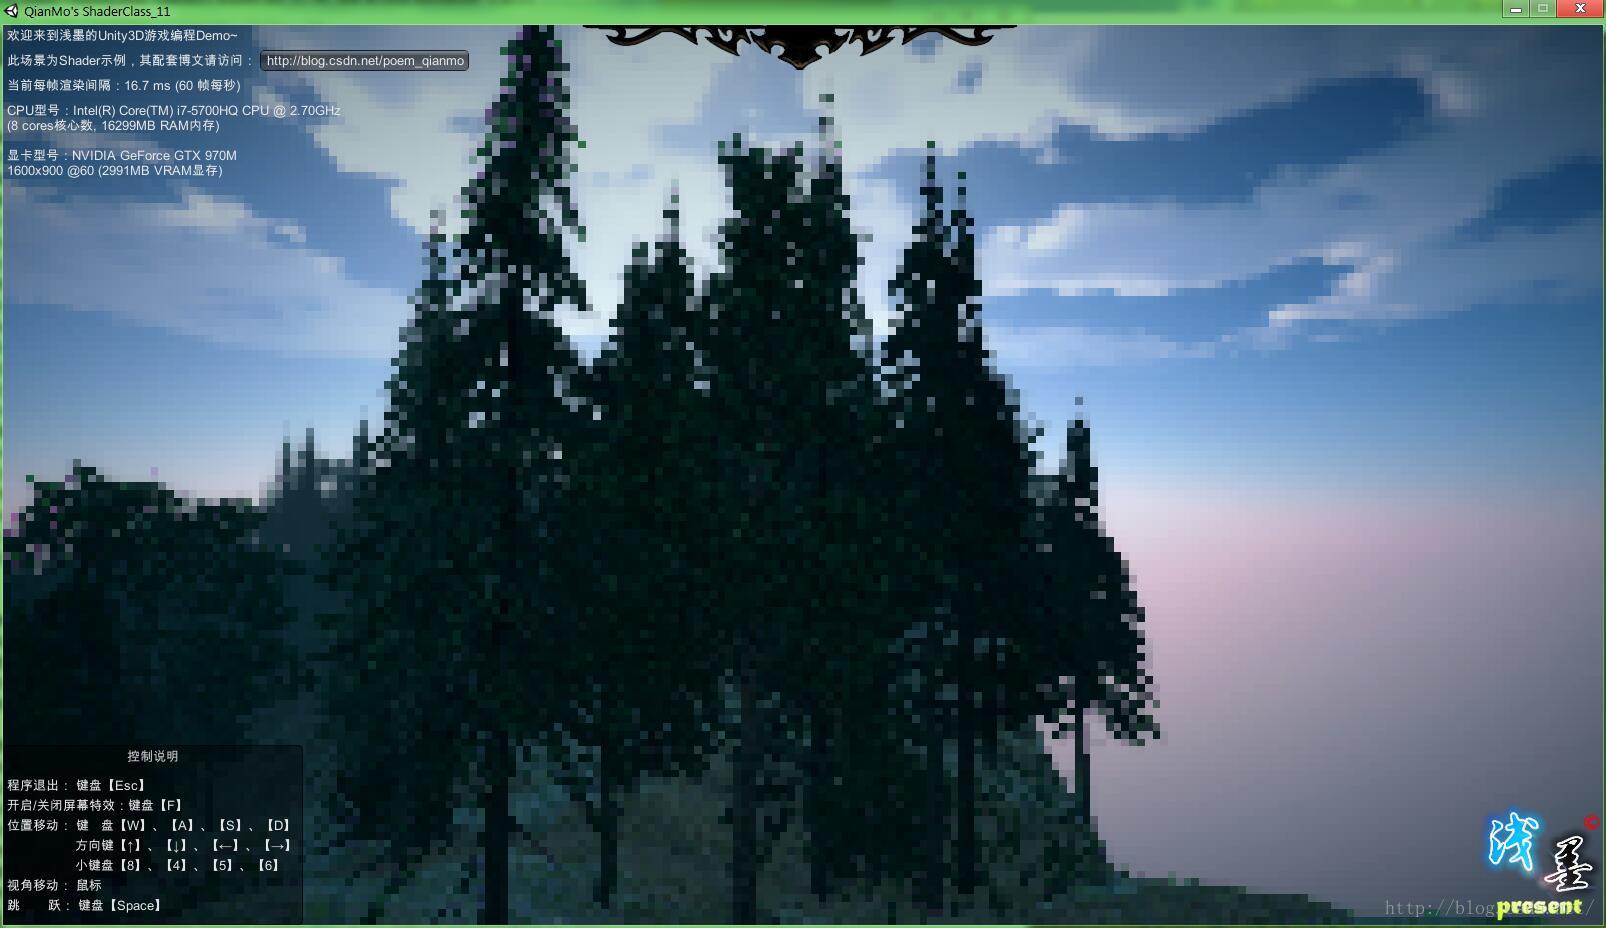
 云端(with 屏幕像素化特效):
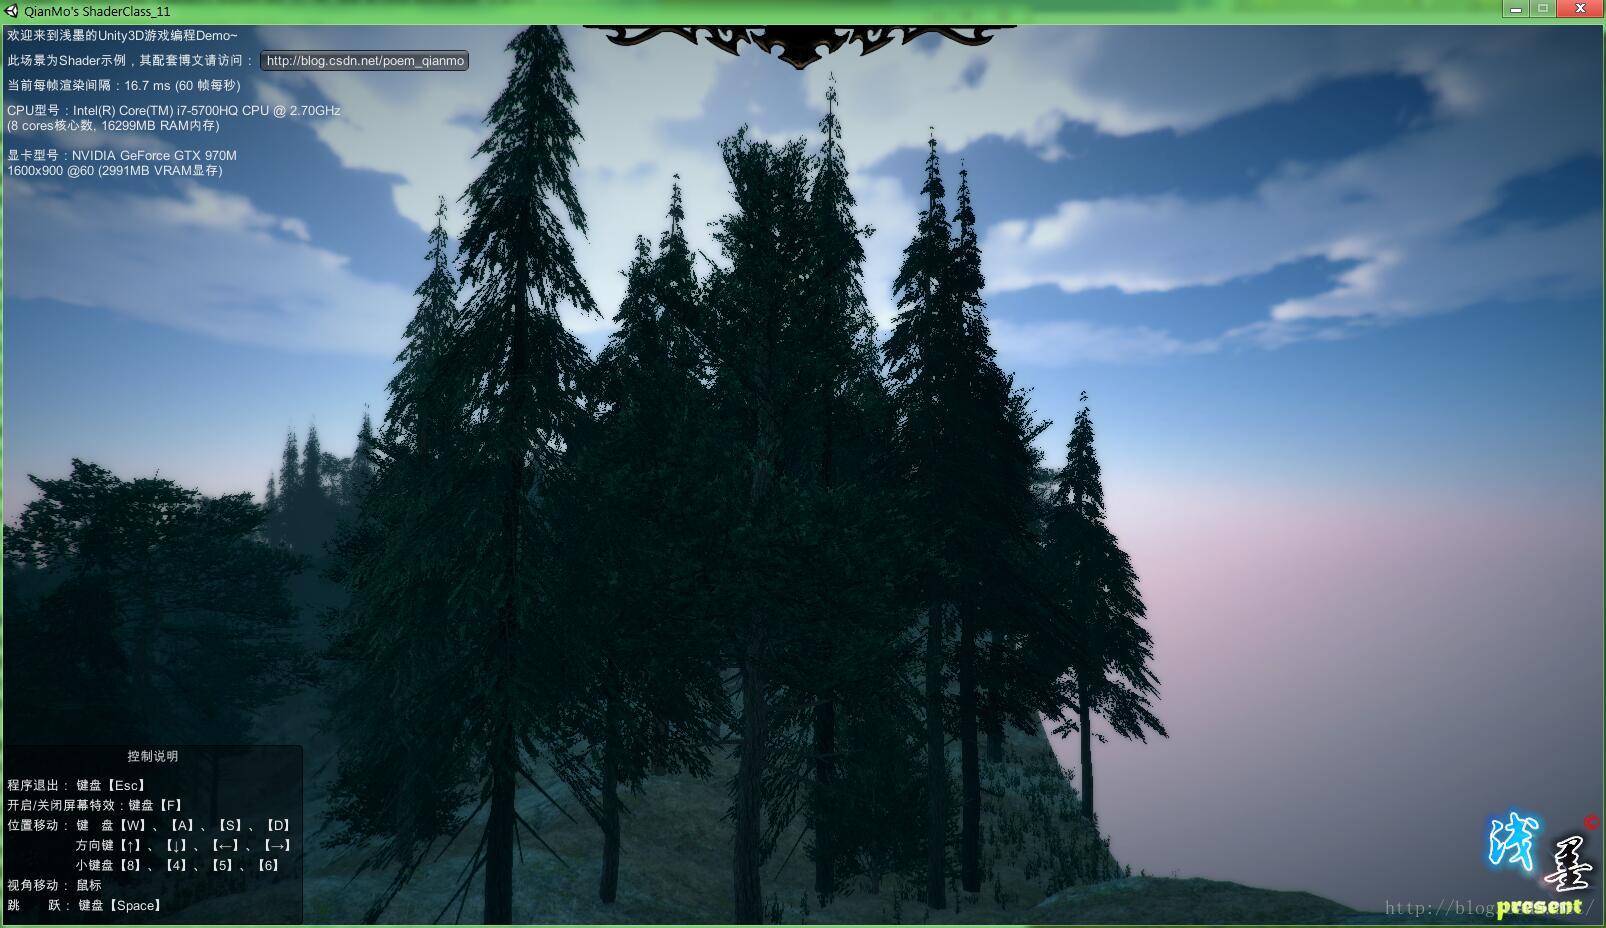
 云端
(
原始
场景
):
云端
(
原始
场景
):
 图就贴这些,更多画面大家可以从文章开头下载的本文配套的exe场景,进行试玩,或者在本文附录中贴出的下载链接中下载本文配套的所有游戏资源的工程。
考虑到有读者朋友反映有时候打包出的unitypackage包会因为unity自身的bug不好打开。干脆从本期开始,我们以后项目工程就直接传项目的压缩包。大家解压出文件夹,然后直接用Unity打开即可。
图就贴这些,更多画面大家可以从文章开头下载的本文配套的exe场景,进行试玩,或者在本文附录中贴出的下载链接中下载本文配套的所有游戏资源的工程。
考虑到有读者朋友反映有时候打包出的unitypackage包会因为unity自身的bug不好打开。干脆从本期开始,我们以后项目工程就直接传项目的压缩包。大家解压出文件夹,然后直接用Unity打开即可。
至此,本文结束。感谢大家的捧场,我们下次更新再会。
PS:最近一段时间临近硕士毕业,有不少学业方面的事情需要处理,博客得停更一段时间,请见谅。

附: 本博文相关下载链接清单
【百度云】博文示例场景exe下载
【百度云】博文示例场景资源和源码工程下载
【Github】屏幕像素化特效实现源码


 2268
2268


 被折叠的 条评论
为什么被折叠?
被折叠的 条评论
为什么被折叠?
 到【灌水乐园】发言


