


 本文介绍如何使用Quartz2D在iOS中绘制虚线。通过创建自定义UIView类并重写drawRect方法,利用CGContextRef API完成虚线绘制。文章详细解释了设置虚线样式和绘制路径的过程。
Quartz 2D是一个非常实用的二维图形绘制引擎, Quartz 2D绘图的核心API是CGContextRef,该API专门用于绘制各种图形,我们可以使用Quartz 2D API来绘制虚线。
使用Quartz 2D绘图的关键步骤有两步:获取CGContextRef;调用CGContextRef的方法进行绘图。
1.自定义UIView时获取CGContextRef
IOS的绘图操作是在UIView类的drawRect方法中完成的,所以如果我们想要在一个UIView中绘图,需要写一个扩展UIView 的类,并重写drawRect方法,在重写的drawRect:方法里进行绘图操作,程序会自动调用此方法进行绘图。在调用drawRect:方法之前,系统会自动配置绘图环境,因此,程序只要通过如下函数即可获取CGContextRef绘图API:
//获得处理的上下文
CGContextRef context =UIGraphicsGetCurrentContext();
获取CGContextRef之后,即可进行绘图。所以如果我们不自定义一个UIView,而是直接在程序里去获取CGContextRef,系统将无法调用drawRect:方法去绘图,那么我们将无法画出一条虚线。
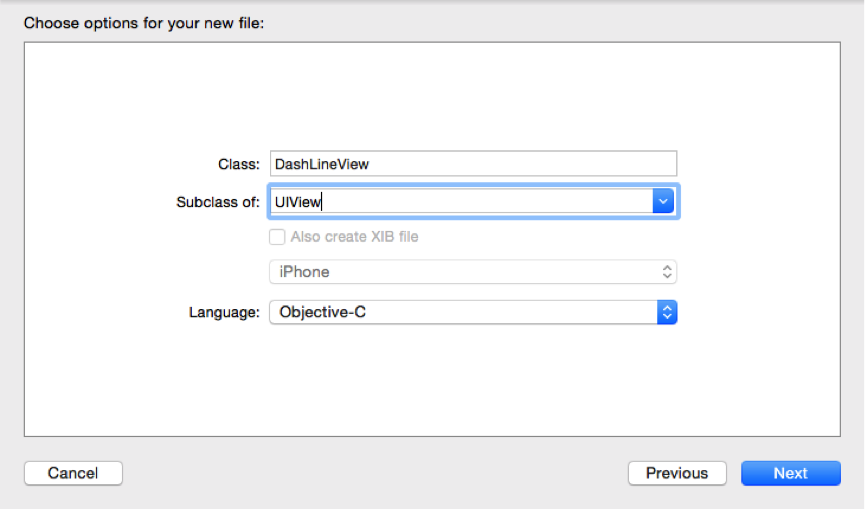
所以对于虚线的绘制,首先创建一个DashLineView类继承自UIView,并创建相应的DashLineView.h和DashLineView.m文件。
我们可以将理解DashLineView为一块画布,而我们需要将虚线画在这块画布上。在dashLineView.m文件中需要重写方法-(void)drawRect:(CGRect)rect来绘制虚线。所以我们在这个drawRect这个方法中写入:
- (void)drawRect:(CGRect)rect {
    if (dashLineWidth < self.frame.size.height) {
        //获得处理的上下文
        CGContextRef context =UIGraphicsGetCurrentContext();
    }
}
这样就可以获取CGContextRef。
2、调用CGContextRef的方法进行绘图
在获取完CGContextRef之后,我们就可以在drawRect:方法中调用CGContextRef的方法进行绘图了。代码如下
//开始一个起始路径
CGContextBeginPath(context);
//设置线条粗细宽度
CGContextSetLineWidth(context, dashLineWidth);
//设置线条的颜色
CGContextSetStrokeColorWithColor(context, dashLineColor.CGColor);
在使用Quartz 2D来绘制虚线最重要也最为强大的一个函数是CGContextSetLineDash(CGContextRef c,CGFloat phase, const CGFloat lengths[],size_t count),这个函数的第3个参数是关键,该参数是一个CGFloat型数组(第4个参数通常用于指定该数组的长度),每个CGFloat值依次控制点线的实线长度、间距。
//lengths说明虚线如何交替绘制,lengths的值{4,4}表示先绘制4个点,再跳过4个点,如此反复
CGFloat lengths[] = {4,4};
效果如图:

lengths的值可以根据需要来自定义。该方法的第2个参数用于指定点线的相位,该参数将会与第3个参数协同起作用,例如:
phase=1, lengths={2,3}:代表长为2的实线、距离为3的间距、长为2的实线、距离为3的间距。但开始绘制起点时只绘制长度为1的实线,因为phase为1就是控制该点线”移过”1个点。
然后我们可以在drawRect:函数中调用如下函数来定义虚线的起始与结束位置:
//lengths说明虚线如何交替绘制,lengths的值{4,4}表示先绘制4个点,再跳过4个点,如此反复
CGFloat lengths[] = {4,4};
//画虚线
CGContextSetLineDash(context, 0, lengths,2);
//设置开始点的位置
CGContextMoveToPoint(context, 0.0, self.frame.size.height/2);
//设置终点的位置      CGContextAddLineToPoint(context,self.frame.size.width,self.frame.size.height/2);
//开始绘制虚线
CGContextStrokePath(context);
//封闭当前线路
CGContextClosePath(context);
通过自定义UIView,获取CGContextRef并调用CGContextRef的方法进行绘图,我们就可以实现虚线的绘制。
完整代码如下:
.h文件代码
//
//  DashLineView.h
//  DashLine
//
//  Created by tiny on 15/3/6.
//  Copyright (c) 2015年 kt. All rights reserved.
//

#import <UIKit/UIKit.h>

@interface DashLineView : UIView{
    CGFloat dashLineWidth;//虚线粗细宽度
}
//虚线颜色
@property (strong, nonatomic)UIColor *dashLineColor;

-(void)setLineColor:(UIColor *)lineColor LineWidth:(CGFloat)lineWidth;
@end
.m文件代码
//
//  DashLineView.m
//  DashLine
//
//  Created by tiny on 15/3/6.
//  Copyright (c) 2015年 kt. All rights reserved.
//

#import "DashLineView.h"

@implementation DashLineView
@synthesize dashLineColor;
/*
// Only override drawRect: if you perform custom drawing.
// An empty implementation adversely affects performance during animation.
 */
- (void)drawRect:(CGRect)rect {
    if (dashLineWidth < self.frame.size.height) {
        //获得处理的上下文
        CGContextRef context =UIGraphicsGetCurrentContext();
        //开始一个起始路径
        CGContextBeginPath(context);
        //设置线条粗细宽度
        CGContextSetLineWidth(context, dashLineWidth);
        //设置线条的颜色
        CGContextSetStrokeColorWithColor(context, dashLineColor.CGColor);
        //lengths说明虚线如何交替绘制,lengths的值{4,4}表示先绘制4个点,再跳过4个点,如此反复
        CGFloat lengths[] = {4,4};
        //画虚线
        CGContextSetLineDash(context, 0, lengths,2);
        //设置开始点的位置
        CGContextMoveToPoint(context, 0.0, self.frame.size.height/2);
        //设置终点的位置
        CGContextAddLineToPoint(context,self.frame.size.width,self.frame.size.height/2);
        //开始绘制虚线
        CGContextStrokePath(context);
        //封闭当前线路
        CGContextClosePath(context);
    }
}

-(void)setLineColor:(UIColor *)lineColor LineWidth:(CGFloat)lineWidth{
    dashLineColor = lineColor;
    dashLineWidth = lineWidth;
}

@end
程序中实例化DashLineView:
DashLineView *dashLine = [[DashLineView alloc]initWithFrame:CGRectMake(0, 0, 30, 1)];
[dashLine setLineColor:[UIColor grayColor] LineWidth:0.5];
dashLine.backgroundColor = [UIColor whiteColor];
[self addSubview:dashLine];


 被折叠的 条评论
为什么被折叠?
被折叠的 条评论
为什么被折叠?
 到【灌水乐园】发言


