


利用学过的逐帧动画技术来在Android上实现让一个士兵上下左右行走的小例子。
具体实现:
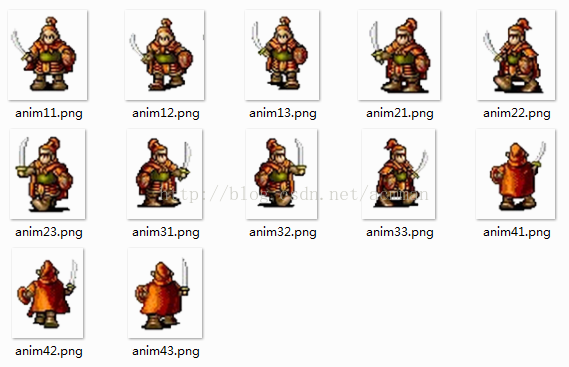
首先将图片资源加入drawable文件夹下,然后在res文件夹下建立如下四个逐帧动画的配置XML文件,分别实现让士兵向上、下、左、右行走的动画播放:
anim_up.xml:
anim_left.xml:
anim_down.xml:
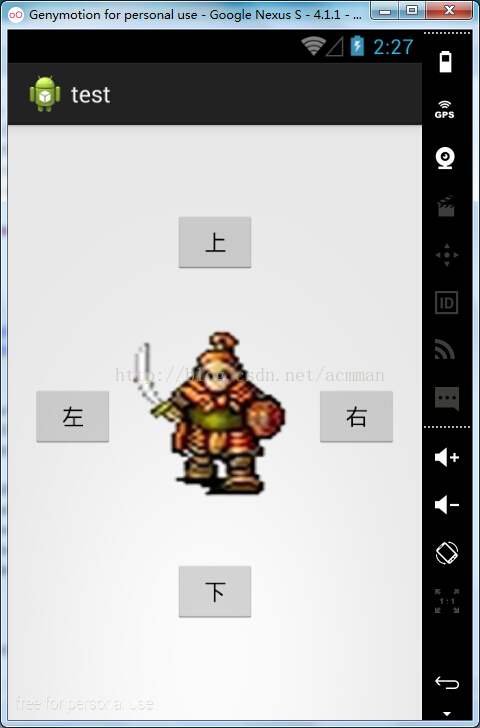
之后在layout中创建Activity的视图文件main.xml,其中利用线形布局,实现四周四个控制按钮,中间一个ImageView图片控件的效果,其中图片控件的背景默认为anim11:
之后,编写对应的Activity代码:
MainActivity:
具体效果如图
使用资源图片如图
具体实现:
首先将图片资源加入drawable文件夹下,然后在res文件夹下建立如下四个逐帧动画的配置XML文件,分别实现让士兵向上、下、左、右行走的动画播放:
anim_up.xml:
<?xml version="1.0" encoding="utf-8"?>
<animation-list xmlns:android="http://schemas.android.com/apk/res/android"
    android:oneshot="false">
    <item android:drawable="@drawable/anim12" android:duration="300"/>
    <item android:drawable="@drawable/anim11" android:duration="300"/>
	<item android:drawable="@drawable/anim13" android:duration="300"/>
</animation-list>
anim_left.xml:
<?xml version="1.0" encoding="utf-8"?>
<animation-list xmlns:android="http://schemas.android.com/apk/res/android"
    android:oneshot="false">
    <item android:drawable="@drawable/anim22" android:duration="300"/>
    <item android:drawable="@drawable/anim21" android:duration="300"/>
	<item android:drawable="@drawable/anim23" android:duration="300"/>
</animation-list>
anim_right.xml:
<?xml version="1.0" encoding="utf-8"?>
<animation-list xmlns:android="http://schemas.android.com/apk/res/android"
    android:oneshot="false">
    <item android:drawable="@drawable/anim32" android:duration="300"/>
    <item android:drawable="@drawable/anim31" android:duration="300"/>
	<item android:drawable="@drawable/anim33" android:duration="300"/>
</animation-list>
anim_down.xml:
<?xml version="1.0" encoding="utf-8"?>
<animation-list xmlns:android="http://schemas.android.com/apk/res/android"
    android:oneshot="false">
    <item android:drawable="@drawable/anim42" android:duration="300"/>
    <item android:drawable="@drawable/anim41" android:duration="300"/>
	<item android:drawable="@drawable/anim43" android:duration="300"/>
</animation-list>
之后在layout中创建Activity的视图文件main.xml,其中利用线形布局,实现四周四个控制按钮,中间一个ImageView图片控件的效果,其中图片控件的背景默认为anim11:
<?xml version="1.0" encoding="utf-8"?>
<LinearLayout xmlns:android="http://schemas.android.com/apk/res/android"
    xmlns:tools="http://schemas.android.com/tools"
    android:layout_width="fill_parent"
    android:layout_height="fill_parent"
    android:id="@+id/linearLayout1"
    android:orientation="vertical"
    >
	<LinearLayout android:layout_width="match_parent"
    	android:layout_height="wrap_content"
    	android:paddingTop="30pt"
    	android:gravity="center"
    	android:orientation="horizontal">
	    <Button android:id="@+id/up"
	        android:layout_width="wrap_content"
	        android:layout_height="wrap_content"
	        android:text="上"/>
	</LinearLayout>
	<LinearLayout android:layout_width="match_parent"
    	android:layout_height="100pt"
    	android:gravity="center"
    	android:orientation="horizontal">
	    <Button android:id="@+id/left"
	        android:layout_width="wrap_content"
	        android:layout_height="wrap_content"
	        android:text="左"/>
	    <ImageView android:id="@+id/image"
	        android:padding="50pt"
	        android:background="@drawable/anim11"
	        android:layout_width="70pt"
	        android:layout_height="70pt"
	        android:text="上"/>
	    <Button android:id="@+id/right"
	        android:layout_width="wrap_content"
	        android:layout_height="wrap_content"
	        android:text="右"/>
	</LinearLayout>
	<LinearLayout
	    android:layout_width="match_parent"
	    android:layout_height="wrap_content"
	    android:gravity="center"
	    android:orientation="horizontal">
	    <Button android:id="@+id/down"
	        android:layout_width="wrap_content"
	        android:layout_height="wrap_content"
	        android:text="下"/>
	</LinearLayout>
</LinearLayout>
之后,编写对应的Activity代码:
MainActivity:
package com.example.test;

import android.app.Activity;
import android.graphics.drawable.AnimationDrawable;
import android.os.Bundle;
import android.os.Handler;
import android.os.Message;
import android.view.View;
import android.view.View.OnClickListener;
import android.widget.Button;
import android.widget.ImageView;
import android.widget.Toast;

public class MainActivity extends Activity {
	private Button up;
	private Button left;
	private Button right;
	private Button down;
	private ImageView imageview;
	private Handler mHandler;//声明一个用于处理消息的Handler类的对象
	private int flag=0;
    @Override
    public void onCreate(Bundle savedInstanceState) {
        super.onCreate(savedInstanceState);
        setContentView(R.layout.main);

        up=(Button)findViewById(R.id.up);
        left=(Button)findViewById(R.id.left);
        right=(Button)findViewById(R.id.right);
        down=(Button)findViewById(R.id.down);
        imageview=(ImageView)findViewById(R.id.image);


        up.setOnClickListener(new OnClickListener() {

			@Override
			public void onClick(View arg0) {
				flag=1;
				 imageview.setBackgroundResource(R.anim.anim_up);
			        AnimationDrawable anim=(AnimationDrawable)imageview.getBackground();
					anim.start();
			}
		});

		 left.setOnClickListener(new OnClickListener() {

			@Override
			public void onClick(View arg0) {
				flag=2;
				 imageview.setBackgroundResource(R.anim.anim_left);
			        AnimationDrawable anim=(AnimationDrawable)imageview.getBackground();
					anim.start();
			}
		});

		 right.setOnClickListener(new OnClickListener() {

			@Override
			public void onClick(View arg0) {
				flag=3;
				 imageview.setBackgroundResource(R.anim.anim_right);
			        AnimationDrawable anim=(AnimationDrawable)imageview.getBackground();
					anim.start();
			}
		});

		 down.setOnClickListener(new OnClickListener() {

			@Override
			public void onClick(View arg0) {
				flag=4;
				 imageview.setBackgroundResource(R.anim.anim_down);
			        AnimationDrawable anim=(AnimationDrawable)imageview.getBackground();
					anim.start();
			}
		});


	}


}
运行之后就可以看到运动的士兵啦,深不神奇?
转载请注明出处:http://blog.csdn.net/acmman/article/details/45700193


 2512
2512


 被折叠的 条评论
为什么被折叠?
被折叠的 条评论
为什么被折叠?
 到【灌水乐园】发言


